background image


18


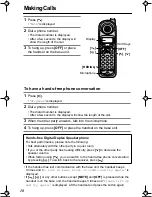
Making Calls


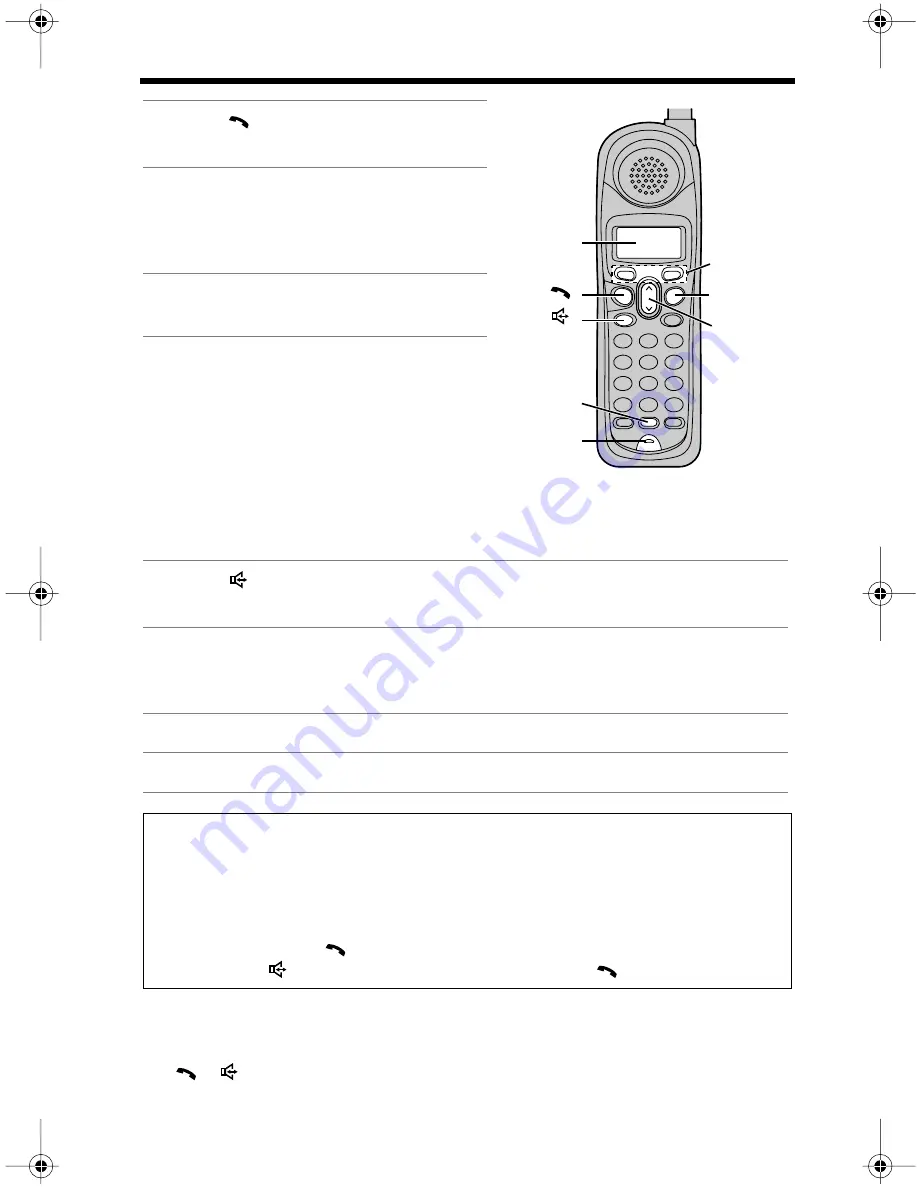
To have a hands-free phone conversation 


• If the handset has lost communication with the base unit, the handset beeps 

3 times and “


No link to base. Place on cradle and try again.


” is 

displayed.

• If 


[

]


[

]


 or any other buttons except 


[MUTE]


 and 


[OFF]


 is pressed while the 

handset is on the base unit, the handset beeps 3 times and “


Please lift up 

and try again.


” is displayed. Lift the handset and press the button again.


1


Press 


[

]


.


• “


Talk


” is displayed.


2


Dial a phone number.


• The dialed number is displayed.
• After a few seconds, the display will 

show the length of the call.


3


To hang up, press 


[OFF] 


or place 

the handset on the base unit.


1


Press 


[

]


.


• “


SP-phone


” is displayed.


2


Dial a phone number.


• The dialed number is displayed.
• After a few seconds, the display will show the length of the call.


3


When the other party answers, talk into the microphone.


4


To hang up, press 


[OFF] 


or place the handset on the base unit.


Hands-free Digital Duplex Speakerphone


For best performance, please note the following:

• Talk alternately with the other party in a quiet room.


• If you or the other party has hearing difficulty, press 


[

]


 to decrease the 

speaker volume.

• While talking using 


[

]


, you can switch to the hands-free phone conversation 

by pressing 


[

]


. To switch back to the receiver, press 


[

]


.

Display

[

][

]

>

>

[

]

[

]

[REDIAL]

Microphone

[OFF]

Soft Keys

>

Содержание KX-TG2216RV

Страница 1: ...c World Wide Web address http www panasonic com for customers in the USA or Puerto Rico Charge the battery for about 6 hours before initial use KX TG2216FV Caller ID Compatible 2 4 GHz Digital Cordless Phone Operating Instructions Model No KX TG2216FV KX TG2216RV KX TG2216SV Pulse or tone dialing capability ...

Страница 2: ...s a second caller s name and phone number while the user is on another call requires a subscription to both Caller ID and Call Waiting After subscribing to Voice Mail Service this phone s VM indicator will flash when there are new messages left in the voice mail box at phone company AC Adaptor p 8 Order No PQLV19Z PQLV19 one Telephone Line Cord p 8 Order No PQJA10075Z one Battery p 9 Order No HHR ...

Страница 3: ...ximum distance and noise free operation the recommended base unit location is Note If you use the handset near a microwave oven which is being used noise may be heard from the receiver or the speaker Move away from the microwave oven and closer to the base unit If you use the handset near another cordless phone noise may be heard Move away from the other cordless phone and closer to your base unit...

Страница 4: ...Voice Enhancer Technology 14 Auto Talk 15 LCD Contrast 15 Ringer Volume 16 Ringer Tone 17 Line Mode 17 Making Calls 18 Answering Calls 20 Caller ID Service 21 Using the Caller List 22 Viewing the Caller List 22 Calling Back from the Caller List 23 Editing the Caller s Phone Number 24 Caller ID Number Auto Edit Feature 25 Storing Caller Information in the Phone Book 26 Erasing Caller Information 27...

Страница 5: ...Mail VM Tone Detection 33 Listening to Voice Mail Messages 34 Special Features 35 Automatic Security Code Setting 35 Handset Locator 35 Temporary Tone Dialing For Rotary or Pulse Service Users 35 Muting Your Conversation 35 For Call Waiting Service Users 36 Using the PAUSE Key For PBX Line Long Distance Calls 36 FLASH Button 37 Wall Mounting 38 Belt Clip 40 Headset 40 Direct Commands 42 Troublesho...

Страница 6: ...6 Location of Controls Base unit Charge Contacts p 10 HANDSET LOCATOR p 35 Antenna p 3 IN USE CHARGE Indicator p 9 20 35 VM Voice Mail Indicator p 32 ...

Страница 7: ...on menu the Caller List and the phone book works as a scroll key Adjusts the handset ringer and receiver speaker volumes works as a volume key Throughout these Operating Instructions The soft keys are indicated with the display above the keys Ex Press Hold indicates Press the soft key below Hold The navigator key is indicated by the arrows or Antenna Display Receiver Soft Keys see below OFF p 11 1...

Страница 8: ...f your unit is connected to a PBX which does not support Caller ID you cannot access Caller ID services The unit will not work during a power failure If you want to connect a standard telephone on the same line use the Panasonic T adaptor KX J66 Fasten the AC adaptor cord Hooks Single Line Telephone Jack RJ11C Telephone Line Cord Power Outlet AC 120 V 60 Hz AC Adaptor Raise the antenna ...

Страница 9: ... until it snaps shut To replace the battery Pull down the latch and remove the cover Replace the old battery with a new one p 10 Close the cover and charge the battery for about 6 hours Battery Charge Place the handset on the base unit and charge for about 6 hours before initial use The IN USE CHARGE indicator lights and the unit beeps once It is normal for the back on the handset to feel warm dur...

Страница 10: ...to grease dust or high humidity Otherwise the battery may not charge properly If the battery is fully charged you do not have to place the handset on the base unit until Recharge battery is displayed and or flashes This will maximize the battery life The battery cannot be overcharged You can check the battery strength on the handset display The battery strength is as shown in the chart on the righ...

Страница 11: ...ing mode 3 Press Select at your desired menu 4 If your selected menu has a sub menu it will be displayed Repeat steps 2 and 3 until your desired menu is displayed 5 Select your desired setting by pressing or How to use the Back key Press Back to go back to the previous menu 6 Press Save to save your setting A confirmation tone will be heard and the setting will be saved 7 Press OFF to exit program...

Страница 12: ...Place on cradle and try again is displayed If or any other buttons except MUTE and OFF is pressed while the handset is on the base unit the handset beeps 3 times and Please lift up and try again is displayed Lift the handset and press the button again Function MenuTable You can use the following functions to customize your unit See the corresponding pages for function details After pressing MENU y...

Страница 13: ...then press Select 3 Scroll to Change language by pressing or then press Select 4 Select the language by pressing Español or English 5 Press Guard or Save then press OFF 1 Press MENU 2 Scroll to Initial setting by pressing or then press Select 3 Scroll to Set tel line by pressing or then press Select 4 Press Select at Set dial mode 5 Select Pulse or Tone by pressing or 6 Press Save then press OFF I...

Страница 14: ...a clearer crisp sound much closer to the actual voice is achieved is displayed when the Voice Enhancer Technology is set to ON Helpful hint Depending on the condition and quality of your telephone line Voice Enhancer may emphasize the noise already on the line If it becomes difficult to hear the caller please set Voice Enhancer mode to OFF To turn the mode ON while talking press VE is displayed Ea...

Страница 15: ...LCD contrast 5 levels The factory preset is level 3 1 Press MENU 2 Scroll to Initial setting by pressing or then press Select 3 Scroll to Auto talk by pressing or then press Select 4 Select On or Off by pressing or 5 Press Save then press OFF 1 Press MENU 2 Scroll to Initial setting by pressing or then press Select 3 Press Select at LCD contrast 4 Select the desired contrast by pressing or Each ti...

Страница 16: ...ect the ringer volume while an external call is being received Press or while the unit is just ringing To set to OFF press and hold Ringer off is displayed 1 Press MENU 2 Press Select at Ringer setting 3 Press Select at Ringer volume 4 Select the desired volume level by pressing or The volume will change and ring The number of steps indicates the volume level To turn the ringer OFF press repeatedl...

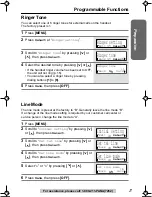
Страница 17: ...pressing or then press Select 4 Select the desired tone by pressing or If the handset ringer volume has been set to OFF the unit will not ring p 16 You can also select a ringer tone by pressing dialing buttons 1 to 6 5 Press Save then press OFF 1 Press MENU 2 Scroll to Initial setting by pressing or then press Select 3 Scroll to Set tel line by pressing or then press Select 4 Scroll to Set line mo...

Страница 18: ...he length of the call 3 To hang up press OFF or place the handset on the base unit 1 Press SP phone is displayed 2 Dial a phone number The dialed number is displayed After a few seconds the display will show the length of the call 3 When the other party answers talk into the microphone 4 To hang up press OFF or place the handset on the base unit Hands free Digital Duplex Speakerphone For best perf...

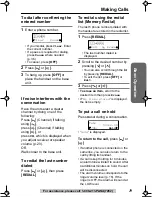
Страница 19: ...s Hold during a conversation Hold is displayed To return to the call press or If another phone is connected on the same line you can also return to the call by lifting its handset If a call is kept holding for 6 minutes an alarm tone will start to sound After 4 additional minutes on hold the call will be disconnected The alarm volume corresponds to the ringer volume level p 16 If the ringer is OFF...

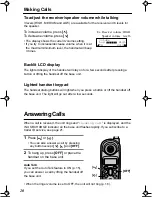
Страница 20: ...he handset dialing buttons will light when you press a button or lift the handset off the base unit The light will go out after a few seconds Answering Calls When a call is received the unit rings and Incoming call is displayed and the IN USE CHARGE indicator on the base unit flashes rapidly If you subscribe to a Caller ID service see page 21 When the ringer volume is set to OFF the unit will not ...

Страница 21: ... the length of the call If the unit does not receive caller ID information one of the following will be displayed If your unit is connected to a PBX which does not support Caller ID you cannot access Caller ID service The name display service may not be available in some areas For further information please contact your telephone company If you subscribe to both Caller ID and Call Waiting when tal...

Страница 22: ...s received message s When the handset is off the base unit Voice Mail will be displayed in place of missed calls display When the handset is on the base unit Voice Mail will be also displayed on the first line Press Rcvd calls to review other calls logged in the Caller List If there are no items in the Caller List Rcvd calls will not be displayed 1 Press Rcvd calls to enter the Caller List You can...

Страница 23: ...ate and time of the most recent call will be recorded After viewing a caller s information X2 to X9 will be replaced with Calling Back from the Caller List In some cases you may have to edit the number before dialing p 24 Ex You may have to delete 1 and the area code If a phone number is not displayed in the caller information you cannot call back that caller from the Caller List 1 Press Rcvd call...

Страница 24: ...alternately displayed as shown on the right 3 Press Select 4 Press Edit Each time you press Edit the number is rearranged into one of 3 patterns 1 The order in which patterns are displayed depends on how the telephone number is displayed in step 2 5 To continue with making a call from the Caller List press or To continue with storing the number in the phone book press Save If there is no name info...

Страница 25: ... number which has one of the 3 patterns that you have edited with specific area codes and that you prefer to be followed by future Caller ID numbers so that in the future all the Caller ID numbers coming from the same area code will be displayed in the same pattern The Caller ID number Auto Edit feature is preset at the factory to ON If a call does not go through the phone number you dialed may ha...

Страница 26: ...calls to enter the Caller List You can also enter by pressing or 2 Scroll to the desired caller by pressing or If the number requires editing see page 24 Name and phone number are alternately displayed as shown on the right 3 Press Select 4 Press Save To continue storing other items repeat from step 2 If there is no name information for the caller Enter name will be displayed a If a name is not re...

Страница 27: ...Press Rcvd calls to enter the Caller List You can also enter by pressing or 2 Scroll to the desired caller by pressing or then press Erase To erase other items repeat step 2 To exit the Caller List press OFF 1 Press Rcvd calls to enter the Caller List You can also enter by pressing or 2 Press All erase 3 Press Yes A beep sounds and all entries in your Caller List are erased 2 missed calls Rcvd Pho...

Страница 28: ...acters with the dialing buttons 0 to 9 p 29 then press If a name is not required press then go to step 4 4 Enter a phone number up to 32 digits Each time you press a digit is erased To erase all of the digits press and hold If a pause is required for dialing press P A pause is stored in a phone number as one digit p 36 5 Press If you want to change the name press Edit then change it If you want to...

Страница 29: ...the incorrect character Each time you press a character is erased Then re enter the correct character To erase all characters press and hold Keys Characters Keys Characters 1 1 6 m n o M N O 6 2 a b c A B C 2 7 p q r s P Q R S 7 3 d e f D E F 3 8 t u v T U V 8 4 g h i G H I 4 9 w x y z W X Y Z 9 5 j k l J K L 5 0 0 Space Erases the character to the left Moves the cursor to the right To enter anoth...

Страница 30: ... in the index you selected the first entry in the next alphabetical index will be displayed 3 Press repeatedly until the desired name is displayed Index table 1 Press Phone book to enter the phone book 2 Press Search 3 Scroll to the desired item To scroll down press To scroll up press 4 Press Call or The displayed phone number is dialed 5 To hang up press OFF or place the handset on the base unit ...

Страница 31: ...en press If you do not need to change the number press then go to step 7 If a pause is required for dialing press P A pause is stored in a phone number as one digit p 36 7 Press Save To continue editing other items repeat from step 2 8 Press OFF 1 Press Phone book to enter the phone book 2 Press Search 3 Scroll to the desired item by pressing or then press Select To search for the item by initial ...

Страница 32: ...il all of the digits are erased Press MENU then press OFF 1 Press MENU 2 Scroll to Initial setting by pressing or then press Select 3 Scroll to Voice Mail by pressing or then press Select 4 Press Select at Store VM access 5 Enter your access number up to 32 digits Each time you press a digit is erased To erase all of the digits press and hold If a pause is required for dialing press P 6 Press MENU...

Страница 33: ...il will be displayed on the handset and the VM indicator on the base unit will flash Set this programming to OFF when you do not subscribe to a voice mail service your telephone company does not send a pulsating tone followed by a continuous dial tone or your unit is connected to a business or office telephone system PBX If you are not sure which setting is required consult your local telephone co...

Страница 34: ...age s press and hold OFF until the unit beeps Voice Mail will disappear and the VM indicator will go out If your voice mail service uses a voice mail tone and the recorded message is over 3 minutes long Voice Mail may not be displayed and the VM indicator may not flash If your voice mail service uses a voice mail tone the tone will be heard from any parallel connected phone If you use another phon...

Страница 35: ...vice Users Press TONE before entering access numbers which require tone dialing The dialing mode changes to tone You can enter numbers to access an answering service electronic banking service etc When you hang up the dialing mode will return to pulse MutingYour Conversation During a call you can mute your phone so the other party cannot listen to you When muting your conversation you can hear the...

Страница 36: ...r s name and phone number will be displayed After you hear a call waiting tone while talking the display shows the caller s name with the phone number and Waiting Contact your telephone company for details and availability in your area Using the PAUSE Key For PBX Line Long Distance Calls We recommend you press Pause or P if a pause is required to dial with a PBX or to make a long distance call Ex ...

Страница 37: ... depends on your telephone exchange or host PBX You can select the following flash times 700 600 400 300 250 110 100 or 90 ms milliseconds The factory preset is 700 ms If PBX functions do not work correctly consult your PBX supplier for the correct settings 1 Press MENU 2 Scroll to Initial setting by pressing or then press Select 3 Scroll to Set tel line by pressing or then press Select 4 Scroll t...

Страница 38: ...or cord through the wall mounting adaptor Connect the AC adaptor 2 Tuck the telephone line cord inside the wall mounting adaptor Connect the telephone line cord to the unit 3 Insert A and B hooks on the wall mounting adaptor into the holes on the base unit To Power Outlet 1 2 1 2 A B ...

Страница 39: ...ection of the arrow until it clicks into place 5 Connect the telephone line cord Mount the unit then slide down Raise the antenna 6 To charge the handset battery Place the handset on the base unit The IN USE CHARGE indicator lights and the unit beeps once To remove the wall mounting adaptor While pushing down the levers remove the adaptor 1 2 2 1 1 ...

Страница 40: ...move the belt clip Headset Connecting the headset to the handset allows hands free phone conversation Connecting the headset to the handset Open the headset jack cover and insert the headset plug into the headset jack as shown below VOLUME Headset Jack Earpiece Ear Rest VOLUME Control Microphone Back side MUTE Clip Loud ...

Страница 41: ...e near your mouth 3 Attach the clothing clip to keep the headset cord out of your way Making Answering Calls 1 Press to make or answer a call 2 To hang up press OFF To switch to the speakerphone while using the headset Press To return to the headset press To adjust the headset receiver volume Rotate the VOLUME control to the desired level To mute the conversation Press and hold MUTE on the headset...

Страница 42: ... 1 Pulse 2 Tone 1 700ms 2 600ms 3 400ms 4 300ms 5 250ms 6 110ms 7 100ms 8 90ms 1 A 2 B Store VM access 1 VM tone detect 2 1 1 On 0 Off 0 Off 1 Low 2 Medium 3 High 0 1 2 3 2 1 6 tone pattern 1 6 1 6 3 5 1 0 0 1 1 5 level 1 5 1 5 3 1 0 4 1 0 5 1 1 2 2 1 3 5 7 3 1 2 7 1 2 1 0 8 1 2 2 4 6 8 p 16 p 17 p 34 p 14 p 15 p 15 p 25 p 13 p 37 p 17 p 32 p 33 p 13 During programming To save the setting press th...

Страница 43: ...ndset on the base unit and try again Plug in the AC adaptor Raise the base unit antenna Static sound cuts in out fades Interference from other electrical units Move the handset and the base unit away from other electrical appliances p 3 Walk closer to the base unit Raise the base unit antenna Select a clearer channel p 19 The handset does not ring The ringer volume is set to OFF Set to HIGH MEDIUM...

Страница 44: ...ck disconnect the Caller ID box or plug the unit directly into the wall jack The handset display exits the Caller List or phone book Do not pause for over 60 seconds while searching You cannot page the handset The handset is too far from the base unit The handset user is making an outside call or viewing the Caller List phone book Wait until the IN USE CHARGE indicator light goes out The handset i...

Страница 45: ...not have a conversation using the headset Make sure the headset is connected properly p 40 If SP phone is displayed on the handset press to switch to the headset If you cannot solve your problem Call our customer call center at 1 800 211 PANA 7262 Panasonic s e mail address for customer inquiries consumerproducts panasonic com for customers in the USA or Puerto Rico ONLY Problem Cause Remedy ...

Страница 46: ...t in the risk of fire or electric shock 10 Never push any objects through slots in this unit This may result in the risk of fire or electric shock Never spill any liquid on the unit 11 To reduce the risk of electric shock do not disassemble this unit Take the unit to an authorized servicenter when service is required Opening or removing covers may expose you to dangerous voltages or other risks In...

Страница 47: ...tions and limitations specified in this manual WARNING TO PREVENT FIRE OR SHOCK HAZARD DO NOT EXPOSE THE BASE UNIT TO RAIN OR ANY TYPE OF MOISTURE ONLY THE HANDSET IS SHOCK AND SPLASH RESISTANT The AC adaptor is used as the main disconnect device ensure that the AC outlet is located installed near the unit and is easily accessible Splash Resistant HANDSET ONLY The handset is designed to be splash ...

Страница 48: ... the telephone company will notify you in advance that temporary discontinuance of service may be required But if advance notice isn t practical the telephone company will notify the customer as soon as possible Also you will be advised of your right to file a complaint with the FCC if you believe it is necessary The telephone company may make changes in its facilities equipment operations or proc...

Страница 49: ... interference to radio or television reception which can be determined by turning the equipment off and on the user is encouraged to try to correct the interference by one or more of the following measures Reorient or relocate the receiving antenna Increase the separation between the equipment and receiver Connect the equipment into an outlet on a circuit different from that to which the receiver ...

Страница 50: ...facilities if any regulations posted in the area instruct you not to do so Hospitals or health care facilities may be using equipment that could be sensitive to external RF radio frequency energy Routine care wipe the unit with a soft cloth Do not use benzine thinner or any abrasive powder When you leave the unit unused for a long period of time unplug the AC adaptor from the outlet If there is an...

Страница 51: ...ther Information 48 FLASH Button 37 Flash time 37 Function Menu Direct Commands 42 Function Menu Selection 11 Function Menu Table 12 H Handset Locator 35 Headset 40 Hold 19 I Installation AC adaptor 8 Installation Battery 9 Installation Headset 40 Installation Telephone Line Cord 8 L LCD Contrast 15 Lighted handset keypad 20 Line Mode 17 Location of Controls 6 7 M Making Calls 18 19 Microphone 18 ...

Страница 52: ...Index 52 T Troubleshooting 43 V VM Voice Mail Service 32 Voice Enhancer Technology 14 Volume control 20 41 W Wall Mounting 38 Warranty 53 ...

Страница 53: ...rs please ship the product to Panasonic Services Company Customer Servicenter Suite B 4900 George McVay Drive McAllen TX 78503 For assistance in Puerto Rico call Panasonic Sales Company 787 750 4300 or fax 787 768 2910 For warranty service for headsets if a headset is included with this product please call Panasonic Call Center at 1 800 211 PANA 7262 When shipping the unit carefully pack include a...

Страница 54: ... If the problem is not handled to your satisfaction then write to the warrantor s Consumer Affairs Department at the addresses listed for the warrantor PARTS AND SERVICE WHICH ARE NOT COVERED BY THIS LIMITED WARRANTY ARE YOUR RESPONSIBILITY Customer Services Directory For Product Information Operating Assistance Literature Request Dealer Locations and all Customer Service inquiries please contact ...

Страница 55: ...00 mAh Frequency 2 402 GHz 2 480 GHz Dimensions H x W x D Approx 246 mm x 54 mm x 39 mm 9 11 16 x 2 1 8 x 1 17 32 Mass Weight Approx 230 g 0 51 lb Security Codes 1 000 000 Dialing Mode Tone DTMF Pulse Operating Environment 5 C 40 C 41 F 104 F Specifications are subject to change without notice For your future reference Serial No Date of purchase found on the bottom of the unit Name and address of ...

Страница 56: ...s for customer inquiries consumerproducts panasonic com for customers in the USA or Puerto Rico ONLY When you ship the product Carefully pack your unit preferably in the original carton Attach a letter detailing the symptom to the outside of the carton Symptom Send the unit to an authorized servicenter prepaid and adequately insured Do not send your unit to the Panasonic Consumer Electronics Compa...

Отзывы: