background image

Table of Contents

2

Introduction

Model composition. . . . . . . . . . . . . . . . . . . .  3
Accessory information . . . . . . . . . . . . . . . . .  3
General information . . . . . . . . . . . . . . . . . . .  4

Important Information

For your safety. . . . . . . . . . . . . . . . . . . . . . .  5
Important safety instructions . . . . . . . . . . . .  6
For best performance  . . . . . . . . . . . . . . . . .  6
Other information . . . . . . . . . . . . . . . . . . . . .  7
Specifications. . . . . . . . . . . . . . . . . . . . . . . .  8

Getting Started

Setting up. . . . . . . . . . . . . . . . . . . . . . . . . . .  9
Note when setting up . . . . . . . . . . . . . . . . .  10
Controls . . . . . . . . . . . . . . . . . . . . . . . . . . .  11
Display . . . . . . . . . . . . . . . . . . . . . . . . . . . .  13
Turning the power on/off  . . . . . . . . . . . . . .  13
Initial settings . . . . . . . . . . . . . . . . . . . . . . .  13

Making/Answering Calls

Making calls . . . . . . . . . . . . . . . . . . . . . . . .  15
Answering calls . . . . . . . . . . . . . . . . . . . . .  15
Useful features during a call  . . . . . . . . . . .  16

Phonebook

Handset phonebook. . . . . . . . . . . . . . . . . .  17

Programming

Programmable settings . . . . . . . . . . . . . . .  19
Special programming . . . . . . . . . . . . . . . . .  21

Caller ID Service

Using Caller ID service  . . . . . . . . . . . . . . .  22
Caller list  . . . . . . . . . . . . . . . . . . . . . . . . . .  22

Voice Mail Service

Voice mail service  . . . . . . . . . . . . . . . . . . .  24

Intercom/Locator

Intercom. . . . . . . . . . . . . . . . . . . . . . . . . . .  25
Handset locator . . . . . . . . . . . . . . . . . . . . .  25
Transferring calls, conference calls . . . . . .  25

Useful Information

Character entry  . . . . . . . . . . . . . . . . . . . . .  26
Error messages . . . . . . . . . . . . . . . . . . . . .  28
Troubleshooting . . . . . . . . . . . . . . . . . . . . .  28
Wall mounting  . . . . . . . . . . . . . . . . . . . . . .  32

Index

Index  . . . . . . . . . . . . . . . . . . . . . . . . . . . . .  33

TG161x_171xFX(e).book  Page 2  Monday, February 28, 2011  9:11 AM

Содержание KX-TG1611FX

Страница 1: ...e provider telephone company For Czech and Slovakia This cordless telephone is possible to use according to General licence No VO R 8 08 2005 23 for Czech VPR 7 2001 for Slovakia Before initial use see Getting Started on page 9 Operating Instructions Model No KX TG1611FX KX TG1612FX KX TG1613FX KX TG1711FX KX TG1712FX Digital Cordless Phone Model shown is KX TG1611 Model shown is KX TG1711 TG161x_...

Страница 2: ...ttings 13 Making Answering Calls Making calls 15 Answering calls 15 Useful features during a call 16 Phonebook Handset phonebook 17 Programming Programmable settings 19 Special programming 21 Caller ID Service Using Caller ID service 22 Caller list 22 Voice Mail Service Voice mail service 24 Intercom Locator Intercom 25 Handset locator 25 Transferring calls conference calls 25 Useful Information C...

Страница 3: ... comes attached to the handset Series Model No Base unit Handset Part No Part No Quantity KX TG1611 series KX TG1611 KX TG1611 KX TGA161 1 KX TG1612 KX TG1611 KX TGA161 2 KX TG1613 KX TG1611 KX TGA161 3 KX TG1711 series KX TG1711 KX TG1711 KX TGA171 1 KX TG1712 KX TG1711 KX TGA171 2 No Accessory item Part number Quantity KX TG1611 KX TG1711 KX TG1612 KX TG1712 KX TG1613 1 AC adaptor PNLV226CE 1 2 ...

Страница 4: ...ions of Radio Telecommunications Terminal Equipment R TTE Directive 1999 5 EC Declarations of Conformity for the relevant Panasonic products described in this manual are available for download by visiting http www doc panasonic de Contact to Authorised Representative Panasonic Testing Centre Panasonic Marketing Europe GmbH Winsbergring 15 22525 Hamburg Germany For your future reference We recommen...

Страница 5: ...malfunction resulting in an accident L Do not allow the AC adaptor or telephone line cord to be excessively pulled bent or placed under heavy objects Operating safeguards L Unplug the product from power outlets before cleaning Do not use liquid or aerosol cleaners L Do not disassemble the product L Do not spill liquids detergents cleansers etc onto the telephone line cord plug or allow it to becom...

Страница 6: ...ss type during an electrical storm There may be a remote risk of electric shock from lightning 3 Do not use the telephone to report a gas leak in the vicinity of the leak 4 Use only the power cord and batteries indicated in this manual Do not dispose of batteries in a fire They may explode Check with local codes for possible special disposal instructions SAVE THESE INSTRUCTIONS For best performanc...

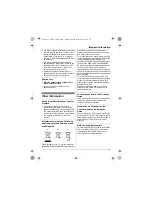
Страница 7: ... household waste For proper treatment recovery and recycling of old products and used batteries please take them to applicable collection points in accordance with your national legislation and the Directives 2002 96 EC and 2006 66 EC By disposing of these products and batteries correctly you will help to save valuable resources and prevent any potential negative effects on human health and the en...

Страница 8: ... 240 V AC 50 60 Hz Power consumption Base unit Standby Approx 0 6 W Maximum Approx 3 3 W Charger Standby Approx 0 1 W Maximum Approx 2 2 W Operating conditions 0 C 40 C 20 80 relative air humidity dry Note L Design and specifications are subject to change without notice L The illustrations in these instructions may vary slightly from the actual product TG161x_171xFX e book Page 8 Monday February 2...

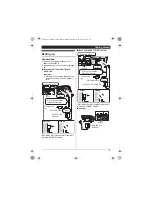
Страница 9: ... if you have DSL ADSL service Base unit KX TG1711 KX TG1712 DSL ADSL filter not supplied is required if you have DSL ADSL service Charger To telephone line DSL ADSL filter Click 220 240 V AC 50 60 Hz Press plug firmly Use only the supplied telephone line cord Hook Correct Wrong Click To telephone line DSL ADSL filter Click 220 240 V AC 50 60 Hz Hooks Click Press plug firmly Correct Wrong Use only ...

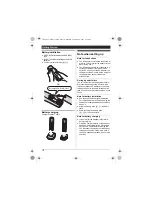
Страница 10: ...ting a corded type telephone without AC adaptor to the same telephone line or to the same telephone line jack if you have such a telephone jack in your house Note for battery installation L Use the supplied rechargeable batteries For replacement we recommend using the Panasonic rechargeable batteries noted on page 4 6 L Wipe the battery ends S T with a dry cloth L Avoid touching the battery ends S...

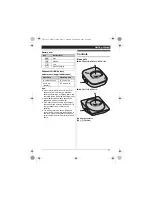
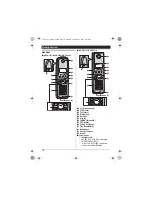
Страница 11: ...handset can be left on the base unit or charger without any ill effect on the batteries L The battery level may not be displayed correctly after you replace the batteries In this case place the handset on the base unit or charger and let it charge for at least 7 hours Controls Base unit KX TG1611 KX TG1612 KX TG1613 KX TG1711 KX TG1712 A Charge contacts B x Locator Icon Battery level 5 High 6 Medi...

Страница 12: ...lay G j OK Menu OK H P Pause I ic Off Power J R Recall Flash K Microphone L Charge contacts M Ringer Control type A Navigator key V or Scroll through various lists and items Volume or V Adjust the receiver volume while talking L B A C D I G J F H E K A M L B A C D I G J F H E K A M TG161x_171xFX e book Page 12 Monday February 28 2011 9 11 AM ...

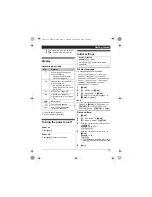
Страница 13: ...Set Time s j OK 3 r Date Time s j OK 4 Enter the current date month and year s j OK Example 15 July 2011 15 7 11 5 Enter the current hour and minute s j OK Example 15 30 15 3 L If you enter the wrong date and or time press C and perform again from step 3 6 ic Item Meaning w Within range of a base unit L When flashing Handset is searching for base unit page 29 C Handset is on an outside call L When...

Страница 14: ...g mode If you cannot make calls change this setting according to your telephone line service The default setting is Tone Tone For tone dial service Pulse For rotary pulse dial service 1 j OK 2 r Setup s j OK 3 r Dial Mode s j OK 4 r Select the desired setting 5 j OK s ic TG161x_171xFX e book Page 14 Monday February 28 2011 9 11 AM ...

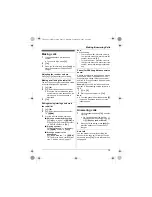
Страница 15: ...age 17 Note L When editing To erase a number place the cursor to the right of where you want to erase the number then press C To insert a number place the cursor to the right of where you want to insert the number then press the appropriate dial key Pause for PBX long distance service users A pause is sometimes required when making calls using a PBX or long distance service When storing a calling ...

Страница 16: ...llows you to receive calls while you are already talking on the phone If you receive a call while on the phone you will hear a call waiting tone If you subscribe to both Caller ID and Call Waiting with Caller ID services the 2nd caller s information is displayed after you hear the call waiting tone on the handset 1 Press R to answer the 2nd call 2 To switch between calls press R Note L Please cont...

Страница 17: ...ecessary 12 characters max page 26 s j OK 4 Edit the phone number if necessary 24 digits max page 15 s j OK 2 times 5 ic Editing an entry and making a call 1 Find the desired entry page 17 s j OK 2 r Edit Call s j OK s Press or to move the cursor s Edit the number page 15 s C Erasing entries Erasing an entry 1 Find the desired entry page 17 s j OK 2 r Erase s j OK 2 times 3 ic Erasing all entries ...

Страница 18: ...ress before pressing k in step 1 to change the dialling mode temporarily to tone When adding entries to the phonebook we recommend adding to the beginning of phone numbers you wish to chain dial page 17 TG161x_171xFX e book Page 18 Monday February 28 2011 9 11 AM ...

Страница 19: ...to select the desired setting s j OK L This step may vary depending on the feature being programmed L To exit the operation press ic Note L In the following table indicates the default settings Main menu Sub menu 1 Sub menu 2 Page Ringer Setup Volume 1 Volume 5 16 Ringtone 2 Ringtone 1 Set Time Date Time 3 13 Alarm Alarm Mode Off 21 Repeat Times Off Repeat Cycle 3 Minutes Ringtone Ringtone 1 Volum...

Страница 20: ...layed 6 If you subscribe to a Caller ID service and want to view the caller s information after lifting up the handset to answer a call turn off this feature 7 Turn this feature off if you prefer not to hear key tones while you are dialling or pressing any keys 8 The recall flash time depends on your telephone exchange or host PBX Contact your PBX supplier if necessary 9 When using the unit in Cze...

Страница 21: ... r Select the desired setting s j OK L If you only want the alarm to sound 1 time select Off and go to step 11 9 r Repeat Cycle s j OK 10 r Select the desired setting s j OK 11 r Ringtone s j OK 12 r Select the desired alarm tone s j OK L We recommend selecting a different ringer tone from the one used for outside calls 13 r Volume s j OK 14 r Select the desired volume s j OK 15 ic Note L Press ic...

Страница 22: ...pears from the display When you receive another new call y is displayed again Phonebook name display When caller information is received and it matches a phone number stored in the phonebook the stored name in the phonebook is displayed and logged in the caller list Caller list Important L Only 1 person can access the caller list at a time KX TG1612 KX TG1613 KX TG1712 L Make sure the unit s date ...

Страница 23: ...j OK 4 j OK s ic Storing caller information to the phonebook 1 y 2 r Select the desired entry s j OK 3 r Save TEL No s j OK 4 To store the name continue from step 3 Adding entries page 17 TG161x_171xFX e book Page 23 Monday February 28 2011 9 11 AM ...

Страница 24: ...ne or when your line is busy Messages are recorded by your service provider telephone company not your telephone When you have new messages 0 is displayed on the handset if message indication service is available Please contact your service provider telephone company for details of this service Important L If 0 still remains on the display even after you have listened to new messages turn it off b...

Страница 25: ...l with an outside party can be made between 2 handsets 1 During an outside call press j OK 2 r Intercom s j OK L C flashes to indicate the outside call is on hold 3 Enter the desired handset number you want to transfer to 4 Wait for the paged party to answer L If the paged party does not answer press C to return to the outside call 5 To complete the transfer Press ic L The outside call is being ro...

Страница 26: ... to move the cursor to the next space then press the appropriate dial key If you do not press any dial key within 5 seconds after entering a character the character is fixed and the cursor moves to the next space Character entry modes The available character entry modes are Alphabet ABC Numeric 0 9 Greek F Extended 1 o Extended 2 H and Cyrillic I When in these entry modes except Numeric you can se...

Страница 27: ...r table p L The following are used for both uppercase and lowercase Extended 2 character table O L The following are used for both uppercase and lowercase Cyrillic character table P TG161x_171xFX e book Page 27 Monday February 28 2011 9 11 AM ...

Страница 28: ...set the unit and turn off the handset Reconnect the adaptor turn on the handset and try again L Remove the batteries from the handset and install again L The handset has not been registered to the base unit Register the handset page 31 The handset display is blank L The handset is not turned on Turn the power on page 13 I cannot hear a dial tone L Make sure that you are using the supplied telephon...

Страница 29: ...teries page 10 Problem Cause solution w is flashing L The handset is too far from the base unit Move closer L The base unit s AC adaptor is not properly connected Reconnect AC adaptor to the base unit L The handset is not registered to the base unit Register it page 31 Noise is heard sound cuts in and out L You are using the handset or base unit in an area with high electrical interference Re posi...

Страница 30: ... ADSL provider for details L Other telephone equipment may be interfering with this unit Disconnect the other equipment and try again Caller information is slow to display L Depending on your service provider telephone company the unit may display the caller s information at the 2nd ring or later L Move closer to the base unit Time on the unit has shifted L Incorrect time information from incoming...

Страница 31: ...rt again from step 1 Deregistering a handset A handset can cancel its own registration to the base unit or other handsets registered to the same base unit This allows the handset to end its wireless connection with the system 1 j OK 131 s Enter the base unit PIN default 0000 L All handsets registered to the base unit are displayed 2 Enter the desired handset number you want to cancel s j OK L A co...

Страница 32: ...wall and the fixing method are strong enough to support the weight of the unit Base unit Charger Available for KX TG1611 KX TG1612 KX TG1613 Screws Not supplied 30 mm Hook 25 mm Screws Not supplied Hooks TG161x_171xFX e book Page 32 Monday February 28 2011 9 11 AM ...

Страница 33: ...20 Language 13 E Error messages 28 H Handset Deregistration 31 Locator 25 Registration 31 I Intercom 25 K Keytones 20 M Making calls 15 Missed calls 22 Mute 16 P Pause 15 Phonebook 17 PIN 31 Power failure 10 Power on off 13 Privacy mode 20 R Recall flash 16 Redialling 15 Ringer tone 19 T Temporary tone dialling 16 Time adjustment 19 Transferring calls 25 Troubleshooting 28 V Voice mail 24 Volume R...

Страница 34: ...Notes 34 TG161x_171xFX e book Page 34 Monday February 28 2011 9 11 AM ...

Страница 35: ...Notes 35 TG161x_171xFX e book Page 35 Monday February 28 2011 9 11 AM ...

Страница 36: ...slava Slovenská republika Telefón 421 2 2062 2211 Fax 421 2 2062 2313 zákaznícka linka 421 2 2062 2911 e mail servis bratislava eu panasonic com aktuálne info na www panasonic sk Thámova 289 13 Palác Karlín 186 00 Praha 8 telefon centrální fax zákaznická linka e mail panasonic praha eu panasonic com e mail servis praha eu panasonic com aktuální info na www panasonic cz 420 236 032 511 420 236 032 ...

Отзывы: