background image

3.1 Installation

Getting Started

21

3.1.2

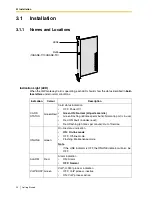
Installing the VoIP Gateway Card in the PBX

Install the VoIP Gateway Card in a free slot of the KX-TDA100/KX-TDA200 PBX.

1.

Insert the card along the guide rails.

2.

Holding the card as shown below, push the release lever in the direction of the arrow so 
that the card engages securely with the connector on the back board.

LINK

Green

Link status indication

ON: Normal connection

OFF: Connection error

DATA

Green

Data transmission indication

ON: Data transmitting

OFF: No data transmitted

Indication

Colour

Description

Guide Rail

Release Lever

Back Board

Содержание KX-TDA0480

Страница 1: ... Getting Started KX TDA5480 Model KX TDA0484 Thank you for purchasing the Panasonic 4 Channel VoIP Gateway Card KX TDA5480 KX TDA0484 Please read this manual carefully before using this product and save this manual for future use ...

Страница 2: ...ng the VoIP Gateway Card 25 4 1 Preparations 26 4 1 1 Preparing the PC 26 4 2 Programming the VoIP Gateway Card in the Los Angeles Office 29 4 2 1 Starting the IP GW4 Maintenance Utility 29 4 2 2 Changing the Status of the VoIP Gateway Card 31 4 2 3 Assigning the IP Address 32 4 2 4 Assigning the Hunt Pattern 33 4 2 5 Programming the Address Translation Table 34 4 2 6 Downloading the Address Trans...

Страница 3: ... 62 B1 2 Numbering Plan Example 63 B2 Programming for the Extension Number Method 65 B2 1 Programming the VoIP Gateway Card 65 B2 2 Programming the PBX 66 C Initialization of the VoIP Gateway Card 69 C1 Initializing the VoIP Gateway Card 70 D Using the KX TDA5480 KX TDA0484 and KX TDA0480 in One Network 73 D1 Considerations in Installation 74 ...

Страница 4: ...4 Getting Started ...

Страница 5: ...Gateway Card designed to be easily integrated into existing IP networks seamlessly bridges Public Switched Telephone Network PSTN and analog telephones with digital data networks without interrupting pre existing data communications Because communications do not take place over conventional telephone networks the high cost of long distance communications is virtually eliminated ...

Страница 6: ...or transmission On the incoming side it reverses this process and translates the packets back into appropriate voice or fax signals PSTN Public Switched Telephone Network IP Network PSTN Voice signals are converted into IP packets Router Switching Hub KX TDA50 PBX with KX TDA5480 VoIP Gateway Card Other data packets Voice data packets IP packets are converted back into voice signals KX TDA100 KX T...

Страница 7: ...IP network PSTN Public Switched Telephone Network IP Network Chicago Office PBX Code 41 PSTN Trunk CO Line Number 9 TIE Line Access Number 7 PSTN Local Telephone 123 4567 Extn 301 300 399 PBX Code 35 PSTN Trunk CO Line Number 9 TIE Line Access Number 7 Extn 201 200 299 Local Telephone 456 7890 G3 Fax Extn 501 500 599 G3 Fax Extn 601 600 699 Default Gateway IP 200 45 11 1 Subnet Mask 255 255 255 0 ...

Страница 8: ... If for practical reasons you must route the VoIP network through a firewall refer to A1 3 Network Devices for more details 1 2 2 Numbering Plan Example There are two methods to plan your numbering system as follows This section provides a network numbering mechanism using the PBX code method based on the previous example diagram Configure your network referring to this example Examples of recomme...

Страница 9: ...imary gateway typically a router or similar device that exchanges IP packets with the other gateways on the VoIP network Subnet Mask Address 255 255 255 0 255 255 255 0 Defines which digits of an IP address are used for the network address and the host address at each network location A card IP address must fall within the same subnet as that of the default gateway e g router that is connected to ...

Страница 10: ... Los Angeles To extension 201 via VoIP network To local telephone 456 7890 via VoIP network through local PSTN Fax Extension Number 500 to 599 600 to 699 A number assigned to each fax extension Los Angeles Office Chicago Office Description Dial 41 Dial 7 Dial 301 Chicago PBX code TIE line access no extension no Dial 41 Dial 9 Dial 7 Dial 123 4567 Chicago PBX code TIE line access no phone no Chicag...

Страница 11: ...eading number to access the destination However for example setting the remaining digits to 7 does not mean that the user must dial all 7 digits when making a call See the example on the right Card IP Address The IP address of each card in the network as the access destination Los Angeles Office PBX Code 35 Chicago Office PBX Code 41 Extensions FAX Extensions PSTN Access Extensions FAX Extensions ...

Страница 12: ...ic Switched Telephone Network IP Network PBX Code PSTN Trunk CO Line Number TIE Line Access Number Extension Number Local Telephone G3 Fax Extension Number Subnet Mask IP Address Card IP Address Default Gateway IP Address Subnet Mask Address PBX Numbering PBX Code TIE Line Access Number PSTN Trunk CO Line Number Extension Number Fax Extension Number Card IP Address Extensions Leading Number Remain...

Страница 13: ...0 PBX This section describes the physical installation process of the KX TDA5480 VoIP Gateway Card covering the following topics 1 installing the card in the KX TDA50 PBX and 2 connecting the card to a network device using a category 5 CAT 5 Ethernet cable ...

Страница 14: ...cation Color Description ONLINE Green On line status indication ON On line mode OFF Off line mode Flashing Maintenance mode Note If the LINK indicator is OFF the ONLINE indicator will also be OFF ALARM Red Alarm indication ON Alarm OFF Normal LINK Green Link status indication ON Normal connection OFF Connection error DATA Green Data transmission indication ON Data transmitting OFF No data transmit...

Страница 15: ...e dummy cover plate for the appropriate slot from the main unit CAUTION For safety reasons smooth the cut edges after removing the dummy cover plate 2 Position the card in the open slot making sure that the tabs on both sides of the card fit into place Then holding the card firmly in place lower the rear end so that the hole of the card fits over the extension bolt Dummy Cover Plate 1 2 Extension ...

Страница 16: ...2 1 Installation 16 Getting Started 3 Insert the new extension bolt included with the card into the hole on the card and tighten it to secure the card Extension Bolt ...

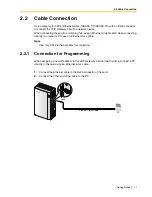
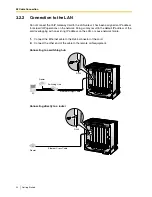
Страница 17: ...rnet straight cable when connecting directly to a router or PC use an Ethernet cross cable Note Use only CAT 5 Ethernet cable for connection 2 2 1 Connection for Programming When assigning a new IP address to the VoIP Gateway Card for the first time connect a PC directly to the card using an Ethernet cross cable 1 Connect the Ethernet cable to the RJ45 connector of the card 2 Connect the other end...

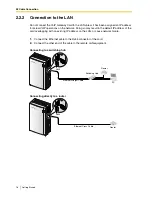
Страница 18: ...g so may result in the default IP address of the card overlapping with an existing IP address on the LAN or cause network failure 1 Connect the Ethernet cable to the RJ45 connector of the card 2 Connect the other end of the cable to the remote LAN equipment Connecting to a switching hub Connecting directly to a router Ethernet Straight Cable Router Switching Hub PC RJ45 Ethernet Cross Cable Router...

Страница 19: ...0 PBX This section describes the physical installation process of the KX TDA0484 VoIP Gateway Card covering the following topics 1 installing the card in the KX TDA100 KX TDA200 PBX and 2 connecting the card to a network device using a category 5 CAT 5 Ethernet cable ...

Страница 20: ...ff Green ON Normal all ports are idle Green Flashing 60 times per minute Normal a port is in use Red ON Fault includes reset Red Flashing 60 times per minute Out of Service ONLINE Green On line status indication ON On line mode OFF Off line mode Flashing Maintenance mode Note If the LINK indicator is OFF the ONLINE indicator will also be OFF ALARM Red Alarm indication ON Alarm OFF Normal VoIP BUSY...

Страница 21: ...ide rails 2 Holding the card as shown below push the release lever in the direction of the arrow so that the card engages securely with the connector on the back board LINK Green Link status indication ON Normal connection OFF Connection error DATA Green Data transmission indication ON Data transmitting OFF No data transmitted Indication Colour Description Guide Rail Release Lever Back Board ...

Страница 22: ...3 1 Installation 22 Getting Started 3 Turn the 2 screws clockwise to fix the card in place Note Make sure the screws are tightened to ground the card securely Screws ...

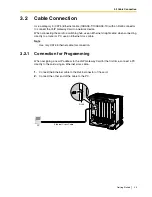
Страница 23: ...rnet straight cable when connecting directly to a router or PC use an Ethernet cross cable Note Use only CAT 5 Ethernet cable for connection 3 2 1 Connection for Programming When assigning a new IP address to the VoIP Gateway Card for the first time connect a PC directly to the card using an Ethernet cross cable 1 Connect the Ethernet cable to the RJ45 connector of the card 2 Connect the other end...

Страница 24: ...g so may result in the default IP address of the card overlapping with an existing IP address on the LAN or cause network failure 1 Connect the Ethernet cable to the RJ45 connector of the card 2 Connect the other end of the cable to the remote LAN equipment Connecting to a switching hub Connecting directly to a router Ethernet Straight Cable Router Switching Hub PC RJ45 Ethernet Cross Cable Router...

Страница 25: ...go through the whole programming process of a VoIP Gateway Card at one location in the network then start programming the other cards at different locations Based on the theoretical network illustrated previously in this manual this section demonstrates the procedure to program the cards in the Los Angeles and Chicago offices ...

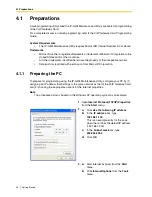
Страница 26: ...shots reprinted with permission from Microsoft Corporation 4 1 1 Preparing the PC To prepare for programming using the IP GW4 Maintenance Utility configure your PC by 1 assigning an IP address that belongs to the same network as that of the VoIP Gateway Card and 2 choosing the appropriate options for the Internet properties Note The procedure below is based on the Windows XP operating system as an...

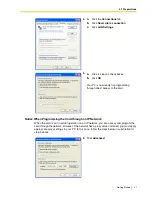
Страница 27: ...network However if the network has a proxy server installed you must apply appropriate proxy settings to your PC In this case follow the steps below in substitution for step 5 above 4 a Click the Connections tab b Click Never dial a connection c Click LAN Settings 5 a Click to clear all check boxes b Click OK Your PC is now ready for programming through direct access to the card 5 Click Advanced ...

Страница 28: ...Preparations 28 Getting Started 6 a Under Do not use proxy server for addresses beginning with type the IP address of the card b Click OK Your PC is now ready for programming the card through an IP network ...

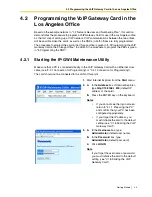
Страница 29: ...e Utility Make sure that a PC is connected directly to the VoIP Gateway Card with an Ethernet cross cable see 2 2 1 Connection for Programming or 3 2 1 Connection for Programming The card should not be connected to the LAN at this point 1 Start Internet Explorer from the Start menu 2 a In the Address box of Internet Explorer type http 192 168 1 200 default IP address of the card b Press the ENTER ...

Страница 30: ...orer you cannot log in again for the period of time specified by the parameter Programming Auto Disconnect Time default 10 min For the log out procedure and Programming Auto Disconnect Time setting refer to 2 5 2 Log Out and 2 3 2 Maintenance Settings of the VoIP Gateway Card Programming Guide respectively The main menu appears Note For readability of the text on the screen it is recommended that ...

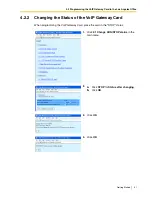
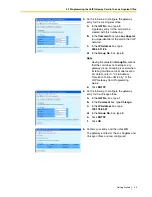
Страница 31: ...etting Started 31 4 2 2 Changing the Status of the VoIP Gateway Card When programming the VoIP Gateway Card place the card in the STOP status 1 Click 2 1 Change RUN STOP status in the main menu 2 a Click STOP for Status after changing b Click OK 3 Click OK 4 Click OK ...

Страница 32: ...over the VoIP network The specific setting values are based on the table under IP Addressing Information in 1 2 2 Numbering Plan Example Note For more details about IP address assignment refer to 2 2 1 Network Parameters of the VoIP Gateway Card Programming Guide 1 Click 1 1 Network Settings General in the main menu 2 a In the IP Address box type 200 45 11 35 b In the Subnet Mask box type 255 255 ...

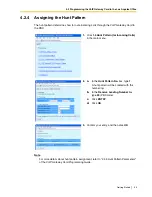
Страница 33: ...he PBX Note For more details about hunt pattern assignment refer to 2 2 5 Hunt Pattern Parameters of the VoIP Gateway Card Programming Guide 1 Click 1 5 Hunt Pattern for Incoming Calls in the main menu 2 a In the Hunt Pattern No box type 1 A hunt pattern will be created with this numbering b In the Receive Leading Number box type 35 PBX code c Click ENTRY d Click OK 3 Confirm your entry and then c...

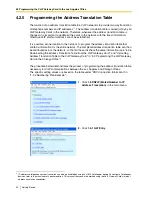
Страница 34: ...ributed across the network so that all the cards share the same information see 4 2 6 Downloading the Address Translation Table from the VoIP Gateway Card and Uploading Address Translation Table to the VoIP Gateway Card in 4 3 Programming the VoIP Gateway Card in the Chicago Office The procedure below demonstrates the process of programming the address translation table necessary for VoIP communic...

Страница 35: ...aving the value 0 for Group No means that the card does not belong to any gateway group Grouping is useful when installing multiple cards at one location For details refer to 2 2 6 Address Translation Table GW Entry of the VoIP Gateway Card Programming Guide e Click ENTRY 4 Do the following to configure the gateway entry for the Chicago office a In the GW No box type 1 b In the Comment box type Ch...

Страница 36: ... 1 6 2 DN2IP Entry 8 Do the following to configure the Los Angeles extensions a In the Leading Number box type 352 PBX code 35 extension starting digit 2 b In the Remaining Number of Digits box type 2 2 digits to dial 00 to 99 following the leading number c Click GW for GW No Group No Selection d In the GW No Group No box type 0 the gateway entry for the card e Click ENTRY 9 a Referring to step 8 ...

Страница 37: ...VoIP network see Uploading Address Translation Table to the VoIP Gateway Card in 4 3 Programming the VoIP Gateway Card in the Chicago Office so that all the cards can communicate with each other over the network Note For more details about downloading the address translation table refer to 2 4 4 Download of Address Translation Table of the VoIP Gateway Card Programming Guide 1 Click 3 4 Download o...

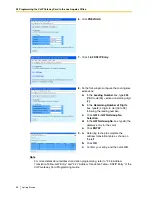
Страница 38: ...y Card in the Los Angeles Office 38 Getting Started 4 2 7 Rebooting the VoIP Gateway Card For all the changes to the parameters to become effective you must reboot the VoIP Gateway Card 1 Click REBOOT in the main menu 2 Click REBOOT ...

Страница 39: ... Set the IP address settings of the PC to the following values IP address 200 45 11 100 Subnet Mask address 255 255 255 0 2 Start Internet Explorer from the Start menu 3 In the Address box of Internet Explorer type http 200 45 11 35 the new IP address of the card 4 Press the ENTER key on the keyboard If you can log in then the card has been successfully programmed After you have confirmed that the...

Страница 40: ...ne downloaded from the card in the Los Angeles office already contains the information for the entire network You can simply upload the address translation table from the Los Angeles office and the cards can communicate with each other on the network Starting the IP GW4 Maintenance Utility Changing the Status of the VoIP Gateway Card 1 Start Internet Explorer from the Start menu 2 a In the Address...

Страница 41: ...rent PBX code from the card in the Los Angeles office 1 Click 1 1 Network Settings General in the main menu 2 a In the IP Address box type 199 176 64 41 b In the Subnet Mask box type 255 255 255 0 c In the Default Gateway box type 199 176 64 1 d Click OK 3 Confirm your entry and then click OK 1 Click 1 5 Hunt Pattern for Incoming Calls in the main menu 2 a In the Hunt Pattern No box type 1 b In th...

Страница 42: ...e cards must share the same address translation table Follow the procedure below to upload the address translation table downloaded from the card in the Los Angeles office see 4 2 6 Downloading the Address Translation Table from the VoIP Gateway Card to the card in the Chicago office 1 Click 3 3 Upload of DN2IP data PC VoIP Gateway in the main menu 2 a Click Browse and choose a file to upload b Cl...

Страница 43: ... address 199 176 64 100 Subnet Mask address 255 255 255 0 2 Start Internet Explorer from the Start menu 3 In the Address box of Internet Explorer type http 199 176 64 41 the new IP address of the card 4 Press the ENTER key on the keyboard If you can log in then the card has been successfully programmed After you have confirmed that the card has been successfully programmed it is strongly recommend...

Страница 44: ...4 3 Programming the VoIP Gateway Card in the Chicago Office 44 Getting Started ...

Страница 45: ...ork using the VoIP Gateway Card as a QSIG network interface the PBX at each location in the network must be programmed appropriately For a detailed discussion of related features refer to the Hybrid IP PBX Feature Guide This section details the procedure to program the PBX to use the card ...

Страница 46: ...led the KX TDA50 Maintenance Console PC programming software for the KX TDA50 PBX in your PC 1 Start the KX TDA50 Maintenance Console from the Start menu 2 a Type the Installer Level Programmer Code default INSTALLER b Click OK 3 a Click Connect RS 232C or USB b In the next screen type the system password for installer default 1234 c Click OK The program menu appears 4 a Double click Configuration...

Страница 47: ...the local PBX in the network c In the Leading Number box type 41 the PBX code of the remote PBX in the network d In the corresponding Trunk Group list click the number of the trunk CO line group to be used when making calls e Set the number modification pattern if necessary f Click OK 8 a Double click Configuration b Double click Slot c Click Status of the card d Set the status to OUS e Click Card...

Страница 48: ...amming software for the KX TDA100 KX TDA200 PBX in your PC 1 Start the KX TDA Maintenance Console from the Start menu 2 a Type the Installer Level Programmer Code default INSTALLER b Click OK 3 a Click Connect RS 232C or USB b In the next screen type the system password for installer default 1234 c Click OK The program menu appears 4 a Double click Configuration b Double click IP GW Port Confirm t...

Страница 49: ...e local PBX in the network c In the Leading Number box type 35 the PBX code of the remote PBX in the network d In the corresponding Trunk Group list click the number of the trunk CO line group to be used when making calls e Set the number modification pattern if necessary f Click OK 8 a Double click Configuration b Double click Slot c Click Status of the card d Set the status to OUS e Click Card T...

Страница 50: ...5 2 Programming the PBX in the Chicago Office 50 Getting Started ...

Страница 51: ...Getting Started 51 Appendix A Guidance for VoIP Installation ...

Страница 52: ...les below for more details refer to 2 2 3 Voice Communication Parameters in the VoIP Gateway Card Programming Guide Required Bandwidth for Voice Communication Via LAN Via WAN PPP Point to Point Protocol Required Bandwidth No of Fax Machines Required Bandwidth for Fax Communication 4 No of Fax Machines Required Bandwidth for Voice Communication CODEC Packet Sending Interval 20 ms 30 ms 40 ms 60 ms ...

Страница 53: ...A1 2 Network Configuration You must evaluate the structure of the existing network to see if a VoIP network can be implemented Below are the points that should be taken into your evaluation Is the IP network a managed network A VoIP network should be implemented on a managed IP network such as Frame Relay Leased Line or IP VPN Virtual Private Network An unmanaged network that is the Internet canno...

Страница 54: ...ogramming Guide Is network address translation NAT NAPT disabled In a network where address translation techniques e g NAT NAPT are used to convert between global and local IP addresses VoIP communications based on the H 323 protocol cannot be carried out appropriately Generally NAT NAPT are features that are available with routers Note If the router on the network supports the H 323 NAT feature i...

Страница 55: ...access points to the IP network For example if router A whose IP address is assigned as the default gateway IP address of the card fails VoIP communications are no longer possible the card is not able to switch its default gateway from router A to router B to access the IP network For more details about the default gateway setting refer to 2 2 1 Network Parameters of the VoIP Gateway Card Programm...

Страница 56: ...n two ends of a call A huge degradation in speech quality will be produced when calls are made through multiple IP networks as shown below therefore it is recommended that you avoid establishing a VoIP network in this fashion IP Network 1 IP Network 2 PSTN IP Network 1 IP Network 2 ...

Страница 57: ...used in the existing network to see if a VoIP network can be implemented Below are the points that should be taken into your evaluation Can the firewall pass packets from the VoIP Gateway Card If the VoIP network contains a firewall the firewall must be configured appropriately to allow VoIP packets which are listed in the table below to pass through the network without being blocked by filtering ...

Страница 58: ... speech quality It is strongly recommended that you use this feature especially in networks where traffic is heavy Typically a router identifies what packets to pass in priority by checking the value in the ToS field of the header of IP packets The VoIP Gateway Card has the ability to set the ToS field of outgoing voice packets see 2 2 3 Voice Communication Parameters in the VoIP Gateway Card Prog...

Страница 59: ...ork bandwidth kbps Available bandwidth for VoIP kbps Required bandwidth for VoIP kbps p 52 No Question Answer Memo Ref 2 a Is the IP network a managed network Make sure to use a managed IP network such as Frame Relay Leased Line or IP VPN Virtual Private Network The VoIP Gateway Card is not intended for use on the Internet Yes No Type of IP network p 53 2 b Is it possible to have static IP address...

Страница 60: ...packets to pass through the network without being blocked by filtering Yes No Model of the firewall p 57 3 b Are layer 2 or higher switches used Do not use repeater hubs as they can increase the network load Yes No Model of the switch p 58 3 c Are category 5 CAT 5 cables used Yes No p 58 No Question Answer Memo Ref 4 Can the router or switch be configured to use priority control features Yes No Mo...

Страница 61: ...Getting Started 61 Appendix B Alternative Numbering Plan Example ...

Страница 62: ...tension number method PSTN Public Switched Telephone Network IP Network Chicago Office PSTN Trunk CO Line Number 93 VoIP Gateway Trunk CO Line Access Number 803 PSTN Local Telephone 123 4567 Extn 301 300 399 PSTN Trunk CO Line Number 92 VoIP Gateway Trunk CO Line Access Number 802 Extn 201 200 299 Local Telephone 456 7890 G3 Fax Extn 501 500 599 G3 Fax Extn 601 600 699 Default Gateway IP 200 45 11...

Страница 63: ...dentifies the IP address of the primary gateway typically a router or similar device that exchanges IP packets with the other gateways on the VoIP network Subnet Mask Address 255 255 255 0 255 255 255 0 Defines which digits of an IP address are used for the network address and the host address at each network location A card IP address must fall within the same subnet as that of the default gatewa...

Страница 64: ...01 via VoIP network To local telephone 456 7890 via VoIP network through local PSTN PBX Connection Information Los Angeles Office Chicago Office Extensions FAX Extensions PSTN Access Extensions FAX Extensions PSTN Access Leading Number 2 5 92 3 6 93 Remaining Digits 2 2 7 2 2 7 Card IP Address 200 45 11 35 199 176 64 41 Dial 301 extension no Dial 93 Dial 802 Dial 123 4567 VoIP Gateway trunk CO lin...

Страница 65: ... steps other than those provided here have common setting values and are therefore omitted from this explanation B2 1 Programming the VoIP Gateway Card The hunt patterns and address translation table need different setting values for the extension number method as shown in the screen shots provided below Programming the VoIP Gateway Card in the Los Angeles Office Create hunt patterns with the sett...

Страница 66: ...Office B2 2 Programming the PBX The steps below are provided in substitution for steps 6 and 7 of the procedure detailed in 5 1 Programming the PBX in the Los Angeles Office and 5 2 Programming the PBX in the Chicago Office Program the PBXs in both offices using the extension number method following these steps Programming the PBX in the Los Angeles Office Step 6 Assign the PSTN trunk CO line acce...

Страница 67: ...e extensions and 6 for the Chicago office fax extensions Step 8 Assign the routing information to route calls to the remote PBX In the Leading Number box type 3 for the Chicago office extensions 6 for the Chicago office fax extensions and 93 for Chicago office PSTN access Note Do not set any value in the Own PBX Code box After the above step follow step 8 of the procedure in 5 1 Programming the PB...

Страница 68: ...n the Other PBX Extension Number TIE box 01 and 02 type 2 for the Los Angeles office extensions and 5 for the Los Angeles office fax extensions Step 8 Assign the routing information to route calls to the remote PBX In the Leading Number box type 2 for the Los Angeles office extensions 5 for the Los Angeles office fax extensions and 92 for Los Angeles office PSTN access Note Do not set any value in...

Страница 69: ...Getting Started 69 Appendix C Initialization of the VoIP Gateway Card ...

Страница 70: ...all settings not just the IP address and log in password to the factory default KX TDA5480 1 Install the card to the KX TDA50 PBX and then turn on the power to the PBX 2 Using the KX TDA50 Maintenance Console confirm that the card is in service INS 3 Set the System Initialize Switch to the SYSTEM INITIALIZE position CAUTION Do not press the Reset Button nor turn the power off then on while the Sys...

Страница 71: ...X TDA Maintenance Console confirm that the card is in service INS 3 Set the System Initialize Switch to the SYSTEM INITIALIZE position CAUTION Do not press the Reset Button nor turn the power off then on while the System Initialize Switch is in this position Doing so will initialize the PBX 4 Using the KX TDA Maintenance Console set the status of the card to OUS then set it back to INS 5 Return th...

Страница 72: ...C1 Initializing the VoIP Gateway Card 72 Getting Started ...

Страница 73: ...Getting Started 73 Appendix D Using the KX TDA5480 KX TDA0484 and KX TDA0480 in One Network ...

Страница 74: ...k you must add it as an Other Unit in a Unit Group network when programming with the MCS as shown below Note For programming instructions and other information about the KX TDA0480 refer to the documentation for the KX TDA0480 Restrictions on Feature Compatibility Some restrictions exist when using the KX TDA5480 KX TDA0484 with the KX TDA0480 as detailed below CLIP service is the only QSIG servic...

Страница 75: ...D1 Considerations in Installation Getting Started 75 ...

Страница 76: ...Gabriel Industrial Park Carolina Puerto Rico 00985 http www panasonic com csd Copyright This manual is copyrighted by Panasonic Communications Co Ltd PCC You may print out this manual solely for internal use with this model Except above you may not reproduce this manual in any form in whole or part without the prior written consent of PCC and its licensee 2004 Panasonic Communications Co Ltd All R...

Отзывы: