background image

102

Clearing a media jam

If the printer has frequent media jams, make sure that you follow these guidelines:

B

Always use high-quality laser paper and transparencies. Refer to 

pages 151

and

152

.

B

Make sure that you load specialty media only in the multi-purpose tray and that you
set the media thickness switch to the correct setting for the media used.

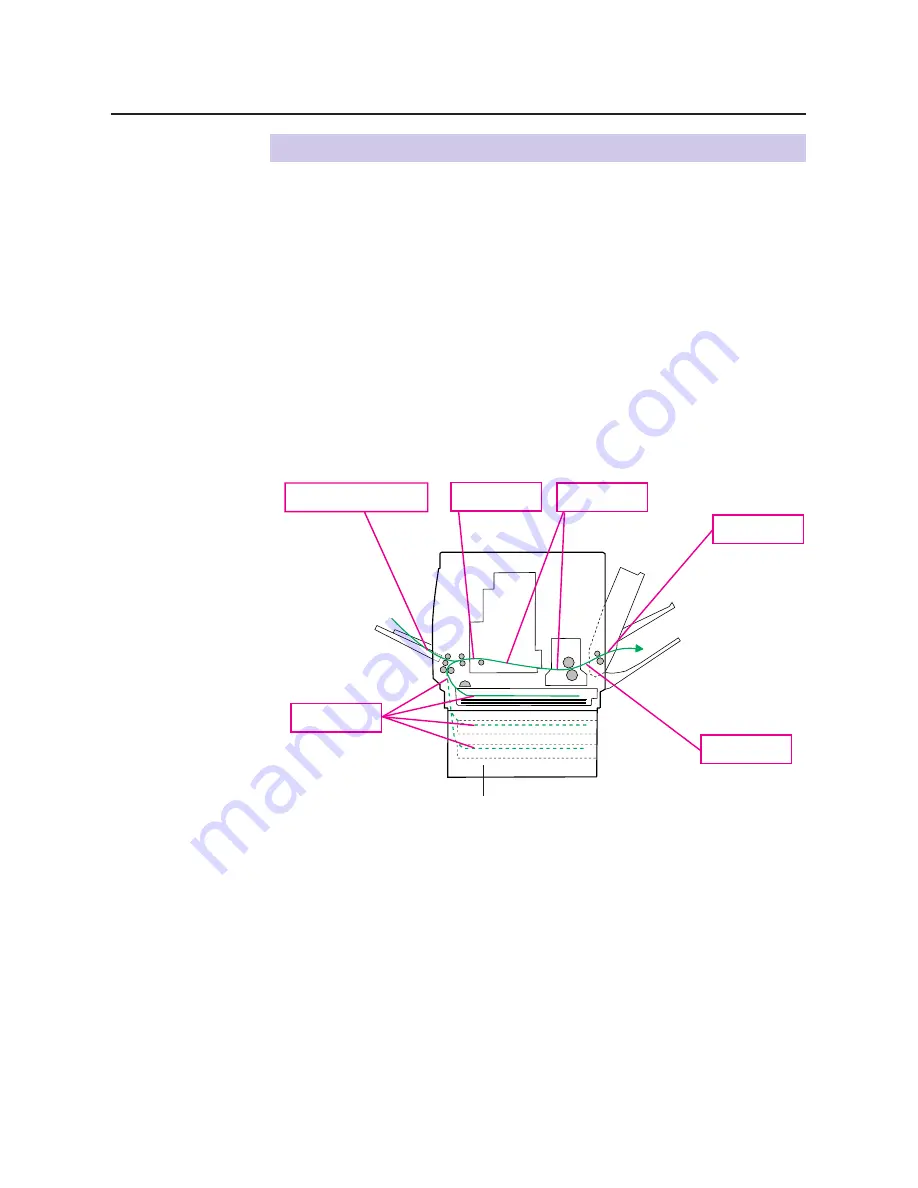
If a media jam occurs, the printer panel reports Jam at <Location>. The <Locations>
are the various sensors throughout the paper path, listed as A through E.

The following illustration shows the locations of the sensors that report media jams 
(A through E).

Care and Maintenance

Printer

Jam at A

Jam at C

Jam at D

Jam at E

Jam at MPT

P. 103-104)

P. 106-109)

P. 110-111)

P. 112)

P. 113)

Jam at B

P. 105)

2nd cassette feeder (option)

Содержание KX-PS8000

Страница 1: ...Operating Instructions and the Utilities and Drivers Reference Guide before using the Digital Color Imaging System Keep this CD ROM in the protective case Do not expose the CD ROM to direct sunlight or extreme heat and do not scratch or smudge the surface of the CD ROM ...

Страница 2: ...entronics Data Computer Corporation BTextBridge is a registered trademark of Xerox Corporation BAdobe and Acrobat are trademarks of Adobe Systems Incorporated BAvery is a registered trademark and all Avery codes are trademarks of Avery Dennison Corporation BAll other acknowledgements are trademarks or registered trademarks of their respective holders It is granted from Microsoft Corporation to use...

Страница 3: ...nsists of the KX PS8001 Color Laser Printer and the KX PS8002 Color Scanner These operating instructions are subject to change without notice KYUSHU MATSUSHITA ELECTRIC CO LTD 1997 Important BDo not duplicate bills coins securities and the like with this system BDo not duplicate copyrighted material or the work of others except for the purpose of private use BDo not duplicate any kind of certifica...

Страница 4: ...e limited right to reverse engineer decompile or disassemble the SOFTWARE solely to the extent specifically permitted by the terms and conditions of Article 6 of the European Community s Directive for the Legal Protection of Computer Programs OJL 122 42 17 May 1991 6 You may not use copy modify alter or transfer the SOFTWARE any copy thereof or its related documentation in whole or in part except ...

Страница 5: ...ser may find the booklet Something About Interference available from FCC local regional offices helpful FCC Warning To assure continued FCC emission limit compliance the user must use the recommended shielded interfacing cable when connecting to a host computer Also any unauthorized changes or modifications to this equipment would void the user s authority to operate this device Technical Support ...

Страница 6: ...34 Loading Paper or Transparencies in the Media Tray 34 Margins and Print Area 37 Loading Media in the Multi purpose Tray 38 Connecting the System 42 DCIS Standard System 44 DCIS Stand Alone System 46 Connecting the Scanner to a Computer 47 Connecting the Printer to a Computer 49 Setting the SCSI ID Number Terminator 52 Power On 53 Printing a Test Page From the Printer Panel 54 Installing the KX P...

Страница 7: ...or Operation 91 Cleaning 93 Scanner 93 Printer 94 User Replaceable Components 98 Clearing a Jam 100 Scanner 100 Printer 102 Troubleshooting 114 Scanner 114 Printer 115 Error Messages 125 Scanner LCD Panel 125 Printer LCD Panel 126 Status Display Program 129 Scanner Status Dialog Box 130 Printer Status Dialog Box 132 Repacking 134 Packing the Scanner 135 Packing the Printer 137 Specifications 145 S...

Страница 8: ...uipment operates satisfactorily does not imply that the power point is grounded earthed and that the installation is completely safe For your safety if in any doubt about the effective grounding earthing of the power point consult a qualified electrician BIf the plug cannot be inserted into the AC outlet contact a licensed electrician to replace the outlet with a properly grounded earthed one Do n...

Страница 9: ...8 1 lbs and the printer weighs approximately 47 9 kg 105 5 lbs They must be handled by two people Turn the power off and remove the power cords when handling the units Light Source Do not look directly at the light source lamps of the scanner as this may be harmful to your eyes ...

Страница 10: ...AYOS DANGER Invisible laser radiation when open and interlock defeated AVOID DIRECT EXPOSURE TO BEAM CAUTION Invisible laser radiation when open and interlocks defeated AVOID EXPOSURE TO BEAM VORSICHT Unsichtbare Laserstrahlung wenn Abdeckung geöffnet und Sicherheitsverriegelung überbrückt NICHT DEM STRAHL AUSSETZEN ADVARSEL Usynlig laserstråling når deksel åpnes og sikkerhedslas brytes UNNGÅ EKSP...

Страница 11: ...NY 13 AMP SOCKET If a new plug is to be fitted please observe the wiring code as shown below If in any doubt please consult a qualified electrician WARNING THIS APPLIANCE MUST BE EARTHED IMPORTANT The wires in this mains lead are coloured in accordance with the following code Green and Yellow Earth Blue Neutral Brown Live As the colours of the wire in the mains lead of this appliance may not corre...

Страница 12: ...perature temperature range 10 C to 32 5 C 50 F to 90 5 F BExtremely high or low humidity humidity range 20 to 80 RH BCondensation due to rapid change of temperature BAreas of poor ventilation BAreas of high dust or chemical fume concentration solvent etc BToo much media document which exceeds the limit mark on the guide of the tray BFront right left doors opened while the printer is operating it m...

Страница 13: ...te feeder for the printer Interface Cable Always use a shielded interface cable Use of an unshielded cable can result in radio interference with data Waste Disposal Method Waste material may be dumped or incinerated under conditions which meet all federal state and local environmental regulations BDo not place heavy objects on the disc case or drop the case BTo clean the disc hold the disc by its ...

Страница 14: ...ndividually High quality Resolution Optical 600 dpi dots per inch Flatbed 30 to 9600 dpi is software selectable ADF 60 to 2400 dpi is software selectable Color Full color mode Maximum 16 7 million colors Monochrome mode Maximum 256 grayscale levels Image modification function Image modification functions such as density gamma adjustment color adjustment and sharpening can be used to modify an imag...

Страница 15: ... options installed Image conversion function Adjusts individual toner densities Scanned colors R red G green B blue are converted to printed colors C cyan M magenta Y yellow K black automatically High speed Continuous full color printing on letter size paper using ADF 4 with SIMM options installed 5 only when using plain paper Easy operation Front Key Panel Easily duplicate documents Digital Dupli...

Страница 16: ...0 3 4 Intel only RAM 16 MB or more More than 32 MB is recommended Free disk space 100 MB or more Virtual memory 16 MB or more More than 32 MB is recommended for Windows 3 1 95 50 MB or more 5 More than 100 MB is recommended for Windows NT 4 0 Display Video card that can display more than 256 colors A video card that can display more than 32 000 colors is recommended Drive CD ROM drive 1 MicrosoftÒ...

Страница 17: ... units BDo not use an extension cord BDo not use a line conditioner transient suppressor or surge protector as it may cause a machine error 105 cm 41 3 126 5 cm 49 8 with 2nd cassette feeder option 50 cm 19 7 ADF opening space Left Right Rear 35 cm 13 8 Controller Board Opening Space 45 cm 17 7 Multi Purpose Tray Opening Space 60 cm 23 6 Front cover opening space 50 cm 19 7 Media tray Opening Spac...

Страница 18: ...area for recording important information such as the name of reseller serial numbers and date of purchase Note BSave the original cartons and packing materials for future shipping and transporting of the units They have been specifically designed to protect the equipment during shipment Before You Start Unpacking Scanner Box 1 Scanner 2 ADF Automatic Document Feeder 3 Power cord 1 2 3 ...

Страница 19: ...ta and yellow 3 Power cord 4 SCSI cable for connection between the scanner and the printer 5 Guide pins 2 6 KX PS8000 Driver Utility and Operating Manuals CD ROM 7 Corel Photo Paint 5 6 CD ROM 8 TextBridge OCR CD ROM 9 Color Calibration Card 10 Setup manual 1 4 2 3 5 7 9 10 6 8 ...

Страница 20: ...ower switch P 53 ADF P 31 76 ADF top cover P 93 Scanner glass ADF tray Scanner panel P 22 Document guides P 76 ADF connector P 31 SCSI connector SCSI A P 44 AC inlet P 46 48 SCSI ID NO and terminator switches P 52 Scanner lock P 30 ADF cable P 31 SCSI connector SCSI B P 44 ...

Страница 21: ...ser P 106 Power switch P 53 Right side door P 28 111 Output tray P 27 Media tray P 34 SCSI connector P 44 49 Multi purpose tray MPT P 38 SCSI ID NO and terminator switches P 52 Left side door P 38 Media thickness switch P 38 Parallel interface connector P 51 AC inlet P 46 50 Accessible by opening the left side door ...

Страница 22: ...r of duplicates from 1 to 99 Pressing this button for more than 2 seconds automatically increases the number of duplicates by 1 Pressing this button for more than 8 seconds increases the number of duplicates by 10 BIn the Menu mode pressing this button displays the next selection MODE button BWhen the scanner is ready pressing this button enters the Menu mode BIn the Menu mode pressing this button...

Страница 23: ...ate regardless of the color of the document START COLOR ENTER button BWhen the scanner is ready and a document is placed in the ADF tray or on the scanner glass pressing this button makes a duplicate of the document If the original is a color document a color duplicate is created BIn the Menu mode after changing a selection pressing this button activates a selection A Y appears to the left of the ...

Страница 24: ...BWhen the printer is in the Menu mode pressing this button Displays the previous menu item or selection Decreases the current numerical value of the selection Moves the cursor to left F F CONTINUE button BWhen the printer is in the Menu mode pressing this button Displays the next menu item or selection Increases the current numerical value of the selection BWhen error messages such as Memory Overf...

Страница 25: ... has occurred BBlinking user correctable error such as media jam open door or a missing replaceable component e g Toner has occurred READY indicator green BON the printer is ready for operation BBlinking the printer is warming up or in the Menu mode BBlinking fast the printer is printing ...

Страница 26: ...Turn the upper green lever clockwise until it stops and the arrows are aligned This tightens the internal belts to ready the unit for printing Close the front door Setup Preparing the Imaging Unit 1 2 3 Setting Up the Printer ...

Страница 27: ...27 Setup Setting Up the Output Tray Remove the adhesive tape that holds the output tray against the printer Lower the tray to the operating position 1 2 ...

Страница 28: ...less toner The page life expectancy is 3 000 pages which is based on a 5 image area Remove the packaging from the toner cartridge Remove the shipping cover from the cartridge Caution BTo avoid possible toner spillage do not tilt cartridge Note BSave all packing material for shipping purposes Open the right side door Caution BDo not leave the right side door open for more than 1 minute the imaging ...

Страница 29: ...riately labeled slot From top to bottom the order of the color toner cartridges is BLACK CYAN MAGENTA YELLOW Repeat steps 1 2 and 4 for each toner cartridge When you have installed all the toner cartridges go to step 6 Close the right side door 4 5 6 ...

Страница 30: ...e it can be used The scanner lock is located on the left of the scanner To unlock the scanner Turn the scanner lock counterclockwise with a flat blade screwdriver until the lock pops out Setting Up the Scanner Unlocking the Scanner 1 Setup ...

Страница 31: ...following steps Hold the ADF vertically then insert the tabs into the holes on the rear of the scanner Close the ADF Plug the end of the ADF cable into the ADF connector located on the back of the scanner Setup Installing the Automatic Document Feeder 1 2 3 Tabs ...

Страница 32: ... or right side of the printer For method A perform the following procedure Remove the two top hole covers with a small flat blade screwdriver then remove the two screws from the printer Install the guide pins and tighten them with a flat blade screwdriver 32 Setup Installing the Scanner 1 2 A B ...

Страница 33: ...s to the holes under the scanner and place the scanner gently onto the printer Safety Caution BThe scanner weighs approximately 17 3 kg 38 1 lbs It must be handled by two people Lock the scanner by sliding it toward the right 4 3 ...

Страница 34: ...y it may cause a jam BIf you have the 2nd Cassette Feeder installed If you wish to use the automatic cassette switching feature a large print job for example make sure that all trays in the printer are the same media type and size The transparency tray should be inserted in the upper or middle tray slots The printer is shipped with a media tray either Letter paper or A4 paper installed Pull the me...

Страница 35: ...optimize your printer s performance always use clean unused media BBe careful not to leave fingerprints on the media which can result in a smudged print BReusing media that has been fed through the printer once for example after jams can reduce the life of the consumables and paper path components BThe recommended transparency is 3M CG3700 If the print quality is poor print on the other side ...

Страница 36: ... the tray or it may cause a jam Notes BLoad media with the print side down Most media has instructions recommending the side to be printed first BDo not mix different types or thicknesses of media in the media tray at one time this may cause a jam Slide the media tray completely into the slot 5 6 Setup ...

Страница 37: ... print areas and the margins for the media sizes supported on this printer Margins Media Page size Top Bottom Sides Letter 216 mm x 279 mm 8 5 x 11 208 mm x 269 mm 8 2 x 10 6 5 6 mm 0 22 5 6 mm 0 22 3 6 mm 0 14 A4 210 mm x 297 mm 8 3 x 11 7 200 mm x 287 mm 7 9 x 11 3 5 1 mm 0 2 4 7 mm 0 19 4 7 mm 0 19 Legal 216 mm x 356 mm 8 5 x 14 208 mm x 343 mm 8 2 x 13 5 5 8 mm 0 23 3 6 mm 0 14 Margins and Pri...

Страница 38: ... 126 P 133 of the Utilities and Drivers Reference Guide Two sided printing double sided on laser paper You should not expect the same print quality and reliability that you get with one sided printing For details refer to page 151 Setting media thickness switch Because the printer accommodates various media weights from the multi purpose tray media thickness can be manually selected for the most r...

Страница 39: ...nd paper path components BWhen printing legal size using the multi purpose tray backside marking may occur If this occurs use the legal tray For detailed information on media refer to page 150 Set the media thickness switch P 38 Open the Multi purpose tray Extend the media support by sliding it outward Separate the media guides to the approximate width of the media 1 2 3 ...

Страница 40: ...the media with the printing side up into the multi purpose tray The height of media should not exceed the limit mark on the left guide or it may cause a media jam Adjust the media guides to the media size Use the printer driver or the scanner panel P 84 to select the multi purpose tray Setup 4 5 6 7 ...

Страница 41: ...inting side facing up The edge where the stamp is located enters the printer last Use the printer driver to select Envelope in the Paper size menu and the Paper source menu Loading Labels For detailed information on labels refer to page 152 Set the media thickness switch P 38 Adjust the media guides to the width of the label sheets Insert the label sheets in the multi purpose tray with the printin...

Страница 42: ... depending on the function s to be used Only one PC can be connected with your DCIS Digital Color Imaging System DCIS Standard System P 44 BFunctions Duplicating Documents P 77 Scanning Documents P 80 Printing DCIS Stand Alone System P 46 BFunction Duplicating Documents P 77 Setup Connecting the System ...

Страница 43: ... Connecting the Scanner to a Computer P 47 BFunction Scanning Documents P 80 Connecting the Printer to a Computer P 49 BFunction Printing 43 Setup ...

Страница 44: ...ain may exceed the recommended length and still operate we cannot guarantee this operation Make sure the computer scanner printer and the other connected peripheral devices are turned off Connect the SCSI cable to the computer s SCSI connector and to the scanner s SCSI connector A or B BThe SCSI 2 board must be installed in the computer If you do not have a SCSI 2 board or a SCSI cable you will ne...

Страница 45: ...r to Table 1 on page 52 Make sure the terminator switch 4 of the scanner is set to OFF and that of the printer is set to ON They are the default settings BIf you have other devices connected to the computer make sure the terminator switches of all those devices are set to OFF BTo change the terminator setting use the terminator switch 4 located on the back of the units Connect the power cords to t...

Страница 46: ...SI connector Make sure the terminator switches 4 of the scanner and printer are set to ON BTo change a terminator setting refer to page 52 Connect the power cord to the scanner s AC inlet and to an AC outlet Connect the other power cord to the printer s AC inlet and to an AC outlet 1 2 3 4 5 DCIS Stand Alone System 1 2 3 4 ON 1 2 3 4 ON Scanner Printer ...

Страница 47: ... do not have a SCSI 2 board or a SCSI interface cable you will need to purchase one from your local computer store or dealer P 16 157 SCSI Interface specifications BIf other SCSI devices are connected to the computer connect the scanner anywhere in the SCSI chain Make sure the SCSI ID No of the scanner is 2 default setting BIf other devices are connected to the computer make sure that each SCSI de...

Страница 48: ...ice set its terminator switch 4 to ON Go to step 5 If the scanner is not the last device make sure the terminator switch 4 is set to OFF default setting Connect the power cord to the scanner s AC inlet and to an AC outlet 4A 5 4B Setup ...

Страница 49: ...t be installed in the computer If you do not have a SCSI 2 board or a SCSI interface cable you will need to purchase one from your local computer store or dealer P 16 157 SCSI Interface specifications Make sure the SCSI ID No of the printer is 1 default setting BIf you have other devices connected to the computer make sure that each SCSI device has different ID No BTo change the printer s ID No us...

Страница 50: ...50 Make sure the terminator switch 4 of the printer is set to ON default setting Connect the power cord to the printer s AC inlet and to an AC outlet 4 5 Setup ...

Страница 51: ...al devices are turned off Connect the parallel interface cable to the computer s parallel interface connector and the printer s parallel interface connector Notes BThe actual connector on the computer may differ depending on the manufacturer of the computer BIf the cable is connected to the PC via a printer buffer or selector the printer may not print Connect the power cord to the printer s AC inl...

Страница 52: ...ned ID number ID number can be changed by using the SCSI ID No switches 1 2 3 Table 1 below Table 1 Setting the Terminator The terminator setting can be changed by using the terminator switch 4 Terminator ON Terminator OFF SCSI ID No switches 52 3 Setup Setting the SCSI ID Number Terminator 0 1 2 3 4 5 6 7 1 OFF ON OFF ON OFF ON OFF ON 2 OFF OFF ON ON OFF OFF ON ON OFF OFF OFF OFF ON ON ON ON 1 2 ...

Страница 53: ...indicator on the printer starts flashing and Initializing is displayed on the printer LCD panel After approximately 3 5 minutes the printer s READY indicator is illuminated and Ready is displayed on the printer LCD panel The printer is ready for printing Note BWhen you power on your system for the first time if New Hardware Found is displayed on the computer screen refer to page 58 Setup Power On ...

Страница 54: ...printing a configuration page 1 2 3 Menu Mode Test Page Test Page Configuration Page Panasonic Color Laser Printer Model Name Printer Rom Version No Installed Memory Installed Cassette Panel Settings System Setting Maintenance Color Calibration KX PS8000 Enhanced V043 M8C160 R019 016 MBytes Media Tray Letter Energy Star on Auto Continue off Data Time Out off Page Count 0000000000 Color Imaging Uni...

Страница 55: ...s Display for Windows 3 1 Windows 95 or Windows NT 4 0 Notes BIf you are using Windows 3 1 disable or uninstall any application software s printer status to prevent conflicts with the KX PS8000 Status Display for Windows 3 1 BWhen reinstalling the KX PS8000 software do it immediately after restarting Windows To install the bundled software Corel Photo Paint TextBridge or Panasonic font manager ref...

Страница 56: ...lick File from the Program Manager then click Run Click Browse and select your CD ROM drive from the Drives box Select Setup exe and click OK Click OK The Installer starts Follow the instructions on the screen to complete the installation 1 2 3 Installing the Printer Driver and Utilities for Windows 3 1 4 5 6 7 8 ...

Страница 57: ...ROM drive Click Next The Run Installation Program window is displayed Click Finish Wait until the Panasonic KX PS8000 Utilities Welcome window is displayed Follow the instructions on the screen to complete the installation After installation restart your system Note BDuring installation when ÒSetup is adding icon to the Printer folder Please wait several minutesÓ is displayed the processing may ta...

Страница 58: ...sh The Insert Disk window is displayed Click OK The Copying Files window is displayed Type in your CD ROM drive name followed by example D in the Copy file from field and click OK Wait until the Panasonic KX PS8000 Utilities Welcome window is displayed Follow the instructions on the screen to complete the installation After installation restart your system Note BThe Plug and Play installation proc...

Страница 59: ...all Program From Floppy Disk or CD ROM window is displayed Insert the KX PS8000 CD ROM into CD ROM drive Click Next The Run Installation Program window is displayed Click Finish Wait until the Panasonic KX PS8000 Utilities Welcome window is displayed Click Next The Setup Type window is displayed Click the type of setup then click Next The Select Program Folder window is displayed Installing the Pr...

Страница 60: ...s displayed Click Browse Click Cancel The Locate File window is displayed Select CD ROM drive Open Drivers Winnt40 Printer then select pgdint inf file Click Open Follow the instructions on the screen to complete the installation To connect the printer to a SCSI port install the SCSI port Refer to the Ports tab of the Panasonic KX PS8000 Properties window P 131 to P 135 of the Utilities and Drivers...

Страница 61: ...oard manual Click Start select Settings then click Printers The Printers window is displayed Click the Panasonic KX PS8000 icon Click the File menu then click Properties The Panasonic KX PS8000 Properties window is displayed Click the Ports tab Click Add Port The Printer Ports window is displayed Click New Monitor The Installing Print Monitor window is displayed Insert the KX PS8000 CD ROM into CD...

Страница 62: ...nf file Click Open The Installing Print Monitor is displayed Click OK The Printer Ports window is displayed Click New Port The Port Name window is displayed Type the port name for example KXPS8000GDI then click OK The Printer Ports window is displayed Click Close 10 13 12 14 15 11 ...

Страница 63: ...ng steps after installing the printer driver Double click the My computer icon Double click the Printers icon Select the Panasonic KX PS8000 printer Click File menu then click Sharing Click Shared Enter the printer name ex KX PS8000 If the shared printer is used through Windows 95 the printer name must not exceed 12 characters Click OK 1 2 7 3 4 5 6 ...

Страница 64: ...dow is displayed Double click the Add Printer icon from Printers Select Network printer server Click Next Select the Panasonic KX PS8000 printer in the Shared Printers box Click OK and follow the instructions on the screen Click Finish For Windows 95 Users Double click the My computer icon Double click the Printers icon Double click the Add Printer icon Click Next Click Network printer then click ...

Страница 65: ...ows 95 click Have Disk The Install From Disk window is displayed Click Browse Insert the KX PS8000 CD ROM into CD ROM drive Select CD ROM drive Open Drivers Win95 Printer then select Pgdi95 inf file Click OK The Install From Disk window is displayed Click OK Click Next Click Next Click Finish 6 7 8 10 9 11 13 12 17 14 15 16 18 ...

Страница 66: ...66 Setup Removing the Printer Driver Click Start move the pointer to Settings and click Printers Select Panasonic KX PS8000 Click File menu then click Delete Click Yes 1 2 3 4 ...

Страница 67: ... PS8000 Utilities icon Double click the Uninstall Utility icon Click Yes For Windows 95 Windows NT 4 0 users Click Start move the pointer to Programs then to KX PS8000 Utilities Click Uninstall Click Yes Note BFor removing the Panasonic KX PS8000 icon in the Printer Folder refer to Help in Windows 95 Windows NT 4 0 1 2 1 2 3 Removing the KX PS8000 Software 3 ...

Страница 68: ...ility CD ROM To install the above applications perform the following steps For Windows 3 1 users Start Windows 3 1 Quit all applications Insert the KX PS8000 Driver Utility CD ROM into your computer CD ROM drive Click File from the Program Manager then click Run Click Browse and select your CD ROM drive from the Drives box Select Instapp exe and click OK Click OK The installer starts Follow the in...

Страница 69: ...e from the Drives box Select Instapp exe and click OPEN Click OK The installer starts Follow the instructions on the screen to complete the installation Note BIf you are using Windows 95 Windows NT 4 0 when you insert CD ROM into your drive the bundled application installer may start automatically In this case quit the Panasonic quick installer and use the application installer For information on ...

Страница 70: ... color density To print a Color Calibration Page Press the MENU EXIT button on the printer panel Press the F button Press the ENTER button Press the F button 5 times and the following is displayed Press the ENTER button A Color Calibration Page will be printed 1 Setup Setting the Color Density Menu Mode Test Page Menu Mode Color Calibration Color Calibration Calibration Offset Color Calibration Ca...

Страница 71: ...xample The current density setting for each color is indicated by the line enclosure on the Color Calibration Page as shown in the following example The factory default setting for each color density is 0 Current color density settings ...

Страница 72: ...s of clean white paper in a well lighted area BIf they match then you do not need to adjust the color density and you may proceed with any operation you wish to perform BIf they do not match go to step 3 Determine which block on the Color Calibration Page most closely matches the density of the cyan sample on the Color Calibration Card BRepeat step 3 for each color 2 3 Color Calibration Card Color...

Страница 73: ... I button twice selects the next previous level settings For example BIf you wish to make the density setting darker by 2 levels Press the F button 4 times BIf you wish to make the density setting lighter by 1 level Press the I button 2 times Press the ENTER button Press the F button 4 times and the following is displayed Color Calibration Calibration Offset Calibration Offset 0 5 to 5 Color Calib...

Страница 74: ...n 4 times Press the ENTER button Repeat instructions through for each color MAGENTA YELLOW BLACK BTo skip a color press the F button BTo return to a previous color press the I button BBefore going to step 5 make sure the following is displayed Press the ENTER button to reprint the Color Calibration Page BThe line enclosure reflects the changes made to the settings BIf you are not satisfied with th...

Страница 75: ...emely thin or thick paper Document with coated surfaces and poorly fixed Plastic or metal sheet Important BAll literary artistic and typographical works are copyrighted While certain reproduction of copyrighted work may be permitted for fair dealing e g for research private study or for the purpose of criticism or review generally reproduction of copyrighted works are not permitted without the per...

Страница 76: ...guides to the width of the documents Using the scanner glass Open the ADF Place the document face down on the scanner glass referring to the document position marks Close the ADF Notes BWhen scanning a book type document of more than 2 cm 0 79 thickness scan it with the ADF open BScanning a document using the flatbed scanner glass produces better quality than scanning it using the ADF For best sca...

Страница 77: ...000 Utilities icon and double click the Digital Duplicator Utility icon The Digital Duplicator Utility window is displayed Go to step 2 For Windows 95 Windows NT 4 0 users Click Start move the pointer to Programs then to KX PS8000 Utilities Next click Digital Duplicator Utility The Digital Duplicator Utility window is displayed Place the document s in the ADF tray or on the scanner glass P 76 Note...

Страница 78: ... selected Select a Media Type and a Paper Size To produce a high quality duplicate s of the original document s perform the following by referring to the table below Select an image type that corresponds to your original document by clicking on G at the left of Original Image Type box Click Notes BWhen making a duplicate of a black and white document click the B W Text Start button to make a dupli...

Страница 79: ...process will take slightly longer BWhen the printer is in the Energy Star mode ÒPRT is ready sleep Ó is displayed on the printer LCD press any button on the scanner panel to release the Energy Star mode The START COLOR ENTER button and START B W button have no effect until the printer is ready However the menu settings can be changed Monochrome halftone or photo original Button MODE START B W Basi...

Страница 80: ...s displayed Click the File menu then click Acquire Image Click Select Source The Select Source window is displayed Select Panasonic KX PS8000 16 bit Driver then click Select Click the File menu then click Acquire Image and go to step 8 For Windows 95 Windows NT 4 0 users Start Windows 95 Windows NT 4 0 Click Start move the pointer to Programs then to Corel PHOTO PAINT 6 Click Corel PHOTO PAINT 6 T...

Страница 81: ...Click Acquire The Panasonic Scanner Driver and the Preview Screen are displayed Place the document s in the ADF tray or on the scanner glass P 76 Click Prescan to display the document image in the Preview Screen and select a scanning area Click Scan The scanner will start scanning the document s Note BFor additional information refer to the Utilities and Drivers Reference Guide 5 6 7 8 9 10 11 ...

Страница 82: ...ill be printed Print time depends on the size of the document Note BFor additional information refer to the Utilities and Drivers Reference Guide For Windows 95 Windows NT 4 0 users Click the File menu then click Print The Print window is displayed Click OK After several minutes the document will be printed Print time depends on the size of the document Note BFor additional information refer to th...

Страница 83: ...en click Save As The Save an Image to Disk window is displayed Enter the File Name Select the File Type Click OK The document will be saved For Windows 95 Windows NT 4 0 users Click the File menu then click Save As The Save an Image to Disk window is displayed Enter the File Name Select the File Type Click Save The document will be saved 1 2 1 2 3 4 3 4 ...

Страница 84: ... to display the next menu BPress the INCREASE NEXT button to display the next selection BPress the START ENTER button to activate the selection Note the factory defaults before changing any settings Selection Menu Lower line in LCD Density 1 Media Upper Tray 1 MP Tray Middle Tray Lower Tray Letter 2 Paper Source A4 2 Legal MPT Paper Size Plain Paper 1 Transparency Label Paper 2nd Side MPT Paper Ty...

Страница 85: ...pe that you have inserted in the multi purpose tray Quality Flatbed Allows you to select a resolution at which you wish to make a duplicate of your original document placed on the flatbed scanner glass Quality ADF Allows you to select a resolution at which you wish to make a duplicate s of your original document s inserted in the ADF tray Output Order ADF Allows you to select Face Up or Face Down ...

Страница 86: ...ode when it is idle for approximately 5 minutes To reactivate the scanner scan a document The Energy Star setting will remain effective even if the scanner is turned off Note BWhen the printer is in the Energy Star mode ÒPRT is ready sleep Ó is displayed on the scanner LCD press any button on the scanner panel to release the Energy Star mode The START COLOR ENTER button and START B W button have n...

Страница 87: ... button repeatedly until the selection you wish to change is displayed Press the START COLOR ENTER button to activate your selection BA Y appears to the left of the selection BIf you wish to change the selections of other menus repeat steps 2 to 4 above Press the STOP RESET button to exit the Menu mode 1 2 3 4 5 INCREASE NEXT MODE READY ERROR STOP START B W RESET ENTER START COLOR INCREASE NEXT MO...

Страница 88: ... selection by 1 or display the next selection BPress the ENTER button to Enter a sub menu Activate a selection Print a Configuration Maintenance Color Calibration Page Before you attempt to change any settings check the factory default settings in the following table For details on changing the settings refer to Outline for Operation P 91 Once you have changed the printer panel settings they are a...

Страница 89: ...ighter colors CYAN MAGENTA YELLOW BLACK Adjusts the density for each color independently Setting a higher number provides darker color and setting a lower number provides lighter color Calibration Test Print Prints a Color Calibration Page with the current density settings Basic Operations xxxxxx Usage xx Usage xx Usage xx Page Count Imaging Unit Transfer Unit Fuser Unit Oil Roll Maintenance Item ...

Страница 90: ...ut set to ON the printer automatically returns to Ready status if the printer does not receive any data from a computer within the time period set in this selection 30 to 240 seconds Network Sets the addresses used in TCP IP Protocol During setting use the I CANCEL button to move the cursor and the F CONTINUE button to increase the numerical value Maintenance Displays the page count of the printer...

Страница 91: ...ase the numerical value or display the desired selection Press the ENTER button to activate your selection and advance to the next item in the same menu that you selected in step 2 BIf you have selected Maintenance Page in step 4 the printer will exit the Menu mode after printing a maintenance page in the selected color BIf you have selected Data Timeout in step 4 you will enter the Selection 2 me...

Страница 92: ...o set more items in the same menu repeat steps 4 to 7 above BTo exit the Menu mode at any stage press the MENU EXIT button BTo change the setting of an item of a different menu first exit the Menu mode then repeat steps 1 to 8 above 8 ...

Страница 93: ...t cover and the white sheet with a soft cloth Use any mild commercial cleaner Caution BDo not use benzine thinner aerosol cleaners or any abrasive powder Internal When using isopropyl alcohol with a lint free cloth make sure that the alcohol is at least 90 pure obtainable from your local pharmacy Do not use rubbing alcohol it can damage the printer Turn the power OFF Open the ADF top cover by lift...

Страница 94: ...l the covers with a soft cloth Use any mild commercial cleaner Caution BDo not use benzine thinner aerosol cleaners or any abrasive powder Internal When using isopropyl alcohol with a lint free cloth make sure that the alcohol is at least 90 pure obtainable from your local pharmacy Do not use rubbing alcohol it can damage the printer Cleaning the paper pick rollers Slide the media tray out you do ...

Страница 95: ... paper feeder and close the left side door Slide the media tray back into place Note BIf you have a 2nd Cassette Feeder you may also need to clean the rollers for the middle and lower media trays which are accessed through the lower left side door Cleaning the home sensor If your printer panel displays Printer Error 30 clean the home sensor inside the printer Open the printer s front door 5 6 4 1 ...

Страница 96: ...om light exposure Important BDo not touch the green surface the right side or the black belt the underside Finger prints may affect the print quality Safety Caution BThe imaging unit weighs approximately 6 5 kg 14 3 lbs Always use the handles when lifting it Cautions BDo not expose the imaging unit to artificial light for more than 45 seconds or you may damage the unit Never expose it to direct su...

Страница 97: ...f the imaging unit with the arrow on the printer and slightly push the imaging unit into the printer Then release the left handle and push the unit in until it stops Turn the lower green lever clockwise 180 to insert the unit completely and to lock it Tighten the two green thumbscrews by turning them clockwise Close the front door 3 4 Sensor Slot 5 Care and Maintenance ...

Страница 98: ...supply User Replaceable Components Printer panel message Imaging Unit wearing out Change the Imaging unit now Toner cartridges Color imaging unit 1 These figures are based on an average of 5 coverage of the printable area and standard density for any one color The frequency of replacement will vary depending on the complexity of the prints and the percentage of coverage and print density 2 The sta...

Страница 99: ...ply roll now Oil supply roll Transfer unit Oil Roll wearing out Oil Roll Worn out Transfer wearing out 31 000 pages Change the Fuser unit soon Fuser Unit wearing out Fuser Unit and Oil Roll Worn out Oil Roll wearing out Display alternately 1 Transparencies coated paper and other specialty media will result in shortening the life of a consumable When replacing the fuser unit replace the oil supply ...

Страница 100: ... jam occurs at the document input area Open the ADF top cover by lifting the cover release tab Remove the jammed document OR Open the ADF top cover by lifting the cover release tab Open the ADF Remove the jammed document Scanner 1 Cover release tab ...

Страница 101: ...re and Maintenance When a jam occurs at the document output area Open the ADF tray Remove the jammed document while keeping the ADF tray raised OR Open the ADF Open the exit guide Remove the jammed document 1 ...

Страница 102: ...et the media thickness switch to the correct setting for the media used If a media jam occurs the printer panel reports Jam at Location The Locations are the various sensors throughout the paper path listed as A through E The following illustration shows the locations of the sensors that report media jams A through E Care and Maintenance Printer Jam at A Jam at C Jam at D Jam at E Jam at MPT P 103...

Страница 103: ...selected media tray Remove the jammed media Close the left side door OR Remove the media tray Remove the jammed media from inside the printer Reinsert the media tray Open and close the front door to clear the error message from the LCD Care and Maintenance 1A ...

Страница 104: ...de door Remove the jammed media Close the lower left side door OR Remove the selected media tray middle or lower media tray Remove the jammed media from inside the printer Reinsert the media tray Open and close the front door to clear the error message from the LCD 1B ...

Страница 105: ... at B Open the left side door Use the green handles to pull out the paper feeder Remove the jammed media on the paper feeder Reinsert the paper feeder and close the left side door 1 2 3 Care and Maintenance 4 ...

Страница 106: ... fuser is hot to avoid personal injury turn off the printer and wait 10 minutes after opening the front door for the fuser to cool before touching it Holding the green tab on the right slide the fuser out until the safety catch stops it Press the green lever on the left to release the safety catch 1 Care and Maintenance CAUTION HOT SURFACE INSIDE ...

Страница 107: ...Take care when handling it Close the front door Remove the oil supply roll Press out on tabs to unlock the oil supply roll Remove the oil supply roll out of the fuser Note BIf the paper is not jammed in the fuser unit perform the following Repeat steps 1 to 4 of Jam B on page 105 Skip step 4 and go to step 5 2 3 Care and Maintenance ...

Страница 108: ...er Press down firmly on the oil supply roll to snap both sides into place Note BIf the oiled cloth is loose rotate the gear A clockwise until it is tight Do not touch the oiled cloth Caution BIf the oil supply roll is not installed correctly print quality will be diminished 4 5 Care and Maintenance Oiled cloth A ...

Страница 109: ...109 Care and Maintenance Turn the small green thumbscrew clockwise to lock the fuser Close the front door 7 Open the front door Slide the fuser back into the printer 6 ...

Страница 110: ...uching it Note BFirst check the exit opening for media that has jammed and folded like an accordion It is especially difficult to see if the media is transparency film Printing face down Open the front door Pull open the access door above the plastic output tray see if the media is visible Turn the large green knob on the fuser counterclockwise Remove the media from inside the access door 1A ...

Страница 111: ...the jammed media e Remove the jammed media from the fuser and the printer Safety Caution BThe fuser is hot to avoid personal injury turn off the printer and wait 10 minutes for the fuser to cool before touching it Close the front door Printing face up Open the front door and the right side door Turn the fuser s large green knob counterclockwise to release the jammed media Remove the jammed media f...

Страница 112: ...intenance Jam at E Remove the jammed media from the output tray OR Pull open the access door above the plastic output tray and remove the media Open and close the front door to clear the error message from the LCD 1 2 ...

Страница 113: ...113 Care and Maintenance Jam at MPT Multi purpose tray Remove the jammed media from the multi purpose tray Open and close the front door to clear the error message from the LCD 1 2 ...

Страница 114: ...ed the limit mark on the document guide AC cord is not connected Scanner is locked SCSI cable is not properly connected SCSI ID No is not set correctly SCSI 2 board is not compatible Software may not be installed Original document is dirty Scanner glass is dirty Document is not positioned correctly Document is not evenly set on the scanner glass You may not be using the software utility correctly ...

Страница 115: ...nter is not ready is disabled or has detected an error The printer has stopped because it detected a user correctable error such as an open door or a media jam Error occurred that is not user correctable READY indicator is off ERROR indicator is on Care and Maintenance Clean the ADF scanner glass and white sheet P 93 Scanned image is skewed when a document is scanned using the ADF Adjust the guide...

Страница 116: ...ing the Color Calibration Page in the Color Calibration menu from the printer panel Compare the settings with the color density samples on the Color Calibration Card and if necessary adjust the density from the printer panel Refer to Setting the Color Density on page 70 The toner is almost depleted Paper doesn t match the environmental conditions or it has too much moisture On the Maintenance Page...

Страница 117: ... its useful life Prints are missing fine line detail Run 20 30 prints The impression will disappear with continued use The roller in the toner cartridge has a slight impression after a long period of storage On the Maintenance Page a single color shows a light repeating horizontal line Replace the imaging unit The imaging unit has reached the end of its useful life Remove dust or stain from OHP tr...

Страница 118: ...e Page straight thin light vertical line in colors The photosensitive belt inside the imaging unit is scratched Trouble Care and Maintenance Possible Cause Replace the imaging unit The imaging unit s internal waste toner box is full On the Maintenance Page each color bleeds into the color band Replace the imaging unit The imaging unit is damaged On the Maintenance Page a single white spot appears ...

Страница 119: ...ee the problem BReplace the fuser Replace the oil supply roll The fuser is near the end of its useful life The oil supply roll has reached the end of its useful life The surface of the printed image appears to have vertical scratches visible by holding the print at an angle and observing the shine of the image At first the scratches appear only on the printed image eventually dark vertical scratch...

Страница 120: ... Replace the imaging unit Possible Cause The main charge grid is dirty Reinsert the imaging unit to correct the contact for the main charge grid The entire page prints in black including the borders Bad electrical contact for the main charge grid The main charge grid is broken Replace the imaging unit The transfer unit is worn out Replace the transfer unit Toner spots appear on the back of the med...

Страница 121: ...g BEngine control board BDeveloper voltage BLaser scanning unit mirror The page prints in black in the image area only The borders are clear Possible Cause Either the image processor board or engine control board is not functioning properly Turn the printer off and back on again If the problem persists call for service on your printer Turn the printer off and back on again If the problem persists ...

Страница 122: ...he Status Display function becomes ineffective Windows 95 1 Click Start select Settings then click Printers 2 Click the Panasonic KX PS8000 icon 3 Click the File menu then click Properties 4 Click the Details tab and Spool settings 5 Click Disable bi directional support for this printer then click OK Windows 3 1 1 Double click Status monitor setup icon in the KX PS8000 Utilities program group 2 Cl...

Страница 123: ...stalled under the hooks at the front of the media tray If printing on transparencies and your printer has a 2nd Cassette Feeder make sure that the transparency tray is installed in the upper or middle tray slot Clean the paper pick rollers P 94 for instructions If you are using media that is 105 g m2 28 lbs check if the Face Down media output setting is selected in the driver If it is change the s...

Страница 124: ...and 75 165 g m2 20 44 lbs paper in the multi purpose tray Make sure that the toner cartridges are installed correctly Make sure that the imaging unit stays covered until immediately before installing it in the printer Exposure to light can damage the imaging unit and will produce light streaks or faded prints Most spots are caused by fingerprints or dust introduced into the printer while installin...

Страница 125: ... the ADF top cover ADF top cover is open Close the ADF top cover Open the ADF top cover remove the jammed document Close the ADF Add memory ADF is open A document is placed in the ADF tray when power is turned on A document is placed in the ADF tray when a jam is cleared The white sheet is dirty ADF paper Jam Remove document from ADF tray ADF open Close the ADF No detection marker in ADF Memory Er...

Страница 126: ...installed Imaging unit is not installed correctly Charger is not installed Jam at C See front door label Jam at D See front door label Jam at E See front door label Jam at MPT See front door label Front or Right door Open Left side door Open Lower Left side door Open Upper Left side door Open Install the black toner cartridge Black toner cartridge is not installed Black Toner Cartridge Not install...

Страница 127: ...talled or media tray is empty Output tray is full Controller Optional SIMM check error Communication cannot be established between the scanner and your computer Printer Ethernet Card I F Error Imaging unit is worn out Imaging unit is wearing out Second transfer roller is wearing out Fuser is worn out Fuser is wearing out Oil supply roll is worn out Oil supply roll is wearing out Black toner cartri...

Страница 128: ...ge now Replace the black toner cartridge soon Replace the cyan toner cartridge soon Replace the magenta toner cartridge soon Replace the yellow toner cartridge soon The printer is too hot or room temperature is too high to print Labels Wait until the printer cools down or use in a cooler place below 32 5 C 90 5 F Memory Overflow There is not enough memory in the printer Press CONTINUE button on th...

Страница 129: ... when BThe printer scanner recovers from an error situation If you have selected the ÒWhen device errorÓ option in the Start Up box of the Setup for Status Display dialog box BThe Panasonic Printer Scanner Status icon does not appear when Windows 3 1 is started BThe Panasonic Printer Scanner Status dialog box disappears after recovering from an error situation Note BThe Setup for Status Display di...

Страница 130: ...imize it This button displays the Status Display Setup dialog box where you can change different settings This button displays the version of the Status Display This button resumes scanning after recovering from an error situation This button cancels the scan job which caused an error This button displays the Panasonic Show configuration dialog box This button displays the previous recovery messag...

Страница 131: ...ntenance This button provides you additional help 0 This button changes the Panasonic Scanner Status dialog box to the Panasonic Printer Status dialog box and is displayed only when using the digital duplicator utility ...

Страница 132: ...ize it This button displays the Setup for Status Display dialog box where you can change different settings This button displays the version of the Status Display This button resumes printing after recovering from an error situation This button cancels the print job which caused an error This button displays the Panasonic Show Configuration dialog box This button displays the previous recovery mes...

Страница 133: ...133 Care and Maintenance 0 This button changes the Panasonic Printer Status dialog box to the Panasonic Scanner Status dialog box and is displayed only when using the digital duplicator utility ...

Страница 134: ...ndled by two people Notes BShould you need to send your scanner and or printer for service consult your reseller first or Panasonic BPlease use the original cartons and all of the original packing materials BImproper repacking of the printer may result in a service charge to remove spilled toner BSince the printer uses dry toner extreme care must be taken when handling The printer should be handle...

Страница 135: ...power cord and all interface cables If the scanner is installed on the top of the printer unlock the scanner by sliding it toward the left Gently raise and remove the scanner by releasing it from the guide pins Unplug the ADF cable 1 2 Care and Maintenance 3 ...

Страница 136: ...enance Open the ADF and remove it from the scanner bed by lifting it up To lock the scanner push and turn the lock clockwise with a flat blade screwdriver Repack the ADF and the scanner bed into the original carton 4 5 6 ...

Страница 137: ...it and the transfer unit contact Panasonic for packaging Turn off the printer remove the power cord and all interface cables Remove the media tray s from the printer remove the media from the tray s Press down on a media tray s metal plate Place the cardboard packing material into the media tray 1 3 2 ...

Страница 138: ...urn the lower green lever 180 counterclockwise Grasping the front green handle slide the unit out until it catches Lift up the green handle on the left Pull the imaging unit out of the printer Important BDo not touch the green surface the right side or the black belt the under side Finger prints may affect the print quality Safety Caution BThe imaging unit weighs approximately 6 5 kg 14 3 lbs Alwa...

Страница 139: ...Do not expose the imaging unit to light for more than 45 seconds to avoid damage On the imaging unit turn the upper lever 90 counterclockwise this is necessary to protect the imaging unit during shipment Insert the imaging unit into the packaging 8 9 10 Care and Maintenance ...

Страница 140: ...t side door Using the green handles slide the paper feeder out Push in on green tabs to unlock the cover Raise the cover until it catches in the open position Rotate the transfer unit s green handles up Lift out the transfer unit 11 13 12 ...

Страница 141: ...nit with a piece of paper and adhesive tape Note BDo not touch or bump the roller it can damage the roller Install the plastic cover and insert the transfer unit into a plastic bag and seal the end tightly Install the transfer unit into the packaging Care and Maintenance 14 15 Plastic cover Plastic bag ...

Страница 142: ...on BTo avoid possible toner spillage do not tilt the cartridge Replace the shipping cover Secure the shipping cover with adhesive tape Insert each toner cartridge into a plastic bag and seal the end of the bag tightly Repeat instructions to for each toner cartridge Care and Maintenance 16 ...

Страница 143: ... adhesive tape Secure the front door the multi purpose tray and the left side door to the printer with adhesive tape If you don t have a 2nd Cassette Feeder go to step 20 If you have a 2nd Cassette Feeder Lift the printer up and away from the 2nd Cassette Feeder Safety Caution BThe printer weighs approximately 41 4 kg 91 2 lbs and the 2nd Cassette Feeder weighs approximately 14 3 kg 31 5 lbs Obser...

Страница 144: ...144 Repack any other accessories in the original shipping box Repack the printer in the original shipping box Make sure that you keep the printer upright and level when moving 21 20 Care and Maintenance ...

Страница 145: ...ss than 20 seconds Power Consumption 55 W Max Scanning 16 W Standby 10 W Energy Star mode Mass Weight 17 3 kg 38 1 lbs with ADF Dimensions Height 181 mm 7 1 Depth 425 mm 16 7 Width 513 mm 20 2 Noise Level 53 dB A with ADF Scanner Type Flatbed Color CCD Scanner Scanning System Mirror moving optical system with R G B 3 line Color CCD Document Type Sheet Book Maximum Scanning Size Horizontal 216 mm 8...

Страница 146: ...rection BBrightness Contrast adjustment BPseudo halftone Dither error diffusion BMirror Positive Negative reverse Bγ correction Linear Adjustable BBackground reduction BColor B W mode Scanning Time Color B W gray scale A4 size 1 6 seconds 30 60 dpi prescan 3 9 seconds 150 dpi 5 2 seconds 200 dpi 7 8 seconds 300 dpi 15 7 seconds 600 dpi 31 4 seconds 1200 dpi 62 7 seconds 2400 dpi more than 62 7 sec...

Страница 147: ...t 20 C Power consumption 850 W Max printing with fuser on 35 W standby with fuser off 25 W Energy Star mode Meets Energy Star power conservation requirements Mass Weight of standard unit with all consumables without optional 2nd Cassette Feeder 47 9 kg 105 5 lbs Dimensions of standard unit Without 2nd Cassette Feeder Height 463 mm 18 2 Depth 493 mm 19 4 Width 510 mm 20 1 784 mm 30 9 with the outpu...

Страница 148: ...follows Standard 600 x 600 dpi Fine 600 x 600 dpi Enhanced 600 x 1200 dpi Letter A4 Legal Letter A4 Legal 2 More than 48 MB Add more than 32 MB Total Printer Memory Letter A4 Legal Fine Fine Selectable Print Quality Mode 3 Scanning Resolution Full Size Print Area 16 MB Standard 20 or 24 MB Add 4 MB or 8 MB Letter A4 Legal Letter A4 Legal 2 32 MB Add 16 MB 300 x 300 dpi Standard Standard Standard S...

Страница 149: ...e printer driver P 121 of the Utilities and Drivers Reference Guide Interface Standard Parallel SCSI 2 Option 10 baseT 10 base2 Altitude Operating 0 to 2 500 m 8 000 ft Storage 0 to 4 000 m 13 125 ft Letter A4 1 Total Memory Selectable Print Quality Mode High Quality 1200 dpi Appendix Fast 300 dpi 80 MB Add 64 MB Printable without Memory Overflow 16 MB Standard 20 MB Add 4 MB Letter A4 Legal 64 MB...

Страница 150: ...5 8 mm 0 23 When the image is printed on the media the image print area is a bit smaller than the media size You may need to adjust the page margins in the application software to match the print area The following table and illustrations show the page sizes the largest print areas and the margins for the media sizes supported on this printer Margins Page size Top Bottom Sides Letter 216 mm x 279 ...

Страница 151: ...mage Any pre printed paper should use inks compatible with 200 C 392 F for 0 1 second BDamaged or wrinkled paper or paper with irregularities such as tabs staples etc BMultipart forms or carbonless paper BPaper with a 25 or more cotton and or fiber content BInk jet paper It may transfer onto the fuser roller and cause damage Two Sided Printing Two sided printing is possible by using the multi purp...

Страница 152: ...arency is ejected without being printed can reduce the life of the consumables and paper path components BWhen using transparencies if the print quality is poor print on the other side BWith any label stock the labels must completely cover the backing material Appendix Labels cover the entire backing material OHP transparency 3M CG3700 Labels AVERY 5163 AVERY 5164 AVERY 5165 Avery L7163 Avery L716...

Страница 153: ...he following characteristics using these may result in paper jams BIrregularly shaped envelopes BEnvelopes with curls wrinkles nicks twists dog ears or other damage BEnvelopes with side seam construction BHighly textured envelopes or with extremely shiny surfaces BEnvelopes that seal by removing a peel off strip BEnvelopes with more than one flap to be sealed BSelf adhesive envelopes BEnvelopes th...

Страница 154: ...seal them Figure 1 Figure 2 Always test a sample of the envelopes you are thinking of buying Confirm that the envelope performs acceptably For best printing results BAvoid printing in high humidity i e above 70 High humidity may cause the envelope to curl and pick up excess toner High humidity may also cause the envelope to seal BAvoid printing below 10 C 50 F with less than 30 relative humidity L...

Страница 155: ...etter size paper Continuous Same original 3 5 ppm 4 Color CMYK 4 7 ppm 3 Color CMY 14 ppm mono ADF duplicate Different original 3 5 ppm 4 Color CMYK 4 4 ppm 3 Color CMY 13 5 ppm mono Maximum 4 7 ppm with SIMM options installed Multiple Duplicate Digital Duplicator Utility 1 999 Duplicate 1 99 Zoom Digital Duplicator Utility 20 400 in 1 steps XY Independent Duplicate 100 Image Editing Area Duplicat...

Страница 156: ... 1 Windows 95 or Windows NT 4 0 Intel only Memory 16 MB or more More than 32 MB is recommended Free disk space 100 MB or more Virtual memory 16 MB or more More than 32 MB is recommended for Windows 3 1 95 50 MB or more More than 100 MB is recommended for Windows NT 4 0 Display Video card that can display more than 256 colors A video card that can display more than 32 000 colors is recommended Driv...

Страница 157: ...exceed 3 m 9 8 ft to ensure reliable operation Signal Cable GND GND GND GND GND GND GND GND GND GND GND RESERVED OPEN RESERVED GND GND GND GND GND GND GND GND GND GND GND DB 0 DB 1 DB 2 DB 3 DB 4 DB 5 DB 6 DB 7 DB P GND GND RESERVED TERMPWR RESERVED GND ATN GND BSY ACK RST MSG SEL C D REQ I O Appendix SCSI Interface Signal Pin 1 2 3 4 5 6 7 8 9 10 11 12 13 14 15 16 17 18 19 20 21 22 23 24 25 Signa...

Страница 158: ...Be sure to use only a shielded cable The printer will not operate properly if any of the pins is not connected IEEE 1284 C type connector Signal Signal Cable 5V Peripheral Use a shielded cable 2 m 6 6 ft or less in length nSelectin Return side pin 30 Appendix Parallel Interface Connector Type 19 Busy Signal Pin 1 20 Select 2 21 nAck 3 22 nFault 4 23 PError 5 24 Data 1 6 25 Data 2 7 26 Data 3 8 27 ...

Страница 159: ... system 42 44 Density 84 85 Digital duplicator function 15 Digital Duplicator Utility 15 77 Document guides 20 Documents Acceptable 75 Duplicating 77 Unacceptable 75 Duplicate specifications 155 Duplicating documents 77 End user license agreement 4 Energy Star 3 85 86 89 90 ENTER button 24 88 91 Envelopes 153 ERROR indicator 25 Error messages 125 126 Printer LCD panel 126 Scanner LCD panel 125 Fea...

Страница 160: ...terface cable 51 Parallel interface connector 51 Part names 20 Printer front side view 21 Printer panel overview 24 Printer rear side view 21 Scanner front side view 20 Scanner panel overview 22 Scanner rear side view 20 PC 16 Placing documents 76 Plug and Play 58 Power cord 45 Power ON 53 Power source 17 Power switch 20 21 Preparing the imaging unit 26 Prescan 81 Printer box 19 Printer driver for...

Страница 161: ...cate 155 Interface 157 158 Media 150 Printer 147 Scanner 145 Software 156 START B W button 23 START COLOR ENTER button 23 Static electricity damage 13 Status Display program 129 STOP RESET button 23 87 Supplies 90 System Connecting 42 DCIS stand alone 46 Requirements 16 Setting 89 90 Standard 42 44 Technical support calls U S A 5 Terminator switch 20 21 45 46 48 50 Test Page 54 TextBridge 19 68 15...

Отзывы: