


4.1 Programming the PBX
4.1.1 Easy Setup Wizard
In the Easy Setup Wizard, you will set up the mandatory settings required for the PBX.
When you log in to Web Maintenance Console for a PBX that is in its initialised, factory default state, the Easy
Setup Wizard for that PBX will launch automatically. You must log in using the Installer level account name
and password.
–
The Installer level account name is "INSTALLER".
–
The default Installer level account password is "1234".
1.
After Easy Setup Wizard launches, select a language, and then click
Install
.
2.
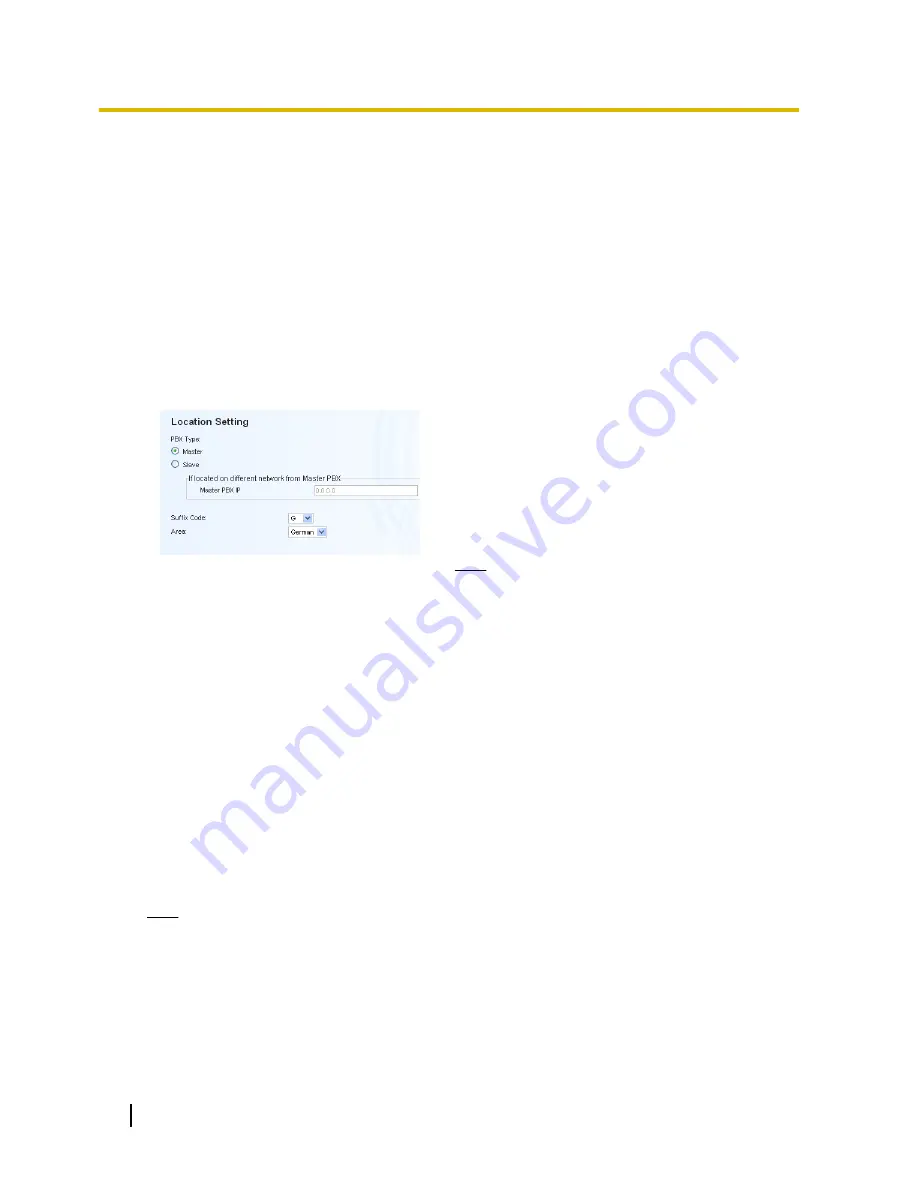
In
Location Setting
:
a.
Select a
PBX Type
:
•
Master
: Select for a PBX that will be registered
as the Master unit of One-look network. Also
select for a stand-alone PBX that will not be used
in a One-look network.
•
Slave
: Select for a PBX that will be registered as
a Slave unit of a One-look network. If
Slave
is
selected, go to step
2-d
below.
Note
•
If the Master unit is located on a different
LAN than the Slave unit being registered, the
Slave unit will not be able to automatically
detect the Master unit for registration. The IP
address of the Master unit must be specified.
Enter the IP address of the Master unit in
If
located on different network from Master
PBX
.
•
For information about stand-alone PBXs and
PBXs in a One-look network, refer to
"2.1.1 System Configurations" in the
Installation Manual.
b.
Select a
Suffix Code
*1
from the drop-down list if
Master
is selected for
PBX Type
.
c.
Select an
Area
*1
from the drop-down list if
Master
is
selected for
PBX Type
.
d.
Click
Next
.
Note
If
Suffix Code
is changed from its default value, a notice about restarting the PBX is displayed. Click
OK
to restart the PBX. After the PBX restarts, start Web Maintenance Console again (refer to
"3.3 Starting Web Maintenance Console"). When you start the Easy Setup Wizard again, you will start
from step
3
, below.
*1
For information about Suffix Codes and Areas to select, refer to "7.6 PBX Region Suffix Codes and Areas" in the Installation
Manual.
28
Getting Started
4.1.1 Easy Setup Wizard
Содержание KX-NS1000
Страница 3: ...Section 1 Before Installation Getting Started 3...
Страница 8: ...8 Getting Started 1 3 Unpacking...
Страница 9: ...Section 2 Installation Getting Started 9...
Страница 18: ...18 Getting Started 2 4 2 Connecting the IP Telephones to the LAN...
Страница 19: ...Section 3 Before Programming Getting Started 19...
Страница 27: ...Section 4 Programming Getting Started 27...
Страница 54: ...54 Getting Started 4 3 2 Registering IP Telephones...
Страница 55: ...Section 5 Confirming the Connection Getting Started 55...


