background image

3. Telephone

26

3.4 Erasing a stored item

3.4.1 Erasing a specific item

1

Press 

{

>

}

.

L

Confirm that there are no documents in the 
document entrance.

2

Press 

{A}

 or 

{B}

 repeatedly to display the desired 

item.

3

Press 

{

Menu

}

.

4

Press 

{#}

.

L

To cancel erasing, press 

{

Stop

}

.

5

Press 

{

Set

}

.

L

To erase other items, repeat steps 2 to 5.

6

Press 

{

Stop

}

 to exit.

3.4.2 Erasing all items

1

Press 

{

>

}

.

L

Confirm that there are no documents in the 
document entrance.

2

Press 

{

Menu

}

.

3

Press 

{A}

 or 

{B}

 repeatedly to select 

YES

.

4

Press 

{

Set

}

.

L

To cancel erasing, press 

{

Stop

}

.

5

Press 

{

Set

}

.

3.5 One-touch dial feature

For rapid access to frequently dialed numbers, the unit 
provides the one-touch dial feature.

3.5.1 Storing one-touch dial items

L

Station 1 to 3 can be used alternatively as broadcast 
keys (page 32).

L

You can also send faxes using the one-touch dial 
feature (page 32).

1

Press 

{

Menu

}

 repeatedly to display 

PHONEBOOK 

SET

.

2

Select the desired station key.

For station 1–3:

Press one of the station keys, press 

{A}

 or 

{B}


repeatedly to select 

DIAL MODE

, then press 

{

Set

}

.

For stations 4–5:

Press one of the station keys.

For stations 6–10:

Press 

{

Lower

}

, then press one of the station keys.

3

Enter the name, up to 16 characters (see page 22 for 
instructions).

4

Press 

{

Set

}

.

5

Enter the telephone number, up to 24 digits.

6

Press 

{

Set

}

.

L

To program other items, repeat steps 2 to 6.

7

Press 

{

Stop

}

 to exit.

Note:

L

You can confirm the stored items by printing the 
telephone number list (page 64).

To correct a mistake

1.

Press 

{

<

}

 or 

{

>

}

 to move the cursor to the incorrect 

character/number.

2.

Press 

{

Stop

}

.

L

To erase all characters/numbers, press and hold 

{

Stop

}

.

3.

Enter the correct character/number.

3.5.2 Making phone calls using the one-
touch dial

Before using this feature, store the desired names and 
telephone numbers for the one-touch dial feature.

1

Lift the handset or press 

{

Monitor

}

.

2

Select the desired station key.

For stations 1–5:

Press the desired station key.

For stations 6–10:

Press 

{

Lower

}

, then press the desired station key.

L

The unit will start dialing automatically.

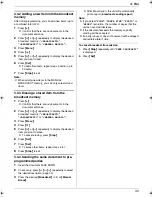
3.5.3 Editing a stored item

1

Press 

{

>

}

.

L

Confirm that there are no documents in the 
document entrance.

2

Press 

{A}

 or 

{B}

 repeatedly to display the desired 

item.

3

Press 

{

Menu

}

.

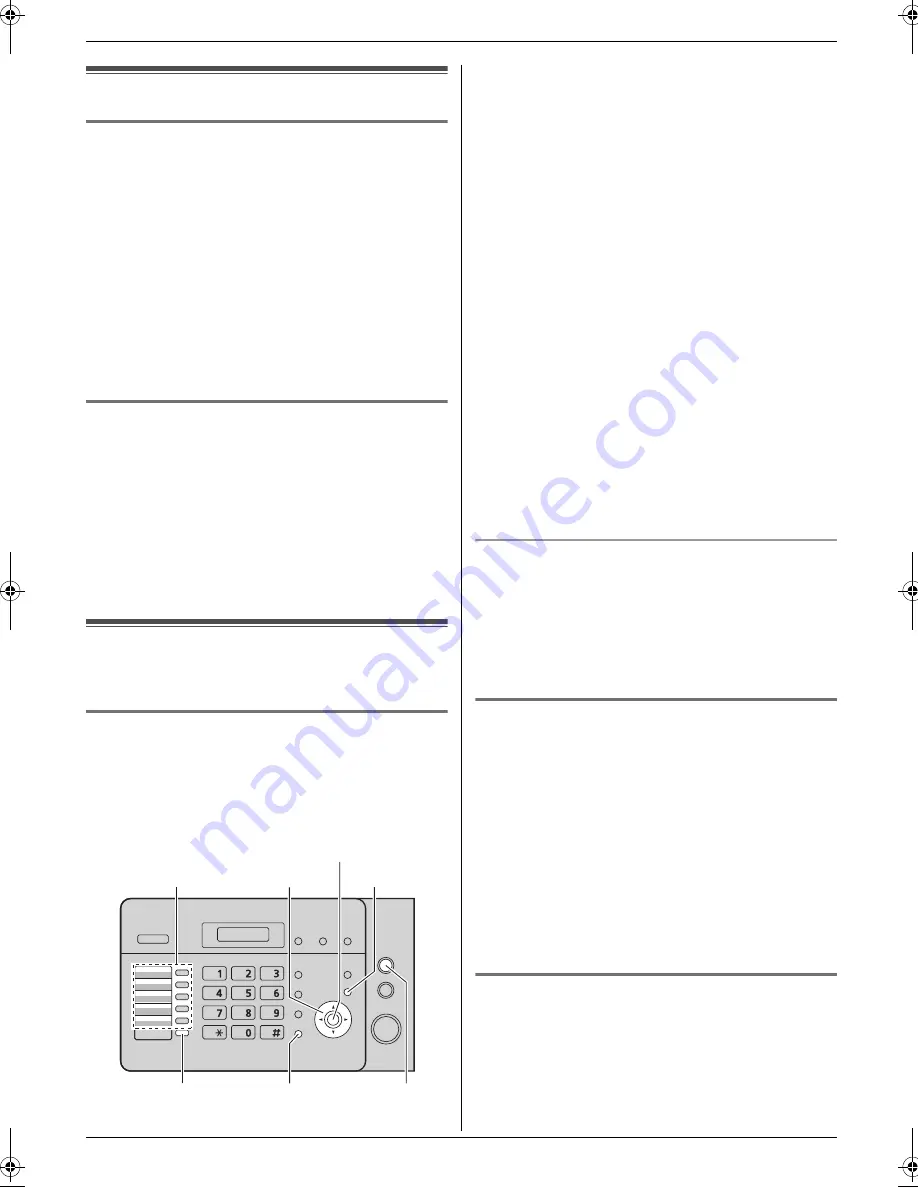
{

<

}{

>

}{A}{B}

{

Monitor

}

{

Stop

}

{

Menu

}

{

Set

}

Station keys

{

Lower

}

FL421-PNQX3022ZA-OI-en.book  Page 26  Thursday, July 29, 2010  9:35 AM

Содержание KX-FL421

Страница 1: ...service through your service provider telephone company is required Operating Instructions Compact Laser Fax Model No KX FL421 For hearing or speech impaired TTY users TTY 1 877 833 8855 For support for customers in the U S A or Puerto Rico VISIT www panasonic com help E MAIL www panasonic com contactinfo Please register your product http www panasonic com prodreg ...

Страница 2: ...rub or use an eraser on the printed side of recording paper as the print may smear Notice for product disposal transfer or return L This product can store your private confidential information To protect your privacy confidentiality we recommend that you erase the information such as phonebook or caller information from the memory before you dispose of transfer or return the product Environment L ...

Страница 3: ...upplied to your home consult your retailer dealer or local power company For safety purposes this unit is equipped with a grounded plug If you do not have this type of outlet please have one installed Do not defeat this safety feature by tampering with the plug Do not place objects on the power cord Install the unit where no one can step or trip on the cord Do not overload power outlets and extens...

Страница 4: ...u to dangerous voltage or other risks Incorrect reassembly can cause electric shock when the unit is subsequently used Follow all warnings and instructions marked on this unit Do not spill liquids detergents cleansers etc onto the telephone line cord plug or allow it to become wet at all This may cause a fire If the telephone line cord plug becomes wet immediately pull it from the telephone wall j...

Страница 5: ... Never touch uninsulated telephone wires or terminals unless the telephone line has been disconnected at the network interface Use caution when installing or modifying telephone lines The printer of this unit utilizes a laser Use of controls or adjustments or performance of procedures other than those specified herein may result in hazardous radiation exposure CLASS 1 LED PRODUCT When using the un...

Страница 6: ...he drum unit the unit should never be turned OFF immediately after printing Leave the power turned ON for a minimum of 30 minutes after printing Location L To avoid malfunction do not position the unit near appliances such as TVs or speakers which generate an intense magnetic field Static electricity L To prevent static electricity damage to the interface connectors or other electrical components ...

Страница 7: ... of items that may be illegal to copy in your country Currency Bank notes and checks Bank and government bonds and securities Passports and identification cards Copyright material or trademarks without the consent of the owner Postage stamps and other negotiable instruments This list is not inclusive and no liability is assumed for either its completeness or accuracy In case of doubt contact your ...

Страница 8: ...ch dial feature and phonebook 32 4 4 Broadcast transmission 32 4 5 Receiving a fax automatically Auto answer ON 34 4 6 Receiving a fax manually Auto answer OFF 34 4 7 Using the unit with an answering machine 35 4 8 Junk fax prohibitor preventing fax reception from undesired callers 36 5 Distinctive Ring Distinctive Ring 5 1 Distinctive Ring service 38 5 2 Using two or more phone numbers on a singl...

Страница 9: ...Table of Contents 9 12 Index 12 1 Index 70 ...

Страница 10: ...tter size pages with a 5 coverage using KX FAT88 To ensure that the unit operates properly we recommend the use of Panasonic toner cartridge and drum unit 1 Power cord PNJA1022Z 1 2 Telephone line cord PFJA02B002Y 1 3 Handset PNLXH1006Z 1 4 Handset cord PQJA10126X 1 5 Paper tray PFKS1085Z3 1 6 Paper stacker PFKS1096Z4 1 7 Document stacker PNKS1006Z1 1 8 Drum unit KX FAD89 1 9 Starter toner cartrid...

Страница 11: ... names and telephone numbers page 23 L To return to a previous step during operation J Copy L To copy a document page 39 K Station keys L To use the one touch dial feature page 26 32 L Lower L To select stations 6 10 for the one touch dial feature page 26 32 M Manual Broad L To send a document to multiple parties manually page 32 33 N Tone L To change from pulse to tone temporarily during dialing ...

Страница 12: ... The paper stacker and document stacker may not be shown in all illustrations 1 Handset 2 Speaker 3 Document guides 4 Paper tray 5 Recording paper entrance 6 Tension plate 7 Document stacker 1 8 Paper stacker 1 9 Recording paper exit j Document exit k Front cover l Document entrance 1 7 8 9 3 4 5 6 k j l 2 ...

Страница 13: ...he black drum surface Do not place the drum unit near dust or dirt or in a high humidity area Do not expose the drum unit to direct sunlight L Do not leave the toner cartridge out of the protection bag for a long time It will decrease the toner life 1 Before opening the protection bag of the new toner cartridge shake it vertically more than 5 times 2 Remove the toner cartridge and drum unit from t...

Страница 14: ...m and toner unit 1 by holding the tabs L Do not touch the transfer roller 2 L Make sure that the triangles 3 match to install the drum and toner unit correctly 8 Close the front cover 1 by pushing down on both sides until locked Toner save feature If you want to reduce toner consumption set the toner save setting to ON feature 79 on page 45 The toner cartridge will last approximately 40 longer Thi...

Страница 15: ...nit cool down 1 7 Paper stacker Line up the slots 1 in the paper stacker with the pegs 2 on the bottom of the unit then insert the two tabs of the paper stacker into the slots on the unit 3 Note L Do not place the unit in an area where the paper stacker may be easily bumped into L Document and recording paper will be ejected from the front of the unit Do not place anything in front of the unit L T...

Страница 16: ... Document stacker Insert the document stacker 1 into the slots 2 Note L Make sure the document stacker is inserted completely or the document may jam 1 9 Handset cord Connect the handset cord 1 L The jack on the longer uncoiled end 2 of the handset cord should be connected to the handset 2 1 1 2 ...

Страница 17: ...e Moist paper Inkjet paper L Some paper is designed to be printed on only one side Try printing on the other side of the paper if you are not happy with the print quality or if misfeeding occurs L For proper paper feeding and best print quality we recommend using long grained paper L Do not use paper of different types or thickness at the same time This may cause paper jams L Avoid double sided pr...

Страница 18: ... A4 size paper Insert the tabs on the A4 paper guides 1 into the slots L L is shown on the A4 paper guide for the left side R is shown on the A4 paper guide for the right side Note L When you use letter or legal paper you do not need to install the A4 paper guides L Change the recording paper size to A4 feature 16 on page 42 1 1 ...

Страница 19: ...htning For additional protection we recommend using a surge protector 5 If the unit shares a single telephone line with a DSL service L Fax transmission reception may be disturbed noise interference may be heard during telephone conversations or Caller ID page 27 may not function properly Please attach a DSL filter 6 to the telephone line cord of the unit to prevent this A DSL filter may be provid...

Страница 20: ...l information which can be printed for quick reference BASIC SETTINGS How to set the date time your logo and fax number FEATURE LIST How to program the features PHONEBOOK How to store names and numbers in the phonebook and how to dial them FAX SND RCV Help with problems to send receive faxes COPIER How to use the copier function Q and A Frequently asked questions and answers ERRORS Explanation of ...

Страница 21: ...ceiver volume While using the handset press A or B Monitor volume While using the monitor press A or B Initial Programming 2 5 Date and time You must set the date and time 1 Press Menu SYSTEM SETUP PRESS 2 Press then 0 1 SET DATE TIME PRESS SET 3 Press Set L The cursor will appear on the display M 01 D 01 Y 10 TIME 12 00AM 4 Enter the current month date year by selecting 2 digits for each Example ...

Страница 22: ...rmation L If the time has not previously been set Caller ID will not adjust the clock L You can turn this feature OFF feature 33 on page 44 2 6 Your logo The logo can be your name or the name of your company 1 Press Menu SYSTEM SETUP PRESS 2 Press then 0 2 YOUR LOGO PRESS SET 3 Press Set L The cursor will appear on the display LOGO 4 Enter your logo up to 30 characters See the following character ...

Страница 23: ...l To correct a mistake 1 Press or to move the cursor to the incorrect character 2 Press Stop L To erase all characters press and hold Stop 3 Enter the correct character To select characters using A or B Instead of pressing the dial keys you can select characters using A or B 1 Press B repeatedly to display the desired character Characters will be displayed in the following order 1 Uppercase letter...

Страница 24: ...our fax number up to 20 digits Example NO 1234567 L To enter a press L To enter a space press L To enter a hyphen press Flash 5 Press Set SETUP ITEM 6 Press Menu to exit Note L Your fax number will be printed on the top of each page sent from your unit To correct a mistake 1 Press or to move the cursor to the incorrect number 2 Press Stop L To erase all numbers press and hold Stop 3 Enter the corr...

Страница 25: ...phone numbers in the phonebook page 25 1 Press L Confirm that there are no documents in the document entrance 2 Press A or B repeatedly to display the desired item 3 Lift the handset or press Monitor L The unit will start dialing automatically To search for a name by initial Example LISA 1 Press L Confirm that there are no documents in the document entrance 2 Press A or B to enter the phonebook 3 ...

Страница 26: ...hen press Set For stations 4 5 Press one of the station keys For stations 6 10 Press Lower then press one of the station keys 3 Enter the name up to 16 characters see page 22 for instructions 4 Press Set 5 Enter the telephone number up to 24 digits 6 Press Set L To program other items repeat steps 2 to 6 7 Press Stop to exit Note L You can confirm the stored items by printing the telephone number ...

Страница 27: ...n have the option of whether or not to answer the call The unit will automatically store caller information name telephone number and date and time of the call from the 30 most recent calls Caller information is stored by the most recent to the oldest call When the 31st call is received the oldest call is deleted Caller information can be viewed on the display one item at a time page 28 or confirm...

Страница 28: ...have been received the display will show NO CALLER DATA To edit a telephone number before calling back storing While displaying a desired caller information press repeatedly Each time you press the telephone number will be changed as follows A 1 Area code Local telephone number 1 added 1 B Local telephone number only area code omitted C Area code Local telephone number 1 D 1 Local telephone number...

Страница 29: ...tem 3 Press Menu 4 Select a station key For station 1 3 Press the desired station key press A or B repeatedly to select DIAL MODE then press Set For stations 4 5 Press the desired station key For stations 6 10 Press Lower then press the desired station key L If you do not need to edit the name skip to step 6 5 If a name is required enter up to 16 characters for the name page 22 6 Press Set L If th...

Страница 30: ...ive from the next page To redial the last number 1 Press Redial Pause 2 Press Start L If the line is busy or if there is no answer the unit will automatically redial the number 1 time L To cancel redialing press Stop then press Set To send more than 15 pages at a time Insert the first 15 pages of the document Add the other pages up to 15 at a time on top of the previously inserted pages while the ...

Страница 31: ...r fasteners L Do not set the following types of documents Make a copy of the document using another copier and set the copy Chemically treated paper such as carbon or carbonless duplicating paper Electrostatically charged paper Badly curled creased or torn paper If documents printed from this unit are curled at one end you can insert the other end that is not curled into the auto document feeder o...

Страница 32: ... 4 4 Broadcast transmission By storing one touch dial and phonebook items page 25 26 into the broadcast memory you can send the same document to multiple parties up to 20 Your programmed items will remain in the broadcast memory allowing frequent re use L The broadcast function utilizes stations 1 3 The one touch dial function will be canceled 4 4 1 Programming items into the broadcast memory 1 Pr...

Страница 33: ...red broadcast memory BROADCAST1 BROADCAST2 or MANUAL BROAD 3 Press Menu 4 Press 5 Press A or B repeatedly to display the desired item you want to erase L To cancel erasing press Stop 6 Press Set 7 Press Set L To erase other items repeat steps 5 to 7 8 Press Stop to exit 4 4 4 Sending the same document to pre programmed parties 1 Insert the document FACE DOWN 2 If necessary press A or B repeatedly ...

Страница 34: ...ll is answered in FAX ONLY mode can be changed feature 06 on page 42 If you have subscribed to a Distinctive Ring service See page 38 4 6 Receiving a fax manually Auto answer OFF 4 6 1 Activating TEL mode Press Auto Answer repeatedly to display the following TEL MODE L The Auto Answer indicator is OFF How to receive phone calls and faxes 1 Lift the handset to answer the call 2 When document recept...

Страница 35: ...n answering machine 4 7 1 Setting up the unit and an answering machine 1 Connect the answering machine 1 L Answering machine is not supplied L Remove the stopper 2 if attached 2 Set the number of rings on the answering machine to 4 rings or less L This will allow the answering machine to answer the call first 3 Record a greeting message on the answering machine L We recommend you record a message ...

Страница 36: ...s 4 8 Junk fax prohibitor preventing fax reception from undesired callers If you subscribe to Caller ID service page 27 this feature prevents fax reception from calls that do not show caller information Additionally the unit will not accept faxes originating from numbers that match the ones on a programmable junk fax prohibitor list Important L This feature does not work when manual reception is p...

Страница 37: ...ax Prohibitor 2 Press repeatedly to display JUNK LIST DISP 3 Press Set 4 Press A or B repeatedly to display the desired item 5 Press L To cancel erasing press Stop 3 times 6 Press Set L The item is erased L To erase other items repeat steps 4 to 6 7 Press Stop 2 times to exit ...

Страница 38: ...nue ringing L If an external telephone answering machine is connected set the ring count of the answering machine to more than 2 5 3 Using three or more phone numbers on a single telephone line You may wish to use three or more phone numbers for a single telephone line In order to distinguish which number the call was addressed to a different ring pattern must be assigned for each number Example U...

Страница 39: ...r printed or typewritten documents with small print SUPER FINE For documents with very small print PHOTO For documents containing photographs shaded drawings etc MIXED Photo with text For documents containing photographs and text L If you select STANDARD copying will be done using FINE mode 6 1 1 More copying features To enlarge a document 1 Insert the document then press Copy 2 Press 3 Press A re...

Страница 40: ...lay COLLATE OFF 4 Press A or B repeatedly to display COLLATE ON 5 Press Start Example Making 2 copies of a 4 page original document Note L The unit will store the documents into memory while collating the copies If memory becomes full while storing the unit will only print out the stored pages L After copying the collating feature will turn OFF automatically Collated pages Uncollated pages 4 3 2 1...

Страница 41: ...tures Summary 7 1 Programming 1 Press Menu 2 Press and the 2 digit code page 42 to page 46 3 Press the desired selection to display the desired setting L This step may be slightly different depending on the feature 4 Press Set 5 Press Menu to exit Menu Set ...

Страница 42: ... details Setting your logo 0 2 Enter your logo using the dial keypad See page 22 for details Setting your fax number 0 3 Enter your fax number using the dial keypad See page 24 for details Printing a confirmation report 0 4 To print a confirmation report for fax transmission results page 31 0 OFF Confirmation reports will not be printed 1 ON A confirmation report will be printed after every transm...

Страница 43: ... fax at a specific time 2 5 This feature allows you to take advantage of low cost calling hours offered by your telephone company This feature can be set up to 24 hours in advance of the desired time 0 OFF default 1 ON To send a document 1 Insert the document 2 If necessary press A or B repeatedly to select the desired resolution page 30 3 Press Menu 4 Press then 2 5 5 Press 1 to select ON 6 Press...

Страница 44: ...am the activation code Important L The fax activation code must be different from the code that you programmed on the answering machine 0 OFF 1 ON default 1 Press Menu 2 Press then 4 1 3 Press 1 to select ON 4 Press Set 5 Enter your code from 2 to 4 digits using 0 9 and L The default code is 9 L Do not enter 0000 6 Press Set 7 Press Menu Setting the memory reception alert 4 4 To alert you with a b...

Страница 45: ... or host PBX 1 900msec 2 700msec default 3 600msec 4 400msec 5 300msec 6 250msec 7 200msec 8 160msec 9 110msec 100msec 0 90msec 80msec Note L If the unit is connected via a PBX PBX functions transferring a call etc might not work correctly Consult your PBX supplier for the correct setting Setting the connecting tone 7 6 If you often have trouble when sending faxes this feature allows you to hear c...

Страница 46: ... Resetting advanced features to their default settings 8 0 0 NO default 1 YES To reset the advanced features 1 Press Menu 2 Press then 8 0 3 Press 1 to select YES 4 Press Set 5 Press Set again 6 Press Menu Feature Code Selection ...

Страница 47: ...because of a problem with the other party s fax machine Check with the other party JUNK FAX PROH REJECT L The junk fax prohibitor feature of this unit rejected fax reception MEMORY FULL L The memory is full of received documents due to a lack of recording paper or a recording paper jam Install paper page 17 or remove the jammed paper page 58 NO DOCUMENT L The document was not fed into the unit pro...

Страница 48: ...or fax memory capacity see page 65 LOW TEMP L The inside of the unit is extremely cold and cannot be operated Use the unit in a warmer area While the unit cannot be operated the received documents are temporarily stored into the memory and will be printed out automatically when the unit warms up MEMORY FULL L When performing memory transmission the document being stored exceeded the memory capacit...

Страница 49: ...ete Replace the toner cartridge immediately page 54 TONER LOW CHANGE SUPPLIES L The toner life is near to an end Replace the toner cartridge as soon as possible page 54 TRANSMIT ERROR L A transmission error occurred Try again WARM UP L The inside of the unit is cold Let the unit warm up Wait for a while WRONG PAPER L The fax message was printed on paper which is shorter than letter size paper Use ...

Страница 50: ... hear a fax tone and cannot talk L FAX ONLY mode is set Tell the other party the number is only used for faxes L Change to TEL mode page 34 L If you use a Distinctive Ring service make sure you have set the same ring pattern assigned by the telephone company page 38 The Redial Pause button does not function properly L If this button is pressed during dialing a pause will be inserted If pressed imm...

Страница 51: ... L The glass or rollers are dirty with correction fluid etc Clean them page 62 Please do not insert a document before correction fluid has dried completely Problem Cause Solution I cannot receive documents L You may have subscribed to a voice mail service due to service packs offered by your telephone company Fax reception may not be possible when voice mail is activated so we recommend you to con...

Страница 52: ...fault setting Verify the remote fax activation code feature 41 on page 44 L The memory is full of received documents due to a lack of recording paper or a recording paper jam Install paper page 17 or remove the jammed paper page 58 The other party complains that they cannot send a document L The memory is full of received documents due to a lack of recording paper or a recording paper jam Install ...

Страница 53: ...life and quality please print the printer test list page 64 If printing quality is still poor replace the toner cartridge and drum unit Problem Cause Solution I cannot receive documents automatically L Your greeting message on the answering machine is too long Shorten the message Record a message up to 10 seconds long L The answering machine rings too many times Set to 1 or 2 rings I cannot receiv...

Страница 54: ... contains a photosensitive drum Exposing it to light may damage the drum Once you have opened the protection bag Do not expose the drum unit to light for more than 5 minutes Do not touch or scratch the black drum surface Do not place the drum unit near dust or dirt or in a high humidity area Do not expose the drum unit to direct sunlight L Do not unplug the unit Loss of fax documents in memory may...

Страница 55: ... black drum surface 3 L Put the used toner cartridge into the protection bag 8 Insert the cleaner 1 fully into the groove 2 of the drum unit and move it from side to side at least 3 times to clean the inside of the drum unit Important L If the groove of the drum unit is dirty lines or dirty patterns may appear on printed sheets Be sure to remove any toner remaining on the inside of the drum unit t...

Страница 56: ...triangles 1 match to install the toner cartridge correctly L If the lower glass 2 is dirty clean it with a soft and dry cloth 12 Install the drum and toner unit 1 by holding the tabs L Make sure that the triangles 2 match to install the drum and toner unit correctly 13 Close the front cover 1 by pushing down on both sides until locked 14 Place the handset on the cradle and attach the document stac...

Страница 57: ...panasonic com help L While the unit displays PLEASE WAIT do not open the front cover or disconnect the power cord Waste disposal method Waste material should be disposed of under conditions which meet all national and local environmental regulations ...

Страница 58: ...per 1 carefully by pulling it toward you L Do not touch the transfer roller 2 4 Close the front cover 1 by pushing down on both sides until locked 5 Place the handset on the cradle and attach the document stacker 9 1 2 When the recording paper has jammed near the recording paper exit 1 Remove the handset and document stacker 2 Lift open the front cover 1 holding the dotted area 2 on the right side...

Страница 59: ...inet L Do not touch the transfer roller 4 4 Lift both green levers 1 forward until they stop 5 Remove the jammed paper 1 from the fuser unit by pulling it upwards carefully then install the drum and toner unit 6 Push back the levers 1 to the original position 7 Close the front cover 1 by pushing down on both sides until locked 1 2 3 4 1 1 1 1 ...

Страница 60: ...nserting make sure to fan and straighten the recording paper 10 Push back the tension plate 9 2 Document jams Note L Do not pull out the jammed document forcibly before opening the front cover 1 Remove the handset and document stacker 2 Lift open the front cover 1 holding the dotted area 2 on the right side 1 Caution The fuser unit 3 gets hot Do not touch it 1 3 2 ...

Страница 61: ...e L Do not touch the transfer roller 2 4 Remove the jammed document carefully 1 5 Push back the inner cover 6 Close the front cover 1 by pushing down on both sides until locked 7 Place the handset on the cradle and attach the document stacker 1 2 1 1 ...

Страница 62: ...aution for the drum unit on page 54 for details L Do not use paper products such as paper towels or tissues to clean the inside of the unit 1 Disconnect the power cord and the telephone line cord 2 Remove the handset and document stacker 3 Lift open the front cover 1 holding the dotted area 2 on the right side 4 Clean the document separation roller 1 with a cloth moistened with isopropyl rubbing a...

Страница 63: ...k the inner cover 8 Remove the drum and toner unit 1 by holding the two tabs 9 Clean the lower glass 1 with a soft and dry cloth 10 Re install the drum and toner unit 1 by holding the tabs L Make sure that the triangles 2 match to install the drum and toner unit correctly 11 Close the front cover 1 by pushing down on both sides until locked 12 Place the handset on the cradle and attach the documen...

Страница 64: ...re 22 on page 43 BROADCAST LIST Provides you with names and numbers which are stored in the broadcast memory page 32 PRINTER TEST Allows you to check the print quality of your unit If the test print has a dirty pattern or blurred points or lines clean the inside of the unit page 62 If printing quality is still poor replace the toner cartridge and drum unit CALLER ID LIST Keeps records of the last ...

Страница 65: ...pprox 12 W Reception Approx 240 W Copy Approx 240 W Maximum Approx 950 W When the fuser lamp turns on Power supply 120 V AC 60 Hz Fax memory capacity Approx 150 pages of memory transmission Approx 100 pages of memory reception Based on the ITU T No 1 Test Chart in standard resolution Laser diode properties Laser output Max 5 mW Wave length 770 nm 800 nm Emission duration Continuous Copy speed Appr...

Страница 66: ... cartridge and drum unit 1 6 Document tray 1 7 Output tray 1 8 Recording paper 2 Preparation 2 1 Connections 2 2 Turning the power switch ON Help Button 2 3 Help function Volume 2 4 Adjusting volume Initial Programming 2 5 Dialing mode 2 6 Date and time 2 7 Your logo 2 8 Your fax number 3 Copy Copying 3 1 Using the unit as a copy machine 3 2 Making a copy 3 3 More copying features 4 PC Operations ...

Страница 67: ... be connected to a telephone line Excessive RENs on a telephone line may result in the devices not ringing in response to an incoming call In most but not all areas the sum of RENs should not exceed five 5 0 To be certain of the number of devices that may be connected to a line as determined by the total RENs contact the local telephone company For products approved after July 23 2001 the REN for ...

Страница 68: ...r voltage supply lightning damage modification introduction of sand humidity or liquids rental use of the product service by anyone other than a Factory Service Center or other Authorized Servicer or damage that is attributable to acts of God THERE ARE NO EXPRESS WARRANTIES EXCEPT AS LISTED UNDER LIMITED WARRANTY COVERAGE THE WARRANTOR IS NOT LIABLE FOR INCIDENTAL OR CONSEQUENTIAL DAMAGES RESULTIN...

Страница 69: ...any 20421 84th Avenue South Kent WA 98032 We Accept Visa MasterCard Discover Card American Express and Personal Checks Obtain Product Information and Operating Assistance locate your nearest Retailer Dealer or Service Center purchase Parts and Accessories or make Customer Service and Literature requests by visiting our Web Site at http www panasonic com help or E mail us via http www panasonic com...

Страница 70: ...re 76 45 Connections 19 Copy 39 Collation 40 Enlarge 39 Reduce 39 D Date and time Feature 01 21 Delayed transmission Feature 25 43 Dialing mode Feature 13 20 Display Contrast Feature 39 44 Error messages 48 Distinctive Ring service Feature 31 38 Document size 31 Drum life 66 Drum unit Installing 13 Replacing 54 E ECM selection Feature 68 45 Error messages 47 48 Extension telephone 35 F Fax activat...

Страница 71: ...38 Ring setting FAX ONLY Feature 06 42 S Sending faxes Broadcast 33 From memory 30 Manually 30 One touch dial 32 Phonebook 32 Set default Feature 80 46 Storing Broadcast 32 One touch dial 26 Phonebook 25 T TEL mode 34 Time adjustment Feature 33 44 Toner cartridge Installing 13 Replacing 54 Toner life 66 Toner save Feature 79 14 45 V Volume 21 ...

Страница 72: ...arranty service The original unit must be properly packaged in the same manner as the replacement unit utilizing the packing materials provided Damage due to improper or inadequate packing will be charged to you as an out of warranty cost Requirements You must give our technicians a valid credit card number Discover VISA Master Card or American Express Optima The proof of purchase must be faxed to...

Отзывы: