background image

Loading Documents on the ADF

18

6

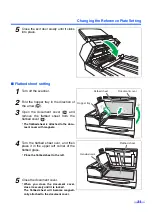
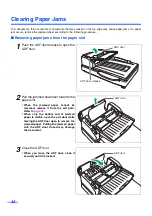
Place the documents on the hopper
with the side to be scanned facing up.
Then push them in the direction of the
arrow until they stop.

• 

The number of sheets that can be loaded
on the hopper at a time is approximately
200 sheets (paper weight: 80 

g

/m

2


[21 lb.]), or approximately 150 sheets
(paper weight: less than 40 

g

/m

2

 [10.6 lb.])

when in "Thin Paper Feeding Mode".

Notice

• 

The amount of documents should not
exceed the limit mark on the document
guide. This may cause a paper jam or
skew.

 Paper weight: 40 

g

/m

2

 (10.6 lb.) or more

 Paper weight: Less than 40 

g

/m

(10.6 lb.)

Fill indicator
(Limit mark)

Portrait

1

2

1

2

Landscape

Содержание KV-S7077

Страница 1: ...Before reading these instructions please read the Quick Installation Guide enclosed with this unit Keep all documentation in a safe place for future reference Current model availability depends on your country area Please contact your dealer Model No Operating Manual Document Scanner ...

Страница 2: ...top button after select ing a job with the cursor buttons This scanner also has a function that starts scanning when documents are simply placed on the hopper tray Touch Free Scanning Other Features The paper feed path can be opened widely to easily remove jammed paper and perform maintenance User Utility helps you perform maintenance for the scanner You can configure and check the counters that i...

Страница 3: ... consists of 2 manuals the Operating Manual this manual and the Quick Installation Guide About the Software Help Each software contains help files For details about viewing the help files see To view the help page 12 Software Manual CD ROM Contents 1 Image Capture Plus is a Panasonic original application for configuring advanced scanning settings 2 Each document is a PDF document To view documents...

Страница 4: ...it is not guaranteed to work Options Note To purchase separately sold items contact your dealer Computer IBM PC AT or compatible machine with a CD ROM drive CPU Intel Core 2 Duo 1 8 GHz or higher Interface USB 2 0 USB 3 0 Part Name Part Number Notes Roller exchange kit KV SS015 See Replacing Consumable Roller Modules page 43 Roller cleaning paper KV SS03 See Roller Cleaning Paper page 7 Ink cartri...

Страница 5: ...hanging the Reference Plate Setting 30 ADF reference plate setting 30 Flatbed sheet setting 31 Clearing Paper Jams 32 Removing paper jams from the paper slot 32 Removing paper jams from the exit path 33 Cleaning the Unit 34 Outside of the scanner 34 Inside the scanner 34 Cleaning the paper feed roller separation roller and double feed prevention roller 35 Cleaning the drive rollers and free roller...

Страница 6: ...ts or otherwise damage the CD ROM Do not leave the CD ROM where it is directly exposed to sunlight or near a heater for extended periods Do not throw or bend the CD ROM It is unlawful to make duplication of certain documents Duplicating certain documents may be illegal in your country area Penalties of fines and or imprisonment may be imposed on those found guilty The following are examples of ite...

Страница 7: ... SS03 please contact your dealer or call our Supplies and Accessories department at 1 800 726 2797 U S A only KEEP AWAY FROM FIRE Security Notice The management of documents and scanned data is the responsibility of the user In particular pay attention to the following points Make sure you have the same number of pages for important documents both before and after scanning and take care not to lea...

Страница 8: ...s selector Hopper extension tray You can select the document feeding method AUTO Continuous scanning MANUAL Manual scanning AC inlet Imprinter door Power cord FAN exhaust vent USB connector Plugs may vary in shape depending on country area Open this door when installing an imprinter unit sold separately or ink cartridge For details about install ing an imprinter unit refer to the Information leaf ...

Страница 9: ...Component Identification 9 Flatbed sheet Flatbed glass Exit door release ADF glass B Reference plate F Reference plate B ADF glass F Exit door ...

Страница 10: ...sed the document or documents detected as a double feed or the dog eared document will be scanned and then ejected from the scanner Scanning will continue after the document is scanned and ejected Start Stop button During scanning pushing this button stops scanning If you press this button after a double feed or a dog eared document is detected and scanning has been paused the document or document...

Страница 11: ...or longer the scanner will enter sleep mode automatically to conserve energy Press any button except the power button on the scanner s operation panel to return to ready mode The time until the scanner enters sleep mode can be changed in User Utility 3 For details about the error check in User Utility LED Red LED Green Status OFF OFF Power OFF 1 OFF Blinking Fast Warming up OFF ON Ready mode or Sc...

Страница 12: ...indows 8 select the Panasonic Document Scanner section on the Apps screen To view the help For Image Capture Plus 1 Select Start All Programs Panasonic Image Capture Plus Image Capture Plus Help For User Utility or Scan Button Setting Tool 1 Select Start All Programs Panasonic Scanner Tools 2 Select that item s help Note In Windows 8 select the Panasonic Document Scanner section on the Apps screen...

Страница 13: ...f sheets of the document loaded on the hopper Notice Use Thin Paper Feeding Mode when scanning a document less than 40 g m2 10 6 lb For details about Thin Paper Feeding Mode refer to the Image Capture Plus TWAIN or ISIS help Recommendable paper Plain paper Documents must also meet the following conditions Paper weight 80 g m2 21 lb Less than 40 g m2 10 6 lb Number of sheets 200 150 Curl Folding 70...

Страница 14: ...acing paper plastic film etc Documents containing hard attachments such as metal or plastic ex clips or staples Document with wet ink or cinnabar seal ink Damaged or notched documents Note Paper with a glossy surface such as coated paper or photographs that are susceptible to damage such as scratching If you scan following types of documents the rollers will need to be cleaned frequently and the l...

Страница 15: ...trait orientation to landscape orientation or vice versa Scan the documents using manual feeding In the scan settings set Feeding Speed to Slow 1 Scan the documents with the flatbed Make sure to remove paper clips and staples from documents before scanning Failing to do so can damage the unit document or both Curled documents may cause a paper jam or damaging the document therefore set the documen...

Страница 16: ...ent 1 page at a time When scanning important documents or thick bound documents select Manual scanning 2 Documents that have been stapled together or stacked together as in a file folder will need to be separated Fan the stack of documents to sepa rate all the edges Hold both ends and bend the docu ments as shown in the illustration To flatten the documents hold firmly and pull them apart as shown...

Страница 17: ...than the actual size of the documents 5 When using long paper pull out the hopper extension tray from the hopper Then raise and adjust the exit stopper to the position a little longer than the actual length of the document Document guide Hopperextension tray Hopper Exit stopper ...

Страница 18: ...pper at a time is approximately 200 sheets paper weight 80 g m2 21 lb or approximately 150 sheets paper weight less than 40 g m2 10 6 lb when in Thin Paper Feeding Mode Notice The amount of documents should not exceed the limit mark on the document guide This may cause a paper jam or skew Paper weight 40 g m2 10 6 lb or more Paper weight Less than 40 g m2 10 6 lb Fill indicator Limit mark Portrait...

Страница 19: ...exit stopper to the size of the document to be output When scanning the document that exceeds 432 mm 17 in close the exit stopper 8 Open your scanning application 1 and scan the documents 1 The software Image Capture Plus included with the scanner can be used for scanning the documents Document guide Exit stopper ...

Страница 20: ... have been stapled together or stacked together as in a file folder will need to be separated Fan the stack of documents to sepa rate all the edges Hold both ends and bend the docu ments as shown in the illustration To flatten the documents hold firmly and pull them apart as shown in the illustration Repeat these steps as necessary 3 Unlock the document guide Slide the document guides selector in ...

Страница 21: ...so that the center of the smallest sheet will be fed to the center of the paper slot If the document is not properly aligned the pages will not be fed correctly The amount of documents should not exceed the limit mark on the document guide This may cause a paper jam or skew Depending on the types of paper the doc ument may not be fed smoothly In such case reduce the number of sheets of the documen...

Страница 22: ...e hopper again and adjust the document guide according to the size of the document to be scanned Make sure to align the document pages along one side Make sure that the center of the smallest sheet of the document will be fed to the center of the paper slot 9 Open your scanning application 1 and scan the documents 1 The software Image Capture Plus included with the scanner can be used for scanning...

Страница 23: ...e direction shown in the illustration until the and marks are aligned to unlock the document guide 2 Completely spread apart the document guides 3 Lock the document guide Slide the document guides selector in the direction shown in the illustration until the and marks are aligned to lock the document guide 2 1 Document guides selector 1 2 1 2 Document guides selector 1 2 ...

Страница 24: ...r flatbed sheet and may damage data stored on printed materials and cards When scanning with the flatbed 1 Raise the hopper tray 2 Open the document cover Notice Make sure to always lift up the hopper tray first before opening the document cover Otherwise there is a possibility that the hopper will be damaged 3 Place the scanning side of the document face down on top of the flatbed glass towards t...

Страница 25: ... Be sure to close the document cover before use After scanning open the document cover and remove the document 7 Open your scanning application 1 and scan the documents 1 The software Image Capture Plus included with the scanner can be used for scanning the documents Scanning thick documents When scanning thick documents such as a book please note the following items Please note that areas of the ...

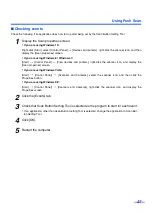
Страница 26: ... the Scan Button Setting Tool 1 Double click the icon in the notification area of the task bar to open the Scan Button Setting Tool In Windows 8 open the Scan Button Setting Tool on the Desktop screen 2 Select Touch Free Scanning or Single Touch Scanning Note In Image Capture Plus and Scan Button Setting Tool Single Touch Scanning means performing push scanning using the 7 segment LED For details ...

Страница 27: ...and printers right click the scanner icon and display the Scan properties screen If you are using Windows Vista Start Control Panel Scanners and Cameras select the scanner icon and then click the Properties button If you are using Windows XP Start Control Panel Scanners and Cameras right click the scanner icon and display the Properties screen 2 Click the Events tab 3 Check that Scan Button Settin...

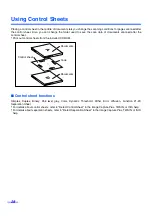
Страница 28: ...int out control sheets from the included CD ROM Control sheet functions Simplex Duplex Binary 256 level gray Color Dynamic Threshold Dither Error diffusion Function 1 9 Separation Sheet For details about control sheets refer to Detect Control Sheet in the Image Capture Plus TWAIN or ISIS help For details about separation sheets refer to Detect Separation Sheet in the Image Capture Plus TWAIN or IS...

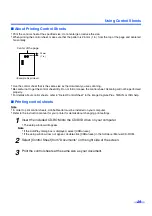
Страница 29: ...r to Detect Control Sheet in the Image Capture Plus TWAIN or ISIS help Printing control sheets Note In order to print control sheets Adobe Reader must be installed on your computer Refer to the instruction manual for your printer for details about changing print settings 1 Insert the included CD ROM into the CD DVD drive on your computer The setup window will appear Note If the AutoPlay dialog box...

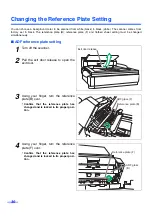
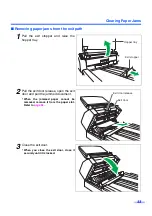
Страница 30: ...eously ADF reference plate setting 1 Turn off the scanner 2 Pull the exit door release to open the exit door 3 Using your finger turn the reference plate B over Confirm that the reference plate has changed and is locked in its proper posi tion 4 Using your finger turn the reference plate F over Confirm that the reference plate has changed and is locked in its proper posi tion Exit door release Ref...

Страница 31: ... flatbed cover The flatbed sheet is attached to the docu ment cover with magnets 4 Turn the flatbed sheet over and then place it in the upper left corner of the flatbed glass Place the flatbed sheet to the left 5 Close the document cover When you close the document cover close it securely until it is locked The flatbed sheet will become magneti cally attached to the document cover Hopper tray Docu...

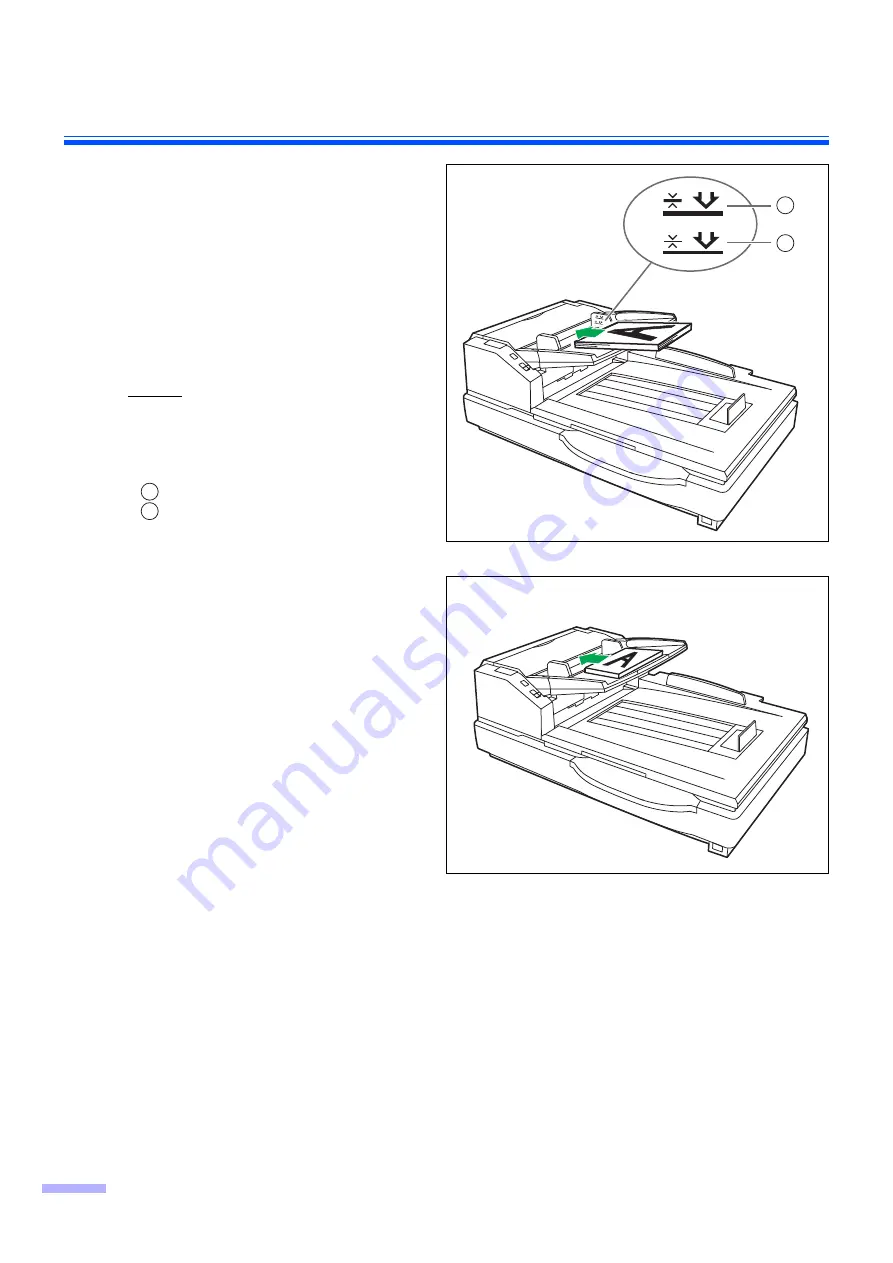
Страница 32: ...he ADF door 2 Pull the jammed document towards the paper slot When the jammed paper cannot be removed remove it from the exit path Refer to page 33 When only the bottom end of jammed paper is visible open the exit door while leaving the ADF door open to remove the jammed paper Pulling the jammed paper with the ADF door closed may damage the document 3 Close the ADF door When you close the ADF door...

Страница 33: ...tray 2 Pull the exit door release open the exit door and pull the jammed document When the jammed paper cannot be removed remove it from the paper slot Refer to page 32 3 Close the exit door When you close the exit door close it securely until it is locked Hopper tray Exit stopper Exit door Exit door release ...

Страница 34: ...nned image Clean the ADF glass and reference plates Refer to page 39 If black dots or white patches occur when scanning with the flatbed Open the document cover and clean the flatbed glass and flatbed sheet using the accessory roller cleaning paper Refer to page 42 Roller cleaning paper Open the bag on the dotted line and take out the roller cleaning paper If the roller cleaning paper bag is left ...

Страница 35: ...er Note When wiping off the dirt on the roller sur faces hold the rollers to prevent them from rotating and wipe the roller all the way around them proceeding from one end to the other in the direction of the arrows shown in the figure 4 Open the double feed prevention conveyor in the direction of the arrow shown in the figure by using the indent on the back side ADF door ADF door release Paper fe...

Страница 36: ...the arrows shown in the figure 6 Close the double feed prevention conveyor in the direction of the arrow shown in the figure 7 Close the ADF door When you close the ADF door close it securely until the door is locked Note If roller cleaning notifications via the After Clean Roller Counter are enabled reset the After Clean Roller Counter in User Utility to 0 after turning ON the unit s power For de...

Страница 37: ...the drive rollers Use Cleaning Mode with the power turned on Cleaning Mode can be set in User Utility During Cleaning Mode the drive rollers rotate a small amount every time the Start Stop button on the scanner is pressed For details refer to the User Utility help 4 Use the roller cleaning paper KV SS03 to remove the dirt from the surfaces of the 4 free rollers When wiping off the dirt on the roll...

Страница 38: ...sed to help when cleaning the drive rollers and the exit rollers Use Cleaning Mode with the power turned on Cleaning Mode can be set in User Utility During Cleaning Mode the drive rollers and the exit rollers rotate a small amount every time the Start Stop button on the scanner is pressed For details refer to the User Utility help 4 Use the roller cleaning paper KV SS03 to remove the dirt from the...

Страница 39: ...anner 2 Pull the exit door release to open the exit door 3 Clean the ADF glass F and reference plate B with the roller cleaning paper KV SS03 4 Clean the ADF glass B and reference plate F with the roller cleaning paper KV SS03 5 Close the exit door When you close the exit door close it securely until it is locked Reference plate B ADF glass F Reference plate F ADF glass B ...

Страница 40: ...nsor with a cotton swab 4 Remove dust on the surface of the reflector sheet for the waiting sensor with a cotton swab 5 Remove dust from the double feed detector G and double feed detector R with a cotton swab 6 Close the ADF door When you close the ADF door close it securely until it is locked Waiting sensor Reflector sheet for waiting sensor Paper sensor Double feed detector G Double feed detect...

Страница 41: ...e dust from the starting and ending sensors with a cotton swab 4 Remove dust from the reflector sheet for the starting and ending sensors with a cotton swab 5 Close the exit door When you close the exit door close it securely until it is locked Ending sensor Starting sensor Reflector sheet for starting sensor Reflector sheet for ending sensor ...

Страница 42: ...row 3 Open the document cover 4 Clean up the surface of flatbed glass with the roller cleaning paper KV SS03 to remove the dirt Also clean up the surface of the flatbed sheet as required 5 Close the document cover and put back the hopper tray to the original position Hopper tray Document cover Flatbed sheet Flatbed glass ...

Страница 43: ... the power off 2 Push the ADF door release to open the ADF door 3 Pull down the paper feed roller module in the direction of the arrow 4 Remove the paper feed roller module as shown on the figure 5 Open the optional roller exchange kit KV SS015 and take out the new paper feed roller module ADF door ADF door release ...

Страница 44: ...l the new paper feed roller module 7 Push the new paper feed roller module upwards in the direction of the arrow so that it is locked by the magnets on both sides 8 Close the ADF door When you close the ADF door close it securely until it is locked ...

Страница 45: ...on conveyor in the direction of the arrow shown in the figure by using the indent on the back side 4 Remove the double feed prevention roller pulling up the shaft in the direction of the arrow 5 Take out the new double feed prevention roller in the optional roller exchange kit KV SS015 ADF door ADF door release Double feed prevention roller Double feed prevention conveyor Indent ...

Страница 46: ...the groove of its shaft with the groove of the metal holder 7 Close the double feed prevention conveyor 8 Close the ADF door When you close the ADF door close it securely until it is locked 9 Reset the After Replace Roller Counter in User Utility to 0 For details refer to the User Utility help Groove ...

Страница 47: ... power button to turn ON the unit s power Scan speed is slow The scanner is connected with USB 1 1 Connect over USB 2 0 USB 3 0 The ADF does not open when the ADF door release is pushed The ADF door is not closed properly Push the ADF door release again after you close the ADF door until it is locked ADF The document has been loaded on the hopper tray But the scanner does not start scanning The do...

Страница 48: ...glass reference plate flatbed glass and flatbed sheet are dirty Clean the ADF glass reference plate flatbed glass and flatbed sheet See page 39 and page 42 The quantity distribution of light varies Adjust shading See page 49 The color of the scanned document is extremely different from the original document The settings of the computer monitor is wrong Adjust the computer monitor settings Dependin...

Страница 49: ... sure to thoroughly clean the ADF glass F area ADF glass B area reference plate F and reference plate B as well as the transport path and drive rollers of the scanning unit If the shading adjustment is carried out while these parts are still dirty it will not be possible to eliminate the lines that form on the scanned images Shading adjustment procedure 1 Start the User Utility 2 Click User Shadin...

Страница 50: ...e Plus Panasonic System Networks Co Ltd Scan Button Setting Tool Panasonic System Networks Co Ltd IDREngine Panasonic System Networks Co Ltd Panasonic Scanner Manuals Panasonic System Networks Co Ltd Panasonic Document Scanner Device Driver Panasonic System Networks Co Ltd MCD Panasonic System Networks Co Ltd KV S7097 KV S7077 ISIS Driver Panasonic System Networks Co Ltd Panasonic Document Scanner...

Страница 51: ...cking of the scanner may result in a service charge to repair the unit The scanner should be handled in the correct horizontal position Materials Required Original scanner carton packing materials Shipping tape and scissors 1 Turn off the scanner and disconnect your scanner from the electrical outlet and USB cable 2 Remove the hopper tray 3 Pack the scanner Quick Installation Guide Software Manual...

Страница 52: ...75 pages min Duplex 150 images min Readout speed 1 portrait Binary color Flatbed Resolution 2 Flatbed ADF 100 600 dpi 1 dpi step 1 200 dpi Optical resolution 600 dpi Paper Size for Flatbed 297 mm x 432 mm 11 7 in x 17 in Size for ADF Continuous scanning 48 mm 1 9 in 70 mm 2 8 in to 302 mm 11 9 in 432 mm 17 in Manual scanning 48 mm 1 9 in 70 mm 2 8 in to 302 mm 11 9 in 5461 mm 215 in Thickness for ...

Страница 53: ... Panasonic System Networks Co Ltd 2016 PNQX7912ZA DD0116AG0 ...

Отзывы: