9.3.5.
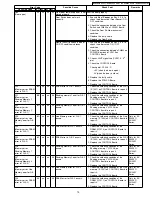
Scanner Condition
Item
Operation
Default
Remarks
Sleep Mode
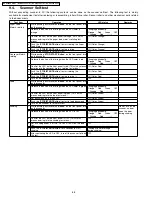
1. Click “
Sleep Mode
“ on the main menu (Service Utility).
2. Set “
Sleep Mode
“ to enable or disable by checking check-box.
3. Set “
Waiting Time
“ (minutes) to change sleep mode.
4. Click “
OK
“ to renew the setting.
Enable
15minutes
Clean Imprinter
1. Click “
Clean Imprinter
“ on the main menu to clean a ink jet head to
print.
—
This item is available only in case
of installing Imprinter (Option) to
scanner KV-S2045C/SU245C
Series. (Not used to KV-
S2025C/SU225C Series)
Warning Setting
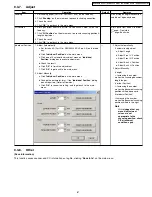
1. Click “
Warning Setting
“ on the main menu.
2. Change the parameters (Clean Roller Timing, Replace Roller Timing)
on “
Warning Setting
“ dialog box.
3. Click “
OK
“ to renew the setting.
Clean:
20000
Replace:
300000
Set Default
1. Click “
Set Default
“ on the main menu.
2. Click “
Set Default
“ on “
Set Default
“ dialog box to set “
Sleep Mode
setting“ and “
Warning Setting
to clean and replace roller“ to default.
3. Click “
Close
” to get back to the main menu.
—
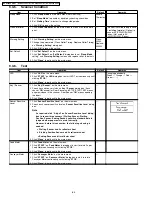
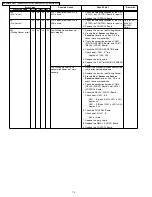
9.3.6.
Test
Item
Operation
Default
Remarks
LED
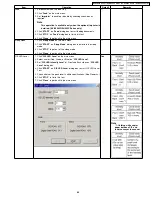
1. Click “
LED
“ on the main menu.
2. Click “
START
“ on
LED
dialog box to start LED Test continuously until
clicking “
STOP
“.
3. Click “
Close
” to get back to the main menu.
—
Changing periodically
(Green — Orange — Red —
Green —....)
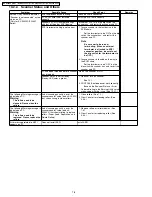
Key / Sensor
1. Click “
Key / Sensor
“ on the main menu.
2. Check key and sensor status on
Key / Sensor
dialog box. (Each
sensor “
ON
“ except for Door Sensor and STOP/START KEY means
paper existence in the scanner. Door Sensor “
ON
“ means opening
the door.)
3. Click “
Close
“ to get back to the main menu.
—
Sensor Sensitive
Level
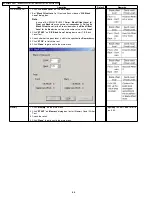
1. Click “
Sensor Sensitive Level
“ on the main menu.
2. Check each sensor sensitive level on
Sensor Sensitive Level
dialog
box.
Note
As required, click “Adjust” on Sensor Sensitive Level dialog
box to renew three sensors’ (Waiting Sensor, Starting
Position Sensor, Ending Sensor) sensitive standard data to
judge whether paper exists or not correctly.
However, before this execution, the following cleaning is
needed.
a.
Waiting Sensor and its reflector sheet
b.
Starting Position Sensor and its reflector sheet
c.
Ending Sensor and its reflector sheet
3. Click “
Close
“ to get back to the main menu.
—
Feed Motor
1. Click “
Feed Motor
“ on the main menu.
2. Click “
START
“ on “
Feed Motor
“ dialog box to start to rotate Paper
Feed Motor continuously until clicking “
STOP
“.
3. Click “
Close
“ to get back to the main menu.
—
Conveyor Motor
1. Click “
Conveyor Motor
“ on the main menu.
2. Click “
START
“ on “
Conveyor Motor
“ dialog box to start to rotate
Conveyor Motor continuously until clicking “
STOP
“.
3. Click “
Close
“ to get back to the main menu.
—
64
KV-S2025C Series / KV-SU225C Series / KV-S2045C Series / KV-SU245C Series
Содержание KV-S2025C
Страница 93: ...12 2 POWER Board PbF stamp 93 KV S2025C Series KV SU225C Series KV S2045C Series KV SU245C Series ...
Страница 96: ...96 KV S2025C Series KV SU225C Series KV S2045C Series KV SU245C Series ...
Страница 114: ...KV S2025C Series KV SU225C Series KV S2045C Series KV SU245C Series 114 ...
Страница 116: ...14 1 Exterior 116 KV S2025C Series KV SU225C Series KV S2045C Series KV SU245C Series ...
Страница 118: ...14 2 Chassis and Base 118 KV S2025C Series KV SU225C Series KV S2045C Series KV SU245C Series ...
Страница 120: ...14 3 Hopper Unit 120 KV S2025C Series KV SU225C Series KV S2045C Series KV SU245C Series ...
Страница 122: ...14 4 Power Unit 122 KV S2025C Series KV SU225C Series KV S2045C Series KV SU245C Series ...
Страница 124: ...14 5 Packing 14 5 1 KV S2025C SU225C Series 124 KV S2025C Series KV SU225C Series KV S2045C Series KV SU245C Series ...
Страница 126: ...14 5 2 KV S2045C SU245C Series 126 KV S2025C Series KV SU225C Series KV S2045C Series KV SU245C Series ...


