background image

14

z

S

PECIAL

 F

EATURES

ENGLISH

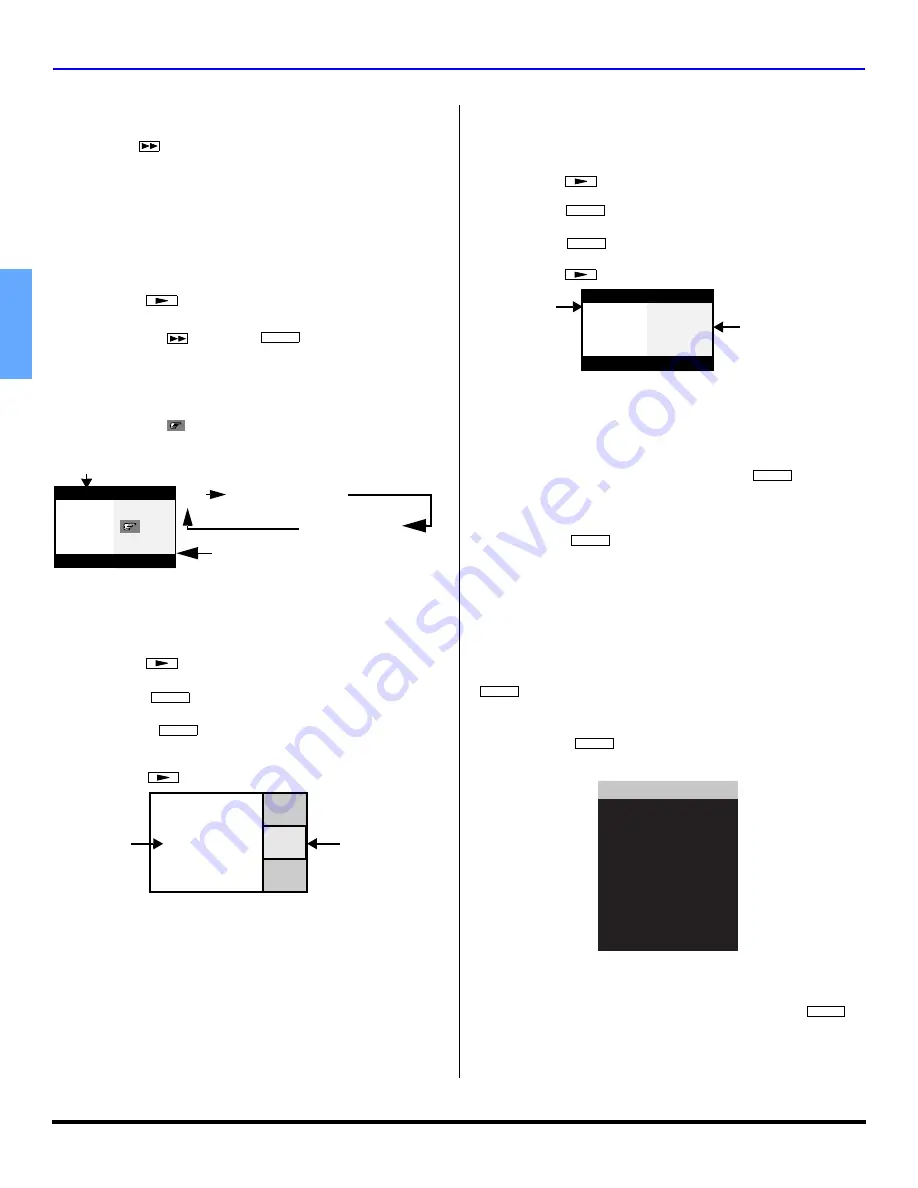
Split-Screen Operational Buttons

SPLIT CTRL Button  

Pressing 

 will enable you to use numeric keys

for changing split channel and to use TV/VIDEO button to
select desired input for Split frame.

TV/VIDEO Button   

Press when Split frame is displayed to select desired input
mode. 

Procedure

Press 

  to display Split frame.

Press 

 then 

 to display video input

menu.

Press corresponding number key on the remote control
to select the input of your choice.

Note:

Split frame input mode can only be changed while right
indicator (

)is displayed. 

Search Button 

This feature lets you scan through all available channels.

Procedure

Press 

 to display split frame.

Press 

 to display search frames.

Press 

again to stop search feature. Split

frame channel will be the last active search frame.

Press 

 to cancel split frame.    

Note:

When main picture is Photo Viewer™, Component, RGB
or HDMI signal, search feature is not available.

Freeze Button 

This feature is used to stop action in Split frame.

Procedure

Press 

 to display split frame.

Press 

 to stop split frame action. 

Press 

 again to continue action. 

Press 

 to cancel frame.      

Main Picture Freeze Feature

This feature is used to stop action of the Main Picture and
display it on a Split freeze frame.

Procedure

To stop action for Main picture, press 

 while

Split frame is not displayed.

Main Picture freeze will be displayed in Split frame. 

Press 

 again to cancel Main Picture freeze

frame.

Note:

While Main Picture freeze frame is displayed, only
FREEZE button is active for Split frame. All other Split
buttons have no effect.

Direct Video Input Selection

This feature lets you select video inputs directly using the

 and the numeric keys on the remote control.

Procedure

Press 

 on the remote control to display the

Input selection menu.   

Press corresponding number key on the remote control
to select the input of your choice.

Note:

Video input can also be selected by pressing 

,

then the CH 

ST

buttons.

SPLIT CTRL.

SPLIT

SPLIT CTRL.

TV/VIDEO

Main Picture

TV

Split Frame

COMPONENT1/2/3

VIDEO 1/2/3

SPLIT

SEARCH

SEARCH

SPLIT

2

3

4

Search Frames

Main Picture

SPLIT

FREEZE

FREEZE

SPLIT

Main Picture

Split freeze frame

FREEZE

FREEZE

TV/VIDEO

TV/VIDEO

1  TV

2  COMPONENT1
3  COMPONENT2
4  COMPONENT3
5  HDMI
6  VIDEO1
7  VIDEO2
8  VIDEO3
9  RGB1
0  RGB2

TV/VIDEO

Содержание HDTV DLP PT-60DL54

Страница 1: ...or de proyección de HDTV DLP Instrucciones de Operación Téléprojecteur haute définition DLP Manuel d utilisation TQB2AA0509 40514 PRINTED IN USA IMPRESO EN EE UU IMPRIMÉ AUX ÉTATS UNIS D LP TM A TEXAS INSTRUMENTS TECHNOLOGY PT 60DL54 PT 50DL54 PT 50DL54X TM ...

Страница 2: ...he point where they exit from the apparatus 11 Only use attachments accessories specified by the manufacturer 12 Use only with the cart stand tripod bracket or table specified by the manufacturer or sold with the apparatus When a cart is used use caution when moving the cart apparatus combi nation to avoid injury from tip over 13 Unplug this apparatus during lightning storms or when unused for lon...

Страница 3: ...MI the HDMI logo and High Definition Multimedia Interface are trademarks or registered trademarks of HDMI Licensing LLC Trademarks DLP is a registered trademark of Texas Instruments VGA is a trademark of International Business Machines Corporation Macintosh is a registered trademark of Apple Computer USA S VGA is a registered trademark of the Video Electronics Standards Association Even if no spec...

Страница 4: ...ollowing measures Reorient or relocate the receiving antenna Increase the separation between the equipment and the receiver Connect the equipment into an outlet on a circuit different from that which the receiver is connected Consult the dealer or an experienced radio TV technician for help Industry Canada Information This Class B digital apparatus complies with Canadian ICES 003 Important Informa...

Страница 5: ...ion Television 8 Optional Equipment Connections 9 RGB Input Connection 9 Analog RGB Signals that can be Input 9 VCR 10 Cable Box 10 VCR and Cable Box 10 Amplifier Connection 11 Digital TV Set Top Box DTV STB or DVD Players 11 Program Out Connection 11 HDMI High Definition Multimedia Interface Input Connection 12 Special Features 13 ASPECT Button 13 BBE Button 13 SAP Button 13 Split Screen Operatio...

Страница 6: ...er petroleum based products For cabinets do not bring into contact with insecticide or other volatile substances Do not allow the unit to come into contact for extended periods with rubber or vinyl products Specifications Specifications are subject to change without notice or obligation Feature Chart Power Source PT 60DL54 2 4A PT 50DL54 2 4A PT 50DL54X 2 4A 120 V AC 60Hz 127 V AC 60Hz Channel Cap...

Страница 7: ...ch your component connectors Avoid long cables to minimize interference AC Power Supply Cord CAUTION TO PREVENT ELECTRIC SHOCK MATCH WIDE BLADE OF PLUG TO WIDE SLOT OF AC OUTLET AND FULLY INSERT DO NOT USE A PLUG WITH A RECEPTACLE OR OTHER OUTLET UNLESS THE BLADE CAN BE FULLY INSERTED TO PREVENT BLADE EXPOSURE PROTECT POWER CORDS FROM BEING WALKED ON ROLLED OVER CRIMPED BENT OR PINCHED PARTICULARL...

Страница 8: ...horten lamp life Because of this having a replacement lamp on hand is recommended A warning will display after 10 000 hours of use When the power is turned on after 10 000 hours of continued use REPLACE LAMP will be displayed for approximately 1 min A warning message to urge the replacement of the lamp will be displayed in red at the center of the screen Important Points to keep in mind When repla...

Страница 9: ...nd by mode Notes The Power Indicator will become orange for approximately 10 seconds The Power Indicator will blink orange for approximately 60 seconds The Power Indicator light will go out Note The Projection Television will consume a small amount of power as long as the power cord is connected to a power outlet Power Indicator Chart Initial Set Up Menu For your convenience the Initial Set Up men...

Страница 10: ...VIDEO AUDIO L R INPUT3 RGB2 IN AUDIO IN 1 2 Item Description Input 3 A V inputs for connecting VCR Palmcorders or other devices Note Press TV Video button to select Video 3 Audio In and RGB 2 In For connecting a PC with RGB output Item Description Antenna Inputs ANT Connect cable antenna or terrestrial antenna to this input Audio In and RGB 1 In For connecting a PC with RGB output INPUTS 1 and 2 A...

Страница 11: ... signal with a vertical scanning frequency of 62 Hz is input To obtain the optimum picture quality with the Projection Television a vertical scanning frequency of 60 Hz is recommended Analog RGB signals that can be input The table below lists the different types of analog RGB signals that can be input If a signal which differs greatly from any of the types listed below is input the picture image m...

Страница 12: ...is diagram when connecting your television to both a VCR and a cable box Viewing a premium scrambled cable channel Procedure Tune the television to Channel 3 or 4 depending on cable box Using the cable box tune to the premium cable channel you want to view Recording a premium scrambled cable channel Procedure Press the TV VIDEO button on the remote control to select the video input VIDEO 1 VIDEO 2...

Страница 13: ...e There are three sets of three video jacks Y PB and PR Separate component color inputs provide luminance and color separation Use the L left and R right audio inputs Program Out Connection To use the television audio and video with optional equipment connect the Video Out and AUDIO L R connections on the back of the television Note If the main picture signal is component video input HDMI JPEG or ...

Страница 14: ...n Press TV VIDEO button on the remote control to select HDMI input The interface on the Projection Television is an HDMI Type A connector If the external device has a DVI output only use a DVI to HDMI adaptor cable 3 to connect to the HDMI jack on the Projection Television Also connect the Audio Out signal from the external device set top box or DVD player to the Audio In 4 jacks below the HDMI in...

Страница 15: ... Picture while viewing a television program or video in the Split frame Procedure Tune TV to channel 3 or 4 Press on the remote control to display Split frame Note Audio is from the Main Picture only Verify that the cable box is ON Choose channels for the Main Picture by tuning the cable box Choose channels for the SPLIT frame by pressing Customer Options depending on Component Input Signal INPUT ...

Страница 16: ...stop split frame action Press again to continue action Press to cancel frame Main Picture Freeze Feature This feature is used to stop action of the Main Picture and display it on a Split freeze frame Procedure To stop action for Main picture press while Split frame is not displayed Main Picture freeze will be displayed in Split frame Press again to cancel Main Picture freeze frame Note While Main ...

Страница 17: ...n menus Press to switch to previously viewed channel or input mode Press to swap Main picture with Split frame REW While remote is in VCR or DVD mode press to rewind Press to display Split frame press again to delete Split frame While remote is in VCR or DVD mode press to play While remote is in VCR or DVD mode press to pause FREEZE While in TV mode press to stop action in the Split frame TV VCR P...

Страница 18: ... Press and together for at least 5 seconds After 5 seconds the illuminated mode component buttons will begin to flash Release the OK and POWER buttons 4 Press appropriate component button on the Remote Control 5 Press the button to place the remote control into the step and set mode 6 Point the remote control towards the component 7 Press VOL X the mode key will blink three times then press the Re...

Страница 19: ...ro 306 Tatung 310 311 339 Teac 310 311 339 Technics 321 322 323 324 Teknika 324 Toshiba 301 346 Vector Research 311 Wards 306 309 335 336 344 Yamaha 305 310 311 339 Zenith 306 344 Codes For Cable Box Brand Code ABC 224 Archer 225 232 Cableview 205 232 Citizen 205 222 Curtis 212 213 Diamond 224 225 232 Eagle 229 Eastern 234 GCbrand 205 232 Gemini 222 General Instrument Jerrold 211 219 220 221 222 2...

Страница 20: ...neer 105 107 Quasar 118 119 121 RCA 103 105 127 130 131 Sansui 103 111 139 Sharp 134 137 Sony 122 Soundesign 138 Teac 111 112 113 Technics 118 119 121 Victor 132 133 Yamaha 101 102 Codes For CD Player Brand Code Admiral 226 Aiwa 233 235 Carver 229 Denon 242 Emerson 239 Fisher 205 Harman Kardon 219 220 221 223 Hitachi 207 Jensen 234 JVC 240 241 245 Kardon 223 Kenwood 200 201 211 245 LXI Sears 236 M...

Страница 21: ...E STB Aspect STB select dash channel PROG STB Menu MENU STB search SEARCH OPEN CLOSE STB Exit EXIT STB M guide SWAP REW STB program info STB jump SPLIT CTRL FF STB FAV SPLIT PLAY Select TV input for DBS STB Record REC POWER TV VIDEO CH CH 1 2 3 4 5 6 7 8 9 0 X RECALL POWER VOL VOL OK CH CH 1 2 3 4 5 6 7 8 9 0 ASPECT RECALL X TV VIDEO Change to TV or SAT Mode FREEZE TV VCR TO DO THIS PRESS TO DO TH...

Страница 22: ...er SPLIT CH DVD VCR CH TO DO THIS PRESS TO DO THIS PRESS Turn on off Rewind SWAP REW Select TV VCR Fast Forward SPLIT CTRL FF POWER RECALL TV VIDEO CH CH 1 2 3 4 5 6 7 8 9 0 VOL VOL ASPECT OK POWER VOL VOL MUTE AVI Press 1 AV2 Press 2 AV3 Press 3 AV4 Press 4 CD Press 5 TUNER Press 6 PHONO Press 7 TAPE Press 8 AUX Press 9 TV VIDEO CH CH POWER TV VIDEO PVR up down Select a Channel PVR left right Pau...

Страница 23: ... desired sub menu PICTURE PIC MODE COLOR TINT BRIGHTNESS PICTURE SHARPNESS NORMAL OTHER ADJ PRESS MENU FOR MAIN MENU VIVID I SET I I I I to select or adjust desired sub menu BRIGHTNESS 32 I Note For sub menu with OTHER ADJ PICTURE PIC MODE COLOR TINT BRIGHTNESS PICTURE SHARPNESS NORMAL OTHER ADJ PRESS MENU FOR MAIN MENU PRESS OK TO ENTER Press to enter sub sub menu field Press to select desired su...

Страница 24: ... not selectable when viewing a regular TV NTSC program Note When viewing a non standard DTV signal format you can change color parameters manually for the best picture quality MPEG NR This feature reduces the block noise caused by the MPEG video compression used in DVD and HDTV sources AUDIO Note While sub menu features are highlighted press VOL X to adjust or activate MODE Select STEREO SAP Secon...

Страница 25: ...vailable for RGB1 and RGB2 input label Procedure Press CH S or CH T to select the desired Video input Press W VOL or VOL X to select desired preset input label see chart below CHANNELS CH SCAN FAVORITES ALL ENTER CHANNEL FAVORITE CHANNELS 3 3 OTHER ADJ ADD DELETE PRESS MENU FOR MAIN MENU CHANNELS OTHER ADJ PRESS MENU TO RETURN PRESET CAPTION MANUAL CAPTION INPUT LABEL CHANNELS PRESS MENU TO RETURN...

Страница 26: ...HANNEL Lock up to four channels ALL Locks all channels and video inputs Press then CH T to highlight HOW LONG Press VOL X to select 12 Hours 24 Hours 48 Hours or ALWAYS Note If GAME CHANNEL or ALL is selected and if a blocked channel or video input is selected the message LOCKED displays in the upper left corner of the TV screen V CHIP SET V Chip technology allows parents to use the Projection Tel...

Страница 27: ...ing NR programs non rated not applicable and none as per FCC Rules Section 15 120 e 2 If the option of blocking NR programs is chosen unexpected and possibly confusing results may occur and you may not receive emergency bulletins or any of the following types of programming Emergency Bulletins Such as EAS messages weather warnings and others Locally originated programming News Political Public Ser...

Страница 28: ...ours or ALWAYS Press to return to Main Menu then press CH S to exit NR CONTAINS NO RATING NOT RATED AND NA NOT APPLICABLE PROGRAMS Movie has not been rated or rating does not apply G GENERAL AUDIENCES All ages admitted PG PARENTAL GUIDANCE SUGGESTED Some material may not be suitable for children PG 13 PARENTS STRONGLY CAUTIONED Some material may be inappropriate for children under 13 R RESTRICTED ...

Страница 29: ...ure lets you adjust the size of the zoom picture and position it vertically Note This feature is only selectable while in Zoom mode Press the ASPECT button on the remote control for selecting Zoom mode RGB ADJ This feature is used to display RGB1 or RGB2 input signal correctly on screen Note This feature is only selectable while in RGB mode V POSITION To adjust the display vertical H POSITION To a...

Страница 30: ...n the signal source AUTO PROGRAM To automatically program all channels received through the RF input MANUAL PROGRAM To manually add or delete channels AUTO POWER ON Select SET to power up the TV at the same time as the Cable box or other components or select OFF CHAN BANNER Select ON to display onscreen banner when changing channels SET UP OTHER ADJ PRESS MENU TO RETURN MODE AUTO PROGRAM MANUAL PR...

Страница 31: ...select the previous or next picture Press EXIT button to exit Photo Viewer mode Photo Viewer Thumbnail mode The thumbnail screen is the initial entry screen It shows the total number of images on the card Filename folder number and the number of the thumbnail that is highlighted the date the picture was taken and the pixels resolution of the picture Procedure Insert SD or PCMCIA card to display th...

Страница 32: ...omatically 100 _PANA Folder names consist of a 3 digit folder number which is followed by five arbitrary characters P1000001 jpg P1000002 jpg P1000003 jpg P1000004 jpg File names consist of four arbitrary characters followed by a 4 digit file number 101 _PANA P1010001 jpg P1010002 jpg P1010003 jpg P1010004 jpg Note Folder and file names may vary according to the digital camera OK EXIT MENU CHANGE ...

Страница 33: ...now Set TV or Cable Mode Properly Check Antenna Cables No Audio No Video No Split Check if the Power Indicator is blinking orange Check if Power Cord is Plugged into Active Outlet Adjust Brightness and Audio Controls Change Channel Check Cable Connections Program the Remote Control Again Check Second Video Source Operation Make sure that a PC is not connected to HDMI DIGITAL IN input Normal Audio ...

Страница 34: ... the screen do not light up DLP is manufactured using an extremely high level of precision technology however sometimes some parts of the screen may be missing picture elements This is not a sign of a malfunction SYMPTOMS CHECKS Power will not turn on and Power LED is flashing Please consult your nearest dealer Power turns off and Temp LED is on Let the set cool down then turn back on If Temp LED ...

Страница 35: ...ep in mind 6 Information Regarding memory cards 29 Initial Set Up Menu 7 Input Label 23 Input Label Chart 23 Inserting and Removing SD or PCMCIA card 29 Installation 5 Interval 30 L Lamp unit replacement period 6 Lock 24 Lock Set 24 M Main and Split Blocking Message 27 Main Picture Freeze Feature 14 Manual Program 28 Mono 22 MPEG NR 22 N Natural Color 22 Normal 22 O Operating a CABLE BOX 19 Operat...

Страница 36: ...34 z NOTES ENGLISH ...

Страница 37: ...NOTES 35 z ENGLISH ...

Страница 38: ...BERÁN QUITARSE NI LA CUBIERTA NI LA TAPA POSTERIOR NO HAY EN EL INTERIOR PIEZA ALGUNA QUE EL USUARIO TENGA QUE REPARAR TODO SERVICIO HABRÁ DE BRINDARLO PERSONAL DE REPARACIÓN CAPACITADO El propósito del relámpago con punta de flecha dentro de un triángulo es el de advertir al usuario de que existen piezas internas del producto que representan riesgo de que las personas reciban descargas eléctricas...

Страница 39: ...hines Corporation Macintosh es una marca registrada de Apple Computer USA S VGA es una marca registrada de de la Asociación de Estándares de Electrónica de Video Aunque no se haya hecho ninguna anotación especial sobre marcas de fabrica o producto estas han sido completamente respetadas PARA RECICLAJE DEL PRODUCTO ESTE PRODUCTO UTILIZA UNA LAMPARA DE MERCURIO DE ALTA PRESION ASI COMO OTROS COMPONE...

Страница 40: ...e oriente o re ubique la antena receptora Incremente el espacio entre el equipo y el receptor Conecte el equipo en un enchufe de c a al cual el receptor no se encuentre conectado Consulte al Vendedor o un técnico experimentado en radio TV Información importante cuando se este usando el monitor de proyección Reflejo de luz externa Instale su monitor de proyección de tal manera de que la luz no se r...

Страница 41: ...odificador de Cable 10 Conexión del Decodificador de Cable y Videocasetera 10 Conexión del Amplificador de Sonido 11 Conexión del Decodificador de Televisión Digital 11 Conexión de Salida del Programa 11 Conexión de entrada HDMI 12 Características especiales 13 Botón ASPECT 13 Botón BBE 13 Botón SAP 13 Operación de SPLIT 13 Operación de SPLIT con un Decodificador de Cable 13 Botones de la Operatio...

Страница 42: ... que insectisidas ó substancias volátilas entren en contacto con el aparáto No permita que el aparáto este en contacto por periodos extendidos con productos de hule ó vinil Especificaciones Las especificaciones están sujetas a cambio sin previo aviso ni obligación alguna Tabla de Características Fuente de Potencia PT 60DL54 2 4A PT 50DL54 2 4A PT 50DL54X 2 4A 120V CA 60Hz 127V CA 60Hz Capacidad de...

Страница 43: ... de Suministro de Corriente Alterna PRECAUCION PARA PREVENIR UNA DESCARGA ELECTRICA BUSQUE LA CLAVIJA ANCHA DEL ENCHUFE E INSERTELA POR COMPLETO EN LA RENDIJA ANCHA DE LA TOMA DE CORRIENTE ALTERNA NO USE ESTE ENCHUFE CON UN RECEPTACULO U OTRA TOMA DE CORRIENTE SALVO QUE LA CLAVIJA SE PUEDA INSERTAR POR COMPLETO PREVINIENDO QUE SE EXPONGA LA CLAVIJA PROTEJA EL CABLE DE AC DE SER PISADO ENROLLADO PL...

Страница 44: ...ue tenga una lámpara de repuesto a la mano Un mensaje será mostrado después de 10 000 horas de uso Cuando el aparato se encienda después de 10 000 horas de uso REEMPLAZAR LAMPARA será mostrado en pantalla por aproximadamente un 1 minuto Puntos importantes a recordar Cuando reemplace su lámpara preste atención a los siguientes puntos de cuidado Precaución La lampar esta caliente cuando esta funcion...

Страница 45: ...10 segundos El indicador de encendido destellara naranja aproximadamente 90 segundos El indicador de encendido se apagará Nota El monitor de proyección consumirá una pequeña cantidad de energía mientras el cable de CA este conectado a un tomacorriente Tabla del indicador de encendido Menú de Programación Inicial Para su conveniencia el menú de auto programación será desplegado en pantalla cuando e...

Страница 46: ...p Lamp 9 8 1 2 3 4 5 6 7 6 7 T S VIDEO VIDEO AUDIO L R INPUT3 RGB2 IN AUDIO IN 1 2 Número Descripción Input 3 Entradas de A V para conectar video caseteras video cámaras u otros aparatos Nota Presione el botón TV Video para seleccionar Video 3 Audio In y RGB 2 In Para conectar una PC con salida RGB Número Descripción Antenna Input ANT Entrada para conectar antena de cable o terrestre Audio In y RG...

Страница 47: ...os con el monitor de proyección La imagen se obscurecerá si la señal RGB tiene una frecuencia vertical de 62 Hz Para obtener la mejor imagen posible con el monitor de proyección se recomienda utilizar una señal con frecuencia vertical de 60 Hz Señales RGB análogas que pueden ser conectadas La siguiente tabla enlista los diferentes tipos de señales análogas RGB que pueden ser utilizadas Si se utili...

Страница 48: ... Decodificador de Cable y Videocasetera Siga este diagrama cuando conecte su televisión tanto a una videocasetera como a un decodificador de cable Viendo un canal de cable premium codificado Procedimiento Sintonize la televisión al canal 3 Usando el decodificador de cable sintonize al canal de cable premium que desea ver Grabando un canal de cable premium codificado Procedimiento Presione el botón...

Страница 49: ... Televisión Digital Panasonic DTV STB ó DVD a su Televisor El televisor tiene dos grupos de entradas de video compuesto cada grupo tiene tres entradas Y PB y PR Los entradas separadas para las señales compuestas de color proveen una mejor separación de luminancia y color Conexión de Salida del Programa Para visualizar en la Televisión el Video y el Audio con equipo opcional de video conéctese a la...

Страница 50: ...HDMI El conector en este Televisión de Proyección es HDMI tipo A Conecte la salida HDMI del set top box o reproductor de DVD a la entrada HDMI IN en la parte posterior del Televisión de Proyección Si el dispositivo externo solo tiene salida DVI utilice un adaptador 3 de DVI a HDMI para conectarse al conector HDMI en el Televisión de Proyección Además conecte la señal de salida de audio del disposi...

Страница 51: ...LIT Procedimiento Sintonize la television canal 3 Presione en el control remoto para desplegar el marco de la pantalla SPLIT Nota El Audio es sólo de la Imagen Principal Verifique que su decodificador de cable esté Encendido Escoja canales para la Imagen Principal sintonizando su decodificador de cable Seleccione el canal de la imagen Split presionando el botón Opciones para la entrada compuesta S...

Страница 52: ...izada para congelar la imágen en la Split Procedimiento Presione para desplegar el marco de la Split Presione de nuevo para descongelar la imágen Presione de nuevo para descongelar la imágen Presione para cancalar el marco de la Split Función de congelamiento de imagen principal Esta función se usa para congelar la imagen principal y desplegarla la en SPLIT Procedimiento Para congelar la imagen pr...

Страница 53: ...deo Presione para cambiar entre la imágen principal y la SPLIT REW En modo VCR o DVD presione para regresar Presione para mostrar ó remover la imágen SPLIT En modo VCR o DVD presione para tocar En modo VCR o DVD presione para pausar FREEZE En modo TV presione para congelar la imagen en el marco SPLIT TV VCR Presione para seleccionar entre modo TV o VCR en su videocasetera Presione para accesar los...

Страница 54: ...a función apropiada del componente en el Control Remoto El botón seleccionado quedará iluminado y el resto se apagará 5 Presione el botón para que el control remoto entre en modo de programación por pasos 6 Apunte el control remoto hacia el componente 7 Presione el botón VOL X los botones de componentes destellarán tres veces Presione el botón de el Control Remoto para probar el componente Si éste...

Страница 55: ... Tashiro 306 Tatung 310 311 339 Teac 310 311 339 Technics 321 322 323 324 Teknika 324 Toshiba 301 346 Vector Research 311 Wards 306 309 335 336 344 Yamaha 305 310 311 339 Zenith 306 344 Códigos para Decodificador de Cable Marca Código ABC 224 Archer 225 232 Cableview 205 232 Citizen 205 222 Curtis 212 213 Diamond 224 225 232 Eagle 229 Eastern 234 GCbrand 205 232 Gemini 222 General Instrument Jerro...

Страница 56: ...9 114 Optimus 103 127 130 131 Panasonic 118 119 121 Philips 123 Pioneer 105 107 Quasar 118 119 121 RCA 103 105 127 130 131 Sansui 103 111 139 Sharp 134 137 Sony 122 Soundesign 138 Teac 111 112 113 Technics 118 119 121 Victor 132 133 Yamaha 101 102 Códigos para reproductor de CD Marca Código Admiral 226 Aiwa 233 235 Carver 229 Denon 242 Emerson 239 Fisher 205 Harman Kardon 219 220 221 223 Hitachi 2...

Страница 57: ...bajo Seleccionar Canal Cambiar el canal Arriba Abajo SPLIT CH DVD VCR CH Sintonizar el Canal previo R TUNE Aspecto DBS Guión para canal de STB PROG Menú STB MENU Busqueda del STB OPEN CLOSE Salir del menú STB EXIT Guía STB SWAP REW Programar Información Saltar STB SPLIT CTRL FF Favoritos del STB SPLIT PLAY Cambiar a modo TV o SAT FREEZE TV VCR Grabar STB REC POWER TV VIDEO CH CH 1 2 3 4 5 6 7 8 9 ...

Страница 58: ...NE Para Hacer Esto Oprima Para Hacer Esto Oprima Encender Apagar Volúmen Audio Mudo Para seleccionar fuente de AV ó componentes Cambiar fuente Envolvente SWAP REW POWER RECALL TV VIDEO CH CH 1 2 3 4 5 6 7 8 9 0 VOL VOL ASPECT OK POWER X POWER VOL VOL MUTE AV1 Press 1 AV2 Press 2 AV3 Press 3 AV4 Press 4 CD Press 5 TUNER Press 6 PHONO Press 7 TAPE Press 8 AUX Press 9 TV VIDEO TV VIDEO Sintonizador E...

Страница 59: ...OS AJ PRESIONE MENU PARA MENU OK PARA ENTRAR Presione Presione para seleccionar el sub sub menu deseado IMAGEN OTROS AJ PRESIONE MENU PARA REGRESAR TEMP COLOR COLOR NATURAL REDUC DE RUIDO 3D Y C FILTRO MATRIZ COLOR RR MPEG SI NO SI SD NO AZUL Presione para seleccionar o ajustar el sub sub menu deseado IMAGEN OTROS AJ PRESIONE MENU PARA REGRESAR TEMP COLOR COLOR NATURAL REDUC DE RUIDO 3D Y C FILTRO...

Страница 60: ...o de los parámetros de color para transmisiones de HD alta definición y SD definición estándar Esta función no se puede seleccionar cuando se ve programación regular de TV NTSC Nota Cuando esté viendo una señal de DTV en un formato no estándar puede cambiar los parámetros de color manualmente para obtener una mejor calidad de imágen MPEG NR Esta característica reduce el ruido de bloques ocasionado...

Страница 61: ...NO para desactivar el Cronometro Cronom 1 y Cronom 2 Seleccione uno ó dos cronómetros para encender y apagar la televisión a la hor canal días seleccionados Notas La televisión se activado automáticamente después de 90 minutos cuando se encendió con el CRONOMETRO Si se selecciona APAGAR o si se presiona una tecla el apagado automático de 90 minutos se cancela El CRONOMETRO está activo cuando la te...

Страница 62: ...r seguro Presione CH T para remarcar V CHIP Presione W VOL or VOL X para seleccionar PROGRAMAS DE EEUU PELICULAS DE EEUU INGLES DE CANADA o FRANCES DE CANADA Presione CH T para seleccionar PROGRAMACION PresioneW VOL ó VOL X para desplegar la tabla de clasificación Programas EEUU Peliculas EEUU Ingles de Canada ó Frances de Canada Presione VOL X para seleccionar SI ó NO Presione CH T para seleccion...

Страница 63: ... advertencias del clima y otros Programas originados localmente Noticias Política Anuncios de Servicio Público Religioso Deportes Estado del Tiempo NR No clasificado Vea Precauciones del Cliente TV Y Todos los niños Los temas y elementos en este programa están especialmente diseñados para un público infantil incluyendo niños de 2 6 años TV Y7 Dirigido a niños mayores Los temas y elementos en este ...

Страница 64: ...nces de Canada E Exento Los programas exentos incluyen noticieros deportivos documentales y programas informativos programas de entretenimiento videos musicales y programación variada c Programación dirigida a niños menores de 8 años No contiene lenguaje ofensivo sexual ni desnudos C8 Programación considerada apta para niños de 8 años en adelante No tiene contenido sexual ni desnudos G AUDIENCIA G...

Страница 65: ...ormación relacionada con el video T1 a T4 Para que la guía de la programación o cualquier otra información sea desplegada en pantalla cuando sea disponible Bloquea una gran porción de la imagen en la pantalla de la televisión Nota Se recomienda el modo C1 para ver subtitulos AJ ACERC Esta característica le permite ajustar el tamaño de la imagen ACERC y posicionaria verticalmente Nota Esta caracter...

Страница 66: ...de la fuente de la señal PROGRAMA AUTO Para programar automáticamente todos los canales con señal PROGRAMA MANUAL Para manualmente incluir o borrar canales AUTOENCENDIDO Seleccione SI para encender la televisión al mismo tiempo que el Decodificador de Cable u otros componentes ó seleccione NO para no hacerlo CANAL INFO Seleccione SI para desplegar la información cuando cambie de canal AJUSTE OTROS...

Страница 67: ...l Photo Viewer Photo Viewer Modo de previsualización La pantalla de previsualización es la primera pantalla accesada desde el menú principal Muestra la cantidad total de imagenes en la tarjeta el nombre del archivo número de folder y el número de la previsualización seleccionada la fecha en que la foto fué tomada y la resolución de la misma Procedimiento Presione MENU para accesar el menú principa...

Страница 68: ...o algunas condiciones no se cumplen o exceden las especificaciones del Photo Viewer ROOT DCIM 100 _PANA P1000001 jpg P1000002 jpg P1000003 jpg P1000004 jpg 101 _PANA P1010001 jpg P1010002 jpg P1010003 jpg P1010004 jpg Nota Creada automáticamente Los nombres de las carpetas de 3 dígitos seguidos de consisten en números de carpetas cinco caracteres arbitrarios Los nombres de archivos arbitrarios seg...

Страница 69: ...ambie el Canal Sonido Ruidoso Sin Imagen Con Motas Ajuste apropiadamente la modalidad de TV o del Cable Revise los Cables de la Antena Sin Sonido Sin Imagen Sin SPLIT Revise que el Cable de Corriente este Enchufado a una toma de Corriente Activa Ajuste los Controles de Brillo y Audio Cambie el Canal Revise las Conexiones del Cable Programe el Control Remoto otra vez Revise la Operación de la Segun...

Страница 70: ...tilizando una tecnología de precisión extremadamente alta aun así a veces algunas partes de la imagen pueden contener elementos ausentes Esto no es una señal de desperfecto Síntoma Revisar El aparato no enciende y el indicador de encendido está destellando Consulte a su distribuidor autorizado más cercano El aparato se apaga y el indicador de TEMP está iluminado Permita que el aparato se enfríe y ...

Страница 71: ...ón 2 Información sobre el abanico de enfriamiento 2 Información sobre las tarjetas de memoria 29 Inglés de Canada 26 Insertando y removiendo tarjetas SD o PCMCIA 29 Instalación 5 Instalación de Pilas en el Control Remoto 6 Intervalo 30 J Juego 24 L Localización de fallas del Photo Viewer 30 M Marcas de Fabrica 1 Matriz Color 22 Medida de seguridad 5 Mensaje de Bloqueo de Imagen Principal y SPLIT 2...

Страница 72: ...e fournie ne peut pas être branchée dans la prise secteur consulter un électricien pour faire remplacer la prise 10 Le fil d alimentation doit être placé dans un endroit où il ne risque pas d être piétiné ou écrasé Faire particulièrement attention à ses extrémités de branchement y compris sa fiche 11 N utiliser que les fils et accessoires recommandés par le fabricant 12 N utiliser que les chariots...

Страница 73: ...e commerce de International Business Machines Corporation Macintosh est une marque déposée de Apple Computer USA S VGA est une marque déposée de la Video Electronics Standard Association Même si aucune mention particulière n est faite de certaines marques de commerce ou marques déposées les droits liés à ces marques ont été entièrement respectés Ce produit renferme une lampe à vapeur de mercure à ...

Страница 74: ... récepteur Raccorder l appareil à une prise de courant se trouvant sur un circuit différent de celui utilisé par le récepteur Consulter votre revendeur ou un technicien qualifié expérimenté Informations fournies par Industrie Canada Cet appareil numérique de la classe B est conforme à la norme NMB 033 du Canada Renseignements importants concernant l utilisation du téléprojecteur Réflexion de la lu...

Страница 75: ...un câblosélecteur 10 Branchement à un magnétoscope et un câblosélecteur 10 Branchement à un amplificateur audio 11 Branchement d un décodeur de télévision numérique lecteur DVD 11 Branchement à la prise PROG OUT 11 Connexion d entrée HDMI 12 Caractéristiques spéciales 13 Touche de format de l image ASPECT 13 Touche de rendu sonore BBE 13 Touche de seconde voie audio SAP 13 Fonction partage d écran...

Страница 76: ... aucune substance volatile telle qu insecticide n entre en contact avec le boîtier S assurer que l appareil ne demeure pas en contact prolongé avec des produits en caoutchouc ou en vinyle Spécifications Les spécifications peuvent être modifiées sans préavis Table des caractéristiques Alimentation PT 50DL54 2 4A PT 60DL54 2 4A 120 V c a 60 Hz Bloc d accord 181 canaux VHF 12 UHF 56 Câble 113 Prises ...

Страница 77: ...alimentation ATTENTION AFIN DE PRÉVENIR TOUT RISQUE D ÉLECTROCUTION INSÉRER À FOND LA LAME LA PLUS LARGE DE LA FICHE DANS LA FENTE LA PLUS LARGE DE LA PRISE NE PAS UTILISER UNE PRISE DANS LAQUELLE LA LAME POLARISÉE NE PEUT ÊTRE INSÉRÉE COMPLÈTEMENT PLACER LE CORDON D ALIMENTATION DANS UN ENDROIT OÙ IL NE RISQUE PAS D ÊTRE PIÉTINÉ COINCÉ ÉCRASÉ PLIÉ ETC FAIRE PARTICULIÈREMENT ATTENTION À SES EXTRÉM...

Страница 78: ...utilisation un message d avertissement s affiche Lorsque l appareil est mis en tension après 10 000 heures d utilisation continue le message REMPLACER LAMPE s affiche pendant une minute environ Un message d avertissement indiquant le besoin de remplacer la lampe s affiche en rouge au centre de l écran Points importants à retenir Lors du remplacement de la lampe respecter les conseils suivants Atte...

Страница 79: ...hors tension Pour mettre le téléprojecteur en mode d attente appuyer sur l interrupteur d alimentation Nota Le voyant d alimentation s allumera en orange pendant 10 secondes environ Le voyant d alimentation clignotera en orange pendant 90 secondes environ Le voyant d alimentation s éteindra Le téléprojecteur continue de consommer une certaine quantité d énergie aussi longtemps que le cordon d alim...

Страница 80: ...uche TV VIDEO pour sélectionner Video 3 Prises d entrée audio et RVB 2 AUDIO IN et RGB2 IN Pour le raccordement d un ordinateur muni d une prise de sortie RVB Numéro Description Entrées d antenne ANT Raccorder le câble d antenne ou l antenne externe à cette prise d entrée Prises d entrée audio et RVB 1 AUDIO IN et RGB1 IN Pour le raccordement d un ordinateur muni d une prise de sortie RVB Prises d...

Страница 81: ... appareils et les câbles supplémentaires illustrés sont vendus séparément L image s assombrira en présence d un signal d entrée RVB avec une fréquence de balayage de 62 Hz Pour un rendement optimal de l image sur le téléprojecteur une fréquence de balayage de 60 Hz est recommandée Signaux d entrée RVB RGB analogiques pris en charge Le tableau qui suit fournit la liste des différents types de signa...

Страница 82: ...canal brouillé désiré Branchement à un magnétoscope et un câblosélecteur Suivre le diagramme ci dessous lors du branchement d un magnétoscope et d un câblosélecteur au téléprojecteur Visionnement d un canal brouillé Marche à suivre Syntoniser le canal 3 ou 4 sur le téléprojecteur selon le câblosélecteur À l aide du câblosélecteur syntoniser le canal brouillé désiré Enregistrement d un canal brouil...

Страница 83: ...nnecter un décodeur de télévision numérique ou lecteur DVD au téléprojecteur Nota Il y a 3 jeux de trois entrées vidéo Y PB et PR Les signaux composants séparés de couleur fournissent la luminance et l analyse chromatique Utiliser les prises d entrée audio gauche L et droite R Branchement à la prise PROG OUT Pour utiliser le signal audio et vidéo du téléprojecteur avec un équipement auxiliaire bra...

Страница 84: ...ecteur DVD Marche à suivre Raccorder la prise de sortie HDMI du décodeur ou du lecteur DVD à la prise d entrée HDMI sur le panneau arrière du téléprojecteur Appuyer sur la touche TV VIDEO sur la télécommande pour sélectionner l entrée HDMI Le connecteur HDMI sur le téléprojecteur est du type A Si l appareil auxiliaire ne possède qu une sortie DVI brancher un câble d adaptation DVI HDMI à la prise ...

Страница 85: ...sionnement d un canal brouillé à l image principale et d une émission télévisée ou d une source vidéo dans l écran partagé Marche à suivre Syntoniser le canal 3 ou 4 sur le téléprojecteur Appuyer sur de la télécommande pour faire afficher l écran partagé Nota Le signal audio est en provenance de l image principale seulement S assurer que le contact est établi sur le câblosélecteur Sélectionner les...

Страница 86: ...r l action de l écran partagé Marche à suivre Appuyer sur pour afficher l écran partagé Appuyer sur pour figer l action à partir de l écran partagé Appuyer de nouveau sur pour mettre hors fonction Appuyer sur pour annuler l écran partagé Arrêt sur image principale Cette fonction permet de figer l action de l image principale et l afficher à l écran partagé Marche à suivre Pour figer l action sur l...

Страница 87: ... appuyé sur la touche Split CTRL appuyer sur cette touche pour afficher l écran partagé Appuyer de nouveau pour désactiver l écran partagé Lorsque la télécommande est en mode magnétoscope ou DVD appuyer sur cette touche pour lancer la lecture Lorsque la télécommande est en mode magnétoscope ou DVD appuyer sur cette touche pour interrompre la lecture FREEZE Lorsqu en mode télé appuyer sur cette tou...

Страница 88: ...sé 5 Appuyer sur la touche pour mettre la télécommande dans le mode programmation 6 Orienter la télécommande vers l appareil auxiliaire 7 Appuyer sur la touche VOL X la touche de mode clignote trois fois puis appuyer sur la touche de la télécommande pour vérifier si l appareil peut être mis en marche Répéter la procédure jusqu à ce que le bon code soit trouvé Si la programmation a réussi le contac...

Страница 89: ...1 Tashiro 306 Tatung 310 311 339 Teac 310 311 339 Technics 321 322 323 324 Teknika 324 Toshiba 301 346 Vector Research 311 Wards 306 309 335 336 344 Yamaha 305 310 311 339 Zenith 306 344 Codes pour câblosélecteurs Marque Code ABC 224 Archer 225 232 Cableview 205 232 Citizen 205 222 Curtis 212 213 Diamond 224 225 232 Eagle 229 Eastern 234 GCbrand 205 232 Gemini 222 General Instrument Jerrold 211 21...

Страница 90: ... 214 215 Optimus 208 218 220 222 Panasonic 224 225 227 Philips 229 230 Pioneer 208 Quasar 224 225 227 RCA 231 237 238 247 Sansui 210 246 Sanyo 205 Scott 210 246 Sharp 242 243 Sherwood 220 Sony 228 Soundesign 244 Teac 212 216 218 Technics 224 225 227 Victor 240 241 245 Yamaha 202 203 204 Codes pour enregistreurs vidéo personnels Marque Code Panasonic Replay TV 100 Philips Tivo 102 Sony Tivo 101 Cod...

Страница 91: ...u canal à tiret du décodeur PROG Menu du décodeur MENU Recherche sur décodeur SEARCH OPEN CLOSE Sortie du décodeur EXIT Guide M du décodeur SWAP REW Renseignements sur le program me du décodeur Saut sur décodeur FF Favoris sur décodeur SPLIT PLAY Sélection du mo de d entrée pour récepteur de diffusion par satellite POWER TV VIDEO CH CH 1 2 3 4 5 6 7 8 9 0 X RECALL POWER VOL VOL OK CH CH 1 2 3 4 5 ...

Страница 92: ...ue SWAP REW Bloc d accord Augmentation du volume du canal ambiophonique SPLIT CTRL FF Réglage du volume du canal centre SPLIT CH DVD VCR CH Action désirée Appuyer sur Action désirée Appuyer sur Mise sous hors tension Rebobinage SWAP REW POWER RECALL TV VIDEO CH CH 1 2 3 4 5 6 7 8 9 0 VOL VOL ASPECT OK POWER VOL VOL MUTE AVI Appuyer sur 1 AV2 Appuyer sur 2 AV3 Appuyer sur 3 AV4 Appuyer sur 4 CD App...

Страница 93: ...S RÉG TEMP COUL COUL NATUR RÉDUCTEUR FILTRE 3D Y C CODEUR COUL RÉDUCTEUR MPEG APPUYER MENU POUR RETOURNER APPUYER MENU POUR RETOURNER BLEU EF HF EF DS HF pour sélectionner ou régler le sous menu secondaire désiré IMAGE AUTRES RÉG TEMP COUL COUL NATUR RÉDUCTEUR FILTRE 3D Y C CODEUR COUL RÉDUCTEUR MPEG APPUYER MENU POUR RETOURNER APPUYER MENU POUR RETOURNER BLEU EF EF EF DS HF Nota Pour quitter les ...

Страница 94: ...ption d un signal de télévision numérique non standard il est possible de modifier les paramètres couleur manuellement pour une meilleure qualité de l image RÉDUCTEUR MPEG Cette fonction réduit l interférence causée par la compression du signal vidéo MPEG effectuée par les sources DVD et à haute définition AUDIO Nota Pour régler les rubriques du sous menu lorsqu elles sont en surbrillance appuyer ...

Страница 95: ... 30 60 ou 90 minutes Sélectionner NON pour mettre la minuterie hors fonction MINUTERIE 1 et MINUTERIE 2 Sélectionner une ou deux minuteries pour mettre le téléprojecteur en et hors marche à une heure préréglée au canal de son choix aux jours voulus Nota Le contact est automatiquement coupé après 90 minutes si la mise en marche a été activée par la fonction MINUTERIE Si l heure de mise hors fonctio...

Страница 96: ...brillance Au moyen des touches numériques entrer le code à quatre chiffres Utiliser un code facile à mémoriser et le conserver dans un endroit sûr Appuyer sur la touche CH T pour mettre RÉGL PUCE en surbrillance Appuyer sur les touches W VOL ou VOL X pour sélectionner ÉMIS TÉLÉ USA FILMS USA CANADA ou CANADA QUÉBEC Appuyer sur la touche CH T pour mettre RÉGLAGE en surbrillance Appuyer sur les touc...

Страница 97: ...missions non cotées NR conformément aux directives de la section 15 120 e 2 de la FCC Il est à noter toutefois que si le verrouillage des émissions non cotées est activé il se pourrait que des résultats inopinés et confus s ensuivent et qu il soit impossible de recevoir des bulletins d urgence ou certains des programmes suivants Bulletins d urgence tels que messages de la sécurité civile avis mété...

Страница 98: ...quer VERT Appuyer sur la touche à reprises pour retourner à RÉGL PUCE Appuyer sur la touche CH T pour sélectionner COMBIEN D HEURES NR PROGRAMMES NON COTÉS NR ou NON SOUMIS À LA CLASSIFICATION NA Le film n a pas été coté ou les cotes ne s appliquent pas G VISA GÉNÉRAL Pour tous âges PG SUPERVISION PARENTALE SUGGÉRÉE Certaines images pourraient ne pas convenir à des enfants PG 13 JUGEMENT DES PAREN...

Страница 99: ...ffichage des sous titres RÉG ZOOM Cette fonction permet le réglage de la taille de l image agrandie et de son positionnement vertical à l écran Nota Cette fonction n est disponible qu en mode zoom Appuyer sur la touche ASPECT sur la télécommande pour sélectionner le mode zoom RÉG RVB Cette fonction permet l affichage correct des signaux d entrée RVB 1 ou RVB 2 Note Cette fonction n est disponible ...

Страница 100: ...gnal PROG AUTO Pour programmer automatiquement tous les canaux reçus par l entremise de la prise d entrée RF PROG MANUELLE Pour ajouter ou supprimer manuellement les canaux CONTACT AUTO Sélectionner EF pour que le téléprojecteur se mette en fonction en même temps que le câblosélecteur ou les autres appareils ou sélectionner HF hors fonction BANNIÈRE CANAL Sélectionner EF pour afficher la bannière ...

Страница 101: ...vante Appuyer sur la touche EXIT pour quitter le mode Photo Viewer Photo Viewer Mode affichage d imagettes L écran d imagettes est l écran initial auquel donne accès le menu principal Il indique le nombre total d images sur la carte le nom du fichier numéro du dossier et le numéro de l imagette en surbrillance la date d enregistrement et la définition de l image nombre de pixels Marche à suivre In...

Страница 102: ...00002 jpg P1000003 jpg P1000004 jpg 101 _PANA P1010001 jpg P1010002 jpg P1010003 jpg P1010004 jpg Nota Les noms des dossiers et des fichiers peuvent varier selon l appareil photo numérique Les noms de dossiers comportent un numéro à 3 chiffres suivi de cinq caractères arbitraires Les noms de fichiers comportent quatre caractères arbitraires suivi d un numéro à 4 chiffres OK SORTIE MENU MODIFIER SÉ...

Страница 103: ... avec présence de neige Sélectionner le mode TÉLÉ ou CÂBLE Vérifier le branchement des câbles d antenne Absence de son Absence d image ou d écran partagé Vérifier si le voyant d alimentation clignote en orange Vérifier si le cordon d alimentation est branché dans une prise secteur active Syntoniser un autre canal Vérifier les raccordements Programmer à nouveau la télécommande Vérifier le fonctionn...

Страница 104: ...st employée pour produire le dispositif DLP Toutefois il arrive parfois que certains éléments de l image soient absents de certaines parties de l écran Cela n est le signe d aucune anomalie PROBLÈME VÉRIFICATIONS Il est impossible de mettre l appareil sous tension et le voyant d alimentation clignote Contacter le détaillant L appareil se met hors tension et le voyant de température est allumé Atte...

Страница 105: ...par la Commis sion fédérale des communications américaine FCC 2 Installation 5 Installation des piles de la télécommande 6 M Menu de configuration de Photo Viewer 30 Message de verrouillage de I image principale et l écran partagé 27 Messages d erreur 30 Mesures de sécurité 5 Minuterie 23 Minuterie 1 et Minuterie 2 23 Mise sous tension mise hors tension 7 Mode 22 Mono 22 N Navigation au menu de ba...

Страница 106: ...rts warranty period there will be no charge for parts You must carry in your product or arrange for in home service during the warranty period If non rechargeable batteries are included they are not warranted This warranty only applies to products purchased and serviced in the United States or Puerto Rico This warranty is extended only to the original purchaser of a new product which was not sold ...

Страница 107: ...is attributable to acts of God THERE ARE NO EXPRESS WARRANTIES EXCEPT AS LISTED UNDER LIMITED WARRANTY COVERAGE THE WARRANTOR IS NOT LIABLE FOR INCIDENTAL OR CONSEQUENTIAL DAMAGES RESULTING FROM THE USE OF THIS PRODUCT OR ARISING OUT OF ANY BREACH OF THIS WARRANTY As examples this excludes damages for lost time cost of having someone remove or re install an installed unit if applicable or travel t...

Страница 108: ...cessory Purchases Purchase Parts Accessories and Instruction Books on line for all Panasonic Products by visiting our Web Site at http www pasc panasonic com or send your request by E mail to npcparts panasonic com You may also contact us directly at 1 800 332 5368 Phone 1 800 237 9080 Fax Only Monday Friday 9 am to 8 pm EST Panasonic Services Company 20421 84th Avenue South Kent WA 98032 We Accep...

Страница 109: ...ED EXCLUDING ANY IMPLIED WARRANTIES OF MERCHANTABILITY OR FITNESS FOR A PARTICULAR PURPOSE IN NO EVENT WILL PANASONIC CANADA INC BE LIABLE FOR ANY SPECIAL INDIRECT OR CONSEQUENTIAL DAMAGES In certain instances some jurisdictions do not allow the exclusion or limitation of incidental or consequential damages or the exclusion of implied warranties so the above limitations and exclusions may not be a...

Страница 110: ... IMPLICITES DU CARACTÈRE ADÉQUAT POUR LA COMMERCIALISATION OU UN USAGE PARTICULIER PANASONIC N AURA D OBLIGATION EN AUCUNE CIRCONSTANCE POUR TOUT DOMMAGE DIRECT INDIRECT OU CONSÉCUTIF Certaines juridictions ne reconnaissent pas les exclusions ou limitations de dommages indirects ou consécutifs ou les exclusions de garanties implicites Dans de tels cas les limitations stipulées ci dessus peuvent ne...

Страница 111: ...GUIA DE SERVICIOS TECNICOS Nota La hoja de garantía y la información de centros de servicio para el modelo PT 50DL54X está localizada en la bolsa de documentos ...

Страница 112: ...nic Canada Inc 5770 Ambler Drive Mississauga Ontario Canada L4W 2T3 Tel 905 624 5010 Fax 905 624 9714 www panasonic ca Panasonic Consumer Electronics Company Division of Matsushita Electric Corporation of America One Panasonic Way Secaucus New Jersey 07094 www panasonic com Panasonic de Mexico S A de C V Amores No 1120 Col Del Valle C P 03100 México D F Tel 0155 5488 1000 Fax 0155 5575 6763 5575 6...

Отзывы: