16
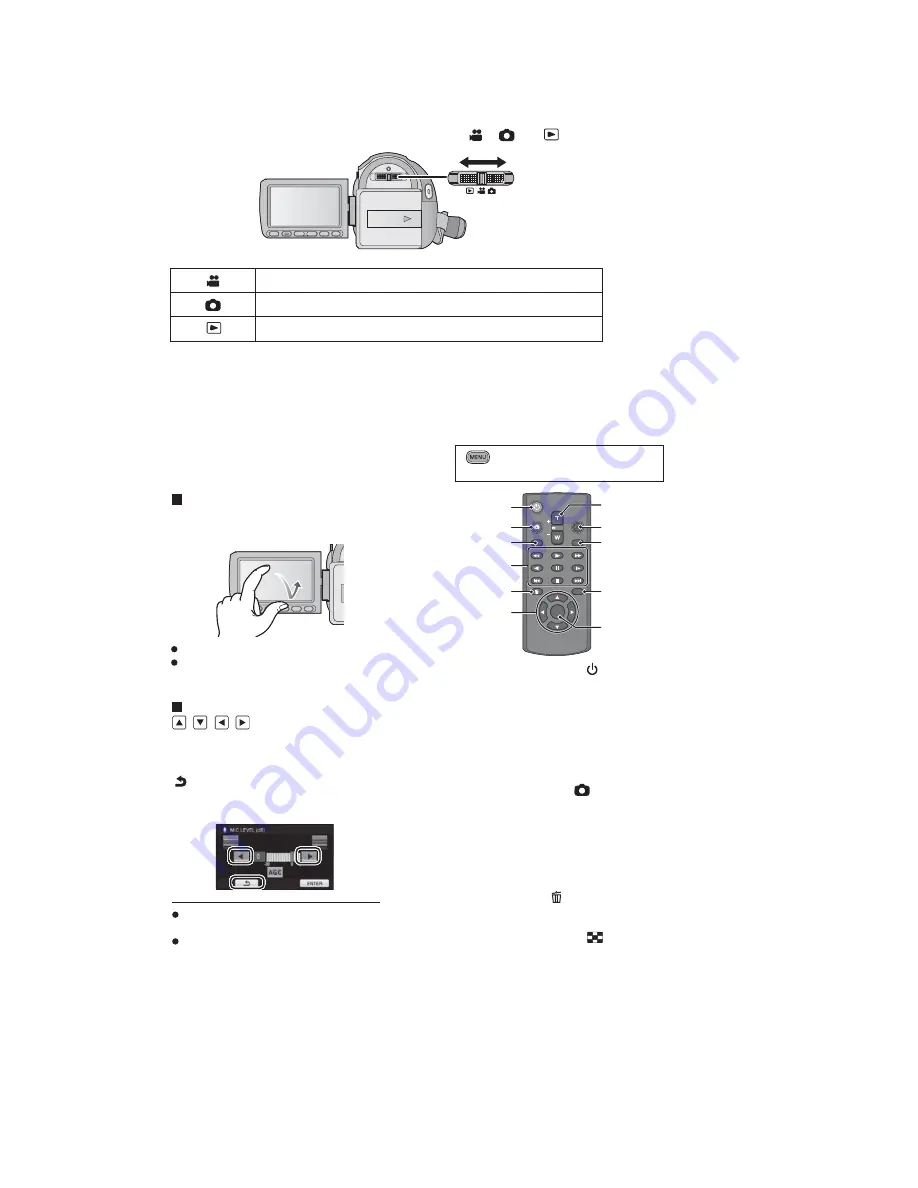
Change the mode to recording or playback.
Operate the mode switch to change the mode to
,
or
.
Motion Picture Recording Mode
Still Picture Recording Mode
Playback Mode
Selecting a mode
Using with the remote
control
Select the menu.
1
Power on/off button [
]
Unit can be turned on/off when the LCD
monitor is opened.
●
Unit cannot be turned on by the power on/
off button when 36 hours have passed after
the unit is turned off. Press the power
button on the unit and turn the unit back on.
●
Unit cannot be turned off when it is
connected to the PC or the DVD burner.
2
Photoshot button [
]
*
3
On-screen display button
[EXT DISPLAY]
4
Playback operation buttons
These buttons function in the same manner
as the corresponding playback operation
icon being displayed on screen.
[Excluding skip playback]
5
Delete button [
]
*
6
Direction buttons [
,
,
,
]
7
Zoom/volume/thumbnail display
switch buttons [T, W,
/VOL]*
8
Recording start/stop button [START/
STOP]
*
9
Date/time button [DATE/TIME]
10 Menu button [MENU]
*
11 OK button [OK]
* means that these buttons function in the
same manner as the corresponding
buttons on the unit.
: [SETUP]
[REMOTE CONTROL]
[ON]
SEARCH
STILL ADV
STILL ADV
SEARCH
/VOL
DATE/TIME
START/
STOP
EXT DISPLAY
PLAY
STOP
OK
SKIP
SKIP
MENU
PAUSE
2
3
4
6
5
8
7
9
10
11
1
You can operate by directly touching the
LCD monitor (touch screen) with your finger.
It is easier to use the stylus pen (supplied)
for detailed operation or if it is hard to
operate with your fingers.
Touch
Touch and release the touch screen to select
icon or picture.
Touch the center of the icon.
Touching the touch screen will not operate
while you are touching another part of the
touch screen.
About the operation icons
/
/
/
:
These icons are used to switch the menu
and thumbnail display page, for item
selection and setting etc.
:
Touch to return to the previous screen
such as when setting menus.
Do not touch on the LCD monitor with
hard pointed tips, such as ball point pens.
Perform the touch screen calibration when
the touch is not recognized or wrong
location is recognized.
How to use the touch
screen
Содержание HDC-SD600EB
Страница 10: ...10 3 5 Formatting ...
Страница 11: ...11 4 Specifications ...
Страница 12: ...12 ...
Страница 13: ...13 ...
Страница 23: ...23 Fig D2 8 3 2 Removal of the Cover Board Unit Fig D3 ...
Страница 24: ...24 8 3 3 Removal of the Top Case Unit Fig D4 Fig D5 8 3 4 Removal of the Front Unit Fig D6 ...
Страница 25: ...25 Fig D7 8 3 5 Removal of the Side Case R Unit Fig D8 ...
Страница 28: ...28 Fig D16 8 3 11 Removal of the Fan Motor Fig D17 8 3 12 Removal of the LCD Case Unit Fig D18 ...
Страница 29: ...29 8 3 13 Removal of the Monitor P C B Unit Fig D19 Fig D20 ...
Страница 30: ...30 Fig D21 8 3 14 Removal of the Front P C B Unit Fig D22 8 3 15 Removal of the Barrier Motor Unit Fig D23 ...
Страница 31: ...31 Fig D24 8 3 16 Removal of the Front Case Fig D25 Fig D26 8 3 17 Removal of the SS SW P C B Unit Fig D27 ...
Страница 34: ...34 8 3 24 Removal of the IRIS Unit Fig D35 8 3 25 Removal of the Zoom Motor Fig D36 ...
Страница 37: ...37 8 3 31 Removal of the Focus Guide Pole L and Focus Guide Pole S Fig D43 ...
Страница 61: ...S 20 ...
Страница 72: ...S 31 S7 3 LCD Section 51 54 55 56 57 8 58 B54 B55 53 52 50 40 ...


