background image

45

VQT1N87

Recording 
(Advanced)

1

Recording functions of 

operation icons

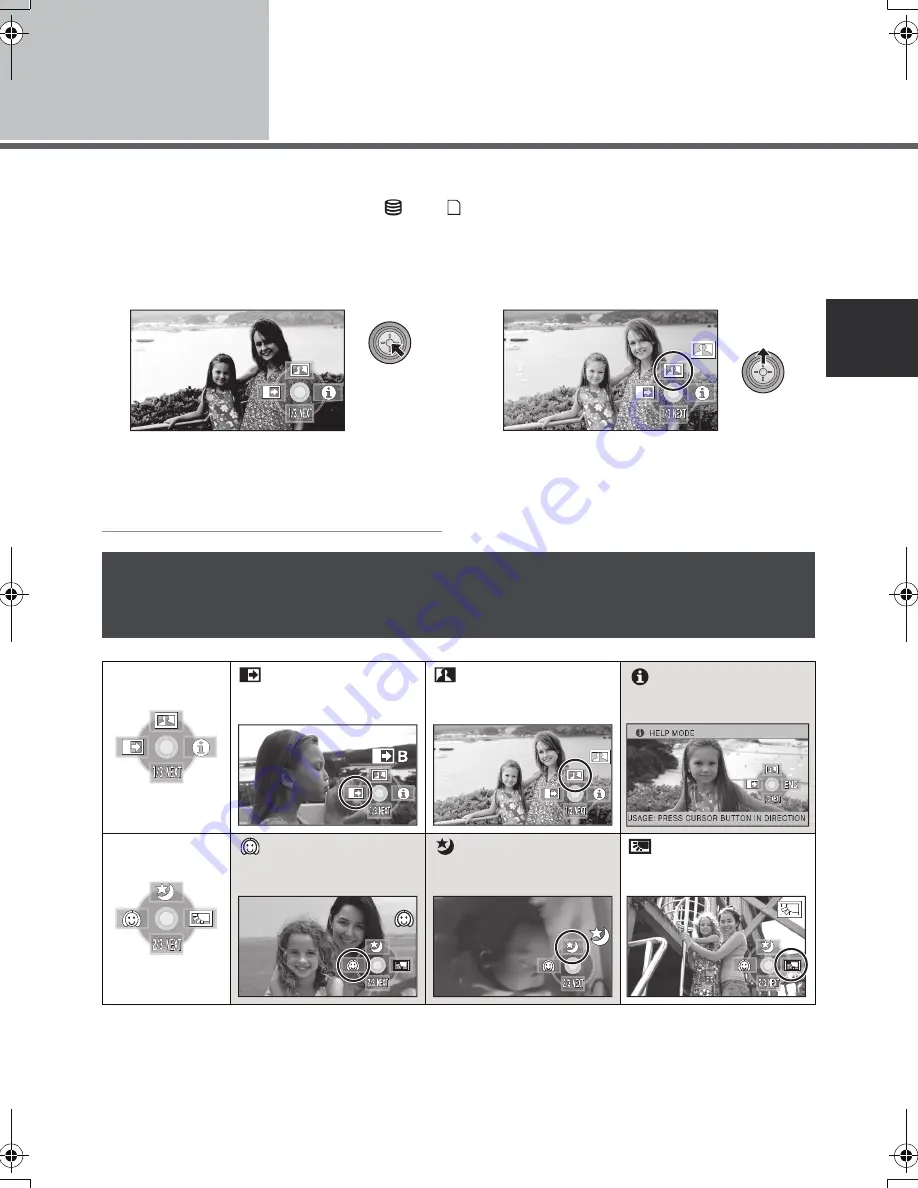
Select the operation icons to add different effects to the images to be recorded.

¬

Rotate the mode dial to select 

 or 

.

1

Press the cursor button, and 
icons will be displayed on the 
screen.

The indication changes each time the cursor 
button is moved down.

The operation icon appears or disappears 
each time the cursor button is pressed.

2

(e.g. Intelligent contrast control)

Select an icon with the cursor 
button.

Select the icon again to cancel the function.
(Refer to page 46 to cancel help mode, and 
page 47 to cancel self-timer.)

Operation icons

Fade, Intelligent contrast control, Help mode, Soft skin mode, Colour night view, 
Backlight compensation, Low light, Self-timer, Tele macro

Fade

Intelligent contrast 

control

Help mode

Soft skin mode

Colour night view

Backlight 

compensation

HDCHS9EP-VQT1N87_eng.book  45 ページ  2008年1月11日 金曜日 午後7時52分

Содержание HDC-HS9

Страница 1: ...Operating Instructions High Definition Video Camera Model No HDC HS9 Before use please read these instructions completely VQT1N87 EP ...

Страница 2: ... DO NOT INSTALL OR PLACE THIS UNIT IN A BOOKCASE BUILT IN CABINET OR IN ANOTHER CONFINED SPACE ENSURE THE UNIT IS WELL VENTILATED TO PREVENT RISK OF ELECTRIC SHOCK OR FIRE HAZARD DUE TO OVERHEATING ENSURE THAT CURTAINS AND ANY OTHER MATERIALS DO NOT OBSTRUCT THE VENTILATION VENTS DO NOT OBSTRUCT THE UNIT S VENTILATION OPENINGS WITH NEWSPAPERS TABLECLOTHS CURTAINS AND SIMILAR ITEMS DO NOT PLACE SOU...

Страница 3: ... Information on Disposal for Users of Waste Electrical Electronic Equipment private households This symbol on the products and or accompanying documents means that used electrical and electronic products should not be mixed with general household waste For proper treatment recovery and recycling please take these products to designated collection points where they will be accepted on a free of cha...

Страница 4: ...usiness Machines Corporation of the U S Intel Core Pentium and Celeron are the registered trademarks or trademarks of the Intel Corporation in the United States and other countries AMD Athlon is a trademark of the Advanced Micro Devices Inc Apple Mac OS is either registered trademarks or trademarks of Apple Inc in the United States and or other countries PowerPC is a trademark of International Bus...

Страница 5: ...ality on the LCD monitor 30 Recording Yourself 30 Recording Recording Basic 1 Before recording 32 Anti Ground Shooting AGS 33 2 Recording motion pictures 34 Recording modes approximate recordable time 36 Quick start 37 PRE REC 37 Shooting guide 38 3 Recording still pictures 39 Picture quality 41 Number of recordable pictures 41 4 Zoom in out function 42 Digital zoom function 42 5 Image stabilizer ...

Страница 6: ...3 Backup With other products 1 Connecting a DVD burner to copy to play back a disc 86 Preparing for copying playing back 86 Copying to discs 87 Playing back the copied disc 90 Managing the copied disc Formatting Auto protect Displaying disc information 91 2 Dubbing images onto other video device 92 3 With a printer PictBridge 93 With a PC Before using 1 What you can do with a PC 96 End User Licens...

Страница 7: ...000023 Button type battery CR2025 AV cable K2KC4CB00027 Component cable K2KZ9DB00004 USB cable K2KZ4CB00011 CD ROM Optional accessories AC adaptor VW AD21E K Battery pack lithium VW VBG130 1320 mAh Battery pack lithium VW VBG260 2640 mAh Battery pack lithium VW VBG6 5800 mAh 1 Battery pack holder kit VW VH04 HDMI mini cable RP CDHM15 RP CDHM30 Tele conversion lens VW T3714H Wide conversion lens VW...

Страница 8: ...ry DVD video etc the data are not compatible Compatibility with other products A B With other products Available function Picture quality Watching Video Pictures on your TV l 78 to 84 Playback with the HDMI mini cable l 81 jPlayback using VIERA Link HDAVI Control l 83 High definition images Playback with the component cable 1080i l 82 Playback with the component cable 576i l 82 Standard images Pla...

Страница 9: ...9 VQT1N87 Preparation Recording Playback Backup With a PC Others 10 Before using 16 Setup ...

Страница 10: ...sable the HDD If these phenomena are observed copy the data on the HDD to a PC a DVD disc etc immediately and contact your dealer Once the HDD is out of order data cannot be restored Operation may stop in hot or cold environments If the surrounding temperature is too hot or too cold the unit is disabled in order to protect the HDD Do not use the unit in low atmospheric pressures The HDD may fail i...

Страница 11: ... Reset button RESET l 118 6 Cursor button Use the cursor button to select the recording functions and playback operations and to operate the menu screen 1 Select by moving up down left right 2 Set by pressing the centre Menu screen operations l 23 To select the recording functions l 45 49 To adjust manually l 57 Playback operations l 62 67 2 3 4 5 6 7 8 9 11 12 13 17 1 10 14 15 16 Due to limitatio...

Страница 12: ...ens hood When fitting the tele conversion lens VW T3714H optional or the wide conversion lens VW W3707H optional first remove the lens hood 21 Remote control sensor l 15 22 Recording lamp l 24 Lens cover A The lens cover opens in HDD or SD card recording mode l 22 18 19 20 21 22 Be careful about the following When 2 lens accessories such as the ND filter and tele conversion lens are fitted and the...

Страница 13: ...tacle This is a hole for attaching the unit to the optional tripod For details on mounting the tripod refer to the operating instructions for the tripod A Camera base The SD card cover cannot be opened when the tripod is used 23 ...

Страница 14: ...port 30 Mode dial l 22 31 Status indicator l 22 32 HDD access lamp ACCESS HDD l 10 33 Recording start stop button l 34 34 Card access lamp ACCESS l 21 35 SD card open lever SD CARD OPEN l 21 36 Card slot l 21 37 SD card cover l 21 38 Shoulder strap fixture 39 Grip belt Adjust the length of the grip belt so that it fits your hand 1 Flip the belt 2 Adjust the length 3 Replace the belt 24 25 26 27 28...

Страница 15: ...t the unit may not operate properly even within the usable ranges Remote control CAUTION Danger of explosion if battery is incorrectly replaced Replace only with the same or equivalent type recommended by the manufacturer Dispose of used batteries according to the manufacturer s instructions ZOOM START STOP PHOTO SHOT EXT DISPLAY DATE TIME VOL PLAY STOP SKIP SKIP MENU ENTER PAUSE SEARCH STILL ADV ...

Страница 16: ...teries including those that have been certified by Panasonic Exercise care when purchasing batteries Many fake or imitation batteries have been found among those sold at unusually low prices and those which customers cannot check for themselves before purchasing When this unit is purchased the battery is not charged Charge the battery before using this unit Important If the DC cable is connected t...

Страница 17: ...llow your local recycling regulations Inserting removing the battery Removing the battery Be sure to set the mode dial to OFF and check that the status indicator is off before removing the battery Move the BATTERY lever in the direction indicated by the arrow and remove the battery when unlocked A Insert the battery until it clicks and locks CAUTION Danger of explosion if battery is incorrectly re...

Страница 18: ...in low temperatures We recommend charging a spare battery for use when recording The batteries heat up after use or charging This is not a malfunction It is not necessary to consume the battery completely The battery can be recharged even if some capacity remains Charging and recording time Battery model number Voltage capacity Charging time Supplied battery VW VBG130 optional 7 2 V 1320 mAh 2 h 3...

Страница 19: ...ss than 3 minutes remaining then will become red If the battery discharges then will flash The remaining battery capacity is displayed in minutes when using the Panasonic battery that you can use for this unit It may take time to display the remaining battery capacity The actual time can vary depending on your actual use The maximum amount of remaining battery capacity able to be indicated is 999 ...

Страница 20: ...ot use SDHC Memory Cards on devices that are only compatible with SD Memory Cards When using an SDHC Memory Card on another device confirm that the device supports the SDHC Memory Card Cards that you can use with this unit Card type Capacity Motion picture recording We recommend using SD cards conforming to Class 4 or higher of the SD Speed Class Rating or the following SD cards made by Panasonic ...

Страница 21: ...this unit or the SD card may damage or erase the data stored on the SD card We recommend saving the important data recorded on this unit to a PC DVD disc etc l 86 96 When the card access lamp is lit do not jRemove the SD card jOperate the mode dial jTurn the unit off jInsert and remove the USB cable jExpose the unit to vibrations or shock Performing the above while the lamp is on may result in dam...

Страница 22: ...er Set the mode dial to OFF The status indicator goes off and the power turns off When the mode dial is set to or the power turns on when the LCD monitor opens and turns off when the LCD monitor closes To turn on the power The status indicator A lights To turn off the power The status indicator A goes off HDD Recording mode l 34 39 Card Recording mode l 34 39 Playback mode l 62 67 OFF Turning the ...

Страница 23: ... Select the submenu item B and move the cursor button right or press the cursor button C Current settings on menus 4 Select the desired setting and press the cursor button to enter the selection Move the cursor button left to return to the previous screen You can set other items continuously 5 Press the MENU button to exit the menu screen The menu screen does not appear during recording or playing...

Страница 24: ... MF ASSIST l 58 AUTO SLOW SHTR l 55 SHOOTING GUIDE l 38 Digital Cinema Colour l 55 SETUP FORMAT CARD l 77 1 DISPLAY DATE TIME l 26 DATE FORMAT l 26 POWER SAVE Language selection Menu list The recording lamp lights up during recording and flashes when the unit receives a signal from the remote control or when the self timer is counting down When this is set to OFF it does not light during recording...

Страница 25: ...E l 65 is selected this does not appear 3 Only when the disc playback tab is selected while a DVD burner optional is connected this appears 4 This appears only when the HDD playback tab is selected 5 This appears only when the card playback tab is selected This allows operations such as starting and ending recording to be signaled by a beep 1 Beep When you start recording When you turn on the powe...

Страница 26: ...nds when the cursor button is pressed 4 Press the MENU button to finish the setting Check the date and time displayed Changing the date and time display mode Select the menu l 23 SETUP DATE TIME desired display style You can also show or change the date and time display by repeatedly pressing the DATE TIME button on the remote control Changing the date format Select the menu l 23 SETUP DATE FORMAT...

Страница 27: ...or or attach the battery to this unit and the built in lithium battery will be recharged Leave the unit as it is for approx 24 hours and the battery will maintain the date and time for approx 6 months The battery is still being recharged even if the mode dial is set to OFF ...

Страница 28: ...ome region is set for the first time the screen for selecting travel destination appears after setting the home region successively If the home region has already been set once execute the menu operation for Step 1 5 Only when setting the region of your travel destination Select your travel destination and enter the selection with the cursor button The local time at the selected travel destination...

Страница 29: ...operations are performed for about 2 seconds the bar will disappear Press the MENU button to exit the menu screen Increasing the brightness of the LCD monitor POWER LCD EXTRA button Each time the POWER LCD EXTRA button is pressed the indication changes by one setting in the following order setting cancelled standard If you use the AC adaptor the indication appears and the screen becomes brighter a...

Страница 30: ...he or indication appears on the LCD monitor and cannot be set to NORMAL independently Rotate the mode dial to select or Rotate the LCD monitor towards the lens side The image is horizontally flipped as if you see a mirror image However the image recorded is the same as a normal recording Only some indications will appear on the screen When appears return the direction of the LCD monitor to normal ...

Страница 31: ...31 VQT1N87 Preparation Recording Playback Backup With a PC Others 32 Recording Basic 45 Recording Advanced ...

Страница 32: ... subject is backlit it will become dark in the recording When recording make sure your footing is stable and there is no danger of colliding with another person or object 1 Hold the unit with both hands 2 Put your hand through the grip belt 3 Do not cover the microphones A 4 Keep your arms near your body 5 Separate your legs for better balance ...

Страница 33: ...n continue the recording Use the recording start stop button to pause the recording About auto mode Colour balance white balance and focusing are adjusted automatically Depending on the brightness of the subject etc the aperture and shutter speed are automatically adjusted for an optimum brightness The shutter speed is adjusted to a maximum of 1 250 in recording mode jAutomatic white balance l 127...

Страница 34: ...is in progress the recording will not stop even if the LCD monitor is closed 3 Press the recording start stop button again to pause recording and are red during recording Do not move this unit until is green VIDEO 0h00m00s 0h00m00s 0h00m00s HG1920 R1h20m R1h20m R1h20m About the compatibility of the recorded motion pictures They are not compatible with devices other than those that support AVCHD Im...

Страница 35: ... SD card while the card access lamp lights up If you do either of the above the recovery operation will begin when the SD card is next inserted or the power is turned back on l 112 Screen indications in the recording mode A Recording mode B Remaining time left for recording When the remaining time is less than 1 minute R0h00m flashes red C Recording time elapsed Each time the unit is put into reco...

Страница 36: ...e is reduced Recordable time using the battery l 18 Mosaic pattern noise may appear on a playback image in the following cases jWhen there is a complicated pattern in the background jWhen the unit is moved too fast jWhen a subject with sharp movements has been recorded Particularly if it has been recorded in HE mode Many repeated recording and deletion of motion pictures may reduce the usable time...

Страница 37: ...sed however the white balance of the scene last recorded is retained In the quick start mode the zoom magnification becomes 1k and the picture size may differ from what it was before quick start standby mode If POWER SAVE l 24 is set to 5 MINUTES and the unit automatically goes into quick start standby mode close the LCD monitor and then open it again If the unit is exposed to vibration or shock t...

Страница 38: ...ault setting is ON A message appears in the following cases When you move the unit quickly When CAMERA PANNING IS TOO FAST appears move the unit slowly while recording When the unit is shaken When USE O I S appears set O I S to ON When the image stabilizer function is on the message does not appear When the image contrast is too strong such as backlight When USE INTELLIGENT CONTRAST appears select...

Страница 39: ...or auto focus only Focus indication appears and the unit focuses on the subject automatically Focus on a subject manually when it is not easily focused automatically If you set O I S l 43 to on then the image stabilizer function will be more effective MEGA optical image stabilizer will be displayed Focus indication A Focus indication The white lamp flashes Focusing The green lamp lights up When in...

Страница 40: ...ing cases jWhen the zoom magnification is high jWhen the unit is shaken jWhen the subject is moving jWhen the subject stands in front of a light source jWhen close subjects and far subjects are included in the same scene jWhen the scene is dark jWhen there is a bright part in the scene jWhen the scene is filled with only horizontal lines jWhen the scene lacks contrast jWhen the colour night view f...

Страница 41: ...ed Still pictures are recorded in normal picture quality If the PICT QUALITY is set to mosaic pattern noise may appear on a playback image depending on the picture content The number of recordable pictures depends on whether and are used together and on the subject being recorded The numbers shown in the table are approximations Picture quality PICTURE PICT QUALITY desired setting Number of record...

Страница 42: ...speed does not vary when operating with the remote control When the zoom speed is high the subject may not be focused easily If the zoom magnification exceeds 10k then the digital zoom function will be activated The maximum magnification provided by the digital zoom can be selected Select the menu l 23 OFF Optical zoom only Up to 10k 25k Up to 25k 700k Up to 700k If 25k or 700k is selected the dig...

Страница 43: ...EGA optical image stabilizer When a tripod is used we recommend that you turn the image stabilizer off In the following cases the image stabilizer function may not work effectively jWhen the digital zoom is used jWhen the unit is shaken greatly jWhen you record a moving subject while tracking it jWhen the conversion lens is used VIDEO PHOTO Optical image stabilizer button O I S Press this button t...

Страница 44: ...sed for instance wearing sunglasses jThe size of a face is small on the screen jThe subject moves quickly jWhen the hand shakes jWhen the digital zoom is used jWhen the unit is tilted In the following cases the function may not operate properly even if faces are detected If this occurs turn off this function jNonhuman subjects are recognised as faces jWhen the brightness or quality cannot be adjus...

Страница 45: ...wn The operation icon appears or disappears each time the cursor button is pressed 2 e g Intelligent contrast control Select an icon with the cursor button Select the icon again to cancel the function Refer to page 46 to cancel help mode and page 47 to cancel self timer Operation icons Fade Intelligent contrast control Help mode Soft skin mode Colour night view Backlight compensation Low light Sel...

Страница 46: ... fade setting is cancelled after the image and audio disappeared completely To select the colour for fade in out Select the menu l 23 VIDEO FADE COLOUR WHITE or BLACK Intelligent contrast control This brightens parts that are in shadow and difficult to see and suppresses white saturation in bright parts at the same time Both bright and dark parts can be recorded clearly Help mode Select the icon o...

Страница 47: ...ed a still picture is recorded after the Ø10 or Ø2 display and the recording lamp flashes for the time which has been set After recording the self timer is cancelled In auto focus mode if the button is pressed halfway once and then fully the lens focuses on the subject when the button is pressed halfway If the button is pressed fully all at once the lens focuses on the subject just before recordin...

Страница 48: ...view function makes dark scenes that are usually invisible can be recorded in bright colours For this reason bright dots that are usually invisible may be seen but this is not a malfunction Attach this unit to a tripod and you can record images free from vibration In darker areas auto focus may focus a bit slower This is normal If there is difficulty focusing with auto focus manually adjust the fo...

Страница 49: ...ance of the composition A HORIZONTAL B GRID1 C GRID2 Select the menu l 23 BASIC GUIDE LINES desired setting When motion picture playback tab is selected while the mode dial is set to l 62 VIDEO SETUP GUIDE LINES desired setting The guide lines do not appear on the images actually recorded 25p digital cinema Images recorded at a rate of 25 frames per second are the same frame rate as movie films Se...

Страница 50: ...rectivity of the microphone is interlocked with the zoom operation Sounds near the front of the unit are recorded more clearly if you zoom in close up and surrounding sounds are recorded more realistically if you zoom out wide angle FOCUS MIC Directivity of the centre is enhanced for recording audio near the front of the unit more clearly Directivity sound sensitivity direction of the built in mic...

Страница 51: ...el automatically 2 Move the cursor button to adjust the microphone input level A Centre B Front left C Back left D Front right E Back right F Microphone input level A gain value for each of the 5 built in microphones is displayed The input level of the microphones cannot be set individually Adjust the gain value so that the last 2 bars of the microphone input level are not red Otherwise the sound ...

Страница 52: ... SELECT Pictures in the selected range are stored DEL ALL No picture is stored Select the thumbnail on the right bottom of the screen with the cursor button and move the cursor button right to display the next page 4 Only when the SELECT is selected Select the range of pictures that will be stored A Start point B Finish point Select the start point and the finish point and enter them using the MEN...

Страница 53: ... corner of the screen ON ß AUTO ßA OFF When AUTO is set the ambient brightness is automatically detected and the flash will activate only when necessary If the flash is not necessary the ßA indicator will not appear when the button is pressed halfway To adjust the brightness of the flash Select the menu l 23 PICTURE FLASH LEVEL desired setting ßj Less brighter ßd0 Normal ßi Much brighter Red eye r...

Страница 54: ...ayed with diagonal lines zebra pattern Select the menu l 23 ADVANCED ZEBRA ON You can record an image with little white saturation if you manually adjust the shutter speed or brightness iris gain l 60 The zebra pattern does not appear on the images actually recorded Colour bar This unit displays a 7 colour bar which is useful for adjusting the picture quality of the TV or the external monitor Sele...

Страница 55: ... turned to ON motion pictures cannot be recorded The following functions are also disabled jChanging the settings in VIDEO on the Menu jPRE REC jPressing the button halfway jDigital zoom jFade jColour night view jLow light jBuilt in Flash jAuto slow shutter jDigital cinema colour jScene mode jAdjusting shutter speed and iris gain The maximum number of times you can record on an SD card or the HDD ...

Страница 56: ...on lens optional can block the flash and may cause a vignetting effect If the flash is activated a large number of times it may take longer to charge it Red eye reduction The flash is activated 2 times Do not move until the second flash is finished Red eye phenomenon may appear depending on the recording conditions Colour bar This function is cancelled when the power is turned off The icon will no...

Страница 57: ...ecording under fluorescent light mercury light or sodium light because the colour and brightness of the playback image may change If you record a subject illuminated with bright light or a highly reflective subject vertical lines of light may appear If the brightness is insufficient the sports mode does not function The 5 display flashes If this mode is used indoors the screen may flicker Scene mo...

Страница 58: ... set it to FOCUS position The manual focus indication MF and the icon shown in the illustration appear 3 Move the cursor button to bring the subject into focus The centre of the screen is enlarged The normal screen returns approximately 2 seconds after you finish bringing the subject into focus The centre of the screen is not enlarged when MF ASSIST is OFF Move the AUTO MANUAL FOCUS switch down ag...

Страница 59: ...he setting is complete If the display continues flashing the white balance cannot be set because it is too dark etc In this case use the automatic white balance When the display flashes the manual white balance previously adjusted is stored Whenever recording conditions change re set the white balance for correct adjustment When setting both the white balance and the iris gain set the white balanc...

Страница 60: ...the AUTO MANUAL FOCUS switch to AUTO to restore to automatic adjustment When setting both the shutter speed and the iris gain value set the shutter speed and then set the iris gain value Manual shutter speed adjustment Avoid recording under fluorescent light mercury light or sodium light because the colour and brightness of the playback image may change If you increase the shutter speed manually t...

Страница 61: ...61 VQT1N87 Preparation Recording Playback Backup With a PC Others 62 Playback 70 Editing 78 With a TV ...

Страница 62: ...hanging from OFF to another mode 1 Rotate the mode dial to select 2 When playing back from an SD card Select motion picture playback of card playback tab with the cursor button C Card playback tab D Motion picture playback When playing back from a HDD Select motion picture playback of HDD playback tab with the cursor button E HDD playback tab F Motion picture playback VIDEO ...

Страница 63: ... all scenes By date Playback of scenes recorded on a selected date l 65 Intelligent scene selection Playback of the detected scenes that have been recorded vividly l 65 4 Select the playback operation with the cursor button 1 Playback Pause 6 Rewind playback 5 Fast forward playback Stops the playback and shows the thumbnails The operation icon appears or disappears each time the cursor button is p...

Страница 64: ...advance the frames one at a time in the reverse direction Normal playback is restored when you move the cursor button up When the frames are advanced one at a time in the reverse direction they will be shown in intervals of 0 5 seconds Operating with the remote control 1 Press the button 2 Press the E or D button Sound will be heard only during normal playback VOL PLAY PAUSE SEARCH STILL ADV STILL...

Страница 65: ...te of the previous month and move it to the right to select the last date of the following month 3 Select the scene to be played back then press the cursor button Select All scenes and press the cursor button to return to the playback of all scenes Playing back of all the scenes returns if the power is turned off or the mode dial is operated Even if scenes are recorded on the same day they are gro...

Страница 66: ... all the scenes returns if the power is turned off or the mode dial is operated For data that are copied to a PC or written to media by selecting motion pictures or edited with the easy editing function of HD Writer 2 5E the Intelligent scene selection is disabled Playback of the first scene starts after playback of the last scene finishes Select the menu l 23 The indication appears on the thumbna...

Страница 67: ...changing from OFF to another mode 1 Rotate the mode dial to select 2 When playing back from an SD card Select still picture playback of card playback tab with the cursor button C Card playback tab D Still picture playback When playing back from a HDD Select still picture playback of HDD playback tab with the cursor button E HDD playback tab F Still picture playback PHOTO ...

Страница 68: ...how playback of the still pictures in numerical order start pause 2 Plays back the previous picture 1 Plays back the next picture Stops the playback and shows the thumbnails The operation icon appears or disappears each time the centre of the cursor button is pressed Any still pictures where the thumbnails are displayed as cannot be played back An error message appears and the screen shows the thu...

Страница 69: ...ove it to the right to select the last date of the following month 3 Select the still picture to be played back Select All scenes and press the cursor button to return to the playback of all still pictures Playing back of all the still pictures returns if the power is turned off or the mode dial is operated Even if still pictures are recorded on the same day they are grouped separately in the foll...

Страница 70: ...DD will be deleted When the confirmation message appears select YES then press the cursor button jWhen the play mode is set to All scenes or still pictures jWhen the play mode is set to All the scenes or still pictures on the selected date 3 Only when SELECT is selected in step 2 Select the scene still picture to be deleted then press the cursor button To unselect the scene still picture press the...

Страница 71: ...e the unnecessary part l 72 Scenes still pictures which cannot be played back the thumbnails are displayed as cannot be deleted Do not open the SD card cover while deleting motion pictures or still pictures on the SD card The deletion will stop In case of ALL SCENES the deletion may take time if there are many scenes or still pictures on the SD card or HDD Do not turn off this unit while deleting ...

Страница 72: ...e divided points When the confirmation message appears select YES then press the cursor button All divided points set on this unit will be cancelled The scenes that were deleted after division cannot be recovered When play mode is set to INTEL SCENE scenes cannot be divided Scenes cannot be divided if the number of all scenes has reached 3998 or the number of scenes played back on a selected date ...

Страница 73: ...1 Select the menu l 23 2 Select the scene still picture to be protected and then press the cursor button The indication appears and the scene still picture is protected Press the cursor button again to cancel the setting 2 or more scenes still pictures can be set in succession Press the MENU button to complete the settings When play mode is set to INTEL SCENE while playing back motion pictures sce...

Страница 74: ... this feature at this time 1 Select the menu l 23 2 Select the still picture to be set then press the cursor button 3 Select the number of prints then press the cursor button To cancel the setting set the number of prints to 0 You can also select multiple still pictures in succession Press the MENU button to complete the settings To cancel all DPOF settings Select the menu l 23 When the confirmati...

Страница 75: ...step 3 Select VIDEO or PICTURE and press the cursor button 5 Only when SELECT SCENES is selected in step 3 Select the scene still picture to be copied and press the cursor button When the cursor button is pressed again the selected scene still picture will be cancelled Up to 99 scenes still pictures can be set in succession Copy after confirming remaining capacity on the copy destination Display t...

Страница 76: ...the unit until a message appears indicating that copying is complete jThe number of recorded scenes is large It will take time to copy if the number of recorded scenes is large even when the recording time is the same jThe temperature of the unit is high If some motion pictures or still pictures have already been recorded to the copy destination then the same date may be assigned or images may not...

Страница 77: ...card while formatting Do not expose the unit to vibrations or shock Select tab while the mode dial is set to l 62 The used space and the usable space on the HDD can be confirmed 1 Select the menu l 23 Press the MENU button to close the indication The 60 GB built in HDD requires some space to store information and manage system files so the actual usable space is slightly less than the indicated va...

Страница 78: ...ed to connect the unit to the HDMI terminal 1 Connect this unit to a TV Confirm the terminals on your TV and use a cable compatible with the terminals Image quality may vary with the connected terminals 1 High quality 2 HDMI terminal 3 Component terminal 4 Video terminal VIDEO PHOTO A V A V A HDMI mini cable optional B Component cable supplied C AV cable supplied Picture quality 1 High definition ...

Страница 79: ...nent cable Select the Video 2 channel with an AV cable The name of the channel may differ depending on the connected TV 3 Set the mode dial to to play back The image and audio are output on the TV Cables Reference items A HDMI mini cable optional Connecting with a HDMI mini cable l 81 Listening in 5 1 channel sound l 82 Playback using VIERA Link HDAVI Control l 83 B Component cable supplied Connec...

Страница 80: ...on icon and time code etc can be displayed on the TV Press the button again to erase the information The screen on this unit will not change When connecting with a HDMI mini cable be sure to connect to a HDMI input terminal Do not connect to a HDMI output terminal on other products When connecting with a component cable be sure to also connect the AV cable Insert it in the audio input terminal for...

Страница 81: ...ation from the connected TV Output resolution 720p 1080i 1080i Others 576p 1080i This is an interlace scan method which scans 1080 scan lines to display a high definition image The 1080 available scan lines are divided in half and scanned on the screen alternatively every 1 50th of a second The number of available scan lines is nearly double the 576 scan lines used to display standard images until...

Страница 82: ...k become possible l 83 The unit cannot be connected to the optical digital cable Connect it to an AV amplifier with the HDMI terminals When this unit is connected to a TV with the component cable the output setting on this unit can be changed Set it to match the terminal on the TV that you connect to Select the menu l 23 576i When connecting to the component terminal on the TV compatible with 576i...

Страница 83: ... as on this unit jPlaying back motion pictures l 62 jPlaying back still pictures l 67 What is the VIERA Link This function allows you to use your remote control for the Panasonic TV for easy operations when this unit has been connected to a VIERA Link compatible device using a HDMI mini cable optional for automatic linked operations Not all operations are possible VIERA Link is a unique Panasonic ...

Страница 84: ...tatus it will turn on automatically if Set has been selected for the TV s Power on link setting Depending on the HDMI terminal on the TV the input channel may not switch automatically In this case use the remote control for the TV to switch the input channel For details on how to switch input please read the operating instructions for the TV If VIERA Link does not work properly refer to page 119 I...

Страница 85: ...85 VQT1N87 Preparation Recording Playback Backup With a PC Others 86 With other products ...

Страница 86: ...when this unit is connected to a DVD burner 3 Connect this unit to the DVD burner with the Mini AB USB Connection Cable supplied with VW BN1 A Mini AB USB Connection Cable supplied with VW BN1 B DVD burner optional Insert the plugs as far as they will go Preparing for copying playing back We recommend using Panasonic DVD burner VW BN1 About discs that can be used for copying New 12 cm discs DVD RA...

Страница 87: ...isc Confirm that auto protection is ON before copying data We recommend that auto protection is turned ON while copying data l 91 1 Connect this unit to the DVD burner to prepare for copying l 86 2 Select copy source media and press the cursor button 3 Select the item and press the cursor button ALL SCENES This is for copying all scenes simultaneously Since motion pictures and still pictures are c...

Страница 88: ...ht to select the last date of the following month 6 Only when SELECT SCENES is selected in step 3 Select START and press the cursor button Only when SELECT DATE is selected in step 3 Press the MENU button 7 When the confirmation message appears select YES then press the cursor button A The number of discs necessary for copying by disc type When 2 or more discs are necessary for copying follow the ...

Страница 89: ...r copying to a disc To copy motion pictures to the full capacity of a disc Disc type Copy time The data is written to all areas of the disc to increase playback compatibility with other devices so even if the data capacity to be copied is small the time it takes for copying may be about the same as the time shown in the table DVD RAM Approx 50 min to 80 min DVD RW Approx 35 min to 75 min DVD R App...

Страница 90: ...cting this unit to the DVD burner or where motion pictures have been recorded in AVCHD format can be played back It may not be possible to play back discs recorded on other devices 1 Connect this unit to the DVD burner to prepare for playback l 86 2 Use the cursor button to select disc playback tab A Destination disc for motion pictures Disc playback tab B Destination disc for still pictures Disc ...

Страница 91: ...T to ON in order to prevent accidental deletion on other devices If a disc that you copied to is inserted in another device without protecting it a message may be displayed prompting you to format the disc If the disc is formatted important data will be erased and the process cannot be reversed 2 Copy to the disc l 87 The copied disc is write protected when it is ejected if AUTO PROTECT is ON To r...

Страница 92: ...te and time display and function indication are not wanted cancel them before dubbing l 26 80 If the dubbed images are played back on a wide screen TV the images may be stretched vertically In this case refer to the operating instruction of the device you are connecting to or read the operating instructions of the wide screen TV and set the aspect ratio to 16 9 VIDEO Change the video input on the ...

Страница 93: ...on is available in all modes A USB cable supplied Insert the plugs as far as they will go 1 Connect this unit to a printer Do not use any other USB connection cables except the supplied one Operation is not guaranteed with any other USB cables 2 Select PictBridge and press the cursor button 3 Select print source media and press the cursor button If the PictBridge indication does not appear or cont...

Страница 94: ...y Move the cursor button down A confirmation message appears If YES is selected the number of prints set is cancelled and the screen returns to step 4 If NO is selected all the settings are kept and the screen returns to step 4 Avoid the following operations during printing These operations disable proper printing jDisconnecting the USB cable jOpening the SD card cover and removing the SD card jSw...

Страница 95: ...95 VQT1N87 Preparation Recording Playback Backup With a PC Others 96 Before using 101 Setup 105 Using with a PC ...

Страница 96: ...tures Copying data between media 1 C Motion pictures 1 Built in HDD Easy editing Editing motion picture data copied on an HDD of a PC Split merge delete Converting the motion picture data to MPEG2 Creating a DVD Video disc Playing back on a PC Play back the motion picture data on an SD card or a DVD disc in high definition picture quality on a PC Formatting discs Depending on the type of disc that...

Страница 97: ...y other software Be sure to use the supplied USB cable when connecting this unit and a PC Operation is not guaranteed with any other USB cables Important Notice Do not insert a disc recorded in AVCHD format with HD Writer 2 5E in a device that does not support the AVCHD format In some cases the disc may get stuck in the device The disc will not play back on devices that do not support the AVCHD fo...

Страница 98: ... Disassembly Licensee may not reverse engineer decompile or disassemble the Software except to the extent either of them is permitted under law or regulation of the country where Licensee resides Matsushita or its distributors or dealers will not be responsible for any defects in the Software or damage to Licensee caused by Licensee s reverse engineering decompiling or disassembly of the Software ...

Страница 99: ...ice Pack 2 Microsoft Windows XP Professional Service Pack 2 Microsoft Windows Vista Home Basic Microsoft Windows Vista Home Premium Microsoft Windows Vista Ultimate Microsoft Windows Vista Business CPU Intel Pentium III 1 0 GHz or higher including compatible CPU Intel Core 2 Duo 2 16 GHz or higher Intel Pentium D 3 2 GHz or higher or AMD Athlon 64 X2 Dual Core 5200 or higher is recommended when a ...

Страница 100: ...the OS Necessary software Windows Vista DirectX 10 Windows XP 2000 DirectX 9 0c If you install the software on a PC that is not compatible with DirectX 9 0c the PC may not work properly If you are unsure whether or not your PC is compatible contact the maker of your PC Sound DirectSound Support Interface USB port Hi Speed USB USB 2 0 Other requirements Mouse or equivalent pointing device PC IBM PC...

Страница 101: ...n in My Computer Computer 2 Click Next 3 Read the End User License Agreement then place a check beside I accept the terms of the license agreement if you agree to them and click Next If you do not agree to the terms and conditions of the License Agreement installation is not possible 4 Continue to follow the on screen messages to install HD Writer 2 5E If using Windows 2000 Microsoft DirectX 9 0c ...

Страница 102: ...ications that you no longer require 1 Select start Settings Control Panel Add or Remove Programs Applications or Uninstall a program 2 Select HD Writer 2 5E for HDC then click Change Remove Change or Remove or Add Remove or Uninstall Proceed with the uninstallation by following the on screen instructions After uninstalling the software be sure to reboot the PC The PC must be rebooted for the appli...

Страница 103: ... power cannot be turned off Disconnect the USB cable before turning this unit off Do not disconnect the USB cable or the AC adaptor while the card access lamp is on or card access icon appears on the LCD monitor Doing so may damage the data Do not disconnect the USB cable or the AC adaptor while the HDD access lamp is on or HDD access icon appears on the LCD monitor Doing so may damage the data If...

Страница 104: ... this unit to the PC and then select PC CONNECT 2 Double click the folder that contains the still pictures on the removable disk DCIM 100CDPFQ etc 3 Drag and drop the still pictures onto the destination folder on the PC s HDD Do not delete the SD card s folders Doing so may make the SD card unuseable in this unit When data not supported by this unit has been recorded on a PC it will not be recogni...

Страница 105: ...r a guest user account the software cannot be used On the PC Select start All Programs Programs Panasonic HD Writer 2 5E HD Writer The HD Writer 2 5E introductory screen is displayed If OK is clicked the software will start For details on how to use the software applications read the PDF operating instructions of the software For details on how to use the software applications read the PDF operati...

Страница 106: ...to a PC via the supplied USB cable The USB function selection screen will appear 2 Select PC CONNECT and press the cursor button 3 Double click NO_NAME or Untitled displayed on the desktop Files are stored in 100CDPFQ 100CDPFR folder etc in the DCIM folder 4 Using a drag and drop operation move the pictures you want to acquire or the folder storing those pictures to any different folder on the PC ...

Страница 107: ...107 VQT1N87 Preparation Recording Playback Backup With a PC Others 108 Indications 113 Helpful hints ...

Страница 108: ... 0h00m00s MF MEGA 3000 2 1M HG1920 1 PRE REC R1h20m HA1920 1920 HG HX1920 HE1440 PRE REC AUTO MNL White balance l 59 Auto white balance Indoor mode recording under incandescent lamp Outdoor mode Manual adjustment mode 1 100 Shutter speed l 60 OPEN F2 0 F number l 60 0dB Gain value l 60 5 Scene mode l 57 Sports mode Portrait mode Spotlight mode Surf snow mode Low light mode l 47 Power LCD Extra l 2...

Страница 109: ... Recording accessing the card l 40 MEGA OIS l 40 HDD Falling detection l 10 2 1M MEGA Motion picture playback Still picture playback 1 Playback l 63 68 Pause l 63 68 5 6 Fast forward rewind playback l 63 7 8 Last first scene paused 9 Skip playback l 64 D E Slow motion playback l 64 1 2 Frame by frame playback l 64 Next Previous still picture l 68 0h00m00s Playback time Play mode l 63 All scenes Sc...

Страница 110: ...ze is not displayed for still pictures recorded with other products that have different picture sizes from the sizes shown above Accessing the card When connected to a PC l 103 Accessing the HDD When connected to a PC l 103 Time display The built in battery is low l 27 The warning alarm indication appears when LCD monitor is rotated towards the lens side Return the direction of the LCD monitor to ...

Страница 111: ... by the unit If this message appears even though motion pictures and still pictures are recorded on an SD card the card may be unstable Reinsert the SD card then turn the power off and then on again CARD LOCKED The write protection switch on the SD card is set to LOCK l 20 INTERNAL TEMPERATURE TOO HIGH PLEASE TURN UNIT OFF AND WAIT A WHILE The internal temperature of this unit is high so it cannot...

Страница 112: ...H THE RESET SWITCH An irregularity in the unit has been detected Press the RESET button to restart the unit l 118 CANNOT CHECK CONNECTED DEVICE DISCONNECT THE USB CABLE FROM THIS UNIT The DVD burner is not correctly connected Disconnect and then reconnect the Mini AB USB Connection Cable Connect a DVD burner that is compatible with this unit l 86 PLEASE CHECK EXTERNAL DRIVE OR DISC A disc that can...

Страница 113: ...n the colour night view function is used When the iris gain is set Intelligent contrast control Low light When the colour night view function is used When the scene mode is used When the HD hi speed burst shooting mode is on Colour night view Set and cancel While recording When PRE REC is used Soft skin mode Set and cancel Tele macro Set and cancel Help mode Fade When PRE REC is used When the HD h...

Страница 114: ...burst shooting mode is on Scene mode When the low light mode is used When setting the AUTO MANUAL FOCUS switch to AUTO When the colour night view function is used When the HD hi speed burst shooting mode is on MF assist function When digital zoom 10k or higher is used Change of white balance When digital zoom 10k or higher is used When the colour night view function is used Adjusting the shutter s...

Страница 115: ...ower back on The power will not turn off automatically when the power save function l 24 is set to OFF If you connect to a TV compatible with VIERA Link with a HDMI mini cable and turn off the power on the TV with the remote control for the TV the power on this unit also turns off If you are not using VIERA Link set VIERA Link to OFF l 83 When this unit is connected to a DVD burner to copy or play...

Страница 116: ...he SD card is correctly inserted Rotate the mode dial to select or No recording is possible while the SD card s write protect switch is set to LOCK l 20 If there is no more available memory of the SD card or HDD free up some memory by deleting unnecessary scenes or use a new SD card l 21 70 If the SD card cover is open this unit may not operate normally Close the SD card cover The unit arbitrarily...

Страница 117: ...tting to match the aspect ratio of the TV If both HDMI mini cable and component cable are connected set the unit to playback mode Scenes cannot be deleted Protected scenes cannot be deleted Release the protect setting l 73 Any scenes still pictures where the thumbnails are displayed as cannot be deleted If the scenes still pictures are unnecessary format the SD card or HDD to erase the data l 77 P...

Страница 118: ...White round spots like soap bubbles appear on the recorded picture If you take a picture with the flash in a dark place or indoors white round spots may appear on the picture caused by the flash reflecting of particles of dust in the air This is not a malfunction A characteristic of this is that the number of round spots and their position differ in every picture PUSH THE RESET SWITCH is displayed...

Страница 119: ...ed by the USB cable this unit is not detected by the PC Use the AC adaptor when connecting this unit and a PC Select another USB terminal on the PC Check the operating environment l 99 Turn the power to the unit off and then back on again and reconnect the USB cable When the USB cable is disconnected an error message will appear on the PC To disconnect the USB cable safely double click the icon in...

Страница 120: ...ollowing conditions are applicable When the scenes were recorded on different dates A The image will be still for several seconds wherever the date changes B The images are played back smoothly if the scenes were recorded on the same date When more than 99 scenes were recorded on the same date A The image will be still for several seconds when the scene changes every time 99 recorded scenes have b...

Страница 121: ...ily stops where the scenes switch between HA HG HX and HE modes B Playback is smooth if the same mode is used or the mode is switched among HA HG and HX When the settings on the 25p digital cinema change 1 25pDIGITAL CINEMA is ON 2 25pDIGITAL CINEMA is OFF A When recording motion pictures after changing settings on the 25p digital cinema the motion pictures at the switching points of scenes stop f...

Страница 122: ...e deleted 2 A new scene is recorded here A The image will be still for several seconds wherever a scene was deleted B The images of consecutive scenes where they are no deletions are played back smoothly one after another When selected scenes are copied between an SD card and the HDD or when selected scenes are copied to a disc in a connected DVD burner A If you select a scene other than the next ...

Страница 123: ... dragging and dropping the scenes in the Image display area B or by clicking Copy between media button on the Start Menu Example 2 When deleting scenes was initiated by HD Writer 2 5E When a scene is deleted the images may be still for several seconds where that scene was deleted Example 3 When merging scenes was initiated by HD Writer 2 5E Wherever scenes are merged the images may be still for se...

Страница 124: ...als onto the unit If the unit is sprayed with such chemicals its body may be marred and the surface finish may peel off Do not leave rubber or plastic products in contact with the unit for a long time When you use the unit in a sandy or dusty place such as a beach do not let sand or fine dust get into the body and terminals of the unit Also keep the unit away from sea water Sand or dust may damage...

Страница 125: ...re spare batteries when going out for recording Prepare batteries appropriate to 3 to 4 times the period you are planning to record for Cold places such as a ski resort can shorten the period which you can record for If you drop the battery accidentally check to see if the terminals are damaged Attaching a battery with damaged terminals can damage the unit or AC adaptor Do not throw old battery in...

Страница 126: ...oom When this unit is moved from an air conditioned car to outside When a cold room has been warmed up quickly When cool wind from an air conditioner is directly blown onto this unit After summer afternoon showers of rain When this unit is in a very humid place where the air is thick with steam e g a heated swimming pool Helpful hint If for example you have used this unit for recording on a ski sl...

Страница 127: ...omatic white balance adjustment the automatic white balance adjustment may not function properly if there is more than one light source For light outside the functional automatic white balance adjustment range use the manual white balance adjustment mode White balance adjustment White balance adjustment determines the white colour under different light sources By recognising which is the white col...

Страница 128: ...s or by highly reflective objects Since whatever is shiny or glistens is brought into focus it is hard to focus on the subject to be recorded The focus may become blurry when recording subjects at the seashore in night views or in scenes involving fireworks or special lights Recording a subject in dark surroundings The unit cannot focus correctly because the light information that comes through th...

Страница 129: ...Monitor 2 7z wide LCD monitor approx 300 K pixels Microphone 5 1 channel surround microphone with a zoom microphone focus microphone function Speaker 1 round speaker 20 mm White balance adjustment Auto tracking white balance system Standard illumination 1 400 lx Minimum required illumination Approx 5 lx 1 25 in low light mode Approx 1 lx with the colour night view function A V terminal video outpu...

Страница 130: ... FAT12 and FAT16 system compliant SDHC Memory Card 4 GB 8 GB 16 GB FAT32 system compliant HDD 60 GB Compression MPEG 4 AVC H 264 Recording mode and transfer rate HA Approx 17 Mbps VBR HG Approx 13 Mbps VBR HX Approx 9 Mbps VBR HE Approx 6 Mbps VBR Refer to page 36 for the recordable time Picture size HA HG 1920k1080 50i 1920k1080 25p HX 1920k1080 50i HE 1440k1080 50i Audio compression Dolby Digita...

Страница 131: ... safety Specifications may change without prior notice Power source Power consumption DC output AC 110 V to 240 V 50 60 Hz 19 W DC 9 3 V 1 2 A Unit operation DC 8 4 V 0 65 A Battery charging Dimensions 92 mm W k33 mm H k61 mm D Mass Approx 115 g ...

Страница 132: ... A E Matsushita Electric Industrial Co Ltd Web site http panasonic net Pursuant to at the directive 2004 108 EC article 9 2 Panasonic Testing Centre Panasonic Marketing Europe GmbH Winsbergring 15 22525 Hamburg F R Germany ...

Отзывы: