background image

- 165 -

If the device is Android (NFC-compatible)

Set the NFC function of the smartphone to ON.

1

Start up the smartphone application “Image App”.

When a Wi-Fi connection guidance screen is displayed, select [NO].

2

Display the screen of a connection setup to home monitor from the menu of a 
smartphone.

3

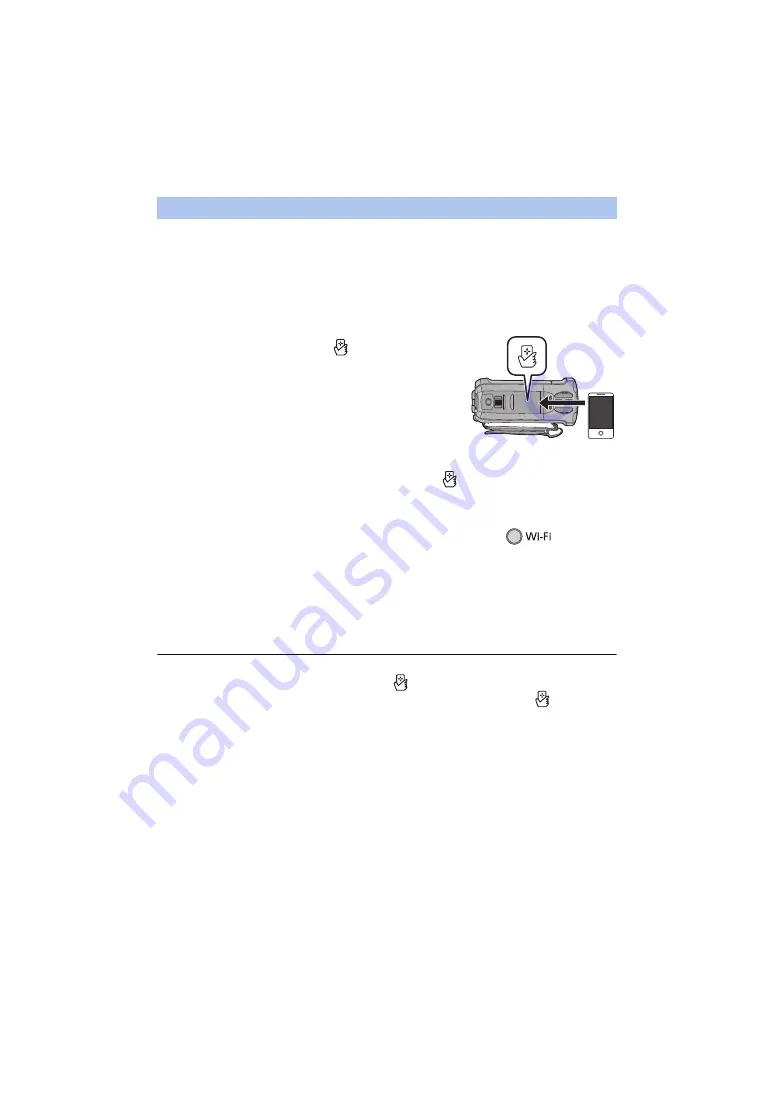
Touch the smartphone on 

 of this unit.

Touch the NFC mark while a message asking you to touch the 
NFC mark on the device is displayed on the smartphone 
screen. 

If the unit is not recognised even when touching the 
smartphone, change positions and try again.

You cannot set up a connection when recording an image with 
this unit.

A confirmation screen is displayed on the screen of a 
smartphone. Touch [YES] to start home monitor.

This unit is turned on even if it touches the smartphone on 

 of this unit, where this unit is 

turned off with a LCD monitor.

If the device is Android (non-NFC-compatible) or iOS

1

Press Wi-Fi button on this unit and touch [Hom.Monitor]. 

2

Start up the smartphone application “Image App”.

When a Wi-Fi connection guidance screen is displayed, select [NO].

Use the smartphone to start home monitor.

To exit [Hom.Monitor]:

Touch [EXIT] displayed on the screen of this unit or press the Wi-Fi button.

The message is displayed. Touch [YES] to close the indication.

After turning off this unit with the LCD monitor, you can also turn on this unit and start the NFC 
communication by touching the smartphone on 

 of this unit. (If you have turned off this unit 

with the power button, this unit will not turn on by touching the smartphone on 

 of this unit)

The following operations allow you to register up to ten smartphones. If the number exceeds ten, 
smartphone information with the oldest registration date and time will be deleted.

j

Touching an NFC-compatible smartphone on this unit.

j

Setting [Direct Connection Password] to [OFF] and connecting this unit and a smartphone 
directly.

Please refer the instructions for the device you are using for information on how to set up and use 
a NFC-compatible smartphone.

When using the home monitor function for the second time or later

Содержание HC-V777

Страница 1: ...a 4K Video Camera Model No HC V770 Model No HC WX970 HC V777 HC WX979 HC V770M HC WX970M HC V760 HC VX870 HC VX878 HC VX870M Please read these instructions carefully before using this product and save this manual for future use SQW0248 until 2015 1 28 ...

Страница 2: ...ise the above also applies in a case where any type of repair is made to the unit including any other non built in memory related component Handling of built in memory WX970M VX870M V770M This unit is equipped with the built in memory When using this component pay attention to the following points Back up data periodically The built in memory is temporary storage In order to avoid erasing data due...

Страница 3: ...recording format MP4 iFrame scene s saved in MP4 1920k1080 25p MP4 1280k720 25p or MP4 640k360 25p MP4 iFrame scene s Scene s recorded in the recording mode iFrame iFrame scene s series series series Scene s containing only the Main Camera s image that was recorded separately from a simultaneously recorded normal scene when Backup for Twin Camera was set to ON Scene s recorded as Backup for Twin C...

Страница 4: ...ing Mode 28 Motion picture Still picture playback 29 Using the menu screen 32 Using the Setup Menu 33 Advanced Recording Using the zoom 44 Zoom ratio during the Still Picture Recording Mode 44 Level Shot Function 45 Recording with the Sub Camera Twin Camera WX970 series 46 Changing and adjusting the settings of the Sub Camera and the Sub Window 49 Recording with the Backup for Twin Camera Function...

Страница 5: ...ning WX970M VX870M V770M 126 Watching Video Pictures on your TV 128 Connecting with a HDMI micro cable 131 Listening in 5 1 channel sound AVCHD 131 Playback using VIERA Link 132 Copy Dubbing Copying between SD card and Built in Memory WX970M VX870M V770M 134 Copying playing back with a USB HDD 137 Preparing for copying playing back 137 Simple copy 140 Copy selected files 140 Playing back the USB H...

Страница 6: ...me 202 When connecting for the second time or later 205 Terminating the connection 205 Recording with a Wireless Sub Camera Wireless Twin Camera 206 Screen display when using a Wireless Sub Camera 206 If the Wi Fi connection cannot be established Wireless Twin Camera 210 With a PC What you can do with a PC 211 Before Installing HD Writer AE 5 2 213 Operating environment 215 Installation 218 Connec...

Страница 7: ...VEL l 90 Microphone input level meter will be displayed When the unit is connected with the AC adaptor sometimes noise may be heard depending on the microphone type In this case please switch to the battery for the power supply and the noise will stop 11 Internal microphones 12 Lens cover The lens cover opens in Motion Picture Recording Mode or Still Picture Recording Mode l 18 13 Multi Manual Dia...

Страница 8: ...s the opposite direction 20 Battery holder l 11 21 Shoulder strap fixture 22 Tripod receptacle Attaching a tripod with a screw length of 5 5 mm or more may damage the unit 23 SD card cover l 16 24 Access lamp ACCESS l 16 25 Card slot l 16 26 Photoshot button l 27 27 Zoom lever W T In Motion Picture Recording Mode or Still Picture Recording Mode l 44 Thumbnail display switch Volume lever sVOLr In P...

Страница 9: ... the length 3 Replace the belt 29 Headphone terminal l 79 Excessive sound pressure from earphones and headphones can cause hearing loss Listening at full volume for long periods may damage the user s ears 30 DC input terminal DC IN l 12 Do not use any other AC adaptors except the supplied one 28 30 29 ...

Страница 10: ...n Wi Fi l 152 159 162 169 171 175 190 193 32 Wi Fi Transmitter l 151 33 NFC touch area l 154 163 202 series series 34 Infrared light l 78 series 35 Sub Camera l 46 36 Sub Camera dial l 47 WX970 VX870 V770 31 32 33 WX970 VX870 34 WX970 35 36 ...

Страница 11: ...reparation Power supply It has been found that counterfeit battery packs which look very similar to the genuine product are made available to purchase in some markets Some of these battery packs are not adequately protected with internal protection to meet the requirements of appropriate safety standards There is a possibility that these battery packs may lead to fire or explosion Please be advise...

Страница 12: ...nd to the DC input terminal of this unit Insert the plugs as far as they will go 2 Insert the AC adaptor into an AC outlet The status indicator will flash red at an interval of approximately 2 seconds approximately 1 second on approximately 1 second off indicating that charging has begun It will turn off when the charging is completed Connecting to the AC outlet It is possible to use this unit wit...

Страница 13: ...midity 60 RH Charging times in parentheses are when charging from the USB terminal series Maximum continuous recordable times and actual recordable times in parentheses are when recording with the Sub Camera 1 1 These include times when is displayed on the screen Battery model number Voltage Capacity minimum Charging time Recording format Recording mode Maximum continuous recordable time Actual re...

Страница 14: ...5 min 3 h 1 h 55 min 1 h 30 min HA HG HE 3 h 45 min 3 h 1 h 55 min 1 h 35 min 4K MP4 2 2160 3 h 10 min 2 h 35 min 1 h 35 min 1 h 20 min MP4 iFrame 1080 50M 3 h 35 min 2 h 55 min 1 h 50 min 1 h 30 min 1080 28M 3 h 40 min 3 h 1 h 55 min 1 h 30 min 720 4 h 10 min 3 h 20 min 2 h 10 min 1 h 45 min iFrame 4 h 15 min 3 h 20 min Battery capacity indication The display changes as the battery capacity reduc...

Страница 15: ... latest information on the support website below http panasonic jp support global cs e_cam This website is in English only When using an SDHC Memory Card SDXC Memory Card with other equipment check the equipment is compatible with these Memory Cards An Eye Fi X2 series SD card is required to use functions related to Eye Fi l 147 We do not guarantee the operation of SD cards other than the ones abo...

Страница 16: ...ess lamp is lit do not j Remove the SD card j Turn the unit off j Insert and remove the USB cable j Expose the unit to vibrations or shock Performing the above while the lamp is on may result in damage to data SD card or this unit Do not expose the terminals of the SD card to water dirt or dust Do not place SD cards in the following areas j In direct sunlight j In very dusty or humid areas j Near ...

Страница 17: ...n the unit Press the power button to turn on the unit j When the unit is originally purchased j When you have turned off the unit using the power button Overheat detection When the internal temperature of the unit rises during use a message will be displayed When this happens the unit will turn off automatically a few minutes later Wait until the temperature has dropped before resuming use series ...

Страница 18: ...switch this unit between Motion Picture Recording Mode and Still Picture Recording Mode 1 Press the recording playback button to switch this unit to Recording Mode The recording mode switching icon A is displayed on the screen 2 Touch the recording mode switching icon Refer to page 19 for touch screen operation Preparation Selecting a mode Motion Picture Recording Mode l 25 Recording motion pictur...

Страница 19: ... in other conditions even if the recording start stop button is pressed the recording mode may not be switched You can operate by directly touching the LCD monitor touch screen with your finger Touch Touch and release the touch screen to select icon or picture Touch the centre of the icon Touching the touch screen will not operate while you are touching another part of the touch screen Slide while...

Страница 20: ...rol Mode l 57 Scene Mode l 61 HDR Movie Mode l 60 4K Photo Mode l 63 FULL HD Slow Motion Video Mode l 62 Stop Motion Animation Assist Mode l 64 and Manual Mode l 65 E Displayed only when you adjust the picture quality with the Multi Manual Dial l 91 series series only To display the Touch Menu Do not touch on the LCD monitor with hard pointed tips such as ball point pens A Touch Menu Recording Mod...

Страница 21: ...World Time setting l 33 HOME DESTINATION The year can be set between 2000 and 2039 3 Touch ENTER Touch EXIT to complete the setting The date and time function is driven by a built in lithium battery If the time display becomes the built in lithium battery needs to be charged To recharge the built in lithium battery connect the AC adaptor or attach the battery to this unit The battery is still bein...

Страница 22: ...s with your hand etc Basic motion picture recording The unit should normally be held steady when recording If you move the unit when recording do so slowly maintaining a constant speed The zoom operation is useful for recording subjects you cannot get close to but overuse of zoom in and zoom out can make the resulting motion picture less enjoyable to watch Recording Yourself Rotate the LCD monitor...

Страница 23: ...n the lens hood with this unit Attach the lens hood so that you can see its LOCK and UNLOCK arrows from above 2 Rotate the lens hood s mounting ring A to the LOCK side to tighten it How to remove the lens hood Rotate the lens hood s mounting ring to the UNLOCK side to loosen and remove it When using a filter kit optional or conversion lens optional remove the lens hood Remove the lens hood when yo...

Страница 24: ...s 1 Set this unit to Recording Mode l 18 2 Select the menu l 32 3 Touch the media to record motion pictures or still pictures The media selected separately for motion pictures or still pictures is highlighted in yellow 4 Touch ENTER Basic Selecting a media to record WX970M VX870M V770M MEDIA SELECT MENU ...

Страница 25: ...will disappear when no touch operation is performed for a specific period of time To display it again touch the screen l 33 It will be constantly displayed when the remaining recordable time becomes less than 30 minutes Basic Recording motion pictures Recording mode R 1h20m Approximate remaining recordable time When the remaining time is less than 1 minute R 0h00m flashes red 0h00m00s Recording ti...

Страница 26: ...P4 or when recording a motion picture in 4K Photo Mode j When REC FORMAT is set to MP4 iFrame series series only While recording is in progress the recording will not stop even if the LCD monitor is closed Put the unit in Pause mode when connecting or disconnecting an external microphone with the MIC terminal Please refer to page 243 about approximate recordable time Maximum recordable scenes of a...

Страница 27: ... tripod is recommended when recording still pictures in dark places because the shutter speed becomes slow You can also take a picture just by touching the subject to focus Touch Shutter l 74 The still picture recording time may be long depending on the picture size The focus indication and the focus area may not be displayed depending on the recording conditions or the menu settings Basic Recordi...

Страница 28: ...set to 4K MP4 when recording a motion picture in 4K Photo Mode or during PRE REC If simultaneous recording is performed during motion picture recording the remaining recordable time will be shortened If this unit is turned off or the recording playback button is pressed the remaining recordable time may be lengthened The still picture recording time may be long depending on the picture size Maximu...

Страница 29: ...ed on the thumbnail screen series series series If you touch scenes recorded as Backup for Twin Camera will be displayed The recording mode icon will be displayed on the thumbnail screen and each thumbnail will be displayed with one of the following icons j AVCHD PH scenes recorded as Backup for Twin Camera j AVCHD HA scenes recorded as Backup for Twin Camera j AVCHD HG scenes recorded as Backup f...

Страница 30: ... screen display will disappear when no touch operation is performed for a specific period of time To display them again touch the screen When touched two times the fast rewind fast forward speed increases The screen display changes to ALL MP4 iFrame 1080 50p 1080 25p 720 25p 360 25p iFrame j AVCHD 1080 50p scene j AVCHD PH scene j AVCHD HA scene j AVCHD HG scene j AVCHD HE scene j MP4 1080 50p sce...

Страница 31: ...back with ALL AVCHD or ALL MP4 iFrame selected the screen may become black momentarily at the time the scene switches Towards r Increases the volume Towards s Decreases the volume Motion picture compatibility This unit is based on AVCHD Progressive AVCHD format MPEG 4 AVC file format Even if the devices used have compatible standards when playback of motion pictures recorded using another device i...

Страница 32: ... by touching 4 Touch the desired item to enter the setting 5 Touch EXIT to exit the menu setting About guide display After touching touching the submenus and items will cause function descriptions and settings confirmation messages to appear After the messages have been displayed the guide display is cancelled Basic Using the menu screen MENU MENU MENU ...

Страница 33: ...t saving time is displayed and the summer time setting is turned on the time difference between the current time and GMT will be set forward by 1 hour Touch SUMMER TIME SET again to return to the normal time setting If you set Link Clock to Summertime to ON the current time will also be set forward by 1 hour l 34 Basic Using the Setup Menu DISPLAY SETUP DISPLAY desired setting 5 SEC Information is...

Страница 34: ...lso be set forward by 1 hour Close the setting by touching EXIT appears and the time of the travel destination is indicated To return the display to the home setting Set the home region using Steps 1 to 3 and close the setting by touching EXIT If you cannot find your travel destination in the area shown on the screen set it by using the time difference from your home region If you set this functio...

Страница 35: ...reen It is possible to change the date format You can set the display method of the zoom button icons and recording button icon Please refer to page 74 Please refer to page 130 DATE TIME SETUP DATE TIME desired display DATE D T OFF DATE FORMAT SETUP DATE FORMAT desired setting Y M D M D Y D M Y ZOOM REC DISPLAY SETUP ZOOM REC DISPLAY desired setting ON Constantly displayed OFF Icons will disappear...

Страница 36: ...n while connecting AC adaptor with this unit this unit automatically turns off This unit will not automatically turn off even if ECONOMY AC is set to ON in following cases j Using the USB cable for PC etc j PRE REC is used j During slide show playback j series series series Using the Wi Fi function The unit is put into recording pause approx 1 second when the unit is turned on Depending on the rec...

Страница 37: ...es series 1 Select the menu 2 Touch the operation icon you would like to change to cancel the setting 3 Touch the operation icon to be set Name of the function is displayed by touching and holding on the operation icon To cancel touch the operation icon again 4 Touch ENTER ALERT SOUND SETUP ALERT SOUND desired setting Volume low Volume high OFF SELECT OPERATION ICONS Motion Picture Recording Mode ...

Страница 38: ...not be set It adjusts brightness and colour density on the LCD monitor These settings will not affect the images actually recorded 1 Select the menu 2 Touch to adjust settings 3 Touch ENTER Touch EXIT to exit the menu screen Please refer to page 131 Please refer to page 132 Please refer to page 130 POWER LCD SETUP POWER LCD desired setting Makes brighter Normal Makes less bright LCD SET SETUP LCD ...

Страница 39: ...cond after character input and the cursor is moved to the right It makes the input easy without moving the cursor when characters on the same key are to be entered again Character input screen is displayed in following conditions j When setting TITLE SETUP for the Highlight Playback l 106 j When entering a name in the Baby Calendar l 112 j series series series When you configure the Wi Fi function...

Страница 40: ...isplayed when the USB HDD is not connected Touch YES When formatting is complete touch EXIT to exit the message screen Perform a physical formatting of the SD card when the SD card is to be disposed transferred l 240 Perform a physical formatting of the built in memory when this unit is to be disposed transferred l 238 Do not turn this unit off or remove the SD card while formatting Do not expose ...

Страница 41: ...f the capacity appears to be smaller The firmware version of this unit is displayed You can update the firmware version of this unit This item is used to start the unit demonstration If DEMO MODE is switched to ON and you touch EXIT when there is no SD card inserted and while this unit is connected to the AC adaptor the demonstration automatically starts If any operation takes place the demonstrat...

Страница 42: ...connect this unit and a PC with the USB cable and check software information License on the PC 1 Select the menu 2 Connect this unit to a PC A message will be displayed when the connection is complete On the PC confirm LICENSE TXT When using the battery the LCD monitor turns off after about 5 seconds Touch the screen to turn the LCD monitor on Do not use any other USB cables except the supplied on...

Страница 43: ...d the menu screen ONLINE MANUAL SETUP ONLINE MANUAL desired access method URL display Displays the URL of the website on the LCD monitor of this unit USB connect Displays the website on a PC connected to this unit with the USB cable QR code Displays the QR code of the website on the LCD monitor of this unit LANGUAGE SETUP LANGUAGE desired language MENU MENU ...

Страница 44: ...oom ratio in Still Picture Recording Mode varies depending on the setting of PICTURE SIZE and ASPECT RATIO l 92 94 If you take your finger off the zoom lever during zoom operation the operation sound may be recorded When returning the zoom lever to the original position move it quietly When the zoom magnification is at its maximum the subjects are focused at about 1 5 m or more When the zoom magni...

Страница 45: ...to Normal or Strong before use When you switch the setting of the Level Shot Function the screen may become black momentarily If you set the option to Strong the angle of view will change series series In the following cases you cannot set the Level Shot function to Strong Even if you set it to Strong it will be reset to Normal j When REC FORMAT is set to 4K MP4 j When the Recording Mode is set to...

Страница 46: ... the LCD monitor If the Sub Window does not appear touch to display it startup disconnection icon for Wireless Twin Camera is disabled when using the Sub Camera Advanced Recording Recording with the Sub Camera Twin Camera WX970 series A Sub Camera Recording a family member next to you Recording scenery Recording yourself Recording only with the Sub Camera is not possible An image recorded with the...

Страница 47: ... recording Rotate the Sub Camera to the desired position The Sub Camera works in Auto Focus which adjusts focus automatically Normally hold this unit as shown in the illustration when recording Rotating the Sub Camera dial to the left The Sub Camera points down Rotating the Sub Camera dial to the right The Sub Camera points up E Sub Camera dial ...

Страница 48: ...ayed To display them touch the Main Camera s image on the screen j Touch Menu j Zoom button icons j Recording button icon j Recording Mode button icon l 54 The following functions do not work when the Sub Window is displayed j Touch Shutter j Creative Control j FACE FRAMING j AF AE tracking j Optical Image Stabilizer Lock j AF ASSIST LAMP j Night Mode Infrared Recording menu items operation icons ...

Страница 49: ...e Recording Mode is set to 4 3 or 3 2 The aspect ratio set in ASPECT RATIO will be displayed 1 Touch the Sub Window The zoom icon will be displayed for approximately 2 seconds 2 Touch the Zoom icon Each touch of the Sub Window switches the magnification level between the normal display 1k and 2k display setting With the normal 1k display setting the zoom icon is displayed with the 2k display setti...

Страница 50: ...nal microphone is connected 4 When WB is touched Touch to select White Balance Mode When is touched Touch to adjust settings Changing the display position of the Sub Window Setting and adjusting the Sub Camera and the Sub Window WB Adjusts the colour balance Adjusts the brightness FOCUS 1 Adjusts the focus 1 2 Allows you to enable Narration Mode Rejects ambient sound allowing your voice to be reco...

Страница 51: ...Scene Select is not available in Narration Mode If you hide the Sub Window Narration Mode will not work When is touched Touch the desired frame series series When REC FORMAT is set to 4K MP4 or this unit is in 4K Photo Mode no frame is displayed and the frame setting cannot be changed If you set the Recording Mode to Intelligent Auto Mode Intelligent Auto Plus Mode the following settings will be u...

Страница 52: ...EC FORMAT to AVCHD and REC MODE to PH HA HG HE l 82 will be displayed on the screen When Twin Camera recording starts this unit also starts recording the Main Camera s image without the Sub Window image as a separate scene Advanced Recording Recording with the Backup for Twin Camera Function WX970 series VX870 series V770 series RECORD SETUP Backup for Twin Camera ON A Twin Camera B Backup for Twi...

Страница 53: ...selected recording can be performed on fewer days Backup for Twin Camera operates when it is set to ON even if you hide the Sub Window You cannot record still pictures while recording with the Backup for Twin Camera function RELAY SCENE COMBINE is not available for scenes that were relay recorded while Backup for Twin Camera was in operation Backup for Twin Camera is not available when any of the ...

Страница 54: ...tures with added effects l 57 1 HDR Movie You can minimise the loss of gradations in bright areas and dark areas when for example the contrast between the background and the subject is large l 60 Scene Mode This option allows this unit to automatically adjust the shutter speed and aperture etc according to the scene you want to record l 61 Manual You can set the shutter speed focus White Balance a...

Страница 55: ...depending on the recording conditions such as when faces are of certain sizes or at certain tilts or when digital zoom is used Intelligent Auto Mode Effect Portrait Faces are detected and focused automatically and the brightness is adjusted so it is recorded clearly Scenery The whole landscape will be recorded vividly without whiting out the background sky which may be very bright 1 Spotlight Very...

Страница 56: ...White Balance functions 1 The effective range of Automatic White Balance adjustment on this unit 2 Blue sky 3 Cloudy sky rain 4 Sunlight 5 White fluorescent lamp 6 Halogen light bulb 7 Incandescent light bulb 8 Sunrise or sunset 9 Candlelight If the Automatic White Balance is not functioning normally adjust the White Balance manually l 66 Auto Focus The unit focuses automatically Auto Focus does n...

Страница 57: ...ar disappear 3 Start recording Set REC FORMAT to AVCHD l 82 Change the Recording Mode to l 54 Select the desired Creative Control Mode then touch Enter Still pictures cannot be taken Intelligent Auto Plus Creative Control Mode Effect Miniature Effect You can record motion pictures with a diorama effect like recording a miniature by intentionally creating focused area and out of focused area in the...

Страница 58: ...ize 3 Touch ENTER 4 When adjusting the brightness Touch The level of brightness is switched every time you touch the icon Standard Bright Dark 5 When adjusting the vividness Touch The level of vividness is switched every time you touch the icon Standard Vivid Most vivid 6 Start recording It will record with an interval 1 second will be recorded for approximately every 6 seconds of recording To mak...

Страница 59: ...every time you touch the icon Standard Bright Dark 2 Start recording Audio cannot be recorded Touch the desired setup time Touch ENTER A frame is recorded with a set recording interval 25 frames will make up a motion picture of 1 second h is an abbreviation for hour min for minute and s for second These times are approximations Maximum recordable time is 12 hours 8mm movie Silent movie Time Lapse ...

Страница 60: ...e when REC FORMAT is set to 4K MP4 the REC FORMAT setting will change to MP4 iFrame and the REC MODE setting of 1080 28M will be selected for MP4 iFrame When you switch from HDR Movie Mode to a different Recording Mode REC FORMAT will not be reset to 4K MP4 The REC FORMAT and REC MODE settings used in HDR Movie Mode will be maintained The following settings are cancelled j FACE FRAMING j Auto Slow...

Страница 61: ...ks Night Scenery j Image may get blurry when close object is recorded RECORD SETUP HDR EFFECT desired setting Sets the correction level to high Sets the correction level to low Scene Mode Mode Effect 5Sports To make fast moving scenes less shaky with slow playback and pause of playback Portrait To make people stand out against the background Soft Skin To makes skin colours appear softer for a more...

Страница 62: ...rding Mode j Using a tripod is recommended Change the Recording Mode to l 54 1 Select the menu 2 Start recording 3 When Interval is selected Touch and hold when you want to use FULL HD Slow Motion Video recording As long as you touch and hold the icon FULL HD Slow Motion Video recording will continue Once you release your finger normal recording will start For each recording you make FULL HD Slow ...

Страница 63: ...creen will change j Images and sound are not output from this unit to another device When you switch to FULL HD Slow Motion Video Mode the screen may become black momentarily When FULL HD Slow Motion Video recording starts the following settings are cancelled j AF AE tracking j PRE REC j Fade On the thumbnail screen in Playback Mode scenes recorded as FULL HD Slow Motion Video are displayed with t...

Страница 64: ...ed and the recording screen will be displayed Once you create a recording group you cannot save still pictures in any of the older recording groups PICTURE SIZE is set to 1920k1080 When you want to record still pictures in a separate recording group use a different SD card When you want to record still pictures in a separate recording group change the recording media or use a different SD card For...

Страница 65: ...tch to Manual Mode by touching the Recording Mode button icon l 54 To cancel the manual settings change the Recording Mode to the Intelligent Auto Mode l 54 When using the LCD monitor 1 Touch the desired item to be set 2 Touch to enter the selection Using the Multi Manual Dial 1 Rotate the Multi Manual Dial to select an item 2 Push the Multi Manual Dial to set 3 Rotate the Multi Manual Dial to sel...

Страница 66: ... setting is complete If the display continues flashing the White Balance cannot be set In this case use other White Balance Modes When the display flashes the Manual White Balance previously adjusted is stored Whenever recording conditions change re set the White Balance When setting both the White Balance and the iris gain set the White Balance first is not displayed on the screen when is being s...

Страница 67: ...n value set the shutter speed and then set the iris gain value Manual shutter speed adjustment When the shutter speed is set lower than 1 12 in the Still Picture Recording Mode using a tripod is recommended The shutter speed will be set to 1 25 when the unit is turned on again You may see a band of light around an object that is shining very bright or highly reflective During normal playback image...

Страница 68: ...us MF appears on the screen 4 Adjust the focus by rotating the Multi Manual Dial The in focus area is displayed in blue The normal screen returns approximately 2 seconds after you finish bringing the subject into focus When MF ASSIST is OFF the blue area is not displayed To restore Auto Focus touch AF in Step 3 or change the Recording Mode to the Intelligent Auto Mode l 54 The blue display does no...

Страница 69: ...el Touch You can adjust the magnification from 3k to 10k When the magnification is set between 5 5k and 10k the magnification window is maximised and the zoom position window is displayed Moving the magnified area Touch or slide the screen while touching it to move the magnified area 3 Rotate the Multi Manual Dial to adjust the focus 4 Touch EXIT or push and hold the Multi Manual Dial to exit the ...

Страница 70: ...ation window is not displayed on TVs The Sub Window is not displayed when the magnification window is displayed The magnification window disappears in the following cases j When you start recording a motion picture j When you continue to zoom in until you enter the digital zoom range The magnification window is not displayed in the following cases j When recording a motion picture or during PRE RE...

Страница 71: ...ch Function icon e g AF AE tracking To cancel touch the Touch Function icon again Optical Image Stabilizer Lock is cancelled by releasing the finger touching Touch function icons 1 In Motion Picture Recording Mode only 2 In Still Picture Recording Mode only Advanced Recording Recording with the Touch Function Image Stabilizer Function AF AE tracking Optical Image Stabilizer Lock 1 Touch Shutter 2 ...

Страница 72: ...his function s default setting is ON Still Picture Recording Mode Image Stabilizer Function Motion Picture Recording Mode setting cancelled When HYBRID O I S is ON is displayed When OFF is displayed When recording with a tripod in Motion Picture Recording Mode we recommend that you set the Image Stabilizer off Still Picture Recording Mode setting cancelled When O I S is MODE1 is displayed When O I...

Страница 73: ... object to lock onto it again When the button is pressed halfway in Still Picture Recording Mode the focus is set to the object that is locked The target frame turns green when it focuses and the target cannot be changed This function cannot be used in Manual Mode In Still Picture Recording Mode it can only be used with some settings in Scene Mode It may track different objects or may not lock the...

Страница 74: ...y of disappear change the setting of the O I S LOCK DISPLAY Stabilization may not be possible under strong shaking conditions To record while moving the unit quickly release Optical Image Stabilizer Lock It is possible to focus and record a still picture of a subject that is touched 1 Touch An icon is displayed A 2 Touch the subject Focus area is displayed at the touched position and a still pictu...

Страница 75: ...e 3 It is displayed only when you set the Recording Mode to HDR Movie Mode l 60 4 It is displayed only when a headphone is connected to the headphone output terminal MIC LEVEL l 90 is set to anything other than AUTO is displayed as the operation icon and adjustment of input level of the microphone is possible If you turn off the unit or press the Recording Playback button PRE REC Self timer Backli...

Страница 76: ...ding of the pictures and sound to start approximately 3 seconds before the recording start stop button is pressed appears on the screen Aim the unit at the subject beforehand There is no beep sound PRE REC is cancelled in the following cases j Press the recording playback button j Touch the recording mode switching icon j If you remove the SD card j If you remove the SD card while MEDIA SELECT is ...

Страница 77: ...n fully the lens focuses on the subject when the button is pressed halfway If the button is pressed fully all at once the lens focuses on the subject just before recording To stop the timer midway through Touch CANCEL Setting the Self timer to Ø2 is a good way to prevent image shake when the button is pressed while using a tripod etc This brightens dark areas so the image can be recorded clearly I...

Страница 78: ...ame time will make conditions even brighter You can record images even in very low light situations minimum required illumination approx 1 lx or in the dark series series Each time the icon is selected the indication changes by one setting in the following order COLOUR Infrared OFF This icon is not displayed in the following cases j When WIDE CONV LENS SET is set to ON j When the Sub Window is dis...

Страница 79: ... attached to this unit do not use the setting The maximum distance that the infrared light can reach is approximately 3 m You can record a clear image by positioning the centre area of the screen over the subject You can change the level of image contrast correction in HDR Movie Mode l 60 The icon changes each time you touch it Low High You cannot change the level of this effect when recording a m...

Страница 80: ...ng 5Sports To make fast moving scenes less shaky with slow playback and pause of playback Portrait To make people stand out against the background Soft Skin To makes skin colours appear softer for a more attractive appearance Spotlight Improved quality when subject is brightly illuminated Snow Improved image quality when shooting in snowy locations Beach To make blue in the sea or sky vibrant Suns...

Страница 81: ...ows you to maintain 4K picture quality Up to 25k i Zoom 40k 2 This zoom function allows you to maintain high definition picture quality Up to 40k D Zoom 60k Digital zoom Up to 60k D Zoom 1500k Digital zoom Up to 1500k Opt Zoom 20k Optical zoom only Up to 20k i Zoom 25k 1 This zoom function allows you to maintain 4K picture quality Up to 25k i Zoom 40k 2 This zoom function allows you to maintain hi...

Страница 82: ...The recording formats that can be set change according to REC FORMAT setting When REC FORMAT is set to AVCHD A Favours image quality B Favours Recording time Opt Zoom 20k Optical zoom only Up to 20k i Zoom 50k This zoom function allows you to maintain high definition picture quality Up to 50k D Zoom 60k Digital zoom Up to 60k D Zoom 250k Digital zoom Up to 250k REC FORMAT RECORD SETUP REC FORMAT d...

Страница 83: ...otion picture to an SD card when there is no space available in the built in memory It allows you to record only to SD card from built in memory Set MEDIA SELECT to Built inMemory Set REC FORMAT to AVCHD l 82 Insert an SD card is displayed on the screen will disappear when space in the built in memory is gone and the recording to the SD card starts Relay Recording can only be performed once Combin...

Страница 84: ...against the prioritised face framing The prioritised face frame is displayed only with Portrait Mode in Intelligent Auto Mode or Intelligent Auto Plus Mode The white frame is for face detection only Focus will be set to prioritised face framing when the button is pressed halfway when recording still pictures Prioritised face framing will turn to green when the focus is set Faces are not detected i...

Страница 85: ... outward Even when the tilt is in the corrected state an error of approximately 1 o may occur In the following cases the electronic level may not be displayed correctly j When moving this unit j When pointing this unit up or down at an angle closer to perpendicular If the unit continues to be tilted upside down from the normal horizontal position while recording motion pictures it is automatically...

Страница 86: ...d back with a TV not compatible with x v Colour colours may not be reproduced properly When these images are played back with devices other than ones compatible with x v Colour it is recommended to record the images after this function is turned OFF x v Colour is a name for devices that are compatible with the xvYCC format an international standard for expanded colour in motion pictures and that f...

Страница 87: ...ayed When Normal is set will be displayed on the screen This function s default setting is Normal When switching to Intelligent Auto Mode or Intelligent Auto Plus Mode Wind Noise Canceller is set to Strong and the setting cannot be changed You may not see the full effect depending on the recording conditions This function cannot be set when using an external microphone This function reduces the lo...

Страница 88: ...t desired setting Auto Records sounds with standard settings Music For recording scenes in which you need to cover a wide sound range and a wide volume range such as music concerts Speech For recording speeches talk sessions and other events in which sounds will be coming mostly from the front of this unit Nature For recording in serene environments such as forests and rivers Festival For recordin...

Страница 89: ...ption is displayed only when 5 1ch 2ch is set to 5 1ch 2 The option is displayed only when 5 1ch 2ch is set to 2ch SURROUND STEREO Records sounds with the setting of MIC SETUP SURROUND or STEREO MIC MONO Records sounds from all directions without setting specific directivity 5 1ch 2ch RECORD SETUP 5 1ch 2ch desired setting 5 1ch Records with the 5 1ch 2ch Records with the 2ch MIC SETUP RECORD SETU...

Страница 90: ...e are not red Otherwise the sound is distorted Select a lower setting for microphone input level 3 Touch ENTER Touch EXIT to complete the setting When MIC SETUP is ZOOM MIC the volume will be different depending on the zoom rate The sound will be recorded in stereo 2ch when 5 1ch 2ch is set to 2ch or an external microphone is input microphone input level meter is displayed on the screen when 5 1ch...

Страница 91: ...i Manual Dial When an item on the picture quality adjustment icon or the manual icon l 65 is not selected each time you push the Multi Manual Dial the picture quality adjustment icon and the manual icon are displayed alternately Display the picture quality adjustment icon 2 Rotate the Multi Manual Dial to select an item 3 Push the Multi Manual Dial to set 4 Rotate the Multi Manual Dial to adjust t...

Страница 92: ...l Zoom cannot be used The maximum zoom magnification is 20k PICTURE SIZE PICTURE PICTURE SIZE desired setting Picture size Aspect ratio Extra Optical Zoom l 44 5216k3912 4 3 3808k2856 640k480 50k 5472k3648 3 2 3984k2656 1728k1152 35 7k 6784k3816 16 9 4992k2808 1920k1080 30k Picture size Aspect ratio Extra Optical Zoom l 44 4896k3672 4 3 3264k2448 640k480 50k 5472k3648 3 2 3984k2656 1728k1152 31 2k...

Страница 93: ...efault setting is in Still Picture Recording Mode and in Motion Picture Recording Mode The recording will become longer depending on the recording pixels Please refer to page 245 for details about the number of recordable pictures PICTURE PICTURE SIZE desired setting Picture size Aspect ratio 6016k3384 16 9 3840k2160 Picture size Aspect ratio 4992k2808 16 9 1920k1080 Picture size Aspect ratio 4736...

Страница 94: ...ard to focus Switch to Manual Mode l 65 When switching to Intelligent Auto Mode or Intelligent Auto Plus Mode the setting is fixed to AUTO and cannot be changed This setting is not available when video light is set to ON You can add a shutter sound when recording still pictures No shutter sound is emitted in Motion Picture Recording Mode ASPECT RATIO PICTURE ASPECT RATIO desired setting 4 3 Aspect...

Страница 95: ...h When Slow motion pictures are played back in reverse they will be shown continuously at approximately 2 3rd the speed of normal playback intervals of 0 5 seconds series series When 4K MP4 scenes are played back in reverse slow motion they will be shown in intervals of 0 5 seconds When scenes recorded with MP4 1080 50M 1080 28M 720 or scenes saved in MP4 1920k1080 25p are played back in reverse s...

Страница 96: ...cenes saved in MP4 1920k1080 25p are advanced one at a time in the reverse direction they will be shown in intervals of 0 5 seconds When the frames of iFrame scenes and scenes saved in MP4 640k360 25p are advanced one at a time in the reverse direction they will be shown in intervals of 1 second When the frames of parts recorded as FULL HD Slow Motion Video are advanced one at a time in the revers...

Страница 97: ... next previous page j Slide the thumbnail display upward downward while touching it j Touch up down on the thumbnail scroll lever l 30 2 Touch the desired search condition FACE and HIGHLIGHT are not available when you play back a 4K MP4 scene MP4 iFrame scene or scene recorded as Backup for Twin Camera series series only When select FACE it will select the portion for which Face Recognition was pe...

Страница 98: ... played back repeatedly When playing back motion pictures by date all the scenes on the selected date are played back repeatedly Resuming the previous playback If playback of a scene was stopped halfway the playback can be resumed from where it was stopped If playback of a motion picture is stopped appears on the thumbnail view of the stopped scene The memorised resume position is cleared if you t...

Страница 99: ... zoom in on during still picture playback It will display enlarged in order of normal display k1 k2 k4 Touch and hold the screen to zoom in from the normal display k1 to k2 Touch the screen to zoom in from k2 to k4 The still picture is zoomed in on centring on the part you touched 2 Move to the zoomed in position by touching or slide while touching the screen The location of the zoom displays for ...

Страница 100: ...gain In cases such as those described below scenes and still pictures are grouped separately on the date list and 1 2 may be added after the date j When the number of scenes exceeds 99 j When the number of still pictures exceeds 999 j When REC MODE in AVCHD is changed j When the microphone input sound 5 1ch 2ch is changed j When recorded in Creative Control Mode j series series series When the ON ...

Страница 101: ...MP4 1920k1080 25p l 123 134 2 Scenes recorded with 720 in MP4 iFrame Scenes saved in MP4 1280k720 25p l 123 3 Scenes saved in MP4 1280k720 25p l 123 134 4 Scenes recorded with iFrame in MP4 iFrame Still pictures recorded in Stop Motion Animation Assist Mode l 64 Still pictures created from motion pictures Scenes saved in Highlight Playback l 107 Scenes saved in MP4 640k360 25p l 123 3 Scenes saved...

Страница 102: ... settings refer to page 104 4 Touch in the thumbnail view 5 Select the playback operation l 30 When the playback is finished or stopped the screen to select REPLAY SAVE l 107 SELECT AGAIN or EXIT is displayed Touch the desired item Skip Playback Slow motion Playback Frame by frame Playback and Direct Playback are not possible Highlight Playback is not available for the following scenes s iFrame sc...

Страница 103: ...sound When EFFECT SETUP is set to NONE you will be able to select NO MUSIC When NO MUSIC is selected the audio recorded at the time of shooting is played back series series series USER BGM lets you use the music stored on your smartphone To set USER BGM use the Wi Fi function Remote Ctrl and create Highlight Playback from the smartphone app Image App The music data will be saved in this unit as US...

Страница 104: ...n touched the date is selected and surrounded by red Touch the date again to cancel the operation When SELECT SCENES is selected Touch the scenes to be played back Up to 99 scenes can be selected in succession When touched the scene is selected and is displayed Touch the scene again to cancel the operation 4 Touch Enter ENTER Playing back with the settings changed SCENE SETUP 1 Select the scene or...

Страница 105: ...the thumbnail display screen and is displayed on the scenes added as favourite scenes 4 Touch Return All the scenes checked as favourite may not be played back depending on the playback time setting l 106 To clear the favourite scenes from the thumbnail display 1 Touch Reset 2 Touch RESET ALL or RESET SELECTED The check on all the favourite scenes will be cleared when RESET ALL is selected 3 When ...

Страница 106: ...acters can be conveniently input without moving the cursor when the Auto Cursor Position is set to ON l 39 A maximum of 18 characters can be entered 4 Touch ENTER to end registration The date of the first scene of the Highlight Playback will be displayed as the date The entered title will be cleared when the unit is turned off or the Highlight Playback is finished APPROX 90 SEC APPROX 3 MIN AUTO N...

Страница 107: ...orded in HA regardless of REC MODE PH HA HG HE of a scene 4 Touch YES 5 Touch EXIT Touch COPY or EXIT The Highlight Playback saved in the built in memory can be copied to the SD card To copy to the SD card select COPY Operate according to the message and touch EXIT at the end is displayed on the thumbnail of the scenes saved by the Highlight Playback Saving the Highlight Playback AVCHD 1920k1080 5...

Страница 108: ... l 109 To set the music l 110 Touching Return after selecting a scene may cancel the selected scene 4 Touch Enter 5 Touch YES and select the playback operation for the edited scene l 30 In the following cases the screen for selecting PREVIEW SAVE l 111 SELECT AGAIN and EXIT is displayed Touch the desired item j Touch NO j Playback finishes j Stop playback You can also select combinations of scenes...

Страница 109: ...played by touching To select part of a scene 1 Touch 3 sec To cancel the operation touch it again 2 Touch the desired scene The touched scene is displayed by 3 second thumbnails 3 To select a single thumbnail Touch the thumbnail of the part you want to play back The thumbnail selection is made as you touch it and the indication white appears on the thumbnail To cancel the selection touch the thumb...

Страница 110: ...hat displays the thumbnails of scenes and perform the following operations j When selecting a scene Touch the desired scene j When selecting part of a scene Perform the operations in Steps 1 5 To set the music 1 Touch Music 2 Touch the desired sound When NO MUSIC is selected the audio recorded at the time of shooting is played back series series series USER BGM lets you use the music stored on you...

Страница 111: ... can be copied to the SD card To copy to the SD card select COPY Operate according to the message and touch EXIT at the end You can save scenes even when using the battery but we recommend that you use the AC adaptor series series series Manually edited scenes recorded as Backup for Twin Camera will be saved as normal AVCHD or MP4 scenes For information on the approximate free space requirements f...

Страница 112: ...e registered Baby 1 is displayed Input method is same operation as for setting up the title l 106 After entering the name touch Enter A maximum of 9 characters can be entered 4 Check the Baby Calendar The name of the registered baby and its age in months are displayed You can switch the age in months display by touching Except for months with no recordings the age in months display is available fo...

Страница 113: ... 1 Touch the name display on the Baby Calendar l 112 or select the menu 2 Touch the name of the baby whose details are to be changed When Baby 1 Baby 2 Baby 3 is displayed the birthday and name or name only are not registered 3 Touch the desired item The setting method is the same as when registering for the first time l 112 4 Touch ENTER The Baby Calendar of the registered baby is displayed To de...

Страница 114: ... playback for the slide show When EFFECT SETUP is selected Touch the desired effect Touch ENTER When EFFECT SETUP is changed MUSIC SELECT will be set the same as EFFECT SETUP To set EFFECT SETUP and MUSIC SELECT to different settings change MUSIC SELECT after setting EFFECT SETUP SLIDES INTERVAL cannot be set when EFFECT SETUP is set ALL DATE SETUP Select the date to be played back SLIDES INTERVAL...

Страница 115: ...yback using the Image App music data will be replaced For information on the file format and playback time of music data that can be used as USER BGM refer to the Image App To delete the music data saved as USER BGM in this unit perform DELETE USER BGM l 39 To test the music audio Touch START and start the audio testing Touch the other music option to change the music to be tested When you touch S...

Страница 116: ...o 9 scenes or 20 scenes display 3 Select the playback operation l 30 The display returns to the thumbnail display when playback is finished or stopped To play back other recording groups You can play back other recording groups by touching the date select icon 1 Touch the date select icon 2 Touch the playback date Touch a date with the indication Recording groups in the selected date are displayed...

Страница 117: ...d as thumbnails will be deleted by selecting ALL SCENES In case of playing back scenes or still pictures by date all the scenes or still pictures on the selected date will be deleted Protected scenes still pictures cannot be deleted 3 When MULTI is selected in Step 2 Touch the scene still picture to be deleted When touched the scene still picture is selected and the indication appears on the thumb...

Страница 118: ...ation Assist Mode are displayed the still pictures cannot be deleted from the menu l 116 During Highlight Playback scenes still pictures cannot be deleted Scenes that cannot be played back the thumbnails are displayed as cannot be deleted In case of ALL SCENES the deletion may take time if there are many scenes or still pictures If you delete scenes recorded on other products or still pictures con...

Страница 119: ...iding the top and bottom section selection buttons It is convenient to use Slow motion Playback and Frame by frame Playback l 95 96 4 Touch ENTER 5 Confirm play back the scene after editing by touching YES A confirmation message appears when NO is touched Proceed to Step 7 6 Stop the playback A confirmation message appears 7 Touch ENTER Repeat Steps 2 7 to continuously delete parts from other scen...

Страница 120: ...29 1 Select the menu 2 Touch and play back the scene you want to divide It is convenient to use Slow motion Playback and Frame by frame Playback l 95 96 3 Touch to set the dividing point Touch YES Touch YES to continue dividing the same scene To continue dividing other scenes touch NO and repeat Steps 2 3 4 Touch Return to complete dividing Unwanted parts can be deleted l 117 To delete all the div...

Страница 121: ... It is convenient to use Slow motion Playback and Frame by frame Playback l 95 96 3 Touch to set the dividing point Set the dividing point so there will be 2 seconds or more for the part for deletion and 3 seconds or more for the part to be kept 4 Touch the part for deletion 5 Touch YES and confirm play back the part for deletion A confirmation message appears when NO is touched Proceed to Step 7 ...

Страница 122: ...n using the Eye Fi card that is set as the selected transfer setting device in advance on the computer 2 Touch the scene still picture to be protected When touched the scene still picture is selected and the indication appears on the thumbnail Touch the scene still picture again to cancel the operation Touch Return to complete the settings When the thumbnails of still pictures recorded in Stop Mot...

Страница 123: ...4 1 Select the menu 2 Touch the scene you want to convert The scene selection is made as you touch it and the indication appears on the thumbnail To cancel the operation touch the scene again You can select up to 99 scenes in succession 3 Touch Enter 4 Select the quality after conversion MP4 scenes after conversion are saved to the same media as the scenes before conversion 5 Touch YES To continue...

Страница 124: ...corded in AVCHD exceeding 4 GB approx or 30 minutes approx will be automatically divided when converted to MP4 scenes and copied If you convert protected scenes to MP4 their protection will be cleared after the conversion series series series Scenes recorded as Backup for Twin Camera will be saved as normal MP4 scenes when converted to MP4 scenes and copied WX970 VX870 V770 ...

Страница 125: ...humbnail To cancel the operation touch the scene again Up to 99 scenes can be selected in succession 3 Touch Enter The converted scene will be saved in the same medium as the one storing the original scene A message asking whether to delete the original scene will be displayed To delete the scene select YES To keep it select NO To cancel the slow speed conversion or the deletion of the original sc...

Страница 126: ... message appears touch YES Scene in the built in memory will be deleted Protected scenes in the built in memory are not deleted 4 Touch EXIT when the relay scene combining complete message is displayed The thumbnail view of the SD card is indicated Relay Recording information will be deleted when the relay scenes are combined and Relay Recording will be possible again When the relayed scenes in th...

Страница 127: ...Y SCENE COMBINE is not available for scenes recorded as Backup for Twin Camera EDIT SCENE RELAY INFO CANCEL Combining of the relay scene cannot be performed if the available space on the SD card is less than the volume of the relayed scene in the built in memory It is recommended to combine the relay scene using the HD Writer AE 5 2 MENU ...

Страница 128: ...ures by connecting this unit to a TV that supports 4K motion pictures and playing back 4K MP4 scenes Although the output resolution will be lower you can also play them back by connecting this unit to a high definition TV or other device that does not support 4K motion pictures Advanced Playback Watching Video Pictures on your TV Confirm the terminals on your TV and use a cable compatible with the...

Страница 129: ...layed on the TV Use the LCD monitor of this unit j When recording a motion picture in HDR Movie Mode or during PRE REC j When HDMI RESOLUTION is set to 576p in HDR Movie Mode j FULL HD Slow Motion Video Mode j series series series When recording a motion picture with Backup for Twin Camera set to ON or during PRE REC A HDMI micro cable supplied Be sure to connect to the HDMI terminal Insert the co...

Страница 130: ...a regular TV 4 3 or when both sides of the images do not appear on the screen Change the menu setting to display the images correctly Check the TV setting Example of images with a 16 9 aspect ratio on a regular TV 4 3 If a wide screen TV is connected adjust the aspect setting on the TV Refer to the operating instructions of the TV for details To display the on screen information on the TV When the...

Страница 131: ...ding Mode j When you play back a non 4K MP4 scene in Playback Mode j When this unit is set to Still Picture Recording Mode or when you play back a still picture Listening in 5 1 channel sound AVCHD You still can listen to the 5 1 channel sound recorded from the internal microphones when this unit is connected to the 5 1 channel compatible AV amplifier or TV using the HDMI micro cable Please read t...

Страница 132: ...or the Panasonic TV for easy operations when this unit has been connected to a VIERA Link compatible device using a HDMI micro cable supplied for automatic linked operations Not all operations are possible VIERA Link is a unique Panasonic function built on a HDMI control function using the standard HDMI CEC Consumer Electronics Control specification Linked operations with HDMI CEC compatible devic...

Страница 133: ...ng on the HDMI terminal on the TV the input channel may not switch automatically In this case use the remote control for the TV to switch the input channel If you are unsure whether or not the TV and AV amplifier you are using are compatible with VIERA Link read the operating instructions for the devices Available linked operations between this unit and a Panasonic TV is different depending on the...

Страница 134: ... divided to fit the space on the SD card If you divide the scenes l 120 and copy by scene selection it is possible to copy matching the remaining capacity of the media or only the necessary parts If there is little or no remaining capacity in the SD card a confirmation message asking to copy after deleting all data on the SD card is displayed Be aware that deleted data cannot be restored Refer to ...

Страница 135: ...change the card following the instructions on the screen 4 Touch EXIT when the copy complete message is displayed The thumbnail view of the copy destination is indicated When you stop copying halfway Touch CANCEL while copying This will convert the scene recorded in AVCHD on the built in memory to MP4 1280k720 25p or 640k360 25p and copy to the SD card This will convert the scene recorded in MP4 o...

Страница 136: ... pictures or still pictures are copied The order in which the scenes or still pictures were copied cannot be changed Approximate time for copying When copying a recorded motion picture of full 4 GB size Approx 5 minutes to 15 minutes When performing on a recorded 1080 50p motion picture of full 4 GB size Approx 10 minutes to 20 minutes When performing on a recorded AVCHD HA motion picture of full ...

Страница 137: ... j A USB HDD with a capacity of below 160 GB or above 2 TB j When a USB HDD has two or more partitions j If a USB HDD is in a format other than FAT32 j When connected by using a USB hub A USB Connection Cable commercially available B USB HDD commercially available C Turn the side with the symbol up to connect the micro A end of the USB Connection Cable to the USB terminal of this unit Connect this...

Страница 138: ...utes until the connection is completed 5 Touch the desired item Following can be performed by connecting the USB HDD with the scenes and still pictures copied from this unit to other devices j Save on a PC or rewrite on USB HDD using HD Writer AE 5 2 When using an Eye Fi card commercially available set Eye Fi TRANSFER to OFF l 147 When the item is set to ON even if you connect the USB HDD to this ...

Страница 139: ...ecovered Back up important data on a PC etc Connect this unit to the USB HDD and touch Playback HDD When formatting is complete touch EXIT to exit the message screen Connect this unit and the USB HDD to format You may no longer be able to use the USB HDD if you format them on another device such as a PC etc Displaying media information The used space of the USB HDD can be checked Connect this unit...

Страница 140: ...for information on copying files between the SD card built in memory 4 Touch the desired items following the instructions on the screen It will return to the previous step by touching When SELECT SCENES is selected When touched the scene still picture is selected and the indication appears on the thumbnail Touch the scene still picture again to cancel the operation When SELECT DATE is selected Whe...

Страница 141: ... USB Connection Cable to the USB terminal of this unit 1 Connect this unit to the USB HDD to prepare for playback l 137 When playing back on a TV connect this unit to the TV l 129 2 Touch Playback HDD 3 Touch the scene or still picture to be played back and then play it back The playback operation is performed the same as when playing back motion pictures or still pictures l 29 95 To terminate the...

Страница 142: ... HDD are saved in the SD card The scenes you have saved in Highlight Playback during playback of the USB HDD are saved in the built in memory If you touch COPY after saving you can copy them to the SD card Deleting scenes and still pictures on the USB HDD may take time You cannot set the following items during playback of USB HDD j SCENE PROTECT j SECTION DELETE j DIVIDE j MANUAL EDIT j SPLIT DELE...

Страница 143: ... with SD card slot series series 4K picture quality High definition picture quality series High definition picture quality Insert the SD card directly l 144 Equipment with USB terminal series series 4K picture quality High definition picture quality series High definition picture quality Connect with supplied USB cable l 144 Equipment without SD card slot or USB terminal Standard picture quality T...

Страница 144: ... as far as they will go 1 Connect the unit to the Blu ray disc recorder or high definition AVCHD compatible DVD recorder The USB function selection screen will appear on the screen of the unit 2 Touch RECORDER on the screen of this unit When you select an option other than RECORDER reconnect the USB cable When using the battery the LCD monitor turns off after about 5 seconds Touch the screen to tu...

Страница 145: ...sc recorder In this case as well perform the operations of Steps 1 to 4 You cannot switch the Recording Mode Playback Mode by pressing the recording playback button on this unit while the Blu ray disc recorder or DVD recorder is connected Disconnect the USB cable before performing either of these operations If the battery runs down during dubbing a message will appear Operate the Blu ray disc reco...

Страница 146: ...be displayed in reduced sizes on the TV If the date and time display and function indication are not wanted cancel them before dubbing l 35 130 Dubbing in standard picture quality Change the video input on the video device and TV that this unit is connected to The channel set will differ depending on the terminal to which the unit is connected See the operating instructions of the video device for...

Страница 147: ...s on the thumbnail screen Copy Dubbing Using the Eye Fi card The functions of the Eye Fi card including wireless transmission are not guaranteed to work on this product In the case of a malfunction of the card please contact the card manufacturer To use the Eye Fi transfer feature a broadband wireless LAN environment is required To use the Eye Fi card permission from the national or regional gover...

Страница 148: ...ansfer settings Insert an Eye Fi card commercially available to the unit 1 Press the recording playback button to switch to the Playback Mode 2 Touch the play mode select icon l 29 3 Select 4K MP4 MP4 iFrame or PICTURE l 29 Set the media to card and select 4K MP4 MP4 iFrame or PICTURE l 29 series series only series series series AVCHD scenes or scenes recorded as Backup for Twin Camera cannot be u...

Страница 149: ...setting can be checked while pausing the recording If the Eye Fi card is removed and then reinserted into the unit set functions related to Eye Fi again from the menu When using the Eye Fi card please be sure to unlock the write protect switch l 15 Before deleting the files please confirm they have been transferred to your PC and uploaded to the sharing site Do not use the Eye Fi card in locations...

Страница 150: ...ing this unit near devices such as cordless telephones or any other wireless LAN device that use the 2 4 GHz radio wave band may cause a decrease in performance in both devices Do not connect to the wireless network you are not authorised to use When this unit utilises its Wi Fi function wireless networks will be searched automatically When this happens wireless networks that you are not authorise...

Страница 151: ...When sending scenes or still pictures we recommend you use the AC adaptor If you are using the battery we recommend you use the fully charged one When sending motion pictures or still pictures on a mobile network or tethering high packet communication fees may be incurred depending on the details of your contract This unit may not connect to a wireless access point depending on the radio wave cond...

Страница 152: ...the smartphone application Image App on your smartphone l 181 2 Check if the smartphone is an Android NFC compatible Android non NFC compatible or iOS device If your smartphone is NFC compatible the NFC mark will be displayed when starting up the Image App Wi Fi WX970 series VX870 series V770 series Remote Ctrl You need to turn on the Wi Fi function of your smartphone Do not remove the SD card dur...

Страница 153: ... 188 When Direct Connection Password is set to ON j Easy Connection WPS l 189 j Connecting with QR code l 189 j Connecting by entering an SSID and Password l 190 When the Wi Fi connection is complete proceed to Using Remote Ctrl with a direct connection l 154 1 Check if the wireless access point is compatible with IEEE802 11b g n 2 Set up a Wi Fi connection between this unit and the wireless acces...

Страница 154: ... connected to this unit will be cut off and the newly touched smartphone will be connected The connection cannot be established while this unit is recording or copying a file to the smartphone during remote operations If the device is Android non NFC compatible or iOS Proceed to Step 2 when your Wi Fi connection has been made via Direct Connection in Wi Fi Setup l 188 1 Press Wi Fi button on this ...

Страница 155: ...uch the smartphone on of this unit Touch the NFC touch area while the NFC mark is displayed on the smartphone screen If this is the first time the smartphone is connecting to this unit touch YES on the screen of this unit and then touch the smartphone on of this unit again If the unit is not recognised even when touching the smartphone change positions and try again When the connection is complete...

Страница 156: ...following operations allow you to register up to ten smartphones If the number exceeds ten smartphone information with the oldest registration date and time will be deleted j Touching an NFC compatible smartphone on this unit j Setting Direct Connection Password to OFF and connecting this unit and a smartphone directly Please refer the instructions for the device you are using for information on h...

Страница 157: ...Motion Animation Assist Mode Twin Camera 1 Changing and adjusting the Sub Window settings 1 Backup for Twin Camera Recording format Picture size White Balance Manual shutter speed iris adjustment 4K Photo Mode only 1 2 Backlight Compensation Night Mode Self timer Aspect ratio Turning the unit off 1 series 2 series 3 Playback screen 1 Camera function button 2 Number of scenes 3 Remaining battery po...

Страница 158: ...ra j MP4 scenes saved as Highlight Playback j Scenes that were converted to MP4 scenes and copied with the MP4 conversion function l 123 3 5 j Scenes that were converted to MP4 scenes and copied with the MP4 conversion function or recording format conversion function l 123 135 4 5 Highlight Photo Collage j Parts that were recognised as clearly recorded are automatically extracted from multiple sce...

Страница 159: ...a connection manually l 187 When the Wi Fi connection is complete proceed to Using Baby Monitor Using Wi Fi Setup Wizard you can also set up a Wi Fi connection in conjunction with the smartphone application Image App l 183 Wi Fi WX970 series VX870 series V770 series Baby Monitor You need to turn on the Wi Fi function of your smartphone If CLOCK SET l 21 is not set correctly the sound detection fun...

Страница 160: ...of the baby being monitored on your smartphone Images of baby monitoring cannot be recorded It cannot be confirmed with multiple smartphones simultaneously Voice message function The smartphone and this unit can be used like radio transceivers allowing the users to have a conversation by taking turns A voice message of up to 1 minute can be sent Open the LCD monitor of this unit when using the Voi...

Страница 161: ...ne when a sound is detected Notification Test This tests if a notification can be sent to the smartphone when a sound is detected Remote Voice Level This sets the voice message volume Sound Detection Sensitivity This sets the sound detection sensitivity Sound Scene Select is set to Auto Changing Baby Monitor settings ON OFF Volume high Volume low High Low ...

Страница 162: ...reless access points to set up a connection l 186 Setting up a connection manually l 187 When the Wi Fi connection is complete proceed to Using Hom Monitor Using Wi Fi Setup Wizard you can also set up a Wi Fi connection in conjunction with the smartphone application Image App l 183 Wi Fi WX970 series VX870 series V770 series Hom Monitor Switch the Wi Fi setting to off on your smartphone and use wi...

Страница 163: ...one is connecting to this unit touch YES on the screen of this unit and then touch the smartphone on of this unit again If the unit is not recognised even when touching the smartphone change positions and try again You cannot set up a connection when recording an image with this unit Check that the message Connecting has disappeared from this unit 6 When Start Home Cam is displayed on the smartpho...

Страница 164: ... 4 Start up the smartphone application Image App If the device is Android When a Wi Fi connection guidance screen is displayed select No If the device is iOS If a confirmation message for the Wi Fi setup is displayed select Close 5 Enable the home monitoring setting from the menu of the smartphone application Image App Select MENU Application function Home Monitor and enable Use Home Monitor 6 Sel...

Страница 165: ... touch Hom Monitor 2 Start up the smartphone application Image App When a Wi Fi connection guidance screen is displayed select NO Use the smartphone to start home monitor To exit Hom Monitor Touch EXIT displayed on the screen of this unit or press the Wi Fi button The message is displayed Touch YES to close the indication After turning off this unit with the LCD monitor you can also turn on this u...

Страница 166: ...ended optimal speed may not be reached depending on your environment Narrowband lines such as analogue modems cannot be used If the line for the smartphone is switched communication may be interrupted In that case connect again Line quality Recommended optimal speed upstream 500 kbps or higher If you have difficulty establishing a connection with Hom Monitor or the connection is disconnected wait ...

Страница 167: ... monitoring detection area Once this unit is set to home monitoring home monitoring standby state it cannot detect moving objects for up to 5 minutes Detection of some moving and stationary subjects may not be possible due to the condition of the subject Check beforehand to see if detection of the moving or stationary object can be detected If the movement of the subject is too fast or too slow if...

Страница 168: ...since it may cause false detection Power of this unit will automatically turn off when monitoring condition continues for approximately 10 days REC MODE is set to HE ZOOM MODE is set to Opt Zoom 20k The following recording modes are not available l 54 j Creative Control Mode j HDR Movie Mode j FULL HD Slow Motion Video Mode j series series 4K Photo Mode Backup for Twin Camera is not available duri...

Страница 169: ... access point Easy Connection WPS l 185 Searching for wireless access points to set up a connection l 186 Setting up a connection manually l 187 When the Wi Fi connection is complete proceed to Playing back on a TV Using Wi Fi Setup Wizard you can also set up a Wi Fi connection in conjunction with the smartphone application Image App l 183 Wi Fi WX970 series VX870 series V770 series DLNA Play Plea...

Страница 170: ...ct the media SD MEM and select the motion picture AVCHD MP4 or still picture JPEG to play back 3 Perform playback operations with the TV remote control Playback operations may differ depending on the TV in use The following operations can be performed if a colour button is pushed Blue Red Skip playback Fast forward Fast rewind playback cannot be performed You cannot perform playback operations wit...

Страница 171: ...unit and the wireless access point Easy Connection WPS l 185 Searching for wireless access points to set up a connection l 186 Setting up a connection manually l 187 When the Wi Fi connection is complete proceed to Copying to a PC l 173 Using Wi Fi Setup Wizard you can also set up a Wi Fi connection in conjunction with the smartphone application Image App l 183 Wi Fi WX970 series VX870 series V770...

Страница 172: ...the workgroup setting of the connected PC has been changed from the standard one you also need to change the PC Connect Setup setting of this unit l 196 The user account of the PC both the Account Name and the Password must consist of 32 or less alphanumeric characters 2 If you use non alphanumeric characters for the user account a destination folder may not be set up 2 If you use more than 32 cha...

Страница 173: ... Input method is same operation as for setting up the title l 106 After entering the computer name of the PC touch Enter 4 Touch INPUT and enter the name of the shared folder If you have created a shared folder destination folder using HD Writer AE 5 2 l 172 touch NEXT Enter the name of the shared folder you have created on your PC and touch Enter A maximum of 15 characters can be entered If a scr...

Страница 174: ...approximately 8 hours the scenes will not be copied If the copy source contains scenes or still pictures recorded on other devices copying may be cancelled Depending on your environment copying may take time or may not be available If the scene to be copied is long or copying fails we recommend that the following be performed for copying j Connecting this unit to the PC by USB cable l 219 224 j In...

Страница 175: ...series VX870 series V770 series Live Cast If CLOCK SET l 21 is not set correctly Live Cast cannot be used Check your contract details carefully as smartphone and internet contract details may result in high communication charges being incurred or a limit placed on communication traffic Caution Be sure to pay special attention to the privacy the likeness rights etc of the subject when you use this ...

Страница 176: ...assword When you connect this unit to a wireless access point l 185 you can acquire a LUMIX CLUB Login ID Password with this unit l 197 4 Use linked services with LUMIX CLUB Log in to the LUMIX CLUB and register set up the USTREAM on WEB service link setup 5 Set up a Wi Fi connection between this unit and the wireless access point Easy Connection WPS l 185 Searching for wireless access points to s...

Страница 177: ...channel name or the scheduled broadcast date This unit can only set the scheduled broadcast date l 179 For other settings set them on the LUMIX CLUB On the LUMIX CLUB register the destination addresses of the e mail in advance Touch will disappear when no touch function is performed for a specific period of time To display them again touch the screen To start the live broadcast Touch If you press ...

Страница 178: ...he Password for the Programme and restart the broadcast Image content may be leaked to third parties depending on the USTREAM image publication method settings Set the publication range and Password using USTREAM if required Touch to display the live broadcast setting screen will disappear when no touch function is performed for a specific period of time To display them again touch the screen Live...

Страница 179: ...ast appears as if frames were dropped or stops when AUTO is set change LINE QUALITY according to your environment If the selected line quality has an image quality higher than the one you are using images will appear as if the frame rate is low Operation cannot be guaranteed for all devices Even with a broadband line the recommended optimal speed may not be reached depending on your environment Na...

Страница 180: ...e media 1 Touch MEDIA SELECT 2 Touch the media for recording motion pictures 3 Touch ENTER Broadcasting live with no sound 1 Touch Microphone On Air 2 Touch OFF If you broadcast and record a motion picture simultaneously when this item is set to OFF the sound of the broadcast will not be recorded ON Live motion pictures are saved on USTREAM OFF Select this option not to save on USTREAM PH HA HG HE...

Страница 181: ...en downloading the app on a mobile network high packet communication fees may be incurred depending on the details of your contract Wi Fi WX970 series VX870 series V770 series Install the Image App About the Image App The Image App is an application provided by Panasonic For Android apps For iOS apps OS Android 2 3 3 or later iOS 6 0 or later iPhone 3GS is not supported Installation procedure 1 Co...

Страница 182: ...870 series V770 series Setting Up a Wi Fi Connection Wi Fi connection methods Connecting to a wireless access point l 185 Setting up a direct connection to a smartphone l 188 Available Wi Fi functions Remote Ctrl l 155 Baby Monitor l 159 Hom Monitor l 162 DLNA Play l 169 Copy l 171 Live Cast l 175 Remote Ctrl l 154 A Lit green The status indicator is lit green while this unit is connected to a des...

Страница 183: ... App 5 Touch the smartphone on of this unit Touch the NFC touch area while the NFC mark is displayed on the smartphone screen If this is the first time the smartphone is connecting to this unit touch YES on the screen of this unit and then touch the smartphone on of this unit again When the connection is complete the setup screen is displayed on the smartphone 6 Follow the on screen instructions o...

Страница 184: ...phone start up Image App 3 Follow the on screen instructions of the smartphone to set up a connection When the settings is complete the smartphone and this unit are connected directly allowing you to use remote operations l 154 When Wi Fi is selected If you are using an Android device start up the smartphone application Image App 1 If the device is Android On the smartphone select Wi Fi and select...

Страница 185: ...ss access point For information on how to delete wireless access points or change the search order of wireless access points please refer to Set Wireless Access Point on page 193 5 Touch Easy Connection WPS 6 Set the wireless access point to waiting for WPS For further details please read the operating instructions for the wireless access point When using a tethering connection please read the ope...

Страница 186: ...cess point if the network authentication is encrypted 1 Press Wi Fi button on this unit 2 Touch Wi Fi Setup 3 Touch Set Wireless Access Point 4 Touch the part with no display of a wireless access point For information on how to delete wireless access points or change the search order of wireless access points please refer to Set Wireless Access Point on page 193 5 Touch Search 6 Touch the wireless...

Страница 187: ...rch order of wireless access points please refer to Set Wireless Access Point on page 193 5 Touch Set Manually 6 Touch INPUT then enter the SSID of the wireless access point to be connected For details on how to enter characters refer to page 106 When the entry is complete touch Enter 7 Touch the desired Network Authentication method When WEP is selected proceed according to step 9 8 Touch the des...

Страница 188: ... Fi Setup l 194 The default setting is OFF Select ON as needed for example when the setting seems necessary for your Wi Fi environment When Direct Connection Password is set to OFF j Proceed to the following Connecting with Direct Connection Password set to OFF When Direct Connection Password is set to ON If your smartphone is compatible with WPS refer to Easy Connection WPS If not refer to Connec...

Страница 189: ...owing you to use remote operations l 154 When using an iOS device perform the following operations 1 Select the option that allows you to install the app on the profile screen of the Image App and follow the on screen instructions to complete the installation 2 Press the home button to close the displayed screen 3 Select the network name SSID of this unit from the Wi Fi setup of the smartphone Whe...

Страница 190: ...ord are displayed with No Password on the history list To display the connection details touch DETAIL 3 Touch ENTER When the connection is complete a message will be displayed and the screen will switch to the Wi Fi function screen selected in step 2 Perform the operation of the selected Wi Fi function If you have selected Remote Ctrl start up the smartphone application Image App after checking th...

Страница 191: ...etting for the 2 4 GHz band is enabled Make sure the wireless access point is registered in this unit l 193 The device may be unable to locate the wireless access point due to problems with the signal Refer to Setting up a connection manually l 187 Easy Connection WPS Make sure the wireless access point is in the correct WPS standby mode Make sure the PIN code has been correctly input Search or Se...

Страница 192: ...settings of the smartphone The Wi Fi connection is disconnected immediately If there is a setting for avoiding poor connections in the Wi Fi setting menu of the Android device 4 0 or later version turn it OFF When this unit is connected to a wireless access point and Image App is started up it cannot find this unit Close Image App and press the Wi Fi button on this unit to terminate the Wi Fi conn...

Страница 193: ...less access points are displayed 2 Configure the wireless access point settings l 185 To delete a wireless access point 1 Touch the wireless access point to be deleted 2 Touch Delete The message is displayed Touch YES to delete To switch the search order 1 Touch the access point you want to switch the order 2 Switch the order by touching or To change the wireless access point delete one of the reg...

Страница 194: ...5 You can use this unit as a Wireless Sub Camera For the connection procedure and other details check the website below http panasonic jp support global cs e_cam Please refer to page 197 This item allows you to use NFC to turn on this unit establish a remote connection and configure the home monitoring settings Please refer to page 168 If you set ON the LCD monitor turns off when remotely operatin...

Страница 195: ...rm Reset Wi Fi Settings from the Setup menu This will set the Wi Fi setting to the condition at the time of purchase and you will be able to use the Wi Fi setting menu l 39 You can change the Wi Fi setting back to the default condition The LUMIX CLUB Login ID and Wi Fi Password are also deleted You can view and change this unit s Device name SSID which is used for operating this unit as a wireless...

Страница 196: ... is displayed If the connection is not successful t is displayed To test the connection to LUMIX CLUB or USTREAM you need to make other settings in advance l 176 You can change the workgroup setting When copying scenes or still pictures to a PC using a Wi Fi function Copy you need to create a shared folder on the PC and connect this unit to the workgroup to which the PC belongs The default setting...

Страница 197: ...cquiring a Login ID 6 Touch NEXT and enter a Password Enter any combination of 8 to 16 characters and numbers for the Password For details on how to enter characters refer to page 106 7 Check the Login ID and touch OK The Login ID 12 digit number will be displayed automatically When logging in to the LUMIX CLUB with a computer you only need to enter the numbers Be sure to make a note of the Login ...

Страница 198: ...Touch NEXT 4 Touch YES in the Login ID delete confirmation screen The message is displayed Touch NEXT 5 Touch YES on the confirmation screen for deleting the LUMIX CLUB account The message is displayed Touch NEXT If you are not deleting the LUMIX CLUB account only the Login ID will be erased when NO is selected 6 Touch EXIT Changes and other actions to Login IDs can only be made to the Login ID ac...

Страница 199: ...Sub Camera is displayed on the Sub Window Wireless Twin Camera WX970 series VX870 series V770 series Wireless Twin Camera function Recording different subjects in one motion picture Recording the same subject from different angles Recording a view seen from the subject These operating instructions describe the procedure for connecting this unit and a smartphone For information on non smartphone de...

Страница 200: ...ompared to the Main camera s image Depending on the device and environment movement in the image transmitted from the smartphone may not look smooth or may look as if frames were missed This is particularly the case with vertical orientation which increases the smartphone s processing burden For information on the setup of your smartphone refer to its operating instructions Please also refer to If...

Страница 201: ...roid non NFC compatible or iOS device If your smartphone is NFC compatible the NFC mark will be displayed when starting up the Image App Wireless Twin Camera WX970 series VX870 series V770 series Using a Smartphone as a Wireless Sub Camera You need to turn on the Wi Fi function of your smartphone Exit the Twin Camera function l 48 series series Set REC FORMAT to AVCHD or MP4 iFrame WX970 VX870 ...

Страница 202: ...application Image App 3 Touch the smartphone on of this unit Touch the NFC touch area while the NFC mark is displayed on the smartphone screen If this is the first time the smartphone is connecting to this unit touch YES on the screen of this unit and then touch the smartphone on of this unit again If the unit is not recognised even when touching the smartphone change positions and try again When ...

Страница 203: ... set the SSID displayed on the screen of this unit When using an Android device perform the following operations 1 Start up the smartphone application Image App 2 On the smartphone select Wi Fi and select the SSID displayed on this unit When using an iOS device perform the following operations 1 On the smartphone select the SSID displayed on this unit from the Wi Fi setup menu 2 Start up the smart...

Страница 204: ...yed on this unit from the Wi Fi setup menu 2 Enter the Password displayed on this unit 3 Start up the smartphone application Image App When the connection is complete the image being captured by the smartphone will be displayed on the Sub Window of this unit Scanning a QR code to set up a connection 1 When using the Wi Fi Setup menu Press Wi Fi button on this unit and touch TWIN CAMERA When using ...

Страница 205: ...id NFC compatible Touch the smartphone on of this unit This unit and the smartphone will be connected via Wi Fi When the connection is complete the image being captured by the smartphone will be displayed on the Sub Window of this unit If the connection cannot be established or no image appears on the Sub Window follow the steps below to set up the connection again 1 Close the smartphone applicati...

Страница 206: ...th a Wireless Sub Camera Wireless Twin Camera The Sub Camera of this unit will be disabled An image recorded with the Main Camera and the Wireless Sub Camera s image displayed on the Sub Window are recorded as a single scene or still picture When you play back such a scene or still picture it is not possible to delete only the Sub Window image or hide it If you set Backup for Twin Camera to ON whe...

Страница 207: ...he Main Camera s aspect ratio is set to 16 9 The yellow frames correspond to the size of the image be displayed on the Sub Window Depending on the smartphone it may not be possible to use horizontal orientation 1 Touch Sub Window 2 Touch the display position you want to change Depending on the display position of the Sub Window the positions of the icons displayed on the screen may change 1 Touch ...

Страница 208: ...nction other than Wireless Twin Camera j Remote Pan Tilt Cradle series series j 4K Photo Mode j Recording mode 4K MP4 The following functions do not work when the Sub Window is displayed j Touch Shutter j FACE FRAMING j AF AE tracking j Optical Image Stabilizer Lock j AF assist lamp You cannot change the following settings series j Sub Window settings WB Brightness Focus Narration j Magnification ...

Страница 209: ...utes or longer the Wi Fi connection will be terminated When the Image App screen disappears image transmission to the Sub Window stops The Wi Fi connection stays connected This may occur when for example the smartphone receives a call or you press the home button If you start up Image App on the smartphone again image transmission to the Main Camera will restart and the Sub Window will be displaye...

Страница 210: ...connecting to a smartphone different from the previously connected smartphone or changed the Direct Connection Password setting after connecting to a smartphone follow the steps below to set up the connection again 1 Close the Image App on the smartphone 2 Press Wi Fi button on this unit and touch TWIN CAMERA 3 Follow the procedure from Step 2 onwards in When connecting a smartphone to this unit a...

Страница 211: ... What you can do with a PC Check the website below to download install the software The software is available for download until the end of March 2018 http panasonic jp support global cs soft download f_ae52 html What can be done with the HD Writer AE 5 2 Data type Copying data to a PC Motion picture and still picture Copying in Blu ray disc AVCHD format The scenes recorded in 1080 50p can be copi...

Страница 212: ...tures on the Internet and share them with your family and friends Motion picture Playing back on a PC Play back the motion picture data in high definition picture quality on a PC Motion picture and still picture Formatting discs Depending on the type of disc that you use formatting is necessary Motion picture Important Notice When using an SDXC Memory Card check the following support site http pan...

Страница 213: ...mputer and may not use it on more than one computer Further Licensee may not use the Software for commercial software hosting services Article 5 Reverse Engineering Decompiling or Disassembly Licensee may not reverse engineer decompile or disassemble the Software except to the extent either of them is permitted under law or regulation of the country where Licensee resides Panasonic or its distribu...

Страница 214: ...cal limitations in the MICROSOFT SQL SERVER COMPACT 3 5 2 Licensee shall not use copy distribute regrant for use or otherwise handle the Software in any way beyond the range of use granted under Article 9 1 and shall not conduct operations such as reverse engineering decompilation disassembling etc of the MICROSOFT SQL SERVER COMPACT 3 5 3 All rights including copyright patent rights etc relating ...

Страница 215: ... Operating environment OS Windows 8 Windows 8 1 32 bit 64 bit Windows 7 32 bit 64 bit SP1 Windows Vista 32 bit SP2 series series A 64 bit version of the Windows 7 Windows 8 Windows 8 1 OS is required for operations involving 4K motion pictures CPU Intel Pentium 4 2 8 GHz or higher including compatible CPU Intel Core 2 Duo 2 16 GHz or higher or AMD Athlon 64 X2 Dual Core 5200 or higher is recommend...

Страница 216: ...k768 pixels or more 1920k1080 pixels or more recommended DirectX 9 0c compatible video card DirectX 10 recommended Compatible with DirectDraw overlay PCI Express k16 compatible recommended Video memory of 256 MB or more recommended series series A video card compatible with hardware decoding of 4K motion pictures is required when using playback function for 4K motion pictures For example Intel HD ...

Страница 217: ...on the HDD in the PC It may become inoperable or the operation may stop suddenly if the capacity gets low Operating environment for the card reader function mass storage The USB equipment operates with the driver installed as standard in the OS OS Windows 8 Windows 8 1 32 bit 64 bit Windows 7 32 bit 64 bit SP1 Windows Vista 32 bit SP2 CPU 1 GHz or higher 32 bit k86 or 64 bit k64 processor includin...

Страница 218: ... Windows 7 Installing HD Writer AE 5 2 Uninstalling HD Writer AE 5 2 Follow the steps below to uninstall any software applications that you no longer require 1 Select Start Control Panel Uninstall a Program 2 Select HD Writer AE 5 2 then click Uninstall Proceed with the uninstallation by following the on screen instructions After uninstalling the software be sure to reboot the PC With a PC Install...

Страница 219: ... recognised as an external drive of the PC l 221 When you select an option other than PC reconnect the USB cable When using the battery the LCD monitor turns off after about 5 seconds Touch the screen to turn the LCD monitor on Do not use any other USB cables except the supplied one Operation is not guaranteed with any other USB cables When this unit is connected to a PC using a USB cable while th...

Страница 220: ...SB cables You cannot charge the battery by connecting the supplied DC cable Be sure to connect the unit directly to the PC Blu ray disc recorder or DVD recorder During charging the status indicator flashes You cannot charge when the status indicator flashes rapidly or when it does not light at all Charge using the AC adaptor l 12 It will take 2 or 3 times longer to charge compared to when using th...

Страница 221: ... JPEG format still pictures recorded in Stop Motion Animation Assist Mode The motion picture thumbnails AVCHD format motion picture files 00000 MTS etc For management We recommend using HD Writer AE 5 2 to copy motion picture data Using Windows Explorer or other programmes on the PC to copy move or rename files and folders recorded with this unit will result in them being unusable with HD Writer A...

Страница 222: ... drop the still pictures onto the destination folder on the PC s HDD Do not delete the SD card s folders Doing so may make the SD card unusable in this unit Do not delete or edit files on the SD card or USB HDD on the PC If you do so this unit may not be able to read these files or its functions may not operate correctly When data not supported by this unit has been recorded on a PC it will not be...

Страница 223: ...AE 5 2 HD Writer AE 5 2 For details on how to use the software applications read the PDF operating instructions of the software Reading the operating instructions of the software applications You will need Adobe Acrobat Reader 5 0 or later or Adobe Reader 7 0 or later to read the PDF operating instructions Select Start All Programs Panasonic HD Writer AE 5 2 Operating Instructions With a PC Starti...

Страница 224: ...t the USB cable When using the battery the LCD monitor turns off after about 5 seconds Touch the screen to turn the LCD monitor on 3 Double click CAM_SD displayed on the desktop For users who have CAM_SD and CAM_MEM are displayed on the desktop Files are stored in 100CDPFQ or 102CDPFT folder etc in the DCIM folder 4 Using a drag and drop operation move the pictures you want to acquire or the folde...

Страница 225: ...1 2 l 63 Stop Motion Animation Assist Mode l 64 Red Recording Green Recording pause 0h00m00s Elapsed recording time l 25 h is an abbreviation for hour m for minute and s for second MINI 8mm SILN INTV MNL Eye Fi transfer l 149 Remaining battery power l 14 1h30m Remaining battery time l 14 Built in memory recording possible status 4 White Card recording possible status Green Recognising the card 1 2...

Страница 226: ...ie Silent movie l 58 59 Vividness Adjustment Miniature Effect l 58 Colour balance Adjustment 8mm movie l 59 WX970 VX870 25 9M 14M 2 1M 20 4M 10 9M 0 3M 20M 10 6M 2M V770 V760 24M 12 6M 2 1M 18M 8M 0 3M 20M 10 6M 2M MEGA PRE REC LOW CUT 1 1 HDR Effect l 79 AF AE tracking l 73 Level Shot Function l 45 Touch Shutter l 74 MF Manual Focus l 68 White Balance l 66 1 100 Shutter Speed l 67 OPEN F2 0 Iris ...

Страница 227: ...Red 1 2 3 Play mode selection display l 29 AVCHD 1080 50p scene l 30 AVCHD PH scene l 30 AVCHD HA scene l 30 AVCHD HG scene l 30 AVCHD HE scene l 30 Blue MP4 1080 50p 50M scene l 30 MP4 1080 50p 28M scene MP4 1080 25p scene l 30 MP4 720 25p scene l 30 MP4 360 25p scene l 30 iFrame scene l 30 Scene recorded with the 4K Photo function l 63 1 2 FULL HD Slow Motion Video recorded scene l 62 50p Relay ...

Страница 228: ...ery is low l 21 Warning for recording of yourself l 22 SD card is not inserted or is incompatible Startup disconnect icon for Wireless Twin Camera l 202 Wi Fi connection status Wireless Twin Camera l 206 For changing the Sub Window size l 49 1 For zooming in out the Sub Window l 49 1 Wi Fi connection warnings for the Wireless Sub Camera function l 206 1 2 3 ...

Страница 229: ... to connect an AC adaptor not compatible with this unit Use the supplied AC adaptor l 12 THIS EXTERNAL DRIVE CANNOT BE USED PLEASE CHECK THE EXTERNAL DRIVE The external drive that this unit cannot recognise is connected Check if the USB HDD can be connected and used with this unit and try to reconnect l 137 Failed to connect wireless access point No wireless access point found 2 Check the Wi Fi se...

Страница 230: ...d off When data recorded on another device is recovered it may not be possible to play back the data on this unit or the other device If recovery fails turn the unit off and on again after waiting a while If recovery fails repeatedly format a media on the unit Please be aware that if a media is formatted then all the data recorded on the media will be erased If the thumbnail information is recover...

Страница 231: ...ly charged the battery has worn out and needs to be replaced This unit is turned off automatically If the unit turns off when you turn off the power to the TV using the TV remote control the VIERA Link is at work If you are not using the VIERA Link set VIERA Link to OFF l 132 This unit cannot be operated though it is turned on This unit does not operate normally Remove the battery or AC adaptor wa...

Страница 232: ...f images is strange when recording in a place such as a gymnasium In a place with multiple light sources such as a gymnasium or a hall set the White Balance setting to Indoor mode 2 If you cannot record clearly with the Indoor mode 2 set it to Manual adjustment mode l 66 Colour or brightness of the image changes or you may see horizontal bars in the image The LCD monitor flickers indoors Colour or...

Страница 233: ...sounds are not output Check if the HDMI micro cable is connected correctly Insert the HDMI micro cable all the way in If the SD card is inserted in another device it is not recognised Check that the device is compatible with the capacity or type of SD card SD Memory Card SDHC Memory Card SDXC Memory Card that you inserted Refer to the operating instructions of the device for details When connected...

Страница 234: ... Read page 191 if the Wi Fi connection cannot be established Cannot operate from smartphone using Remote Ctrl Install the smartphone app Image App on your smartphone l 181 When I look at the recording screen with the smartphone mosaic like noise appears on the screen and the image movement does not look smooth When this unit is set to any of the following recording formats or recording modes mosai...

Страница 235: ... the password for the Wi Fi Perform Reset Wi Fi Settings from the Setup menu l 39 This will set the Wi Fi setting to the condition at the time of purchase and you will be able to use the Wi Fi setting menu When performing Reset Wi Fi Settings all Wi Fi settings including the LUMIX CLUB Login ID and registered wireless access points will be deleted I have forgotten the Login ID or Password for the ...

Страница 236: ...mentarily stop at every 4 GB of data when played back with another device It may not play back smoothly when the editing of scenes was done with the HD Writer AE 5 2 but it will play back smoothly if you set the seamless settings in the HD Writer AE 5 2 Refer to the operating instructions for the HD Writer AE 5 2 Principal reasons for not playing back smoothly When the scenes were recorded on diff...

Страница 237: ...y peel off Do not leave rubber or plastic products in contact with the unit for a long time When you use the unit in a sandy or dusty place such as a beach do not let sand or fine dust get into the body and terminals of the unit Also keep the unit away from sea water Sand or dust may damage the unit Care should be taken when inserting and removing a card If sea water splashes onto the unit wipe of...

Страница 238: ...ion may not appear or the low battery indication may appear about 5 minutes after starting use At high temperatures the protection function may be triggered making it impossible to use the unit Be sure to detach the battery after use If the battery is left attached a minute amount of current continues to flow even if the unit is off Keeping the unit in this state may result in over discharge of th...

Страница 239: ...ox 2 seconds When the battery is over discharged or the temperature of the battery is too high or low It can be charged but it may take a few hours to complete the charging normally It will flash in approx 2 second intervals when normal charging resumes Even in such cases it may start flashing in approx 4 second intervals until charging is completed depending on the conditions of use Flashing with...

Страница 240: ...out 3 seconds When the SD card data deletion screen appears select YES and then follow the on screen instructions The customer is responsible for the management of the data in the SD card When the LCD screen is dirty or condensation has occurred please wipe it using a soft cloth such as eyeglass cleaner Do not touch the LCD monitor with your fingernails or rub or press with strong force It may bec...

Страница 241: ...ormation always delete information such as personal information and wireless LAN connection settings that you have saved within this unit with Reset Wi Fi Settings Delete account l 39 198 To protect personal information delete the registered details of Baby Calendar unless they are necessary for the repair l 113 Remove the Memory Card from this unit when requesting a repair Settings may return to ...

Страница 242: ... of Apple Inc registered in the U S and other countries iPhone is a trademark of Apple Inc registered in the U S and other countries App Store is a service mark of Apple Inc Android and Google Play are trademarks or registered trademarks of Google Inc The Wi Fi CERTIFIED Logo is a certification mark of Wi Fi Alliance The Wi Fi Protected Setup Identifier mark is a certification mark of Wi Fi Allian...

Страница 243: ...ording with a lot of action is recorded or recording of short scene is repeated Others Recording modes approximate recordable time Recording format AVCHD Recording mode 1080 50p 1080 50i PH HA HG HE Picture size Frame rate 1920k1080 50p 1920k1080 50i 1920k1080 50i 1920k1080 50i 1920k1080 50i SD card 4 GB 19 min 21 min 30 min 40 min 1 h 30 min 16 GB 1 h 20 min 1 h 30 min 2 h 2 h 40 min 6 h 40 min 6...

Страница 244: ...above table as a guideline for the time that can be copied onto one DVD disc 4 7 GB series series series Recordable times will be approximately half the times in the above table when Backup for Twin Camera is in operation WX970 VX870 V770 ...

Страница 245: ...6k3912 3808k2856 640k480 Aspect ratio 4 3 SD card 4 GB 300 550 28000 16 GB 1300 2400 117000 64 GB 5000 9500 475000 Built in memory 16 GB 1300 2400 117000 Picture size 5472k3648 3984k2656 1728k1152 Aspect ratio 3 2 SD card 4 GB 300 600 2200 16 GB 1300 2400 8500 64 GB 5500 10000 36000 Built in memory 16 GB 1300 2400 8500 Recording fromat 4K MP4 AVCHD MP4 iFrame Picture size 6016k3384 3840k2160 4992k...

Страница 246: ...d management and the capacity which can be used on the unit a PC etc Picture size 6528k3672 4736k2664 1920k1080 Aspect ratio 16 9 SD card 4 GB 250 500 3200 16 GB 1100 2100 12500 64 GB 4700 8500 52000 Built in memory 16 GB 1100 2100 12500 Picture size 4896k3672 3264k2448 640k480 Aspect ratio 4 3 SD card 4 GB 350 750 28000 16 GB 1500 3100 117000 64 GB 6000 12500 475000 Built in memory 16 GB 1500 310...

Страница 247: ... the shoe adaptor Insert the shoe adaptor into the shoe adaptor mounting part When removing the shoe adaptor When removing the shoe adaptor slide the SHOE ADAPTOR RELEASE lever and remove the shoe adaptor while sliding the lever Others Optional accessories Attaching the Conversion Lens Filter Kit Be careful about the following When 2 lens accessories such as the ND filter and Wide Conversion Lens ...

Страница 248: ...le to the USB terminal of this unit 3 Press the power button of the Remote Pan Tilt Cradle to turn it on The status indicator B lights on 4 Turn on this unit series series series Using Wi Fi functions in combination with the Remote Pan Tilt Cradle The Remote Pan Tilt Cradle can also be used by the following Wi Fi functions Make the Wi Fi connection after connecting the Remote Pan Tilt Cradle to th...

Страница 249: ...ts j A level location with no obstacles j A location approximately 2 to 3 m away from subjects Do not use the Remote Pan Tilt Cradle when a Wide Conversion Lens VW W4907H optional is attached to this unit Before mounting this unit on the Remote Pan Tilt Cradle insert the SD card and the battery When this unit is mounted on the Remote Pan Tilt Cradle make sure to hold the Remote Pan Tilt Cradle to ...

Страница 250: ...of the Remote Pan Tilt Cradle Description Party Scene The operation is automatic The Remote Pan Tilt Cradle works within the recording range set in Panning Angle Tilt Angle At an event such as a party recording will be performed while the Remote Pan Tilt Cradle automatically controls the recording direction within the recording range When a person or a moving object is detected recording of the pe...

Страница 251: ...ut a registered position are indicated as Not set 3 Determine a position with You can also operate the zoom with the zoom lever 4 Touch ENTER To register positions to other position buttons repeat Steps 2 4 To adjust a position that has already been registered to a position button touch the position button to which the position you want to adjust is registered and follow Steps 3 4 Moving the Remot...

Страница 252: ...radle this unit is set to Motion Picture Recording Mode You cannot switch this unit to Still Picture Recording Mode We recommend that you make a test recording in advance to check if the image and sound are recorded correctly The sound of the Remote Pan Tilt Cradle in operation will be recorded If you start recording after making changes to the setup of the Remote Pan Tilt Cradle such as switching...

Страница 253: ...ng too fast or not moving j The area being recorded is close to a window Depending on recording conditions scenes may not be recorded as intended In such cases we recommend setting the mode to Manual About Party Scene Sound Scene Select is set to Auto About Moving Object When recording starts a moving subject will be detected Before recording point the camera at the subject This unit cannot track ...

Страница 254: ...rating range of the Remote Pan Tilt Cradle set for Party Scene Moving Object The Remote Pan Tilt Cradle moves in the ranges set at Panning Angle and Tilt Angle When the confirmation operation is finished the Remote Pan Tilt Cradle returns to its home position The firmware version of the Remote Pan Tilt Cradle is displayed Remote Pan Tilt Cradle settings Panning Angle 180 90 45 Stationary 180 Pans ...

Страница 255: ...ne Demo the demonstration automatically starts When you touch EXIT the demonstration will be cancelled You can watch the demonstration of how the Remote Pan Tilt Cradle will operate when Moving Object is set Touch Moving Object Demo the demonstration automatically starts When you touch EXIT the demonstration will be cancelled Version Up For the latest update information check the support website b...

Страница 256: ...Panasonic Corporation Web site http www panasonic com ...

Страница 257: ...This file was downloaded from the site mans io Instruction manuals and user guides Samsung Pioneer Alpine LG Dell Sharp Sony Philips Epson Netgear ...

Отзывы: