7
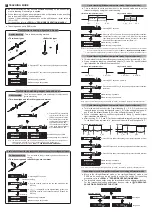
TEACHING MODE
●
Be sure that detection may become unstable depending on the use environ-
ment in teaching if less margin is applied.
●
When teaching in Window comparator mode or Hysteresis mode, a setting
has to be made in PRO mode beforehand.
In case 1-point teaching, make sure to set the shift amount. (initial value is
10% or 100)
For the setting, refer to
<PRO6>
in “
PRO MODE OPERATION MANUAL
.”
●
Teaching can be set in RUN mode.
2-point teaching
This is basic teaching method.
<Reflective type>
<Thru-beam type>
1
2
1
2
Stable sensing is possible
1.
Press the SET key in the sensing object present condition.
2.
Press the SET key in the sensing object absent condition.
Stable sensing is not possible
Limit-teaching
<Thru-beam type and refractive type are common>
or
Stable sensing is possible
1.
Press the SET key in the sensing
object present condition or non
sensing object present condition.
2.
The threshold level is shifted
to high value (low sensitivity)
by pressing down UP key.
The threshold level is shifted
to low value (high sensitivity)
by pressing down UP key.
Stable sensing is not possible
Note: The shift value of approx. 15% is an initial value. Display of the shift value can be changed to per-
centage [approx. 0 to 999% (unit 1 %)] or incident light intensity [0 to 9999 (unit 1)].
For setting the shift amount, refer to
<PRO1>
in “
PRO MODE OPERATION MANUAL
.”
Full-auto teaching
<Thru-beam type and refractive type are common>
Stable sensing is possible
1.
Pressing SET key down
2.
Run the sensing object on the line and hold down the
SET key.
Stable sensing is not possible
3.
“
” is displayed on the digital display (green) and
when the sensing object passed through, release the
SET key.
Automatic
Pressing down long
Useful when sensing object can be set
Useful when sensing object cannot be set
This is teaching method in case small object or object in back
ground are existing.
This is method to conduct teaching doing sensing object is
moving.
Useful when not want to stop production line and to keep the sensing object move
1-point teaching (Window comparator mode / Hysteresis mode)
●
This is method to set the shift amount to the desired value and to set the
threshold range by using the 1-point teaching.
<Hysteresis mode>
1_SL
P-1
2_SL
<Window comparator mode>
1_SL
P-1
2_SL
Set to de-
sired value
Set to de-
sired value
Set to de-
sired value
Set to de-
sired value
Stable sensing is possible
1.
Pressing SET key down
2.
Press the SET key down in the sensing object present condition.
Stable sensing is not possible
3.
The threshold value (1_SL) that is 10% lower from the incident
light intensity and the threshold value (2_SL) that is 10% higher
from the incident light intensity are set. (Note 1, 2)
Notes 1) The shift amount of 10% is an initial value. The shift amount can be set in PRO mode. Furthermore, the shift value
can be set in incident light amount. For setting method, refer to
<PRO6>
in “
PRO MODE OPERATION MANUAL
.”
2) If the value after setting exceeds the maximum (minimum), the maximum (minimum) sensitivity will be set.
2-point teaching (Window comparator mode / Hysteresis mode)
●
This is method to set the threshold range by conducting the 2-point teaching (P-1, P-2).
● When conducting teaching, use sensing objects (P-1 and P-2) whose incident
light intensities are different from each other.
<Hysteresis mode>
1_SL (P-1)
2_SL (P-2)
<Window comparator mode>
1_SL (P-1)
2_SL (P-2)
Stable sensing is possible
1.
Pressing SET key down (1st time)
2.
Press down the SET key in the sensing object present condition.
(2nd time)
Stable sensing is not possible
Note: If the value after setting exceeds the maximum (minimum), the maximum (minimum) sensitivity will be set.
3-point teaching (Window comparator mode / Hysteresis mode)
●
This is the method to conduct the 3-point teaching (P-1, P-2, P-3) and to set the
threshold range by setting the threshold value (1_SL) of the mid-point between “A”
and “B” and the threshold value (2_SL) of the mid-point between “B” and “C”.
● When conducting teaching, use sensing objects (A, B and C) whose incident
light intensities are different.
●
After teaching, P-1, P-2 and P-3 will be automatically relocated in ascending order:
i.e. the lowest value is placed in “A”, the second lowest in “B” and the highest in “C”.
<Hysteresis mode>
A
2_SL
1_SL
B
C
<Window comparator mode>
A
2_SL
1_SL
B
C
Stable sensing is possible
1.
Press SET key down in the sensing object present condition (1st time)
2.
Press SET key down in the sensing object present condition (2nd time)
Stable sensing is not possible
3.
Press SET key down in the sensing object present condition (3rd time)
Note: If the value after setting exceeds the maximum (minimum), the maximum (minimum) sensitivity will be set.
Span adjustment in rising differential mode or trailing differential mode
●
Move to the rising differential mode, or the trailing differential mode in the
PRO6 mode, and press the jog switch to confirm the setting.
For the setting
procedure, refer to
<PRO6>
in “
PRO MODE OPERATION MANUAL
.”
● The threshold can be set by using the threshold value fine adjustment function.
For the threshold value fine adjustment function, refer to “
THRESHOLD
VALUE FINE ADJUSTMENT FUNCTION
”
Short span
Long span
Changed intensity


