background image

50

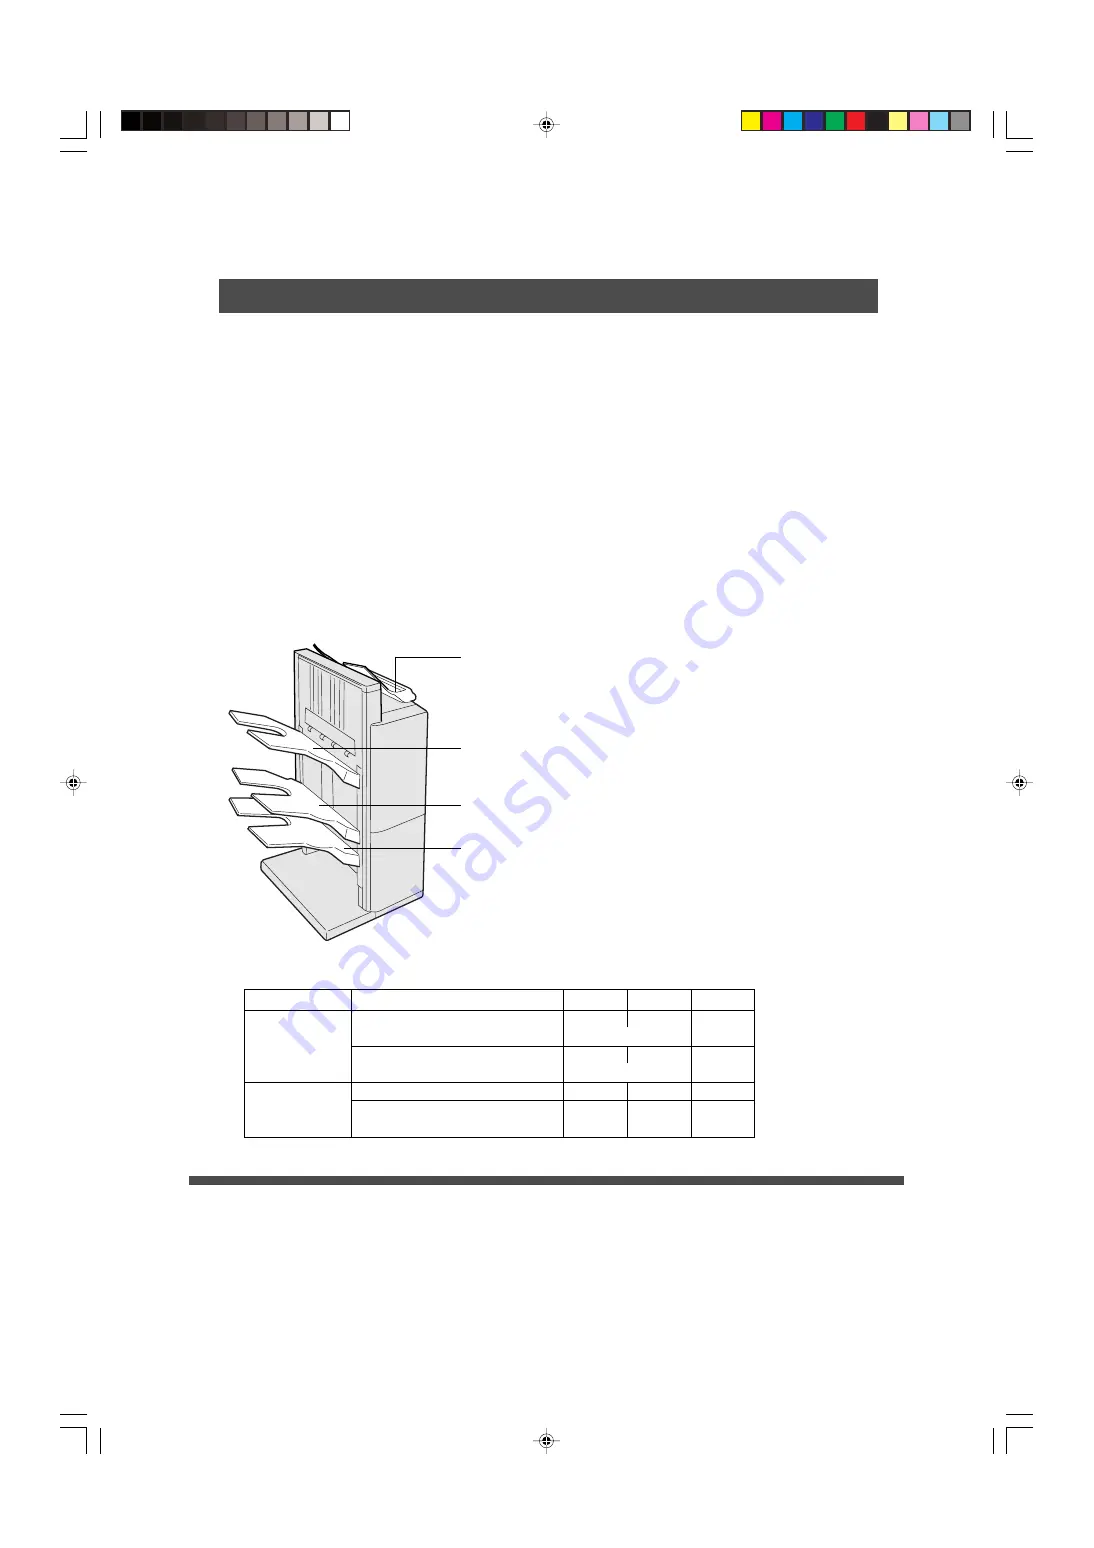
3 Bin Finisher, Inverting Unit, Exit Guide Unit

FA-F350

2. Operation

Set by the PC

Windows 3.1 (

See P.21

)

#

Click the Printer icon in the control panel
of PC.

$

Click the Setup.

%

Click Option select Paper menu.

&

Set the desired function(s) in the Output
menu.

C

Face Up/Face Down

 Output Form

C

Sort/Rotate/Shift

 Sorter

(

Click the OK.

)

Print the created document.

#

Click the Start and Printer icon.

$

Click the Panasonic FP-D350.

%

Click the Property of File menu.

&

Set the desired function(s) in the Output
menu.

(

Click the OK.

)

Print the created document.

Windows 95 (

See P.28

)

Windows NT 4.0 (

See P.28

)

Set the desired function(s) in the Output
menu of software printer property.

Mac OS (

See P.32

)

Select the Printer Specific Options by
application soft’s printer setting.

Modes

Staple-sort

Non-sort
Shift-sort
Shift-group

Paper Size

Letter

Letter R, Legal, Ledger

Letter
Letter R, Legal, Ledger

1 Bin

2 Bin

3 Bin

300

750

200

(20 sets)

100

(20 sets)

or (Max. 30 sets)

150

500

or (Max. 30 sets)

300

1000

200

150

500

100

Bin Capacity (sheets)

C

Windows 3.1 (

See P.21

)

C

Windows 95/NT4.0 (

See P.28

)

C

Mac OS (

See P.32

)

Set the bin using the PC.

3. FA-F350/F355 Operation

Interrupt Tray
When using interrupt
copy mode.

1 Bin

2 Bin

3 Bin

P50-51-Pos.p65

11/24/99, 4:48 PM

50

Содержание FP-D350

Страница 1: ...l of Digital Copier 38 Contents of Limitation 39 Printer Setting User Preset Mode 41 Options Components 47 Inverting Shift Tray 2 Bin Inverting Shift Tray 48 3 Bin Finisher Inverting Unit Exit Guide U...

Страница 2: ...uld turned off turn on the power switch again after more than 15 seconds If data in the hard disk should be destroyed on that time Panasonic will not bear any responsibility CWhen the digital copier i...

Страница 3: ...u get These internal fonts are part of the PCL language COptions 1 Printer expansion memory 16 32 MB Increase the speed of rusterization when printing CThe rusterization process takes place in the pri...

Страница 4: ...e to remove paper misfeed Paper Feed Cover COpen to remove paper misfeed Rear side Left side Connection to PC Parallel Interface Connector CConnection to PC Exit Cover COpen to remove paper misfeed Pa...

Страница 5: ...to off line PRINT DATA key When depressed this will print any data in the printer memory RESET key Clear Reset the data in the printer No Combining Function Table CCombination function in Copy Filing...

Страница 6: ...cation software If both are selected multiple quantity may be printed out CPaper size and print direction can be selected either by the printer or by the application software In this case selection by...

Страница 7: ...o the document 3 When the options are newly installed set the connected options in the device option setting screen otherwise some functions may not be possible to use See P 23 26 ATTENTION Magnify 33...

Страница 8: ...on Save settings 35 Layout direction Border 34 Check the operating status of the printer and connecting status of the optional accessories CThe status can be checked by the status monitor of the HDP w...

Страница 9: ...Add key 3 Open Install Driver dialog box Click Install Unlisted or Updated Printer Click Install key 4 Insert the Printer Driver Floppy Disk into drive A or B Click OK key Printers Default Printer Ins...

Страница 10: ...D350 List of Printers OK Cancel Help Printers Default Printer Color Printing System on LPT1 Installed Printers Genigraphics Driver on GENI HP Laser Jet Series II on LPT1 Color Printing System on LPT1...

Страница 11: ...ers Add Printer Add Printer Wizard Next Cancel This wizard will help you to install your printer quickly and easily To begin installing your printer click Next Add Printer Wizard How is this printer a...

Страница 12: ...er Wizard Click the manufacture and model of your printer If your printer came with an installation disk click Have Disk If your printer is not listed consult your printer documentation for a compatib...

Страница 13: ...ard You can type a name for this printer or you can use the name supplied below When you have finished click Next Printer name Panasonic XXXXX Your Windows based programs will use this printer as the...

Страница 14: ...rst time 1 Double click the Macintosh HD 2 Double click the System Folder 3 Insert the floppy disk into PC Double click the Floppy disk icon PFPDS S S ppd file will be indicated on the window 4 Click...

Страница 15: ...5 Click and move the PFPDS S S ppd to the Printer Descriptions then release the mouse bottom Take out the Floppy Disk Click and move the Floppy Disk icon to the Trush icon then release the mouse bott...

Страница 16: ...page 15 1 Double click Preferences inside the System Folder 2 Double click Printing Prefs 3 Double click Parsed PPD Folder Delete PFPDS S S ppd file ATTENTION CAfter installing PFPDS S S ppd file wil...

Страница 17: ...click Select Click the Setup 3 Click the Select PPD 4 Select the PFPDS S S PPD Click the Select Click the OK after returning window in step 3 Close the selector windows returning to window in step 2 C...

Страница 18: ...and Machine ID Click Set Insert the floppy disk into PC Insert PFPD User Information Chooser US to hard disk Double click PFPD User Information Chooser US CPlease keep the PFPD User Information Choos...

Страница 19: ...cassette runs out paper the printer will automatically select the letter landscape cassette and rotate the image to fit the paper Orientation Portrait Portrait Landscape Magnify None Print with fixed...

Страница 20: ...ided printing Flip on Long Edge Regular book format Flip on Short Edge Sketch book or legal pad format Rotate mode of sorter can not be used Booklet 2 When duplexing Off Booklet making using the Autom...

Страница 21: ...s printed Image overlay 3 same as above None When printing selected image is combined together with document being printed Registration procedure of the Image 1 to 10 1 Create the image fixed format u...

Страница 22: ...font True Type by down loading to printer font Although print speed is slow it is possible to print a similar font from the PC Device Options Set the Number of Paper Drawers Change Paper Drawer Option...

Страница 23: ...t quality For windows 95 For Windows NT 4 0 Following items can be set with printer setting menu of application software Save the toner consumption NOTE 1 For Windows NT 4 0 refer to page 31 2 When se...

Страница 24: ...ilar font from the PC If printer does not change TrueType font PC font selects a printer font which is closest Restore Defaults Reset the setting of item to default setting No Item Default setting Set...

Страница 25: ...iddle 5 System lower Change Paper Drawer Auto Selection Auto Selection Specified Drawer Expansion memory Memory None None 16 MB 32 MB This shows only additional memory added Accessory setting None Lar...

Страница 26: ...not be printed See P 38 When printing See P 38 Add CIt is not possible to re save a file if the security print is made CIt is not possible to save a file if print is made in the image overlay Setting...

Страница 27: ...e staple when sort is selected None Top left Center left Top right Bottom left Duplex 1 with Automatic duplex unit None None It enables double sided printing Flip on Long Edge Regular book format Flip...

Страница 28: ...rientation Portrait Portrait Landscape Copies 1 1 to 999 Magnify None Print with fixed ratio reduction N in 1 1 in 1 1 in 1 2 in 1 4 in 1 Paper Size Letter A4 Print size when selecting N in 1 A3 B4 A4...

Страница 29: ...sending data to recognize the next data CTransmission retry After error display waiting time after sending the data to retry 15 45 New Driver Installing another printer driver Following item will be...

Страница 30: ...tern Device Gamma Pixel Diameter Device Alignment White CRevert Revert the before setting CDefault Reset the above setting items to default setting 2 Image Option Filing Function is installed When pri...

Страница 31: ...nt of File menu 35 page When installing the options 1 Select the Apple mark Click the Selector of indicated list 2 Click the LaserWriterS S S Select the MEI_S S S S S S Click the Re setting 3 Click th...

Страница 32: ...A mirror image can be made in landscape direction Following items can be set by selecting the PostScript Option on menu Pattern Inverse None Negative Positive image can be made Font substitution Sele...

Страница 33: ...ted CLeft to right page left side icon CRight to left page right side icon Border None Selecting the line type when the page per sheet is selected CNone Single hairline Single thin line Double hairlin...

Страница 34: ...etting Item Default setting Setting Copies 1 1 to 999 Pages All Set up the print page s CAll From To Paper Source All pages from Auto select All pages from CAuto select Main upper drawer Main lower dr...

Страница 35: ...ginal Paper Size COriginal Paper Size CSelect from following size A3 A4 A5 B4 B5 Invoice Letter Legal Ledger Booklet Off COn Off Resolution 600 dpi C600 dpi 300 dpi Super Multi Gray On COn Off Staple...

Страница 36: ...Down When FA TR350 TR355 RU350 is installed Sorter Sort CSort 1 sheet of each original is placed into a separate bin CRotated Stack Group Grouped sheets are placed and separated rotation onto tray CRo...

Страница 37: ...panel and touch OK key of LCD 1 to 999 02 Paper Size Letter A4 Select the size and touch OK key A3 B4 A4 B5 A5 FLS1 FLS2 LEDGER LEGAL LETTER INVOICE 03 Paper feeding Select the cassette and touch OK...

Страница 38: ...allowed Paper rotation is only available when automatic paper selection is selected Precautions for filing and or making security print Paper size can only be selected by the original key in the contr...

Страница 39: ...nt as Japanese CThe overlay will print only 100 ratio when the opposite orientation is selected Both Windows Mac CPlease close all applications before changing the printer property setting CPlease ens...

Страница 40: ...Advanced Function key and touch ON LINE key Printer Setting User Preset Mode This setting should be made only from the control panel of the printer 1 2 00 PCL menu Font Symbol set Pitch Point size Li...

Страница 41: ...1 unit 0 1 point pitch Select using up down key 0 03 Point size 120 04 Line inch Select the line inch C100 4800 100 unit 1 point pitch Select using up down key 0 Select the number of the symbol table...

Страница 42: ...Multi Gray function CNo SMG Clear the half tone printing when the half tone image ASCII Select data type from PC CASCII Binary 02 Protocol PostScript menu OK 00 Font 01 Half tone 02 Protocol 03 04 0 N...

Страница 43: ...he period time of next data documents If there is no data within setting time display time out to PC C0 999 seconds 0 No time out setting 30 seconds 01 Job completion PCL Select if the period of sente...

Страница 44: ...ork printer 00 Job completion PCL Select if detect the period of the sentence data or not CNo Yes When selecting No it will be time out settings Select if respond or not 01 PostScript response No CDoc...

Страница 45: ...lection to update of the program in the printer controller from the PC or not CNo Yes When selected yes contact your service technician 02 Flash ROM update accept Selection to print data code transfer...

Страница 46: ...Cassette FA MA301 C3000 sheets System Console FA DS725 CTo increase paper feed sources and capacity Storage Drawer 1 Options for System Console Paper Drawer FA MA0555 C550 sheets Paper Drawer kit FA...

Страница 47: ...m CSort Rotate Shift Sorter Click the OK Print the created document Mac OS See P 32 Select the Printer Specific Options by application soft s printer setting Click the Start and Printer icon Click the...

Страница 48: ...RU350 Inverting Unit 1 2 3 1 1 1 Ascending Descending Inverse Data Ascending Descending Inverting Unit Data Finisher Face Down Face Up Original FA FK35 Exit Guide Unit Required for FA F350 when FA RU...

Страница 49: ...nt the created document Windows 95 See P 28 Windows NT 4 0 See P 28 Set the desired function s in the Output menu of software printer property Mac OS See P 32 Select the Printer Specific Options by ap...

Страница 50: ...t the desired data Lock Knob CIf the unit fails to staple after replacing the staple cartridge follow the instructions below Remove the staple cartridge Pull down the stapler toward you Press the rele...

Страница 51: ...ctronic sorting Punch and Shift Punch and Staple CSort by stapling sets FA FK35 Exit Guide Unit CFeeds paper to 2 bin finisher FA FK35 should be installed when installing FA F320 COffset using punchin...

Страница 52: ...ce Up Face Down Output Form CSort Rotate Shift Sorter Click the OK Print the created document Click the Start and Printer icon Click the Panasonic FP D350 Click the Property of File menu Set the desir...

Страница 53: ...e left appears when the staples are out 3 Pull out the finisher 4 Open the stapler cover Lift up the lock lever Raise up the stapler unit Add staples Non sort Sort Sort rotate Group rotate Punch Shift...

Страница 54: ...ut the tape 7 Insert the staple cartridge 8 Return the stapler unit to the original position 9 Close the stapler cover Return the finisher to the original position FA F320 10 Check the operation Selec...

Страница 55: ...he staple cover Remove the remaining staples Close the staple cover 2 Reinstall the staple cartridge according to staple replacing procedures steps 7 to 10 and check operation Pull out the finisher Pu...

Страница 56: ...message 1 3 2 4 6 5 7 9 8 0 LEDGER LEGAL INVOICE LETTER LETTER Touch Panel Display J Adding Paper See P 58 Adding Toner See P 61 B Replace waste toner bottle See P 62 Removing a Paper Misfeed I Printe...

Страница 57: ...arencies cannot be used in the paper drawer tray Use bypass for special paper 3 Overfill Indicator Make sure paper is not loaded above overfill indicator located in the paper drawer tray 1 sided copy...

Страница 58: ...ly 50 sheets of paper into the tray Do not fill above Insert the paper until it stops Adjust the side guides Incorrect adjustment may cause paper to wrinkle misfeed or skew Side Guides 4 Print the cre...

Страница 59: ...ouch the tray while it is moving Paper Feed Tray 2 Add paper After tray stops place paper neatly on to tray Letter size only portrait 3 Do not fill above red line Up to 3000 sheets 20 lbs 4 Close the...

Страница 60: ...stributed Remove the cap from the bottle Do not turn the shutter Insert new toner bottle to the hopper assembly Turn the bottle until it stops and arrows are aligned CFor optimum copy quality use reco...

Страница 61: ...ste toner bottle straight out Do not squeeze the bottle 3 4 Install new bottle Do not insert the bottle from the top Close bottle with cap 5 Close waste toner bottle cover Cap CDo not use toner in was...

Страница 62: ...Caution the fuser area may be hot Open the fuser guide Check that no misfed paper is remaining Close the fuser guide 4 Close exit cover Close front panel Fusing Area Left Paper Clearing Knob Caution h...

Страница 63: ...panel 1 3 2 3 1 2 Open the paper feed cover Remove misfed paper Close entry cover Right Paper Clearing Knob Entry Cover Lever a a a a a CDo not touch or scratch the surface of the drum CCheck that the...

Страница 64: ...Capacity Cassette Hold the latch and slide the large capacity cassette to the right Remove misfed paper 2 1 2 1 Open the door Remove misfed paper Close the door Return the large capacity cassette to o...

Страница 65: ...t Open paper transport section until it stops Remove misfed paper Close paper transport section 2 1 Transport Section 4 Push back automatic duplex unit CWhen the misfeed indicators light at A C and D...

Страница 66: ...350 1 Hold release lever Open inverting shift tray or inverting unit until it stops 2 Open transfer guide Remove misfed paper Close transfer guide 3 Close inverse shift tray or inverting unit Release...

Страница 67: ...n the 2 bin inverting shift tray to the left until it stops Pull out gently 2 Open transfer guide Remove misfed paper Close transfer guide 3 Return the 2 bin inverting shift tray to the original posit...

Страница 68: ...the buffer roller cover Remove misfed paper Close the buffer roller cover and top cover 4 Return the finisher to the original position Interrupt Tray Lock release button H 3 Bin Finisher FA F350 Print...

Страница 69: ...See P 54 Turn the paper transport knob A Remove misfed paper When can not remove paper Life up the finisher guide and remove misfed paper 2 Bin Finisher FA F320 4 When the misfed paper is not stay Tu...

Страница 70: ...Check if the selected font is installed on the PC Select Always use TrueType in the printer driver font screen The character is not smooth Select outline font and not bit map font Different character...

Страница 71: ...smoothing function It takes long time to print Select 300 dpi resolution When the print of the first page is slow cancel the power save mode of the digital copier The print stops in the middle of the...

Страница 72: ...ible to print the data in the none printable area Paper Size Paper feed direction Ledger C Legal C Letter C Letter B Invoice C A3 C B4 C A4 C A4 B B5 C A5 C 11 279 4 8 1 2 215 9 8 1 2 215 9 11 279 4 5...

Страница 73: ...d cable connecting condition Signal which initializes printer Normally it is High and it will initialize when signal becomes Low Signal which shows printer is error condition Use at bi directional com...

Страница 74: ...T 4 0 MacOS7 X support available with Postscript option Spooling Memory Hard Disk 128 256 or 512 MB Option Printer Unit Resolution Max 600 dpi True 1200 dpi Smoothing Print Speed 35 ppm pages per minu...

Страница 75: ...Bins 2 Bin Capacity Specifications are subject to change without notice Other option specifications Refer to operating guide copier function Lower 300 sheets Electrical Requirements Supplied from cop...

Страница 76: ...more NOTE Filing and or Printer CInformation regarding the options for Filing Printer Network can be found in each of the options respective operating guides C Before system upgrades Part name Part No...

Страница 77: ...742 Italic SWC Swiss 742 Bold SWC Swiss 742 Bold Italic SWC Swiss 742 Condensed SWC Swiss 742 Condensed Italic SWC Swiss 742 Condensed Bold SWC Swiss 742 Condensed Bold Italic SWC Incised 901 SWC Inci...

Страница 78: ...Oblique SWA Fixed Pitch 810 Courier SWA Fixed Pitch 810 Courier Bold SWA Fixed Pitch 810 Courier Italic SWA Fixed Pitch 810 Courier Bold Italic SWA Symbol SWA Century 702 Century Schoolbook SWA Centur...

Страница 79: ...437 12 PC 8 DN Denmark Norway 13 PC 850 IBM 850 14 PC 8 TK Code Page 437T 15 PC 852 Latin 2 16 Roman 8 17 Desk Top 19 Macintosh 20 Math 8 HP Math 8 21 Microsoft Publishing 22 Pi Font HP Pi Font 23 PS...

Страница 80: ...NT S Save settings Mac OS Screen font and printed fonts are different Selection of Functions Setting the Access Mac OS Setting the Binding Mac OS Setting the Booklet Windows 3 1 Setting the Booklet M...

Страница 81: ...olution Windows 3 1 Setting the Resolution Windows 95 NT Setting the Resolution Mac OS Setting the Security Print Windows 3 1 Setting the Security Print Windows 95 NT Setting the Smooth font Mac OS Se...

Страница 82: ...ect Internet option from the pull down menu Select Security tab from the Internet option dialog Select the Internet zone from the list ox of the zone on the security tab Set the radio button of the zo...

Страница 83: ...the PRINTER and OFF LINE key then select the Printer settings 2 Select the 2 2 screen Select 7 Security print 3 Select the User ID registered document Touch OK key Input the identification code 4 digi...

Отзывы: