background image

- 17 - 


5. When charging is completed, the 

charging lamp will start flashing quickly 
in green color.

6. If the temperature of the battery pack 

is 0°C or less, charging takes longer to 
fully charge the battery pack than the 
standard charging time.
Even when the battery is fully charged, 
it will have approximately 50% of the 
power of a fully charged battery at nor-
mal operating temperature.

7. If the power lamp does not light im-

mediately after the charger is plugged 
in, or if after the standard charging 
time the charging lamp does not flash 
quickly in green, consult an authorized 
service center.

8. If a fully charged battery pack is insert-

ed into the charger again, the charging 
lamp lights up. After several minutes, 
the charging lamp may flash quickly to 
indicate the charging is completed.

Ni-MH/Ni-Cd Battery Pack

NOTE:

When you charge the battery pack for the first time, or after prolonged storage, 
charge it for about 24 hours to bring the battery up to full capacity.

Battery charger (EY0L80)

1. Plug the charger into the AC outlet.

NOTE:

Sparks may be produced when the plug is inserted into the AC power supply, but 
this is not a problem in terms of safety.

2. Insert the battery pack firmly into the charger.

3. During charging, the charging lamp will be lit.

When charging is completed, an internal electronic switch will automatically be trig-
gered to prevent overcharging.

• Charging will not start if the battery pack is warm (for example, immedi-ately af-

ter heavy-duty operation).
The orange standby lamp will be flashing until the battery cools down. Charging 
will then begin automatically.

4. When charging is completed, the charging lamp will start flashing quickly in green 

color.

5. If the charging lamp does not light immediately after the charger is plugged in, or if 

after the standard charging time the charging lamp does not flash quickly in green, 
consult an authorized service center.

6. If a fully charged battery pack is inserted into the charger again, the charging lamp 

lights up. After several minutes, the charging lamp may flash quickly to indicate the 
charging is completed.
Содержание EY4640X

Страница 1: ...ead manual completely before first using this product and save this manual for future use IMPORTANT Ce mode d emploi contient des informations sur la sécurité Lisez le en entier avant d utiliser le produit et conservez le pour référence IMPORTANTE Este manual contiene información de seguridad Lea completamente este manual antes de utilizar por primera vez este producto y guárdelo para poder consul...

Страница 2: ... 2 Index Index Indice English Page 4 Français Page 22 Español Página 42 FUNCTIONAL DESCRIPTION DESCRIPTION DES FONCTIONS DESCRIPCIÓN FUNCIONAL Ni MH Ni Cd A B P M N O L J I H G C D E F Q S T V W U R K ...

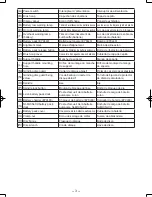
Страница 3: ... Support handle Manche de support Mango de soporte L Support handle mounting hole Orifice de montage du manche de support Orificio de montaje de mango de soporte M Grinding disc guard Carter de disque abrasif Protección de disco de desbastado N Grinding disc guard fixing screw Vis de fixation du carter de disque abrasif Tornillo de fijación de protector de disco de amoladora O Spindle Axe Eje P Sp...

Страница 4: ...dicates a potentially haz ardous situation which could result in minor or moderate injury if not avoided Cautions also alert you to unsafe practices to be avoided WARNING Warning indicates a potentially haz ardous situation which could result in serious injury or death if not avoided DANGER Danger indicates an imminent haz ard which will result in serious injury or death if not avoided II GENERAL ...

Страница 5: ... wrench or a key left attached to a rotating part of the power tool may result in personal injury 5 Do not overreach Keep proper footing and balance at all times This enables better control of the power tool in unexpected situa tions 6 Dress properly Do not wear loose clothing or jewelry Keep your hair clothing and gloves away from moving parts Loose clothes jewelry or long hair can be caught in m...

Страница 6: ...he battery terminals to gether may cause burns or a fire 5 Under abusive conditions liq uid may be ejected from battery avoid contact If contact acci dentally occurs flush with wa ter If liquid contacts eyes addi tionally seek medical help Liquid ejected from the battery may cause irritation or burns Service 1 Have your power tool serviced by a qualified repair person using only identical replacem...

Страница 7: ... filtrating parti cles generated by your operation Prolonged exposure to high inten sity noise may cause hearing loss 9 Keep bystanders a safe dis tance away from work area Any one entering the work area must wear personal protective equip ment Fragments of workpiece or of a broken accessory may fly away and cause injury beyond im mediate area of operation 10 Hold power tool by insulated gripping ...

Страница 8: ...the tool in direction oppo site to the wheel s movement at the point of snagging 4 Use special care when working corners sharp edges etc Avoid bouncing and snagging the ac cessory Corners sharp edges or bouncing have a tendency to snag the rotating accessory and cause loss of control or kickback 5 Do not attach a saw chain wood carving blade or toothed saw blade Such blades create frequent kickbac...

Страница 9: ...orkpiece 5 Support panels or any oversized workpiece to minimize the risk of wheel pinching and kickback Large workpieces tend to sag un der their own weight Supports must be placed under the work piece near the line of cut and near the edge of the workpiece on both sides of the wheel 6 Use extra caution when mak ing a pocket cut into existing walls or other blind areas The protruding wheel may cu...

Страница 10: ... 18 18 16 8 Do not operate charger with dam aged cord or plug replace them immediately 9 Do not operate charger if it has re ceived a sharp blow been dropped or otherwise damaged in any way take it to a qualified serviceman 10 Do not disassemble charger take it to a qualified serviceman when service or repair is required Incor rect reassembly may result in a risk of electric shock or fire 11 To re...

Страница 11: ...ot carry or store the battery pack in the same container as nails or similar metal objects Do not charge the battery pack in a high temperature location such as next to a fire or in direct sunlight Otherwise the battery may over heat catch fire or explode Never use other than the dedicated charger to charge the battery pack Otherwise the battery may leak overheat or explode After removing the batt...

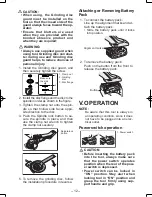
Страница 12: ...dle in place and then use the clamp nut wrench to tighten the clamp nut securely 1 Spindle lock button 1 5 To remove the grinding disc follow the installation procedure in reverse Attaching or Removing Battery Pack 1 To connect the battery pack Line up the alignment marks and at tach the battery pack Slide the battery pack until it locks into position Alignment marks 2 To remove the battery pack P...

Страница 13: ...f the tool and wait until the wheel has come to a complete stop be fore putting the tool down Visual inspection and workout test on disc 1 Always make sure that the disc has no cracks before use 2 Always give workout test on the blade as follows 3 Always make sure the disc is firmly fixed Work out time Brand new disc more than 3 min Before use on current disc more than 1 min Grinding operation A B...

Страница 14: ...grinding will cause the disc to crack and break causing serious personal injury CAUTION To prevent excessive temperature increase of the tool surface do not operate the tool continuously using two or more battery packs The tool needs cool off time be fore switching to another pack Do not close up ventilation slots on the sides of the body during operation Otherwise the machine function is adversel...

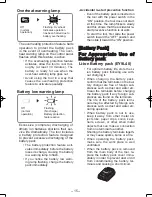
Страница 15: ...ower switch in the ON position the tool does not start At this time the lamp flickers slowly and this shows that the accidental re start preventive function is at work To start the tool first slide the power switch toward the OFF position and then slide it toward the ON position Battery Pack Battery Pack For Appropriate Use of For Appropriate Use of Battery pack Battery pack Li ion Battery pack EY...

Страница 16: ...s con secutively During charging the charger may become slightly warm This is nor mal Do NOT charge the battery for a long period CAUTION To prevent the risk of fire or damage to the battery charger Do not use power source from an engine generator Do not cover vent holes on the charger and the battery pack Unplug the charger when not in use Li ion Battery Pack NOTE Your battery pack is not fully c...

Страница 17: ... battery up to full capacity Battery charger EY0L80 1 Plug the charger into the AC outlet NOTE Sparks may be produced when the plug is inserted into the AC power supply but this is not a problem in terms of safety 2 Insert the battery pack firmly into the charger 3 During charging the charging lamp will be lit When charging is completed an internal electronic switch will automatically be trig gere...

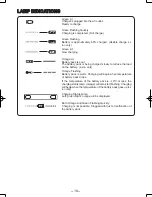
Страница 18: ...ed slowly to reduce the load on the battery Li ion only Orange Flashing Battery pack is warm Charging will begin when temperature of battery pack drops If the temperature of the battery pack is 10 C or less the charging status lamp orange will also start flashing Charging will begin when the temperature of the battery pack goes up Li ion only Charging Status Lamp Left green Right orange will be di...

Страница 19: ... for wiping the unit Do not use a damp cloth thinner benzine or other volatile solvents for cleaning VII ACCESSORIES CAUTION The use of any accessories not specified in this manual may re sult in fire electric shock or per sonal injury Use recommended accessories only Your tool is supplied with a guard for use with a grinding disc A cut off disc can also be used with a cut off disc guard If you de...

Страница 20: ...kg 4 8 lbs Overall length 361 mm 14 7 32 BATTERY PACK Model EY9L40 Storage battery Li ion Battery Battery voltage 14 4 V DC 3 6 V x 4 cells Capacity 3 Ah BATTERY CHARGER Model EY0L80 Rating See the rating plate on the bottom of the charger Weight 0 95 kg 2 1 lbs Li ion battery pack Charging time 3 Ah 14 4 V 21 6 V 28 8 V EY9L40 Usable 35 min Full 50 min EY9L60 Usable 45 min Full 60 min EY9L80 Usab...

Страница 21: ...06 20 min 1 7 Ah EY9180 EY9182 EY9101 EY9103 25 min 2 Ah EY9168 EY9188 EY9106 EY9107 EY9108 EY9136 EY9116 EY9117 30 min 60 min 3 Ah EY9200 EY9230 EY9210 45 min 90 min 3 5 Ah EY9201 EY9231 EY9251 55 min 65 min NOTE This chart may include models that are not available in your area Please refer to the latest general catalogue ...

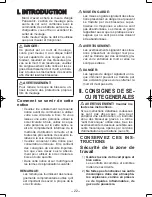
Страница 22: ... en toute sécurité Dans cette notice et sur l outil figurent les termes de signalisation suivants REMARQUE Les remarques fournissent des rensei gnements complémentaires utiles qu il est important de savoir à propos de la scie circulaire MISE EN GARDE Les mises en garde signalent des situa tions présentant un danger réel pouvant se traduire par des blessures super ficielles ou moyennes si elles ne ...

Страница 23: ...es d électrocution Sécurité personnelle 1 Restez alerte regardez ce que vous faites et faites preuve de bon sens lorsque vous utilisez un outil mécanique N utilisez pas un outil mécanique alors que vous êtes fa tigué ou sous les effets de drogue d alcool ou de médicaments Un moment d inattention pendant que vous faites fonctionner l outil mé canique peut entraîner des blessures graves 2 Utilisez d...

Страница 24: ...nctionnement de l outil méca nique S il est endommagé faites réparer l outil mécanique avant de l utiliser De nombreux accidents sont provo qués par des outils mécaniques mal entretenus 6 Maintenez les outils de coupe affû tés et propres Les outils de coupe bien entretenus avec des lames bien affûtées ont moins de chances de gripper et sont plus faciles à contrôler 7 Utilisez l outil mécanique les...

Страница 25: ... l outil électrique Des accessoires fonction nant plus rapidement que leur VITES SE NOMINALE risquent de se casser et de voler en éclats 5 Le diamètre externe et l épaisseur de votre accessoire doivent cor respondre à la puissance nomina le de votre outil électrique Des ac cessoires aux dimensions inappro priées ne sont pas protégeables ou contrôlables 6 La taille de tonnelle des roues flasques pa...

Страница 26: ...tilateur du moteur tirera la poussière à l intérieur du logement et une accu mulation excessive de poudre métal lique peut entraîner des chocs électri ques 15 N opérez pas l outil électrique à proximité de matériaux inflamma bles Les étincelles risquent d en flammer ces matériaux 16 N utilisez pas d accessoires qui nécessitent des liquides de refroi dissement L utilisation d eau ou de liquides de ...

Страница 27: ...on à l outil électrique et la posi tionner pour une sécurité maxima le de manière à exposer la meule au minimum en direction de l opé rateur La protection permet de pro téger l opérateur contre les fragments de meule et un contact accidentel avec la meule 3 Il ne faut utiliser les meules que pour les applications recomman dées Par exemple ne pas meu ler avec la face latérale de la meu le à tronçon...

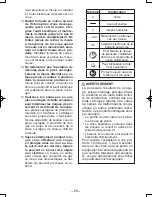
Страница 28: ...Soyez extrêmement prudent lors que vous effectuez une coupe en plongée dans un mur ou tou te autre surface derrière laquel le peuvent se trouver des objets non visibles La meule en saillie peut couper des conduites de gaz ou d eau des fils électriques ou des objets qui peuvent provoquer un re bond Symbole Signification V Volts Courant continu n Vitesse nominale min 1 Révolutions ou alternan ces pa...

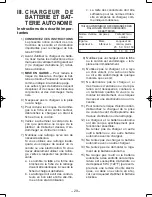
Страница 29: ...c teurs en bon état et être elle mê me en bon état d utilisation c La taille des conducteurs doit être suffisante pour les normes d inten sité en ampères du chargeur com me indiqué ci dessous TAILLEAWG MINIMUM RECOMMANDÉE DES RALLONGES POUR CHARGEURS DE BATTERIES Norme d entrée CA Ampères Taille AWG du cordon Egal ou supérieur à Mais inférieur à Longueur du cordon pieds 25 50 100 150 0 2 18 18 18 ...

Страница 30: ...outils spéciaux 25 POUR RÉDUIRE LES RISQUES D ÉLECTROCUTION CET APPA REIL EST ÉQUIPÉ D UNE FICHE POLARISÉE UNE LAME EST PLUS LARGE QUE L AUTRE Cette fiche ne pourra être insérée que d une seule façon dans une prise po larisée Si la fiche ne peut pas être in sérée à fond dans la prise insérez la fiche sens dessus dessous Si vous ne parvenez toujours pas à insérer la fiche adressez vous à un électri...

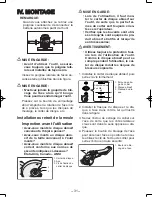
Страница 31: ...e 2 Axe 3 Vis de fixation du carter de disque 3 2 1 MISE EN GARDE Lors de l utilisation il faut mon ter le carter de disque abrasif sur l outil de sorte que la partie fer mée du carter soit toujours orien tée vers l opérateur Vérifiez que les buvards sont utili sés lorsqu ils sont équipés du pro duit abrasif stratifié et lorsqu ils sont nécessaires AVERTISSEMENT Utilisez toujours la protection fou...

Страница 32: ...de l interrupteur a été pressé L interrupteur peut être verrouillé dans la position MARCHE Res tez alerte quand l outil est ver rouillé dans la position MARCHE et agrippez fermement l outil en uti lisant le manche et la prise Pour démarrer l outil pressez et glis sez l interrupteur vers la position MAR CHE Pour une opération continue pressez sur l avant l interrupteur pour le verrouiller Pour arrê...

Страница 33: ...acultatif non inclus Assurez vous du côté AVERTISSEMENT Lors de l utilisation d un disque de tronconnage abrasif assurez vous de n utiliser que le carter de disque de tronconnage concu pour cet te utilisation avec le disque à tron conner N utilisez JAMAIS pas de disque à tronçonner abrasif pour le meula ge latéral Ne coincez pas le disque ou n ap pliquez pas de pression excessive Ne tentez pas d e...

Страница 34: ...ur l interrupteur à la position ARRET le levier de l interrupteur sur ARRET et ensuite pressez dessus pour le ramener sur la position MAR CHE le levier de l interrupteur sur MARCHE pour démarrer la scie MARCHE ARRET Témoin d avertissement de surchauffe Arrêt fonc tionnement normal Clignotant Surchauffe Indique que le fonction nement a été arrêté à la suite d une surchauffe de la batterie La caract...

Страница 35: ...e longévité optimale de la bat terie rangez la batterie autonome Li ion sans la charger après l avoir uti lisée Lors de la charge de la batterie auto nome assurez vous que les bornes du chargeur de batterie sont libres de tout corps étranger comme de la pous sière et de l eau etc Nettoyez les bor nes avant de charger la batterie auto nome si des corps étrangers se trou vent sur les bornes La durée...

Страница 36: ... la suite La température du chargeur peut s élever en cours d utilisation Ce n est pas là le signe d une anomalie de fonctionnement NE chargez PAS la batterie pendant une longue période MISE EN GARDE Pour éviter les risques d incendie ou d endommagement du chargeur de bat terie N utilisez pas de source d alimen tation provenant d un générateur de moteur Ne bouchez pas les trous d aéra tion du char...

Страница 37: ...d REMARQUE Chargez une nouvelle batterie autono me ou une batterie autonome qui n a pas été utilisée pendant une période prolongée pendant 24 heures pour lui redonner sa pleine capacité Chargeur de batterie EY0L80 1 Branchez le cordon d alimentation du chargeur dans une prise secteur REMARQUE Des étincelles peuvent être produites lorsque la fiche est introduite dans la prise d alimentation secteur...

Страница 38: ...réduire l effort de la batterie Li ion seulement Clignotant en orange La batterie autonome est chaude La charge commence lorsque la température de la batterie autonome descend Lorsque la température de la batterie autonome est de 10ºC ou moins le témoin de l état de charge orange se met également à clignoter La charge commence lorsque la température de la batterie autonome augmente Li ion seulemen...

Страница 39: ...til N utilisez pas de tissu humide dissolvant benzi ne ou autres dissolvants volatiles pour le nettoyer VII VII ACCESSOIRES ACCESSOIRES MISE EN GARDE L utilisation d accessoires ne figu rant pas dans ce manuel peut cau ser un incendie un choc électri que ou des blessures corporelles N utilisez que les accessoires re commandés L outil vous est fourni avec un car ter pour l utilisation avec un dis q...

Страница 40: ...8 lbs Longueur totale 361 mm 14 7 32 BATTERIE AUTONOME Modèle EY9L40 Stockage de la batterie Batterie Li ion Tension de la batterie 14 4 V CC 3 6 V x 4 piles Capacité 3 Ah CHARGEUR DE BATTERIE Modèle EY0L80 Puissance nominale Voir la plaque signalétique se trouvant sur le côté inférieur du chargeur Poids 0 95 k 2 1 lbs Batterie autonome Li ion Durée de chargement 3 Ah 14 4 V 21 6 V 28 8 V EY9L40 U...

Страница 41: ... min 1 7 Ah EY9180 EY9182 EY9101 EY9103 25 min 2 Ah EY9168 EY9188 EY9106 EY9107 EY9108 EY9136 EY9116 EY9117 30 min 60 min 3 Ah EY9200 EY9230 EY9210 45 min 90 min 3 5 Ah EY9201 EY9231 EY9251 55 min 65 min REMARQUE Ce tableau peut inclure des modèles non disponibles dans votre région Veuillez vous reporter au catalogue général le plus récent ...

Страница 42: ... Este manual y el producto utilizan las siguientes palabras clave NOTA Las notas proporcionan información adicional que usted deberá conocer sobre la amoladora PRECAUCIÓN La precaución indica una situación po tencialmente peligrosa que podría re sultar en daños menores o moderados si no se evita Las precauciones tam bién le indicarán prácticas no seguras que tendrá que evitar ADVERTENCIA La advert...

Страница 43: ... el riesgo de descarga eléctrica Seguridad personal 1 Manténgase alerta vigile lo que haga y utilice sentido común cuando haga funcionar la herra mienta eléctrica No utilice una he rramienta eléctrica mientras es tá cansado o bajo la influencia de drogas alcohol o medicamentos Un descuido instantáneo mientras hace funcionar las herramientas eléctricas puede provocar una herida personal de gravedad...

Страница 44: ...a haga reparar la herramienta eléctrica antes de utilizar Muchos accidentes se deben a herra mientas eléctricas mal mantenidas 6 Mantenga las herramientas de cor te afiladas y limpias Las herramientas de corte bien mantenidas con bordes de corte afi lados tienen menos posibilidades de atascarse y son más fáciles de con trolar 7 Utilice la herramienta eléctrica accesorios y brocas de herramien ta e...

Страница 45: ...s restos que salgan volando generados por di versas operaciones La protección de los ojos debe ser capaz de dete ner los restos que salgan volando ge nerados por diversas operaciones La máscara anti polvo o respirador debe ser capaz de filtrar las partículas ge neradas por su operación La exposi ción prolongada a ruido de alta inten sidad puede causar la pérdida de la audición 9 Mantenga a los tra...

Страница 46: ... para tener el máximo control sobre reacciones violentas o de par de apriete durante el ini cio El operador puede controlar las fuerzas de las reacciones violentas o de par de apriete si se toman las de bidas precauciones 2 Nunca coloque su mano cerca del accesorio giratorio El accesorio puede reaccionar violentamente so bre su mano 3 No posicione su cuerpo en el área donde la herramienta eléctric...

Страница 47: ...nterrumpa un corte por cualquier razón desconecte la alimentación de la herramienta y mantenga la herramienta eléctrica inmóvil hasta que la rueda se de tenga por completo Nunca intente remover la rueda de corte del cor te mientras la rueda esté en mo vimiento de otra manera podría ocurrir una reacción violenta In vestigue y tome acciones correctivas para eliminar la causa del ligamiento de la rue...

Страница 48: ...e eléctrico tire del en chufe y no del cable cuando desco necte el cargador 6 Cerciórese que el cable está insta lado de tal forma que nadie lo pise o enriede en los pies o esté expuesto a otros daños o tensión 7 No debe utilizar un cable de exten sión a menos que sea absolutamen te necesario El uso de un cable de extensión incor recto puede provocar un riesgo de fuego o descarga eléctrica Si debe...

Страница 49: ...rriente calentamiento excesivo y el riesgo de fuego o heri das personales 24 NOTA Si el cable de alimentación de este aparato está dañado debe cam biarlo en un taller de reparaciones autorizado por el fabricante porque son necesarias herramientas de uso especial 25 PARA REDUCIR EL RIESGO DE DESCARGA ELECTRICA ESTE APARATO TIENE UN ENCHUFE POLARIZADO UNA PATA ES MAS ANCHA QUE LA OTRA Este enchufe e...

Страница 50: ...3 Tornillo de fija ción de protec tor de disco de amoladora 3 2 1 PRECAUCIÓN Al usar el protector de disco de amoladora debe de estar instalado en la herramienta de manera que el lado cerrado del protector esté siempre hacia el lado del operario Asegúrese de usar secantes cuan do se provean junto con productos abrasivos pegados y cuando sean necesarios ADVERTENCIA Siempre use la protección suminis...

Страница 51: ...empre asegúrese de que el interruptor de alimentación opera adecuadamente y vuelve a la posición OFF cuando se presio na la parte de atrás del interruptor de alimentación El interruptor de alimentación se puede bloquear en la posición ON Permanezca alerta cuando bloquee la herramienta en la posi ción ON y sujete la herramien ta con firmeza usando el mango y empuñadura de soporte Para arrancar la h...

Страница 52: ...n disco de des bastado nuevo no haga funcionar la amoladora en la dirección B o cortará la pieza de trabajo Una vez que el bor de del disco de desbastado ha queda do redondeado por el uso el disco de desbastado se puede trabajar en am bas direcciones A y B Uso de un protector de disco de corte EY9X213E disponible como accesorio no incluido Asegure el costado ADVERTENCIA Cuando esté usando un disco...

Страница 53: ...rtada La luz de adver tencia destellará en este momento para indicar que se ha activado la función de prevención de arranque de bloqueo Presione el interruptor a la posición OFF palanca interruptora en OFF y luego presione de nuevo la posición ON palanca interruptora en ON para arrancar la amoladora ON OFF Luz de advertencia de sobre calentamiento Apagado funcio namiento normal Destella Sobrecalen...

Страница 54: ...Li ión siguiendo el uso sin carga Cuando cargue la caja de batería con firme que los terminales en el cargador de batería estén libres de materias ex trañas tales como polvo y agua etc Limpie los terminales antes de cargar la caja de batería si hay materias ex trañas en los terminales La vida de los terminales de la caja de batería puede verse afectada por materias extrañas tales como polvo y agua...

Страница 55: ...gar la batería antes de utilizarla Cargador de batería EY0L80 1 Enchufe el cargador en la fuente de ali mentación de CA NOTA Se pueden producir chispas cuando se inserta el enchufe en la alimentación eléctrica de CA pero este no es un pro blema en términos de seguridad 2 Meta firmemente la batería en el cargador 1 Alinee las marcas de alineación y colo que la batería en el enchufe del cargador 2 D...

Страница 56: ...ría en el carga dor 3 La luz indicadora de carga permanecerá encendida durante la carga Cuando haya terminado la carga se ac cionará automáticamente un conmu tador electrónico interno para impedir cualquier sobrecarga No podrá cargar la batería si ésta es tá todavía caliente por ejemplo in mediatamente después de haber tra bajado mucho La luz de espera naranja seguirá des tellando hasta que se enf...

Страница 57: ...atería está fría La batería se esta cargando lentamente para reducir la carga de la batería sólo Li ión Destella en naranja La batería está caliente La carga comenzará cuando baje la temperatura de la batería Si la temperatura de la batería es de 10 C o menos la luz de carga naranja también empezará a destellar La carga empezará cuando sube la temperatura de la batería sólo Li ión Luz de estado de...

Страница 58: ...nasonic siempre usando re puestos de Panasonic VI VI MANTENIMIENTO MANTENIMIENTO Para frotar la herramienta emplee sólo un paño que sea suave y que esté se co No emplee paños humedecidos di solventes bencina ni otros solventes volátiles para la limpieza VII ACCESORIOS VII ACCESORIOS PRECAUCIÓN El uso de cualquier otro acceso rio no especificado en este ma nual puede causar incendios gol pes eléctr...

Страница 59: ... 2 2 k 4 8 lbs Longitud total 361 mm 14 7 32 BATERÍA Modelo EY9L40 Batería de almacenaje Batería Li ión Tensión de batería 14 4 V CC 3 6 V x 4 celdas Capacidad 3 Ah CARGADOR DE BATERÍA Modelo EY0L80 Régimen Vea la placa de especificaciones en la parte inferior del cargador Peso 0 95 k 2 1 lbs Pacco batteria Li ion Batería de Li ión 3 Ah 14 4 V 21 6 V 28 8 V EY9L40 Utilizable 35 min Completa 50 min...

Страница 60: ...Y9006 20 min 1 7 Ah EY9180 EY9182 EY9101 EY9103 25 min 2 Ah EY9168 EY9188 EY9106 EY9107 EY9108 EY9136 EY9116 EY9117 30 min 60 min 3 Ah EY9200 EY9230 EY9210 45 min 90 min 3 5 Ah EY9201 EY9231 EY9251 55 min 65 min NOTA Este cuadro puede contener modelos no disponibles en su país Consulte el más reciente catálogo general ...

Страница 61: ... 61 MEMO ...

Страница 62: ... 62 MEMO ...

Страница 63: ... 63 MEMO ...

Страница 64: ...PANASONIC CONSUMER ELECTRONICS COMPANY One Panasonic Way Secaucus New Jersey 07094 No 1 EN FR ES EY981046401 H2010 Printed in China ...

Отзывы: