background image

EN

G

LI

SH

Replacing the Lamp unit

CAUTION:


z

When the projector is mounted on a ceiling, do not work with your face close to the 

projector.


z

Attach the lamp unit and the lamp cover securely.


z

When you experience difficulty in installing the lamp, remove it and try again. If you 

use force to install the lamp, the connector may be damaged.


z

Do not use other than designated lamp units.


z

Do not lossen other than designated screws.


J

Replacement procedure

1) 

Turn off the Power by following the 

procedure in "Turning off the projector". 

Unplug the AC power cord. Wait at least 

1 hour and make sure the lamp unit and 

surroundings are cool.

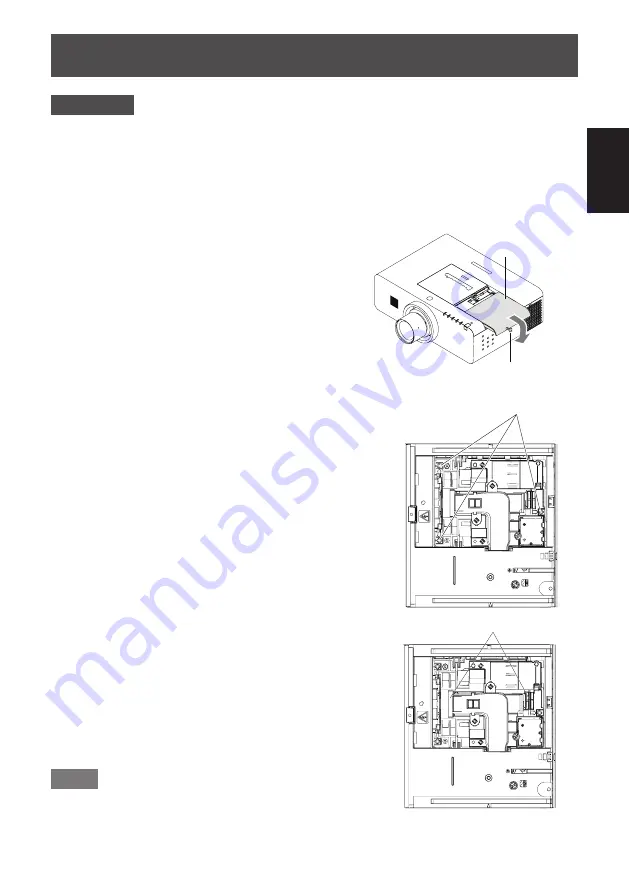
2)  Use a Phillips screwdriver to loosen the 

lamp cover fixing screw and open the 

lamp cover.


z

Open the lamp cover, slide the lamp cover in 

the direction of the arow shown in the right 

picture and let the projector stand on the 

side at the same time.

3)  Use a Phillips screwdriver to loosen the 

three lamp unit fixing screws until the 

screws turn freely. Hold the used lamp 

unit by its handles, and pull it gently 

from the projector.

4)  Insert the new lamp unit in correct 

direction. Tighten the three lamp unit 

fixing screws securely with a Phillips 

screwdriver.

5)  Close the lamp cover, and tighten the 

lamp cover fixing screw securely with a 

Phillips screwdriver.


z

Close the lamp cover by pushing it slowly 

opposite to the direction of the arrow.

Note


z

When you replace the new lamp unit (ET-

LAE200), the projector resets the total 

usage time of the lamp unit automatically.

E-7

Lamp cover

fixing screw

Lamp cover

Lamp unit fixing screws

Handles

Содержание ET-LAE200

Страница 1: ... unit Commercial Use Thank you for purchasing this Panasonic product Before using this product please read the instructions carefully and save this manual for future use Before using this product be sure to read Read this first Page E 2 DPQX1193ZB X1 Printed in China ...

Страница 2: ...ctor E 2 WARNING TURN OFF THE UV LAMP BEFORE OPENING THE LAMP COVER Notice USA only Hg LAMP CONTAINS MERCURY Manage in Accord with Disposal Laws See www lamprecycle org or 1 888 411 1996 WARNING Do not disassemble the lamp unit If the lamp breaks it could cause injury Lamp replacement The lamp has high internal pressure If improperly handled an explosion and severe injury or accidents will result ...

Страница 3: ...Fukuoka 812 8531 Japón Importador Panasonic Connect Europe GmbH Representante Autorizado para la UE Panasonic Testing Centre Winsbergring 15 22525 Hamburgo Alemania Deutsch Hergestellt von Panasonic Connect Co Ltd 4 1 62 Minoshima Hakata ku Fukuoka 812 8531 Japan Importeur Panasonic Connect Europe GmbH Vertretungsberechtigter in der EU Panasonic Testing Centre Winsbergring 15 22525 Hamburg Deutsch...

Страница 4: ... Εξουσιοδοτημένος αντιπρόσωπος στην ΕΕ Panasonic Testing Centre Winsbergring 15 22525 Hamburg Γερμανία Hrvatski Proizvodi Panasonic Connect Co Ltd 4 1 62 Minoshima Hakata ku Fukuoka 812 8531 Japan Uvoznik Panasonic Connect Europe GmbH Ovlašteni zastupnik u EU u Panasonic Testing Centre Winsbergring 15 22525 Hamburg Njemačka Latviešu Ražotājs Panasonic Connect Co Ltd 4 1 62 Minoshima Hakata ku Fuku...

Страница 5: ...sonic Connect Europe GmbH Representante Autorizado na UE Panasonic Testing Centre Winsbergring 15 22525 Hamburgo Alemanha Română Fabricat de Panasonic Connect Co Ltd 4 1 62 Minoshima Hakata ku Fukuoka 812 8531 Japonia Importator Panasonic Connect Europe GmbH Reprezentant autorizat în UE Panasonic Testing Centre Winsbergring 15 22525 Hamburg Germania Slovenčina Výrobca Panasonic Connect Co Ltd 4 1 ...

Страница 6: ...bH Auktoriserad representant i EU Panasonic Testing Centre Winsbergring 15 22525 Hamburg Tyskland Türkçe Tarafından Üretilmiştir Panasonic Connect Co Ltd 4 1 62 Minoshima Hakata ku Fukuoka 812 8531 Japonya İthalatçı Panasonic Connect Europe GmbH AB Yetkili Temsilcisi Panasonic Testing Centre Winsbergring 15 22525 Hamburg Almanya E 6 ...

Страница 7: ...ver fixing screw and open the lamp cover z z Open the lamp cover slide the lamp cover in the direction of the arow shown in the right picture and let the projector stand on the side at the same time 3 Use a Phillips screwdriver to loosen the three lamp unit fixing screws until the screws turn freely Hold the used lamp unit by its handles and pull it gently from the projector 4 Insert the new lamp ...

Страница 8: ...utor for the correct disposal of the old lamp unit If you continue to use a lamp after the replacement time the lamp may break Do not disassemble the lamp unit When replacing the lamp because it has stopped illuminating there is a possibility that the lamp may be broken If replacing the lamp of a projector which has been installed on the ceiling you should always assume that the lamp is broken and...

Страница 9: ... and electronic products must not be mixed with general household waste For proper treatment recovery and recycling of old products please take them to applicable collection points in accordance with your national legislation By disposing of them correctly you will help to save valuable resources and prevent any potential negative effects on human health and the environment For more information ab...

Отзывы: