background image

ENGLISH-5

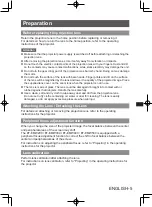
Before replacing the projection lens

Return the projection lens to the home position before replacing or removing it.

For details on how to return the lens to the home position, refer to the operating 

instructions of the projector.

Attention


z

Make sure that the projector power supply is switched off before attaching or detaching the 

projection lens.


z

After removing the projection lens, store it safely away from vibration or impacts.


z

Do not touch the electric contact points of the projection lens with your fingers. Dust and dirt 

on the contacts may cause contact malfunctions, while static electricity may damage the unit.


z

Do not turn the gear (ring) part of the projection lens barrel by hand. Doing so may damage 

the motor.


z

Do not touch the surface of the lens with bare hands. Finger prints and dirt on the surface 

of the lens will be magnified by the lens and lower the quality of the projected image. Place 

the supplied lens cover on the zoom lens when the projector is not in use.


z

The lens is made of glass. The lens could be damaged if brought into contact with or 

rubbed against hard objects. Handle the lens carefully.


z

Use a clean, soft and dry cloth to wipe away dust and dirt from the projection lens. 

Do not use fl uffy cloths containing oil, water or dust for cleaning. The lens is easily 

damaged, so do not apply excessive pressure when wiping it.

Attaching the Lens / Detaching the Lens

For details on attaching or removing the projection lens, refer to the operating 

instructions for the projector.

Peripheral focus adjustment function

When you change the size of the projected image, the focal balance between the center

and peripheral areas of the screen may shift. 

The ET-EMW200 / ET-EMW300 / ET-EMW400 / ET-EMW500 is equipped with a 

peripheral focus adjustment function to correct the shift in focal balance between the 

center and peripheral areas of the screen.

For instructions on adjusting the peripheral focus, refer to “Projecting” in the operating 

instructions for the projector.

Lens calibration

Perform lens calibration after attaching the lens.

For instructions on lens calibration, refer to “Projecting” in the operating instructions for 

the projector.

Preparation

Содержание ET-EMW200

Страница 1: ...c product To ensure correct use of this lens please read the operating instructions supplied with the lens and the projector carefully Before using this product be sure to read Read this first Page 3...

Страница 2: ...ng the Lens Detaching the Lens 5 Peripheral focus adjustment function 5 Lens calibration 5 Projection relationships 6 Lens shift ranges 7 Specifications 9 Dimensions 9 Projected image size and Project...

Страница 3: ...z z Unexpected projection of light may cause injury to eyes z z Replacing the projection lens without removing the power plug may result in electric shock Do not stand in front of the lens while the...

Страница 4: ...orted Refer to the operating instructions for your projector or the Panasonic website https panasonic net cns projector Supplied Accessories Make sure that the following has been provided Part name Ap...

Страница 5: ...ot in use z z The lens is made of glass The lens could be damaged if brought into contact with or rubbed against hard objects Handle the lens carefully z z Use a clean soft and dry cloth to wipe away...

Страница 6: ...ge SW Projected image width SD Projected image size z z Dimension for L1 approximate values Unit m Projector model ET EMW200 ET EMW300 ET EMW400 ET EMW500 ET EMS600 ET EMT700 ET EMT800 PT MZ16K PT MZ1...

Страница 7: ...position shift within the adjustment range Perform lens shift adjustment within the ranges shown in the following illustrations The focus may change when the lens position is shifted out of the adjus...

Страница 8: ...EMW300 0 5V 0 5V 0 2H 0 2H 0 13V 0 13V Standard projection position Projected image height V Projected image width H Origin position of the lens mounter Note z z The home position of the projector a...

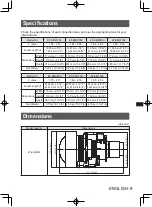
Страница 9: ...Width 179 mm 7 1 16 179 mm 7 1 16 179 mm 7 1 16 179 mm 7 1 16 Height 175 mm 6 7 8 175 mm 6 7 8 175 mm 6 7 8 175 mm 6 7 8 Depth 314 mm 12 3 8 284 mm 11 3 16 284 mm 11 3 16 285 mm 11 7 32 Net Weight 5 2...

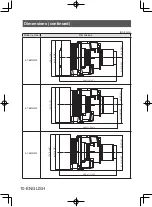
Страница 10: ...ued Unit mm Model number Dimensions ET EMW300 175 6 7 8 179 7 1 16 82 3 7 32 91 3 19 32 284 11 3 16 ET EMW400 175 6 7 8 179 7 1 16 82 3 7 32 91 3 19 32 284 11 3 16 ET EMW500 175 6 7 8 179 7 1 16 285 1...

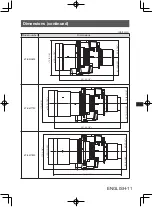
Страница 11: ...Unit mm Model number Dimensions ET EMS600 130 11 7 32 173 5 1 8 267 10 1 2 82 3 7 32 91 3 19 32 ET EMT700 130 11 7 32 173 5 1 8 79 25 3 1 8 93 75 3 11 16 327 12 7 8 ET EMT800 130 11 7 32 173 5 1 8 82...

Страница 12: ...in accordance with national legislation Information on Disposal in other Countries outside the European Union This symbol is only valid in the European Union If you wish to discard this product pleas...

Страница 13: ...SH SW SD Screen cran Projected image Image projet e L Projection distance Distance de projection LW Minimum distance Distance minimale LT Maximum distance Distance maximale SH Projected image height...

Страница 14: ...des mod les suivants consultez Installation dans le mode d emploi du projecteur De plus assurez vous de v rifier la taille de l cran en diagonale SD m et d utiliser la Formules de distance de projecti...

Страница 15: ...18 3 68 4 30 0 47 4 24 10 16 400 5 385 8 616 11 69 18 38 0 54 5 92 4 21 4 92 0 54 4 85 12 70 500 6 731 10 770 14 63 22 99 0 67 7 40 5 28 6 16 0 67 6 06 Lens model Mod le d objectif ET EMW300 ET EMW400...

Страница 16: ...0 4 44 13 61 27 09 0 40 4 44 8 89 350 4 712 7 539 7 23 10 40 0 47 5 18 15 90 31 63 0 47 5 18 10 16 400 5 385 8 616 8 27 11 90 0 54 5 92 18 19 36 16 0 54 5 92 12 70 500 6 731 10 770 10 34 14 89 0 67 7...

Страница 17: ...3 78 4 42 0 24 4 11 10 16 400 4 981 8 855 12 02 18 89 0 83 5 81 4 33 5 06 0 28 4 70 12 70 500 6 226 11 069 15 04 23 63 1 04 7 26 5 42 6 33 0 35 5 88 Lens model Mod le d objectif ET EMW300 ET EMW400 T...

Страница 18: ...2 4 36 13 99 27 85 0 62 4 36 8 89 350 4 358 7 748 7 43 10 70 0 73 5 08 16 35 32 51 0 73 5 08 10 16 400 4 981 8 855 8 50 12 23 0 83 5 81 18 70 37 17 0 83 5 81 12 70 500 6 226 11 069 10 63 15 30 1 04 7...

Страница 19: ...4 17 4 87 0 53 4 80 10 16 400 6 096 8 128 13 25 20 81 0 61 6 71 4 77 5 57 0 61 5 49 12 70 500 7 620 10 160 16 57 26 03 0 76 8 38 5 98 6 98 0 76 6 86 Lens model Mod le d objectif ET EMW300 ET EMW400 T...

Страница 20: ...6 5 03 15 43 30 69 0 46 5 03 8 89 350 5 334 7 112 8 19 11 79 0 53 5 87 18 01 35 82 0 53 5 87 10 16 400 6 096 8 128 9 36 13 48 0 61 6 71 20 60 40 95 0 61 6 71 12 70 500 7 620 10 160 11 72 16 86 0 76 8...

Страница 21: ...nf rieure la taille d cran sp cifi e z z Le rapport de projection est bas sur la valeur en cours de projection avec une taille de l image projet e de 2 54 m 100 z 5 z 100 Setting up dimensions which a...

Страница 22: ...ct de l cran est 16 10 16 10 0 4189 SD 0 0435 0 4888 SD 0 0473 When the screen aspect ratio is 16 9 Lorsque le rapport d aspect de l cran est 16 9 16 9 0 4306 SD 0 0435 0 5023 SD 0 0473 When the scree...

Страница 23: ...10 1 8007 SD 0 1082 3 5693 SD 0 1046 When the screen aspect ratio is 16 9 Lorsque le rapport d aspect de l cran est 16 9 16 9 1 8508 SD 0 1082 3 6685 SD 0 1046 When the screen aspect ratio is 4 3 Lors...

Страница 24: ...laza Newark NJ 07102 TEL 877 803 8492 Panasonic Canada Inc 5770 Ambler Drive Mississauga Ontario L4W 2T3 TEL 905 624 5010 Panasonic Corporation Web Site https panasonic net cns projector Panasonic Cor...

Отзывы: