background image

IN USA CONTACT:
Division of Panasonic Corporation of North America
Panasonic Consumer Electronics Company

One Panasonic Way 2F-3  Secaucus, NJ 07094

IN PUERTO RICO CONTACT:
Panasonic Sales Company
Division of Panasonic Corporation of Puerto Rico, Inc.

San Gabriel Industrial Park 65

th

Infantry Avenue KM9.5

Carolina, Puerto Rico 00630 

IN CANADA CONTACT:
AU CANADA, CONTACTER:
Panasonic Canada Inc.

5770 Ambler Drive, Mississauga, Ontario L4W 2T3
(905) 624-5010
Vancouver: (604) 278-4211
Calgary: (403) 295-3955
Toronto: (905) 624-8447
Montréal: (514) 633-8684

En México:
Panasonic de México, S.A de C.V.
México D.F.

Amores 1120, Col. del Valle, 03100
Tel: 54 88 10 00

Service

Assistance

Accessories

Dépannage

Assistance

Accessoires

Call 1-800-338-0552 (In USA)
panasonic.com/shavers (In USA)
Call 1-800-467-3405 (In Canada, only for shavers)
Composer 1-800-467-3405 (Au Canada, pour les rasoirs seulement)

No.1 EN  FR  ES  (U.S.A./CANADA)

Printed in Japan

Imprimé au Japon

R

Operating Instructions

Manuel d’utilisation

Instrucciones de operación

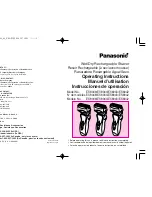
Wet/Dry Rechargeable Shaver 

Resoir Rechargeable (à sec/avec mousse)

Rasuradora Recargable Agua/Seco

B

Before operating this unit, please read these instructions completely.

B

Il est recommandé de lire attentivement ce manuel avant d’utiliser l’appareil.

B

Antes de operar este producto, lea este instructivo en su totalidad.

Model No.

ES8048/ES8044/ES8043/ES8042

N° de modèles ES8048/ES8044/ES8043/ES8042
Modelo No.

ES8048/ES8044/ES8043/ES8042

  ES8048̲44̲43̲42̲USA取説    05.03.17  19:21    ページ 1

Содержание ES8044S

Страница 1: ...shavers In USA 00 467 3405 In Canada only for shavers er 1 800 467 3405 Au Canada pour les rasoirs seulement R ES U S A CANADA Printed in Japan Imprimé au Japon R Operating Instructions Manuel d utilisation Instrucciones de operación Wet Dry Rechargeable Shaver Resoir Rechargeable à sec avec mousse Rasuradora Recargable Agua Seco B Before operating this unit please read these instructions complete...

Страница 2: ...ever drop or insert any object into any opening 6 Keep the cord away from heated surfaces 7 Do not use outdoors or oper ate where aerosol spray products are being used or where oxygen is being admin istered 8 Always attach plug to appli ance first then to outlet To disconnect turn off the switch then remove plug from outlet VE THESE INSTRUCTIONS NGER To reduce the risk of electric shock not reach ...

Страница 3: ...8048 I I J b I c I a B 3 4 5 a b 2 status charge low mid high status charge low mid high charge status recharge charge status recharge charge status A B ES8044 ES8048 C D ES8043 E ES8042 6 ES8044 ES8048 status charge low mid high charge status recharge ES8043 charge status ES8042 7 8 9 43 42 USA取説 05 03 17 19 21 ページ 4 ...

Страница 4: ...ow J Charge status lamp K Low battery indicator L On Off switch M Finger rest N Trimmer O Trimmer handle P Adaptor Q Power cord R Charging stand READ ALL INSTRUCTIONS BE FORE USE Charging Connect the power cord to the shaver and plug the adaptor into an AC outlet see fig 1 A The shaver will adjust automatically to voltages between 100 240V AC In some areas a special plug adap tor may be required W...

Страница 5: ...n nect the power cord from the shaver before cleaning with water For cleanliness and convenience we recommend that you clean your shaver with water and a liquid hand soap Regular cleaning will keep your shaver in good condition while pre venting odors or bacteria from devel 8 status lamp blinks twice per 048 ES8044 rge status lamp will glow e shaver is being charged ery capacity monitor will fully...

Страница 6: ...observe this may lead to hand injuries Wash the shaver in tap water Do not use salt water or boiling water Also do not use cleaning products that are designed for toilets bath rooms or kitchen appliances Do not submerge the shaver for a long time Do not wipe any part of the shaver with thinner benzine or alcohol Clean it by using a cloth dampened with soapy water 10 nd maintain the cutting per e s...

Страница 7: ...Utilisez cet appareil uniquement pour son usage prévu comme le décrit le présent manuel N utilisez pas d accessoires qui ne sont pas recommandés par le fabricant 4 N utilisez jamais cet appareil si le cordon ou la fiche est endommagé s il ne fonctionne pas correctement s il est tombé endommagé ou tombé dans l eau Retournez l appareil à un centre de réparation pour le faire contrôler et réparer 5 N...

Страница 8: ...gement avec support de chargement voir fig 1 B Pour effectuer un chargement avec le support reliez le cordon d alimentation au support de chargement Placez le rasoir sur le support et branchez l adaptateur au secteur Vous pouvez laisser votre rasoir sur le support en permanence afin de maintenir un chargement maximum Il est impossible de surcharger le rasoir 7 usage r peut être utilisé pour un l e...

Страница 9: ...es voir fig 9 Appuyer sur les boutons d ouverture du cadre de la grille et soulever ce dernier pour le retirer Retirez les lames intérieures l une après l autre en les saisissant fermement à leurs extrémités et en tirant fermement hors du rasoir 9 tion du rasoir n La grille extérieure du e est très fine et doit être ée avec précaution pour ne e endommagée Avant utilisation vérifiez l état de Afin ...

Страница 10: ...S COMMUNIQUER AVEC L UNE DES SUCCURSALES MENTIONNÉES SUR LA DERNIÈRE PAGE DE COU VERTURE POUR LE CANA DA CONTACTER L UNE DES SUCCURSALES DE VENTE INDIQUÉE AU DOS 11 chez pas les parties es des lames intérieures érer les nouvelles lames es tenez les lames une par eurs extrémités et appuyez ent jusqu à ce qu elles se en place dans le rasoir TION atterie au lithium ion ble alimente le produit que vez...

Страница 11: ... máquina continúa conectada finalmente se iluminará ORTANTE PARA SU SEGURIDAD un aparato eléctrico se debe tomar ciertas ciones básicas incluyendo las siguientes Lea todas las instrucciones antes de usar este aparato LIGRO a el aparato si este ha caído al Desenchufe inmediatamente loque ni guarde el cable de ntación donde corra el riesgo erse dentro de una bañera o o No lo coloque ni deje caer o d...

Страница 12: ...feitado húmedo Aplique una fina capa de espuma de afeitar sobre la piel la espuma actuará como lubricante De todos los productos para facilitar el afeitado gel jabón crema etc la espuma es el más adecuado No aplique demasiada espuma ya que podría 8 eratura ambiente adecuada carga está entre 15 C 35 C 95 F emperatura está muy por o por debajo de este rango ble que el tiempo de carga te o que el ada...

Страница 13: ...xpuestos a la luz directa del sol o una fuente de calor o donde haya mucha humedad 10 el funcionamiento de la ra Si el cabezal de la a queda taponado con sólo tiene que enjuagarlo gua corriente ción de la recorta a fig 6 el mando de la recortadora iba hasta que oiga un clic la recortadora en ángulo on respecto a la piel y hacia abajo para recortar as eza de la afeitadora a fig 7 ncia Para evitar d...

Страница 14: ...te periodos prolongados No limpie ninguna parte de la afeitadora con aguarrás benceno o alcohol Límpiela únicamente con un paño húmedo y agua jabonosa No retire la carcasa de la afeitadora pues esto podría afectar a su hermeticidad No limpie la afeitadora con agua si está conectada al cable de alimentación Cuando limpie la afeitadora con agua hágalo con las dos cuchillas internas colocadas Si lo h...

Отзывы: