8
English
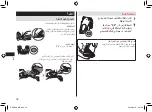
Chargingthehairclipper
•
Press the power switch to turn off the power.
1
1
Connecttheappliance
plugtothestandsocket.
2
2
Placetheclipperonthe
chargingstand.
3
3
Inserttheadaptorintoa
householdoutlet.
3
3
2
2
1
1
•
Charging is required when the recharge
lamp blinks.
•
The clipper can be used for approximately
5 minutes after the recharge lamp blinks.
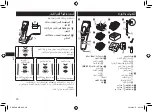
When charging
starts
When charging is
completed
10 minutes
after charging
is completed
Charge status lamp
glows.
The charge status
lamp blinks once
every second.
The charge status
lamp blinks once
every 2 seconds.
•
1 full charge will provide approximately 50 minutes of continuous
operation.
The operating time may differ depending on the frequency of
use, the operating method and the ambient temperature.
•
Charging is completed after approx. 1 hour.
•
The charging time may differ when using the clipper for the first
time, or if it has not been used for more than 6 months. The lamp
on the main body may not glow for several minutes when first
starting charging, but will glow when continuing to charge.
•
To keep charging the battery will not affect battery performance.
•
Recommended ambient temperature for charging is 10 – 35 °C.
The battery may not charge properly or not at all under extreme
low or high temperatures.
•
When the charge status lamp is blinking rapidly (twice every
second), there is a charging malfunction. Please charge the
battery in the recommended ambient temperature range.
Chargingwithoutthechargingstand
1. Press the power switch to turn off the power, and
insert the appliance plug into the clipper.
2. Plug in the adaptor into a household outlet.
ACoperation
If you connect the AC adaptor to the clipper in the same way as for
charging, and turn on the power, you can use it.
•
If the remaining battery is too low, the blades may move slowly or
stop, even with the AC operation. In this case, charge the battery
for 1 minute or more.
•
The battery will be discharged, even with the AC operation.
ER-GP80_ME.indb 8
2014/03/25 14:23:44
Содержание ER-DGP82
Страница 2: ...2 ER GP80_ME indb 2 2014 03 25 14 23 43 ...
Страница 14: ...14 ER GP80_ME indb 14 2014 03 25 14 23 45 ...
Страница 35: ...35 ER GP80_ME indb 35 2014 04 17 9 42 00 ...


