


60
JPEG-
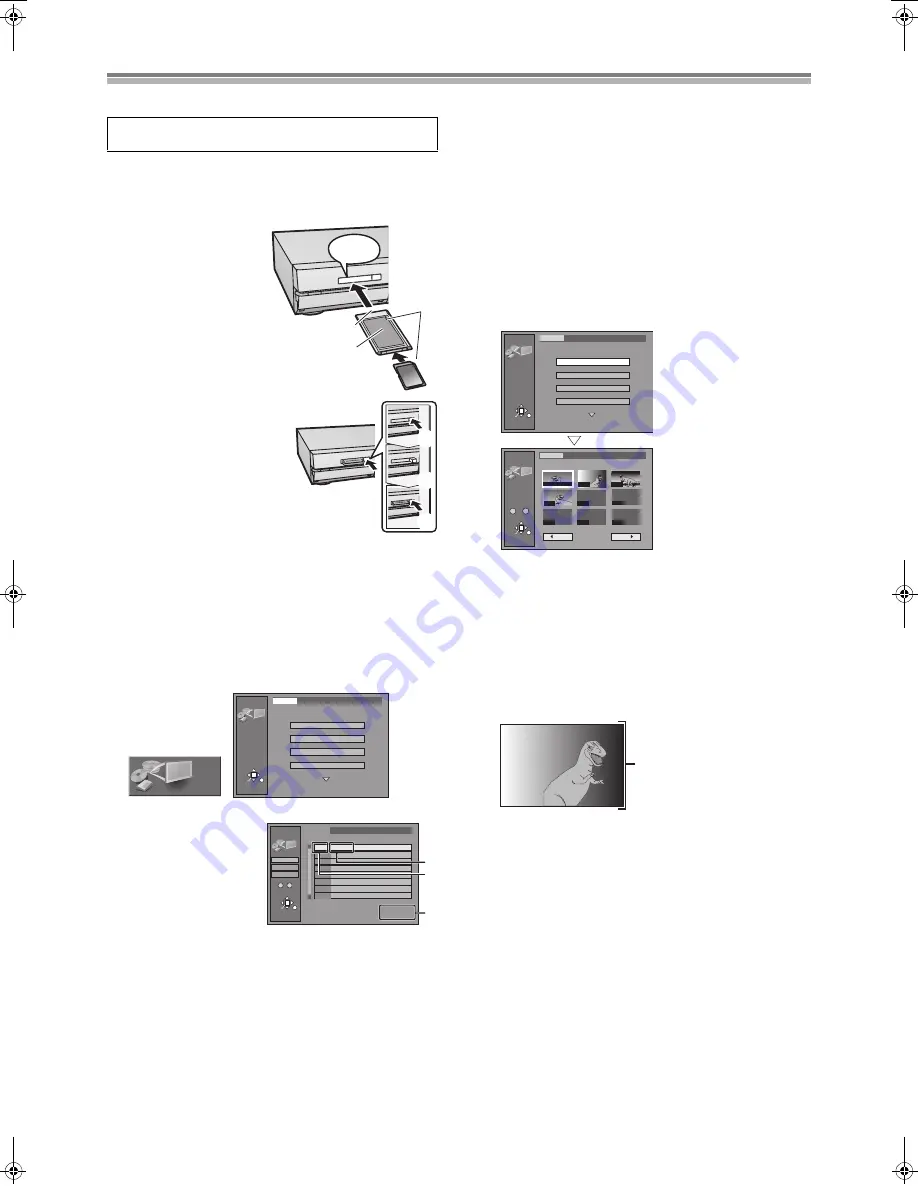
Playing JPEG pictures
Inserting/Removing the PC Card
≥
When the card indicator in the unit display is flashing, the card is
being read from or written to.
Do not turn off the power or
remove the card. Such action may result in malfunction or
loss of the card's contents.
Inserting the card
(1) Hold the edge of the card
and insert until firmly
home.
Do not press directly on
the memory card.
(2)
2
Align to match the
mark.
(3) Terminal connections
facing into the unit.
(4) The labelled side facing
upwards.
Removing the card
(1) Press [EJECT]
(39)
.
(2) Comes out.
(3) Push again.
≥
If using the adaptor, remove the
adaptor and card together.
≥
If the eject button does not come
out,
To remove the PC card, press the
card in once more and then
repeat steps (1)–(3).
≥
It is not possible to open the disc tray while the JPEG pictures
screen is displayed.
Selecting the folder
[CARD]
[HDD]
[RAM]
1) While stopped
Press [FUNCTIONS]
(11)
.
2) Use [
3
,
4
,
2
,
1
]
(10)
to select “JPEG” and press [ENTER]
(10)
.
3) Use [
3
,
4
]
(10)
to select “INPUT” and press [ENTER]
(10)
.
≥
A list of the valid folders
in the drive appears.
(a) Folder name
(b) Folder number
(c) Numbers* of scenes
(JPEG pictures) and
files that are in the
selected folder
* They don't include numbers in the folders lower than the
folder selected currently.
4) Use [
2
,
3
,
4
]
(10)
to select the drive (PC CARD/HDD/DVD)
and press [
1
]
(10)
.
5) Use [
3
,
4
]
(10)
to select the JPEG picture folder.
≥
“Scene” and “File” refer to numbers inside the folder
selected. It is not included Lower files are not included.
≥
If there is more than one upper folder, pressing [
:
] or
[
9
]
(32)
will switch between them (See Note in “Folders
that can be displayed/saved” (Underline part), page 13)
≥
It is possible to give the folder a title. (page 61)
6) Press [ENTER]
(10)
Displaying JPEG pictures (Album
Display)
[CARD]
[HDD]
[RAM]
You can display a list of the JPEG pictures or display pictures one
by one from any folder existing on the PC card, HDD or DVD-RAM.
1
While stopped
Press [FUNCTIONS]
(11)
.
2
Use [
3
,
4
,
2
,
1
]
(10)
to select “JPEG” and press
[ENTER]
(10)
.
3
Select the folder for displaying.
(Refer to Selecting the
folder.)
4
Use [
3
,
4
]
(10)
to select “ALBUM” and press
[ENTER]
(10)
.
≥
A list of the JPEG pictures in the folder appears.
ª
To display JPEG pictures one by one
Use [
3
,
4
,
2
,
1
]
(10)
to select a JPEG picture and press
[ENTER]
(10)
.
≥
If there are more than 10 JPEG pictures, use [
3
,
4
,
2
,
1
]
(10)
to select “Next
1
” and press [ENTER]
(10)
. Select “
2
Back.” to
move back.
≥
While in the Slide Show, it is possible to perform this function.
≥
You can also select a page of JPEG pictures with the numeric
buttons
(4)
.
Example:
“2”: [0]
)
[0]
)
[2]
“12”: [0]
)
[1]
)
[2]
ª
To stop JPEG picture display
Press [RETURN]
(23)
. (The JPEG picture list containing the
picture you first selected will be displayed.)
ª
To select the next or previous JPEG picture
While in JPEG picture display, use [
2
,
1
]
(10)
.
[
1
]
(10)
: next JPEG picture
[
2
]
(10)
: previous JPEG picture
The JPEG picture changes every time the button is pressed.
Carry out insertion/removal of the PC card after turning
the unit off.
(2)
(3)
(4)
(1)
(1)
(2)
(3)
JPEG
RETURN
ENTER
SELECT
INPUT
PC CARD 100CDPFP
1/2
ALBUM
SLIDE SHOW
COPY
COPY ALL OF PC CARD
JPEG
JPEG
INPUT
RETURN
ENTER
PC CARD 100CDPFP
\DCIM\100CDPFP
Scene 0046
File 0046
001 100CDPFP
(b)
PC CARD
DVD
HDD
3
3
1
1
1
1
1
1
1
1
0
–
9
No.
(c)
(a)
JPEG
ALBUM
RETURN
ENTER
SELECT
INPUT
PC CARD 100CDPFP
Select Page
0
–
9
1 / 1
Back
Next
- - -
- - -
- - -
- - -
002
003
004
- - -
001 00:00.19
JPEG
RETURN
ENTER
SELECT
INPUT
PC CARD 100CDPFP
1/2
ALBUM
SLIDE SHOW
COPY
COPY ALL OF PC CARD
A
DVD(PAL).book 60 ページ 2003年5月13日 火曜日 午後12時3分
Содержание DMRHS2 - DVD RECORD.W/HD DRIV
Страница 94: ...94 ...


