64
VQT2J12
Changing the unit’s settings
You can change the unit’s settings using Setup menu.
≥
The settings remain intact even if you switch the unit to standby.
1
While stopped
Press [FUNCTION MENU].
2
Press [
3
,
4
] to select “Others” and
press [OK].
3
Press [
3
,
4
] to select “Setup” and
press [OK].
4
Press [
3
,
4
] to select the tab and
press [
1
].
5
Press [
3
,
4
] to select the menu and
press [OK].
6
Press [
3
,
4
] to select the option and
press [OK].
To return to the previous screen
Press [RETURN ].
To exit the screen
Press [EXIT].
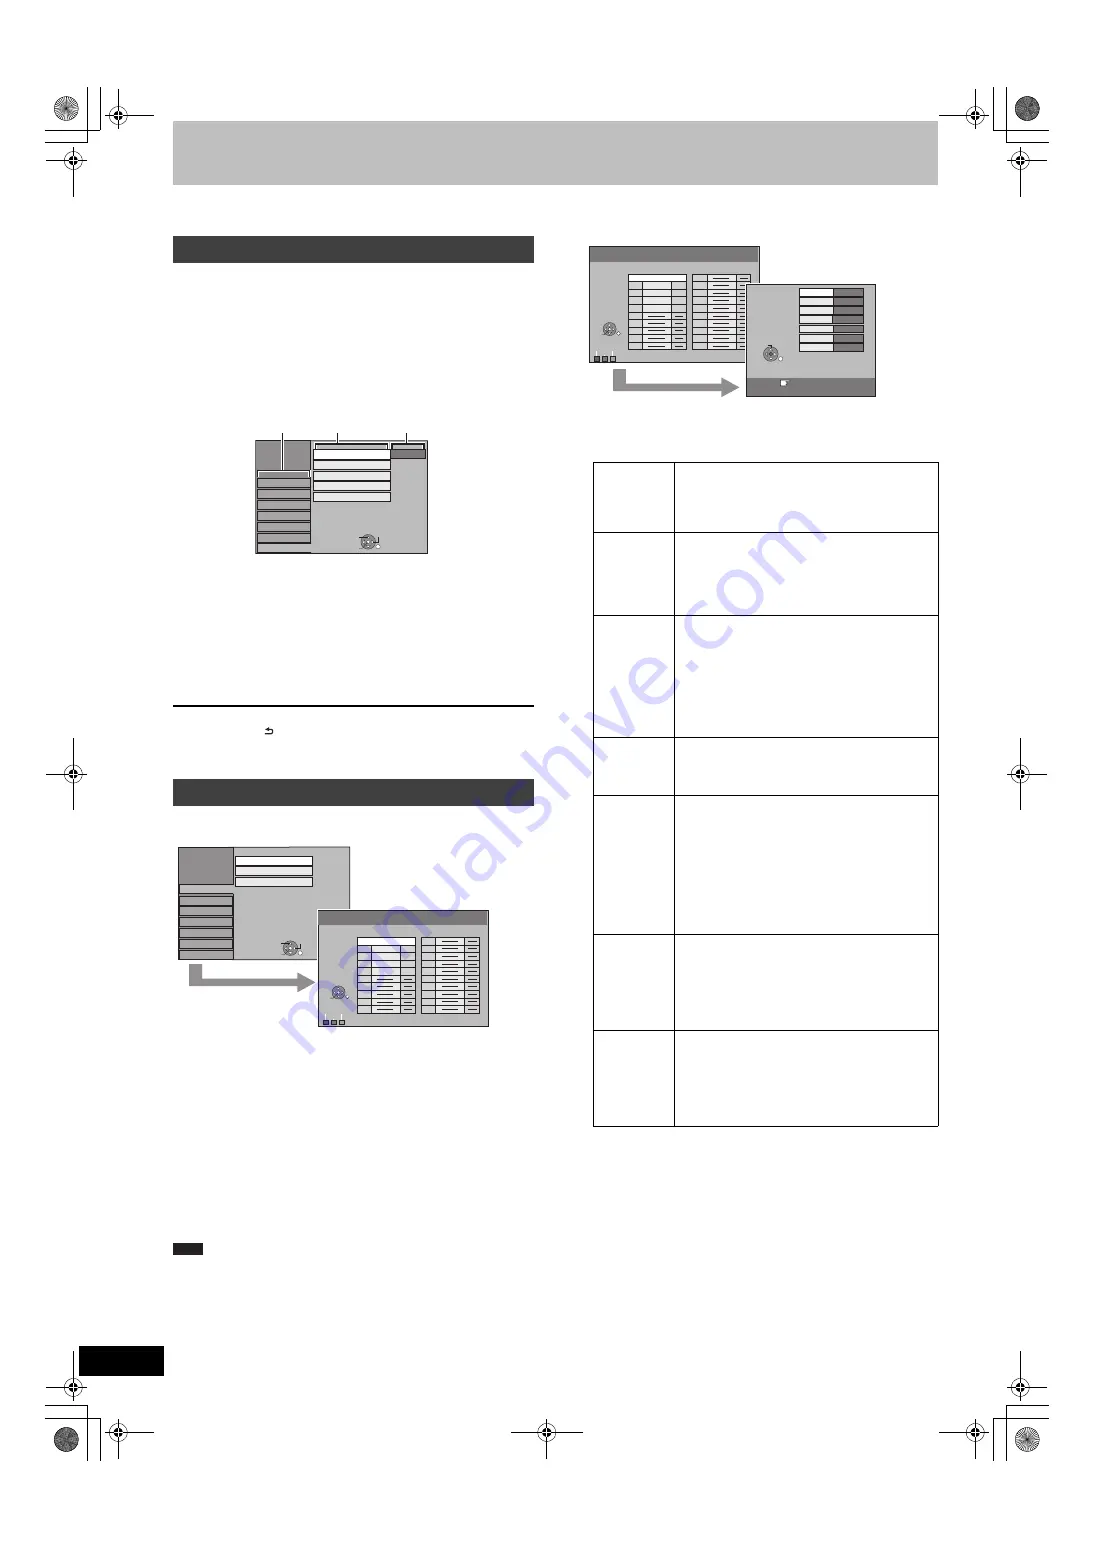
Manual Tuning
You can add or delete channels, or change programme positions.
§
If the confirmation screen appears, select “Yes” and press [OK] to
continue.
To delete a programme position
Press [
3
,
4
,
2
,
1
] to select a programme position and press the
“Red” button.
To add a blank programme position
Press [
3
,
4
,
2
,
1
] to select a programme position and press the
“Green” button.
To move a TV station to another programme position
1
Press [
3
,
4
,
2
,
1
] to select a programme position and press
the “Yellow” button.
2
Press [
3
,
4
] to select the new programme position to which you
want to assign the TV station and press [OK].
≥
When the unit sets itself automatically with VIERA Link or Q Link
function (
>
10), only deletion of the programme position can be
performed.
≥
If you delete programme position of “Host Channel”, the GUIDE
Plus+ data is also deleted.
≥
This unit does not support SECAM L, L’.
To change the tuning settings for individual programme
position
1
Press [
3
,
4
,
2
,
1
] to select a programme position and
press [OK].
2
Press [
3
,
4
] to select an item and press [
1
].
You can make the following two settings by selecting the external
input channel (AV1, AV2, AV3 (
[EH63]
)) in step
1
(
@
above).
≥
Video System (Auto/PAL/SECAM)
In order to record properly, make the appropriate settings to match
the connected equipment.
≥
Title Page (Auto/Off)
Common procedures
Tuning
Setup
Remote Control
Clock
DivX Registration
Initialize
DVD 1
Standby Settings
Disc
Picture
Sound
Display
Tuning
Connection
OK
RETURN
TAB
SELECT
Others
Tabs
Menus
Options
Setup
Manual Tuning
Auto Setup Restart
Download from TV
Disc
Picture
Sound
Display
Tuning
Connection
Others
OK
RETURN
TAB
SELECT
Manual Tuning
Pos Channel CH
Pos Channel CH
Delete
Add
Move
1 ARD 4
2 ZDF 2
3 N3 5
4 HR3 8
5 BR3 10
6
7
8
9
10
11
12
13
14
15
16
17
18
19
20
OK
RETURN
SELECT
Note
Pos
To change the programme position in which
the TV stations are assigned
Press [
3
,
4
] or numbered buttons to select the
number of the desired programme position and
press [OK].
Channel
To enter or change the Channel of a TV
station
Press [
3
,
4
,
2
,
1
] to enter station name and
press [OK].
If the
Channel
needs a blank space, select the
blank between “Z” and “
¢
”.
CH
To enter newly available TV stations or
change the CH number of an already tuned
TV station
Press [
3
,
4
] or the numbered buttons to enter
the CH number of the desired TV station.
Wait a few moments until the desired TV station
has been tuned.
After the desired TV station is tuned, press
[OK].
Fine Tuning
To obtain the best tuning condition
Press [
3
,
4
] to adjust the best tuning condition
and press [OK].
≥
Press [
1
] to return to “Auto”.
Video
System
To select the video system type
Press [
3
,
4
] to select “PAL” or “SECAM” if the
picture lacks colour, and press [OK].
≥
Auto
This unit automatically distinguishes PAL and
SECAM signals.
≥
PAL
For receiving PAL signals.
≥
SECAM
For receiving SECAM signals.
Mono
To select the type of sound to be recorded
Press [
3
,
4
] to select “On” if the stereo sound
is distorted due to inferior reception conditions,
or if you want to record the normal (mono)
sound during a stereo, bilingual or NICAM
broadcast, and press [OK].
Title Page
To enter the Teletext title page for a channel
Entering title page number allows the unit to
automatically record programme and channels.
Press [
3
,
4
] or numbered buttons to enter the
number and press [OK].
≥
To find the correct title page for the station,
refer to its Teletext TV guide.
Manual Tuning
Pos Channel CH
Pos Channel CH
Delete
Add
Move
1 ARD 4
2 ZDF 2
3 N3 5
4 HR3 8
5 BR3 10
6
7
8
9
10
11
12
13
14
15
16
17
18
19
20
OK
RETURN
SELECT
Pos
Channel
CH
Fine Tuning
Video System
1
4
Auto
RETURN : leave
Manual
Tuning
ARD
Auto
Mono
Off
Title Page
301
RETURN
SELECT
DMR-EH6353EC-VQT2J12_eng.book 64 ページ 2010年1月20日 水曜日 午前11時45分


