41
9.1.3.
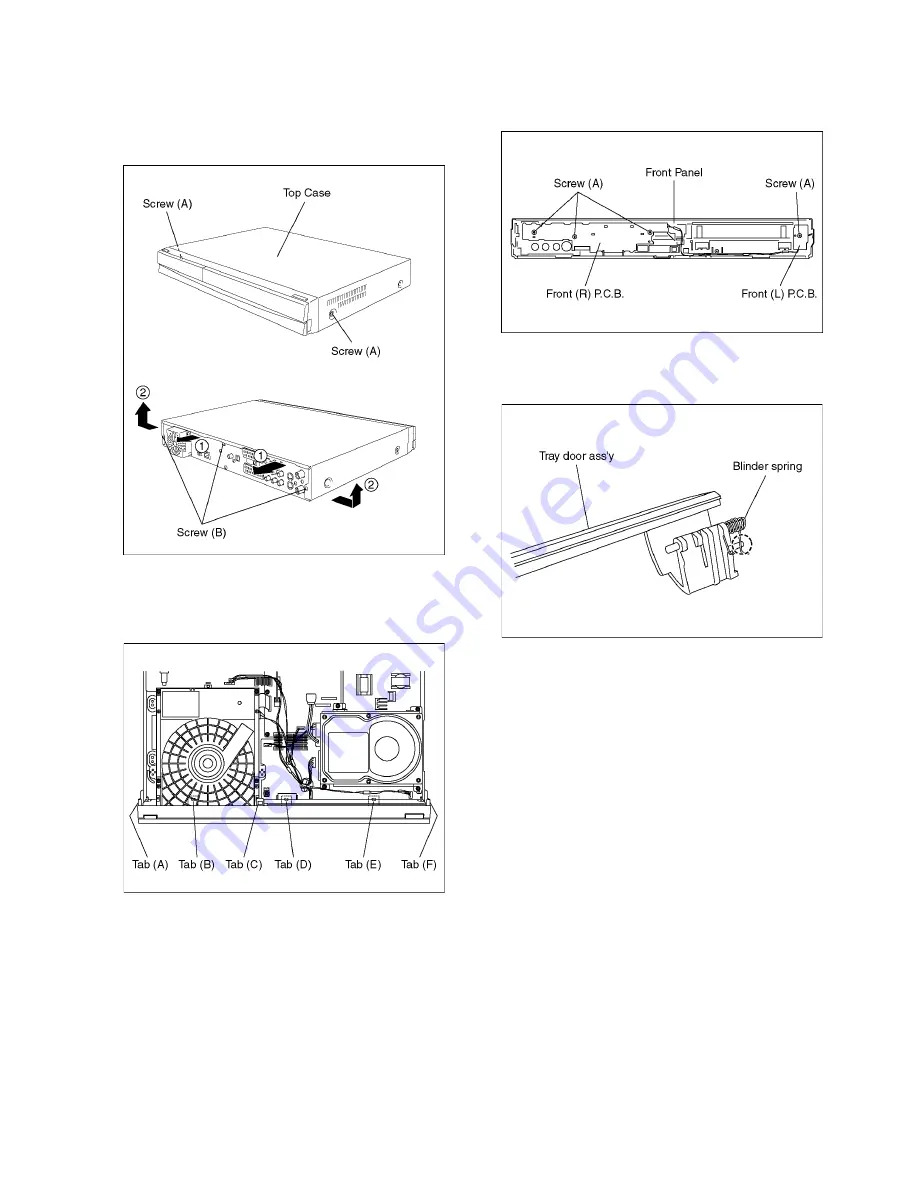
Top Case
1. Remove 2 Screws (A) and 3 Screws (B).
2. Slide the Top Case rearward and open the both ends at
rear side of the Top Case a little and lift the Top Case in
the direction of the arrows.
9.1.4.
Front Panel
1. Unlock 6 tabs (A) - (F) turn.
2. Pull with the Front Panel in the direction of your side.
9.1.5.
Front (L) P.C.B., Front (R) P.C.B.
1. Remove 4 Screws (A) to remove the Front (L) and Front
(R) P.C.B.
9.1.5.1.
How to assemble Tray door ass’y
1. Attach the Blinder spring to Tray door ass’y.
Содержание DMR-BW500EF
Страница 5: ...5 2 2 Precaution of Laser Diode ...
Страница 13: ...13 4 Specifications ...
Страница 14: ...14 ...
Страница 15: ...15 ...
Страница 16: ...16 5 Location of Controls and Components ...
Страница 17: ...17 ...
Страница 40: ...40 9 1 2 P C B Positions ...
Страница 49: ...49 9 2 6 Grease ...
Страница 50: ...50 9 2 7 How to Clean the Lens of Optical Pick UP Follow the 9 2 1 Upper Base Ass y ...
Страница 52: ...52 10 1 2 Checking and Repairing of BD Drive ...
Страница 53: ...53 10 1 3 Checking and Repairing of AV IO P C B ...
Страница 54: ...54 10 1 4 Checking and Repairing of HDD ...
Страница 112: ...S8 2 Frame and Casing Section 2 S 57 50 51 49 46 45 44 43 47 53 54 52 55 48 41 42 ...
Страница 114: ...S8 4 Packing Parts and Accessories Section S 59 A5 A1 A3 A2 PC1 PC3 A8 A6 PC2 A9 A9 1 BATTERY REMOTE CONT A4 ...


