background image

VQT1S36

120

Connecting to other equipment

Note

Depending on the [ASPECT RATIO], bands may be displayed on the top and bottom or the left 
and right of the pictures.

Do not use any other cables except a genuine Panasonic component cable (DMW-HDC2; 
optional).

Audio will be output as monaural.

When you play back a picture vertically, it may be blurry.

Image is not displayed on the LCD monitor/Viewfinder when the component cable is 
connected.

There are some playback menus that cannot be used while the component cable is connected.


(P134)

When pictures are displayed, they may not be displayed properly depending on the type of TV.

Read the operating instructions for the TV.

Using the Conversion Lens (optional)

With the optional conversion lenses, you can record even more faraway pictures and take 
close-up pictures of smaller subjects. 
Refer to 

P93

 for details.

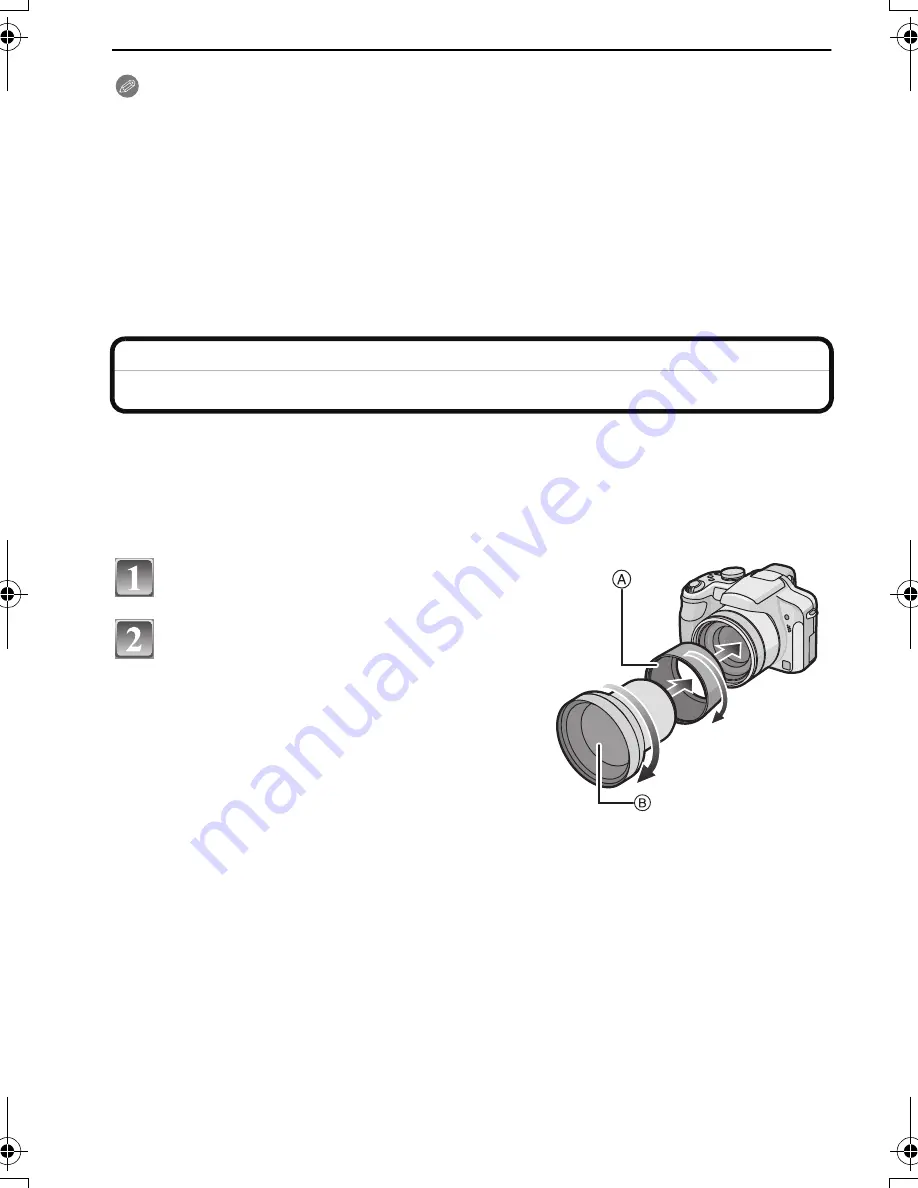
Preparations: Remove the lens cap, lens hood, and hood adaptor.

Attach the lens adaptor.

Rotate the lens adaptor slowly and carefully.

Attach the tele conversion lens.

A

Lens adaptor (DMW-LA3; optional)

B

Tele conversion lens (DMW-LT55; optional)

Close-up lens (DMW-LC55; optional) can be 
attached in a similar manner.

DMC-FZ28P_PC.book  120 ページ  2008年7月2日 水曜日 午後11時14分

Содержание DMC FZ28K - Lumix Digital Camera

Страница 1: ... this product please read the instructions completely VQT1S36 For USA assistance please call 1 800 211 PANA 7262 or contact us via the web at http www panasonic com contactinfo For Canadian assistance please call 1 800 99 LUMIX 1 800 995 8649 or send e mail to lumixconcierge ca panasonic com PC P ...

Страница 2: ...c of your Digital Camera may look somewhat different from those shown in the illustrations in these Operating Instructions SDHC Logo is a trademark Microsoft product screen shot s reprinted with permission from Microsoft Corporation Other names company names and product names printed in these instructions are trademarks or registered trademarks of the companies concerned A lithium ion battery that...

Страница 3: ... if not installed and used in accordance with the instructions may cause harmful interference to radio communications However there is no guarantee that interference will not occur in a particular installation If this equipment does cause harmful interference to radio or television reception which can be determined by turning the equipment off and on the user is encouraged to try to correct the in...

Страница 4: ...rence that may cause undesired operation Information on Disposal in other Countries outside the European Union This symbol is only valid in the European Union If you wish to discard this product please contact your local authorities or dealer and ask for the correct method of disposal CAUTION Battery pack Lithium ion battery pack Use the specified unit to recharge the battery pack Do not use the b...

Страница 5: ...ondensation When the lens or the Viewfinder is fogged up Condensation occurs when the ambient temperature or humidity changes Be careful of condensation since it causes lens stains fungus and camera malfunction If condensation occurs turn the camera off and leave it for about 2 hours The fog will disappear naturally when the temperature of the camera becomes close to the ambient temperature Read t...

Страница 6: ...LAY 40 Confirm the picture in REC mode Review 41 Displaying Multiple Screens Multi Playback 41 Using the Playback Zoom 41 Switching the PLAYBACK mode 42 Deleting Pictures 42 To delete a single picture 42 To delete multiple pictures up to 50 or all the pictures 43 Advanced Recording pictures About the LCD Monitor Viewfinder 44 Taking Pictures using the Built in Flash 46 Switching to the appropriate...

Страница 7: ...EDIT 100 TEXT STAMP 101 Q RESIZE 103 TRIMMING 104 LEVELING 105 ASPECT CONV 105 N ROTATE M ROTATE DISP 106 Ü FAVORITE 107 O DPOF PRINT 108 P PROTECT 109 B AUDIO DUB 110 S COPY 110 Connecting to other equipment Connecting to a PC 112 Printing the Pictures 114 Selecting a single picture and printing it 115 Selecting multiple pictures and printing them 115 Print Settings 116 Playing Back Pictures on a...

Страница 8: ... is shipped Charge the battery before use Insert the battery and the card P17 When you do not use the card you can record or play back pictures on the built in memory P18 Refer to P19 when you use a card Turn the camera on to take pictures 1 Slide the REC PLAYBACK selector switch to 2 Press the shutter button to take pictures P32 Play back the pictures 1 Slide the REC PLAYBACK selector switch to 2...

Страница 9: ... to install the software to your PC 6 Shoulder Strap 7 Lens Cap Lens Cap String 8 Lens Hood A Silver B Black 9 Hood Adaptor SD Memory Card SDHC Memory Card and MultiMediaCard are indicated as card in the text The card is optional You can record or play back pictures on the built in memory when you are not using a card For information about optional accessories refer to the Digital Camera Accessory...

Страница 10: ... 56 57 60 The joystick is operated in two different ways it can be moved in the up down left and right directions to perform an operation or it can be pressed to select In these operating instructions it is pictured as shown in the figure below or described with 3 4 2 1 Example When the joystick is moved toward 2 left Place your finger on the right side of the joystick and move the joystick toward...

Страница 11: ...53 Auto bracket P54 Color bracket P54 Flash output adjustment P46 18 Zoom lever P38 19 Shutter button P32 74 20 AF FOCUS button P33 51 61 86 21 Mode dial P30 22 Camera ON OFF switch P20 23 Power lamp P32 24 AF MF button P59 25 Strap eyelet P13 Be sure to attach the strap when using the camera to ensure that you will not drop it 26 DIGITAL AV OUT socket P112 114 118 27 DC IN socket P112 114 Always ...

Страница 12: ...Battery door P17 32 Tripod receptacle When you use a tripod make sure the tripod is stable when the camera is attached to it Attaching the Lens Cap Strap Lens Cap When you turn the camera off carry the camera or play back the pictures attach the lens cap to protect the surface of the lens Pass the string through the hole on the lens cap Pass the same string through the hole on the camera 30 31 32 ...

Страница 13: ...p to the other side of the camera being careful not to twist it Check that the strap is firmly attached to the camera Attach the strap so that the LUMIX LOGO is on the outside Attaching the Lens Hood In bright sunlight or backlight the lens hood will minimize lens flare and ghosting The lens hood cuts off excess lighting and improves the picture quality Check that the camera is turned off Close th...

Страница 14: ...portion of the photo may turn dark vignetting effect and the control of the flash may be disabled because the photo flash may be obscured by the lens hood We recommend detaching the lens hood When using the AF assist lamp in the dark detach the lens hood For details on how to attach the MC protector ND filter and PL filter refer to P122 You cannot attach the conversion lens when the hood adaptor i...

Страница 15: ...function The battery will be exhausted if left for a long period of time after being charged The battery can be recharged even when it still has some charge left but it is not recommended that the battery charge be frequently topped up while the battery is fully charged The battery has characteristics that will reduce its operating duration and cause the battery to swell up When the operating time...

Страница 16: ...attery Starting recording 30 seconds after the camera is turned on When the optical image stabilizer function is set to AUTO Recording once every 30 seconds with full flash every second recording Rotating the zoom lever from Tele to Wide or vice versa in every recording Turning the camera off every 10 recordings and leaving it until the temperature of the battery decreases The number of recordable...

Страница 17: ...time may become shorter as the number of times it is charged increases For long term battery use we recommend you do not frequently charge the battery before it is exhausted The performance of the battery may temporarily deteriorate and the operating time may become shorter in low temperature conditions e g skiing snowboarding Inserting and Removing the Card optional the Battery Check that this un...

Страница 18: ...ove the battery while the power is on as the settings on the camera may not be stored properly The supplied battery is designed only for the camera Do not use it with any other equipment Before removing the card or battery turn the camera off and wait until the power lamp has gone off completely Otherwise this unit may no longer operate normally and the card itself may be damaged or the recorded p...

Страница 19: ...ts battery or card or disconnect the AC adaptor DMW AC7PP optional when the access indication is lit when pictures are being read or deleted or the built in memory or the card is being formatted P29 Furthermore do not subject the camera to vibration or impact The card or the data on the card may be damaged and this unit may no longer operate normally The data on the built in memory or the card may...

Страница 20: ...ight is displayed as AM 12 00 and noon is displayed as PM 12 00 This display format is common in the US and elsewhere Press MENU SET to set After completing the clock settings turn the camera off Then turn the camera back on switch to recording mode and check that the display reflects the settings that were performed When MENU SET has been pressed to complete the settings without the clock having ...

Страница 21: ...the camera Functions that cannot be set or will not work under some conditions Due to the camera s specifications it may not be possible to set some of the functions or some functions may not work in some of the conditions under which the camera is used For details refer to P130 MODE playback mode menu P40 94 to96 A REC PLAYBACK selector switch This menu lets you select the setting of the playback...

Страница 22: ...mera on A MENU SET button B REC PLAYBACK selector switch C Mode dial Slide the REC PLAYBACK selector switch to When selecting the PLAYBACK mode menu settings set the REC PLAYBACK selector switch to and proceed to step 4 Set the mode dial to Setting menu items Press MENU SET to display the menu You can switch menu screens from any menu item by rotating the zoom lever Switching to the SETUP menu 1 P...

Страница 23: ...o select AF MODE Select the item at the very bottom and press 4 to move to the second screen Press 1 Depending on the item its setting may not appear or it may be displayed in a different way Press 3 4 to select š Press MENU SET to set Using the quick menu Press and hold down the joystick in recording mode until the Q MENU is displayed Press 3 4 2 1 to select the menu item and the setting and then...

Страница 24: ...V the volume of the TV speakers does not change Refer to P61 for details U CLOCK SET Setting Date Time WORLD TIME Set the time in your home area and travel destination DESTINATION Travel destination area HOME Your home area TRAVEL DATE Set the departure date and the return date of the vacation TRAVEL SETUP OFF SET LOCATION OFF SET r BEEP This allows you to set the beep and shutter sound r BEEP LEV...

Страница 25: ... mode Fn BUTTON SET Assign REC Mode Menu to 4 button It is convenient to register REC Mode Menu that is used often REVIEW SENSITIVITY WHITE BALANCE METERING MODE AF MODE I EXPOSURE MONITOR VIEWFINDER You can adjust the brightness of the monitor or the Viewfinder in 7 steps LCD MODE These menu settings make it easier to see the LCD monitor when you are in bright places or when you are holding the c...

Страница 26: ...to turn on the LCD monitor again AUTO LCD OFF does not work while operating menu or playback zoom AV and HD output is turned off while LCD monitor is turned off HIGHLIGHT When the auto review or the review function is activated white saturated areas blink in black and white OFF ON MF ASSIST In manual focus the assistance screen appears on the center of the screen to facilitate focusing on the subj...

Страница 27: ...t YES to reset the folder number When the RESET setting is selected during recording the operation that resets the lens is also performed at the same time You will hear the sound of the lens operating but this is normal and not indicative of malfunctioning When SETUP menu settings are reset the following settings are also reset In addition FAVORITE P107 in PLAYBACK mode menu is set to OFF and ROTA...

Страница 28: ...ied y SELECT ON CONNECTION Select either PC or PictBridge PTP if you connected the camera to a PC or a printer supporting PictBridge PictBridge PTP Set after or before connecting to a printer supporting PictBridge z PC Set after or before connecting to a PC VIDEO OUT Set to match the color television system in each country Playback mode only NTSC Video output is set to NTSC system PAL Video output...

Страница 29: ...ayed Press DISPLAY to close JITTER SUBJ MOVE DEMO Press MENU SET to close AUTO DEMO JITTER SUBJ MOVE DEMO is an approximation AUTO DEMO has no TV output capability You can also display JITTER SUBJ MOVE DEMO by using the quick menu P23 FORMAT The built in memory or card is formatted Formatting irretrievably deletes all the data so check the data carefully before formatting LANGUAGE Set the language...

Страница 30: ... Turn the camera on A REC PLAYBACK selector switch Slide the REC PLAYBACK selector switch to Switching the mode by rotating the mode dial Align a desired mode with part B Rotate the mode dial slowly and surely to adjust to each mode The mode dial rotates 360 o The screen C is displayed on the LCD monitor Viewfinder when the mode dial is turned Basic Intelligent auto mode P32 The subjects are recor...

Страница 31: ...mode P62 Use this mode to take pictures with previously registered settings Motion picture mode P74 This mode allows you to record motion pictures Û Scene mode P66 This allows you to take pictures that match the scene being recorded Portrait mode P63 Use this mode to take pictures of people Scenery mode P64 Use this mode to take pictures of scenery Sports mode P65 Use this mode to take pictures of...

Страница 32: ...to ñ Hold this unit gently with both hands keep your arms still at your side and stand with your feet slightly apart A AF assist lamp The power lamp 3 lights when you turn this unit on 2 It turns off after about 1 second 1 Shutter button Press the shutter button halfway to focus The focus indication 1 green lights when the subject is focused The AF area 2 is displayed around the subject s face by ...

Страница 33: ...cified subject will be chosen when set to AF tracking P86 Face detection When or is selected the camera automatically detects a person s face and it will adjust the focus and exposure P85 Note Due to conditions such as the ones below a different scene may be identified for the same subject Subject conditions When the face is bright or dark The size of the subject The distance to the subject The co...

Страница 34: ...ASPECT RATIO P80 COLOR EFFECT P89 AF TRACKING P86 The settings which can be selected are different from when other REC modes are used SETUP menu CLOCK SET WORLD TIME TRAVEL DATE BEEP LANGUAGE The settings of the following items are fixed About the flash Settings in Intelligent auto mode Item Settings Fn BUTTON SET P25 o GUIDE LINE P25 REC INFO OFF ECONOMY POWER SAVE P26 5MIN AUTO REVIEW P27 2SEC F...

Страница 35: ...d in the Intelligent auto mode REC mode Taking pictures with your favorite settings Program AE mode Many more menu items can be set and you can take pictures with greater freedom than when you take pictures in the Intelligent auto mode P32 Slide the REC PLAYBACK selector switch to A Mode dial B REC PLAYBACK selector switch Set the mode dial to To change the setting while taking pictures refer to U...

Страница 36: ...ry the actions in step 1 before pressing the shutter button fully We recommend that you use the face detection function when taking pictures of people P84 Press the shutter button halfway to focus The focus range is 30 cm 0 99 feet Wide 2 m 6 57 feet Tele to If pictures are to be taken at an even closer range refer to Taking Close up Pictures P51 Press the halfway pressed shutter button fully to t...

Страница 37: ... held vertically are played back vertically rotated Only when ROTATE DISP P106 is set to ON Pictures may not be displayed vertically if they were taken with the camera aimed up or down Pictures cannot be displayed vertically when recording motion pictures or creating flip animations This unit will remember the focus point during the recording and it can be enlarged with that point as a center Pres...

Страница 38: ...re value and shutter speed turns red Program shift is canceled and the camera returns to normal program AE mode if more than 10 seconds pass after program shift is activated However the program shift setting is memorized Depending on the brightness of the subject program shift may not be activated REC mode Taking Pictures with the Zoom You can zoom in to make people and objects appear closer or zo...

Страница 39: ...me Tele position You can enter the digital zoom range by continuously rotating the zoom lever to Tele or releasing the zoom lever once and then rotating it to Tele again Extended optical zoom mechanism When you set the picture size to 3 million pixels the 10M 10 1 million pixels CCD area is cropped to the center 3M 3 million pixels area allowing a picture with a higher zoom effect Feature Optical ...

Страница 40: ...R may not be effective When using the digital zoom we recommend using a tripod and the self timer P52 for taking pictures PLAYBACK mode Playing back Pictures NORMAL PLAY Press 2 1 to select the picture A File number B Picture number Speed of picture forwarding rewinding changes depending on the playback status Fast forwarding Fast rewinding Press and hold 2 1 during playback The file number A and ...

Страница 41: ...le Image File Format Files which do not comply with the DCF standard cannot be played back The lens barrel retracts about 15 seconds after switching from REC mode to PLAYBACK mode You can also delete the recording information etc on the LCD monitor Viewfinder during playback zoom by pressing DISPLAY If you want to save the enlarged picture use the trimming function P104 The playback zoom may not o...

Страница 42: ...and then press MENU SET NORMAL PLAY P40 All the pictures are played back SLIDE SHOW P94 The pictures are played back in sequence CATEGORY PLAY P96 The pictures grouped together in categories are played back FAVORITE PLAY P96 Your favorite pictures are played back FAVORITE PLAY is not displayed when FAVORITE has not been set To delete a single picture Select the picture to be deleted and then press...

Страница 43: ...DELETE ALL or ALL DELETE EXCEPT Ü the deleting will stop halfway Depending on the number of pictures to be deleted it may take some time to delete them If pictures do not conform to the DCF standard or are protected P109 they will not be deleted even if DELETE ALL or ALL DELETE EXCEPTÜ is selected To delete multiple pictures up to 50 or all the pictures Press Press 3 4 to select DELETE MULTI or DE...

Страница 44: ...97 and during a slide show P94 you can only select Normal display I or No display K In recording mode E Normal display 1 F No display G No display Recording guide line 1 2 H Out of frame display In playback mode 1 If the HISTOGRAM in SETUP menu is set to ON histogram will be displayed 2 Set the pattern of the guide lines displayed by setting GUIDE LINE in SETUP menu You can also set whether or not...

Страница 45: ... switch the display to the LCD monitor even when using the Viewfinder to record When switching from recording mode to playback mode When reviewing pictures When turning the camera on in playback mode Recording guide line When you align the subject on the horizontal and vertical guide lines or the cross point of these lines you can take pictures with well designed composition by viewing the size th...

Страница 46: ...RRY SKY or FIREWORKS in scene mode P66 When the flash is closed When the brightness of the screen is not correctly displayed in dark places When the exposure is not adequately adjusted The histogram is an approximation in recording mode The histogram of a picture may not match in recording mode and playback mode The histogram displayed in this camera does not match histograms displayed by picture ...

Страница 47: ... make it necessary AUTO Red eye reduction The flash is automatically activated when the recording conditions make it necessary It is activated once before the actual recording to reduce the red eye phenomenon eyes of the subject appearing red in the picture and then activated again for the actual recording Use this when you take pictures of people in low lighting conditions Forced flash ON Forced ...

Страница 48: ...s selected iˆ or i is set depending on the type of subject and brightness The flash setting may change if the recording mode is changed Set the flash setting again if necessary The flash setting is memorized even if the camera is turned off However the advanced scene mode or the scene mode flash setting is reset to the initial setting when the advanced scene mode or the scene mode is changed Œ Œ ñ...

Страница 49: ... can adjust from j2 EV to i2 EV in steps of 1 3 EV Select 0 EV to return to the original flash output 2 Press MENU SET to close the menu You can also close the menu by pressing the shutter button halfway Note When the flash output is adjusted the flash output value appears on the upper left of the screen The flash output setting is memorized even if the camera is turned off Shutter speed for each ...

Страница 50: ...take a picture beyond the available flash range the exposure may not be adjusted properly and the picture may become bright or dark When the flash is being charged the flash icon blinks red and you cannot take a picture even when you press the shutter button fully When AUTO LCD OFF is set the LCD monitor turns off and the power lamp lights The white balance may not be properly adjusted if the flas...

Страница 51: ...res of flowers on the ground standing or take close up pictures of insects that may run away when you get too close Jitter may occur when using the tele macro function If you cannot use a tripod it is recommended to take a picture in the light condition that will allow aperture setting of F4 0 or above and shutter speed of 1 125 or higher to maintain the jitter compensation function If you focus o...

Страница 52: ...before recording In dark places the self timer indicator will blink and then may turn on brightly operating as an AF assist lamp P91 to allow the camera to focus on the subject We recommend using a tripod when recording with the self timer The number of pictures which can be taken in burst mode is fixed to 3 The number of pictures which can be taken in FLASH BURST P70 is fixed to 5 Press 2 ë Press...

Страница 53: ...t the following examples Operate with the joystick Tilt the joystick toward 2 to select È and then move 3 4 to compensate the exposure A Exposure compensation value Select È only to return to the original exposure 0 EV Press the shutter button halfway to finish Note EV is an abbreviation of Exposure Value It refers to the amount of light given to the CCD by the aperture value and the shutter speed...

Страница 54: ...e selected modes are automatically recorded each time the shutter button is pressed Press DISPLAY to display COLOR BRACKET from the auto bracket It is switched between auto bracket and color bracket every time DISPLAY is pressed Press 2 1 to select the mode Auto Bracket 1st picture 2nd picture 3rd picture d0 EV j1 EV i1 EV Press 3 È until AUTO BRACKET appears set the compensation range of the expo...

Страница 55: ...less of the auto review setting The picture is not enlarged You cannot set the auto review function in the SETUP menu In shutter priority AE and manual exposure if the shutter speed is set to more than 1 second auto bracket is canceled Œ is set for the flash when auto bracket color bracket is set Burst is canceled when auto bracket color bracket is set The one set last will take precedence auto br...

Страница 56: ...taking pictures in a place landscape indoors outdoors etc where there is a large difference between the light and shade it may take time until the exposure is stable If burst is used at this time the exposure may not become optimal The burst speed pictures second may become slower depending on the recording environment such as in dark places if the ISO sensitivity is high etc Burst mode is not can...

Страница 57: ... Check the pictures using the review function or playback mode Set the aperture value to a higher number when the subject is too bright Set the aperture value to a lower number when the subject is too dim The aperture value and the shutter speed displayed on the screen turn red when the exposure is not adequate We recommend using a tripod when the shutter speed is slow cannot be set for shutter pr...

Страница 58: ...ay differ from the brightness of the actual pictures Check the pictures using the review function or playback mode If the exposure is not adequate the aperture value and the shutter speed turn red when the shutter button is pressed halfway for flash cannot be set The SENSITIVITY is automatically set to ISO100 when you switch the recording mode to Manual exposure while the SENSITIVITY is set to AUT...

Страница 59: ...uto focus Press and hold AF MF until the focus range is displayed is displayed while in manual focus mode Press and hold AF MF again to cancel the manual focus mode Available Shutter Speed Sec Per 1 3 EV Aperture Value 8 6 5 4 3 2 F2 8 to F8 0 2 5 2 1 6 1 3 1 1 1 3 1 1 6 1 2 1 2 5 1 3 2 1 4 1 5 1 6 1 8 1 10 1 13 1 15 1 20 1 25 1 30 1 40 1 50 1 60 1 80 1 100 1 125 1 160 1 200 1 250 1 320 1 400 1 50...

Страница 60: ...ish Changing the zoom area The magnified area can be changed while the screen is expanded using MF Assist This is convenient when you want to change the focus position to take pictures 1 Display MF Assist with 3 4 on the joystick 2 Change the area to be expanded with the cursor buttons 3 4 2 1 3 Press MENU SET to set The following will return the MF assistance to the original position Changing the...

Страница 61: ...ng recording If you focus on the subject in Wide and then rotate the zoom lever to Tele the focus may not be adequate In this case focus on the subject again The MF assistance does not appear when using the digital zoom The distance to the subject displayed on the screen in manual focus is an approximation of the focus position Use the MF assistance screen for a final check of the focus After canc...

Страница 62: ...de You can select one of your own custom settings saved with CUST SET MEM to suit the picture taking conditions Initial setting of the program AE mode is registered as the custom settings initially Slide the REC PLAYBACK selector switch to Set the Mode Dial to or A Display custom settings When set to You can take pictures with the custom settings registered in the is displayed on the screen When s...

Страница 63: ...enes and flowers in accordance with the surrounding conditions Slide the REC PLAYBACK selector switch to Set the mode dial Press 3 4 to select the advanced scene mode Press MENU SET to set The menu screen is switched to the recording screen in the selected advanced scene mode About the information If you press DISPLAY when selecting an advanced scene mode in step 3 explanations about each advanced...

Страница 64: ...part of the background etc is a color close to skin color this part is also smoothed When SOFT SKIN is selected this mode may not be effective when there is insufficient brightness OUTDOOR PORTRAIT Prevents faces from appearing dark when photographing outside INDOOR PORTRAIT Sets the ISO sensitivity setting to the appropriate setting to prevent blurring of photo subject for indoor photography CREA...

Страница 65: ...ange in which the focus is adjusted is shown below NIGHT PORTRAIT 0 9 m 2 95 feet to 5 m 16 4 feet Wide SPORTS NORMAL SPORTS Controls the ISO sensitivity while stopping movement with a high shutter speed OUTDOOR SPORTS Fast shutter speed for stopping movement when taking photographs outdoors in good weather INDOOR SPORTS Increases the ISO sensitivity and increases the shutter speed to prevent blur...

Страница 66: ...bject is changed after focusing on the subject it may become difficult to focus on it again Close up mode gives priority to a subject close to the camera Therefore if the subject is 50 cm 1 64 feet or more from the camera achieving focus may take some time When you take pictures at close range the resolution of the periphery of the picture may decrease slightly This is not a malfunction If the len...

Страница 67: ...cally adjusts them to the optimal setting INTELLIGENT ISO SENSITIVITY ISO LIMIT SET METERING MODE I EXPOSURE COLOR EFFECT PICT ADJ MIN SHTR SPEED FLASH SYNCHRO I EXPOSURE is activated automatically in the following scene modes PARTY CANDLE LIGHT BABY1 BABY2 SUNSET HIGH SENS Select this when you want to take pictures at a wedding reception an indoor party etc This allows you to take pictures of peo...

Страница 68: ...n when the birthday or name has been set the age or name will not be displayed Before taking pictures set AGE or NAME to ON The focus range is 1 cm 0 04 feet Wide 2 m 6 57 feet Tele to INTELLIGENT ISO is activated and maximum ISO sensitivity level becomes ISO400 If the camera is turned on with BABY1 BABY2 set the age and name are displayed at the lower left of the screen for about 5 seconds along ...

Страница 69: ...is is a convenient mode for shooting rapid movement or a decisive moment 1 Press 3 4 to select SPEED PRIORITY or IMAGE PRIORITY and then press MENU SET to set 2 Press 3 4 to select the picture size and aspect ratio and then press MENU SET to set 3M 4 3 2 5M 3 2 or 2M 16 9 is selected as the picture size 3 Take pictures Still pictures are taken continuously while the shutter button is pressed fully...

Страница 70: ...inting The focus range is 1 cm 0 04 feet Wide 2 m 6 57 feet Tele to The focus zoom exposure shutter speed ISO sensitivity and flash level are fixed to the settings for the first picture INTELLIGENT ISO will automatically set the maximum ISO sensitivity to ISO3200 See the Note on P50 when using the FLASH BURST When you move the camera to follow a subject moving in one direction such as a runner or ...

Страница 71: ...ill not become a blur When the camera cannot follow the subject well You cannot set the stabilizer function mode to MODE2 or AUTO When you set it to MODE1 only vertical jitters can be compensated This allows you to take vivid pictures of a starry sky or a dark subject Setting the shutter speed Select a shutter speed of 15 SEC 30 SEC or 60 SEC 1 Press 3 4 to select the number of seconds and then pr...

Страница 72: ... steps 1 to 5 for prefocus This mode is most effective when the subject is 10 m 32 8 feet or more away The shutter speed becomes the following When OFF is set on the optical image stabilizer function Fixed to 2 seconds When AUTO MODE1 or MODE2 is set on the optical image stabilizer function 1 4th of a second or 2 seconds The shutter speed becomes 2 seconds only when the camera has determined that ...

Страница 73: ...atio Press 3 4 to select the picture size and aspect ratio and then press MENU SET to set 3M 4 3 2 5M 3 2 or 2M 16 9 is selected as the picture size Note QUALITY is automatically fixed to You can take pictures suitable for 4qk6q 10k15 cm printing The focus range is 1 cm 0 04 feet Wide 2 m 6 57 feet Tele to Face detection may not operate normally in the dark areas around the edges of the screen Pic...

Страница 74: ...me B is displayed on the top right and the elapsed recording time C is displayed on the bottom right of the screen After pressing the shutter button fully release it straight away If the button is held down the sound will not be recorded for a few seconds when recording starts When the subject is focused the focus indication lights You cannot change the zoom speed P39 The audio is also recorded si...

Страница 75: ... pictures This is not a malfunction When motion pictures recorded with the camera are played back on other equipment the quality of the picture and sound may deteriorate and it may not be possible to play them back Also the recording information may not be displayed correctly This unit does not support recording motion pictures on MultiMediaCards The angle of field may be narrower in compared to s...

Страница 76: ...01 The number of days since the departure date the trip destination can be printed out using the PHOTOfunSTUDIO viewer bundled software on the CD ROM supplied Select CLOCK SET to set the current date and time in advance P20 Select TRAVEL DATE from the SETUP menu and then press 1 Press 3 to select TRAVEL SETUP and then press 1 Press 4 to select SET and then press MENU SET Press 3 4 2 1 to set the d...

Страница 77: ...t to OFF in step 3 Note The travel date is calculated using the date in the clock setting and the departure date you set If you set WORLD TIME P78 to the DESTINATION the travel date is calculated using the date of the travel destination The travel date setting is memorized even if the camera is turned off If TRAVEL DATE is set to OFF the number of days that have passed since the departure date wil...

Страница 78: ...then press MENU SET Press 2 1 to select the home area and then press MENU SET A Current time B Time difference from GMT Greenwich Mean Time If daylight saving time is used at the home area press 3 Press 3 again to return to the original time The daylight saving time setting for the home area does not advance the current time Advance the clock setting by one hour Press 3 to select DESTINATION and t...

Страница 79: ... aspect ratio is X This item cannot be set in the Intelligent auto mode When the aspect ratio is Y When the aspect ratio is W Note EZ is an abbreviation of Extended optical Zoom A digital picture is made of numerous dots called pixels The higher the numbers of pixels the finer the picture will be when it is printed on a large piece of paper or displayed on a PC monitor A Many pixels Fine B Few pix...

Страница 80: ...of recordable pictures You can enjoy more advanced picture editing if you use RAW files You can save RAW files in a file format JPEG TIFF etc that can be displayed on your PC etc develop them and edit them using the software SILKYPIX Developer Studio by Ichikawa Soft Laboratory on the CD ROM supplied images are recorded with a smaller data volume than The following PLAYBACK mode menu can be used f...

Страница 81: ...O LIMIT SET when set to ON When the ISO LIMIT SET is set to AUTO it will be set automatically within the range up to ISO800 depending on the brightness For details on REC mode menu settings refer to P22 This allows the sensitivity to light ISO sensitivity to be set Setting to a higher figure enables pictures to be taken even in dark places without the resulting pictures coming out dark Applicable ...

Страница 82: ...tions where the color of white takes on a reddish or bluish tinge this item adjusts to the color of white which is closest to what is seen by the eye in accordance with the light source Applicable modes It cannot be selected in the motion picture mode Note The optimal white balance will differ depending on the type of halogen lighting being recorded under so use AWB or The white balance might not ...

Страница 83: ...you are not finely adjusting the white balance The white balance fine adjustment setting is reflected in the picture when using the flash You can finely adjust the white balance independently for each white balance item The white balance fine adjustment setting is memorized even if the camera is turned off The white balance fine adjustment level returns to the standard setting center point in the ...

Страница 84: ...d and AF MODE is set to š the camera will adjust the exposure to suit the person s face For details on REC mode menu settings refer to P22 This allows the focusing method that suits the positions and number of the subjects to be selected Applicable modes C METERING MODE C Multiple This is the method in which the camera measures the most suitable exposure by judging the allocation of brightness on ...

Страница 85: ...e following cases the facial recognition function may fail to work making it impossible to detect faces AF MODE is switched to When the face is not facing the camera When the face is at an angle When the face is extremely bright or dark When there is little contrast on the faces When the facial features are hidden behind sunglasses etc When the face appears small on the screen When there is rapid ...

Страница 86: ...en the subject is moving too fast When the background has the same or similar color to the subject When jitter is occurring When using the zoom About AF area selection You can select the AF area by pressing AF FOCUS when ƒ Ø or Ù is selected It is also possible to switch to AF area selection screen by pressing 1 when AF mode is selected with 3 4 You can set from the quick menu P23 When selecting ƒ...

Страница 87: ...y Continuous AF can be selected About and will adjust the focus automatically when the jitter of the camera gets small will adjust the focus at all times continuous AF operation The camera will adjust the focus automatically and the focus adjustment when the shutter button is pressed becomes faster It is effective when you do not want to miss the photo opportunity Note The battery will be consumed...

Страница 88: ...performed after locking Perform the locking again For details on REC mode menu settings refer to P22 Contrast and exposure will be adjusted automatically when there is a big difference in brightness between the background and subject to bring the image close to how you see Applicable modes OFF LOW STANDARD HIGH Note is displayed when it is set to either LOW STANDARD or HIGH Even if the ISO sensiti...

Страница 89: ...ly from the other recording modes COLOR EFFECT becomes disabled when color bracket is set For details on REC mode menu settings refer to P22 Adjusting the picture quality for the recorded pictures Applicable modes DIGITAL ZOOM H COLOR EFFECT OFF This is the standard setting B W The picture becomes black and white SEPIA The picture becomes sepia COOL The picture becomes bluish WARM The picture beco...

Страница 90: ...f camera jitter when you press the shutter button The setting is fixed to OFF in STARRY SKY in scene mode It cannot be set to AUTO or MODE2 in PANNING in scene mode or motion picture mode For details on REC mode menu settings refer to P22 You can take a picture brightly in dark places by setting MIN SHTR SPEED slower Also you can set it faster to reduce the blur of the subject Applicable modes 1 2...

Страница 91: ...n REC mode menu settings refer to P22 Illuminating the subject makes it easier for the camera to focus when recording in low light conditions that make focusing difficult Applicable modes B AUDIO REC OFF Audio will not be recorded ON B is displayed on the screen Audio will be recorded as soon as the image is recorded It will stop in 5 seconds F AF ASSIST LAMP OFF The AF assist lamp does not turn o...

Страница 92: ...cting images Applicable modes PICTURE CAPTURE Taking pictures for flip animation CREATE MOTION PICTURE Creating an animated file using the pictures taken with PICTURE CAPTURE DELETE STILL PICTURES To delete all pictures for flip animation Creating the flip animation 1 Select PICTURE CAPTURE and then press 1 2 Press the shutter button and capture the images one frame at a time The picture size is 3...

Страница 93: ...s You can play back created flip animations with the same method used to play back motion pictures P97 Playback may not be possible on other equipment You may also hear noise during playback on other equipment which does not have a mute function For details on REC mode menu settings refer to P22 With the optional conversion lenses you can record even more faraway pictures and take close up picture...

Страница 94: ...et to view the pictures you have taken Slide the REC PLAYBACK selector switch to and then press MENU SET Press 1 Press 3 4 to select SLIDE SHOW and then press MENU SET When ALL or FAVORITE has been selected in step 4 When CATEGORY SELECTION has been selected in step 4 Press 3 4 to select the item and then press MENU SET FAVORITE can be selected only when FAVORITE on the PLAYBACK menu P107 is at ON...

Страница 95: ...The pictures are played back with the recommended effects in each category SETUP DURATION or REPEAT can be set DURATION can be set only when OFF has been selected as the EFFECT setting AUDIO will be displayed only when the EFFECT is set to OFF Audio will be played along with the still picture with audio by setting the AUDIO to ON Note Motion pictures cannot be played back as a slide show It is not...

Страница 96: ...ard or the built in memory If you press while searching the searching will stop halfway Pictures are sorted into the categories shown below Still pictures created from a motion picture cannot be played back from the motion pictures category in category playback You can play back the pictures you have set as FAVORITE P107 Only when FAVORITE is set to ON and there are pictures which have been set to...

Страница 97: ...s the elapsed playback time is displayed on the upper right of the screen For example 8 minutes and 30 seconds is displayed as 8m30s Operations performed during motion picture playback The cursor displayed during playback is the same as 3 4 2 1 A Play Pause B Stop C Fast rewind Frame by frame rewind D Fast forward Frame by frame forward These operations can be performed only in the pause mode E Re...

Страница 98: ...t When using a high capacity card it is possible that fast rewinding may be slower than usual PLAYBACK mode Creating still pictures from a motion picture You can create a single still picture with 1 screen or 9 screens from a recorded motion picture This is effective in moving scenes when you want to look carefully at the movement of a sportsperson etc Press 3 to pause motion picture playback To s...

Страница 99: ...ted picture is created A new picture cannot be created if there is no free space on the built in memory or the card so we recommend checking that there is free space and then editing the picture You can display pictures by recording date Picture size Item 1 picture 9 pictures 2 M 2 M 0 3 M 2 M 0 3 M 1 M CALENDAR Select CALENDAR on the PLAYBACK mode menu P22 You can also rotate the zoom lever sever...

Страница 100: ...red it can be included in prints using TEXT STAMP P101 Only alphabetic characters and symbols can be entered Select TITLE EDIT on the PLAYBACK mode menu P22 Press 3 4 to select SINGLE or MULTI and then press MENU SET Press MENU SET to display the pictures that were recorded on the selected date Press to return to the calendar screen Press 3 4 2 1 to select a picture and then press MENU SET The pic...

Страница 101: ...NU SET 2 Press 3 Press MENU SET to close the menu MULTI setting 1 In step 4 delete all the texts select EXIT and press MENU SET 2 Press MENU SET to close the menu Note Text can be scrolled if all of the registered text does not fit on the screen The name setting of BABY1 BABY2 or PET in scene mode or LOCATION in travel date can also be registered by using the operation in steps 4 and following The...

Страница 102: ...SET If you set TEXT STAMP for a picture with a picture size larger than the picture size will become smaller as shown below The picture becomes slightly rougher Press 3 to select YES and then press MENU SET The message SAVE NEW PICTURES appears if the picture was recorded with a picture size or less Select the picture and then press MENU SET to set appears on screen if the picture is stamped with ...

Страница 103: ...ommend resizing to if you want to attach a picture to an e mail or use it on a website Pictures set to the minimum number of pixels for ASPECT RATIO cannot be further reduced in size Select RESIZE on the PLAYBACK mode menu P22 Q RESIZE Reducing the picture size number of pixels Press 3 4 to select SINGLE or MULTI and then press MENU SET Select the picture and size SINGLE setting 1 Press 2 1 to sel...

Страница 104: ...sible to resize pictures recorded with other equipment You can enlarge and then clip the important part of the recorded picture Select TRIMMING on the PLAYBACK mode menu P22 Press MENU SET Press 3 to select YES and then press MENU SET Press to return to the menu screen Press MENU SET to close the menu TRIMMING Press 2 1 to select the picture and then press MENU SET Use the zoom lever and press 3 4...

Страница 105: ...SET 1 clockwise 2 counterclockwise Up to 2 o can be adjusted Press 3 to select YES and then press MENU SET Press to return to the menu screen Press MENU SET to close the menu Note Quality of image may become coarse when levelling is performed Recorded pixels may decrease compared to original image when levelling is performed Levelling may not be performed on images recorded with other equipment Yo...

Страница 106: ...22 The ROTATE function is disabled when ROTATE DISP is set to OFF Press 2 1 to select the picture and then press MENU SET Motion pictures and protected pictures cannot be rotated Press 3 4 to select the direction to rotate the picture and then press MENU SET Press to return to the menu screen Press MENU SET to close the menu Press 2 1 to determine the horizontal position and press MENU SET to set ...

Страница 107: ...ITE on the PLAYBACK mode menu P22 Canceling all the FAVORITE settings 1 Select CANCEL on the screen shown in step 2 and then press MENU SET 2 Press 3 to select YES and then press MENU SET 3 Press MENU SET to close the menu You cannot select CANCEL if not even one picture has been set as a favorite Note You can set up to 999 pictures as favorites Rotate display The picture is automatically rotated ...

Страница 108: ...pictures recorded on the built in memory copy them to a card P110 and then set the DPOF setting For more information visit http panasonic jp dc dpof_110 white_e htm Select DPOF PRINT on the PLAYBACK mode menu P22 Press 3 4 to set the number of prints and then press MENU SET to set When MULTI has been selected repeat steps 3 and 4 for each picture It is not possible to use the same setting for a mu...

Страница 109: ... the DPOF print settings with other equipment In this case cancel all the settings and reset the settings If the file is not based on the DCF standard the DPOF print setting cannot be set You can set protection for pictures you do not want to be deleted by mistake Select PROTECT on the PLAYBACK mode menu P22 Press to return to the menu screen Press MENU SET to close the menu Canceling all the PROT...

Страница 110: ...uilt in memory Select COPY on the PLAYBACK mode menu P22 Press 3 4 to select the copy destination and then press MENU SET B AUDIO DUB Press 2 1 to select the picture and then press MENU SET to start audio recording The message OVERWRITE AUDIO DATA screen appears when audio has already been recorded Press 3 to select YES and then press MENU SET to start audio recording The original audio is overwri...

Страница 111: ...e data will only be copied halfway We recommend using a card which has more free space than the built in memory about 50 MB If a picture exists with the same name folder number file number as the picture to be copied in the copy destination when is selected a new folder is created and the picture is copied If a picture exists with the same name folder number file number as the picture to be copied...

Страница 112: ...lied USB connection cable may cause malfunction Press 3 4 to select PC and then press MENU SET If USB MODE P28 is set to PC in the SETUP menu in advance the camera will be automatically connected to the PC without displaying the USB MODE selection screen Since there is no need to set this each time you connect to the PC it is convenient A USB connection cable supplied Check the directions of the c...

Страница 113: ...a before removing the hardware Note Turn the camera off before connecting or disconnecting the AC adaptor DMW AC7PP optional Before inserting or removing a card turn the camera off and disconnect the USB connection cable Otherwise data may be destroyed With the Mac OS X v10 2 or an earlier operating system set the Write Protect switch of the SDHC memory card to the LOCK position when importing pic...

Страница 114: ... via the USB connection cable A supplied Press 3 4 to select PictBridge PTP and then press MENU SET Note Do not use any other USB connection cables except the supplied one Use of cables other than the supplied USB connection cable may cause malfunction A USB connection cable supplied Check the directions of the connectors and plug them straight in or unplug them straight out Otherwise the connecto...

Страница 115: ...nds Press 3 to select PRINT START and then press MENU SET Refer to P116 for the items which can be set before starting to print the pictures Press MENU SET to cancel printing halfway Disconnect the USB connection cable after printing Selecting multiple pictures and printing them Press 3 Press 3 4 to select an item and then press MENU SET If the print check screen has appeared select YES and print ...

Страница 116: ...ecedence over the print with date setting check the printer s print with date setting as well Note When asking the photo shop to print the pictures By stamping the date using TEXT STAMP P101 or setting date printing at the time of the DPOF PRINT P108 setting before going to a photo shop the dates can be printed at the photo shop You can set the number of prints up to 999 Press 3 to select PRINT ST...

Страница 117: ...sage from the printer when the indication lights orange during printing After finishing printing make sure there are no problems with the printer If the number of prints is high the pictures may be printed several times In this case the remaining number of prints indicated may differ from the number set When the pictures in RAW files are to be printed the JPEG pictures recorded simultaneously by t...

Страница 118: ...ket on the camera Turn the TV on and select external input Turn the camera on Note Depending on the ASPECT RATIO black bands may be displayed on the top and bottom or the left and right of the pictures Do not use any other AV cables except the supplied one Read the operating instructions for the TV When you play back a picture vertically it may be blurry You can view pictures on TVs in other count...

Страница 119: ...1080i Playing back pictures on a TV with an SD Memory Card slot Playing back on the TV with component socket Preparations Turn this unit and the TV off 1 Component Plugs Connect the plugs to the component video input sockets on the TV with same color Indication on the TV might be different 2 Audio Pin Plugs to the audio input socket 3 TV with component socket A Align the marks and insert B Compone...

Страница 120: ... be used while the component cable is connected P134 When pictures are displayed they may not be displayed properly depending on the type of TV Read the operating instructions for the TV Using the Conversion Lens optional With the optional conversion lenses you can record even more faraway pictures and take close up pictures of smaller subjects Refer to P93 for details Preparations Remove the lens...

Страница 121: ...d When there is dirt water oil and fingerprints etc on the surface of the lens the image may be affected Lightly wipe the surface of the lens with a soft dry cloth before and after taking pictures When using the tele conversion lens We recommend using a tripod The stabilizer function may not work sufficiently The focus indication may light due to the jitter even if the subject is not focused The t...

Страница 122: ...Turn the camera on and slide the REC PLAYBACK selector switch to Extend the lens by turning the zoom lever toward the Tele Close the flash Attach the filter with the lens extended Hold the ring at the end of the lens barrel with your hand so it does not rotate and then rotate slowly and surely A MC protector B ND filter C PL filter Note Do not attach multiple filters at the same time If the filter...

Страница 123: ...9 6 Quality P80 7 Battery indication P16 8 Number of recordable pictures P142 9 Built in memory P18 Card P18 displayed only during recording 10 Recording state 11 Joystick P23 37 56 57 59 ISO sensitivity P81 12 Shutter speed P36 13 Aperture value P36 14 Exposure compensation P53 15 Metering mode P84 16 Optical image stabilizer P90 Jitter alert P37 7 10 1 9 8 2 13 12 11 14 4 3 ...

Страница 124: ...d time Travel destination setting 2 P78 Zoom Extended optical zoom P38 Digital zoom P38 89 31 Minimum shutter speed P90 32 Self timer mode P52 33 Age 1 P68 Location 2 P76 34 Program shift P37 35 Exposure compensation P53 36 High angle mode P25 Auto Power LCD P25 Power LCD P25 37 Intelligent Exposure P88 38 Burst P55 Auto bracket P54 Color bracket P54 B Audio recording P91 39 Quick AF P87 Continuou...

Страница 125: ...k the unit or put a lot of pressure on it Take care not to knock or drop the bag case that you inserted the camera in as the shock may cause damage to the camera lens or LCD monitor Do not use a paper bag as it can easily rip causing the camera to fall and be damaged We strongly recommend you purchase a good camera bag case from your local dealer to protect your camera Keep the camera as far away ...

Страница 126: ... accompanying instructions Do not press the LCD monitor with excessive force Uneven colors may appear on the LCD monitor and it may malfunction If the camera is cold when you turn it on the picture on the LCD monitor Viewfinder will be slightly darker than usual at first However the picture will return to normal brightness when the internal temperature of the camera increases Do not press the lens...

Страница 127: ...re to disconnect the power supply device from the electrical outlet A very small amount of current is consumed if it is left connected Keep the terminals of the charger and battery clean Do not leave the card where the temperature is high where electromagnetic waves or static electricity are easily generated or exposed to direct sunlight Do not bend or drop the card The card may be damaged or the ...

Страница 128: ...he SDHC Memory Card are moved to LOCK Move the switch back to unlock it P19 NO VALID PICTURE TO PLAY Record a picture or insert a card with a recorded picture and then play it THIS PICTURE IS PROTECTED Delete the picture after canceling the protect setting P109 THIS PICTURE CANNOT BE DELETED SOME PICTURES CANNOT BE DELETED Pictures not based on the DCF standard cannot be deleted If you want to del...

Страница 129: ...tact the dealer or your nearest Service Center MEMORY CARD PARAMETER ERROR Use a card compatible with this unit P19 You can only use an SDHC Memory Card if using cards with 4 GB or more capacity MEMORY CARD ERROR PLEASE CHECK THE CARD An error has occurred accessing the card Insert the card again Or try with a different card READ ERROR WRITE ERROR PLEASE CHECK THE CARD An error has occurred readin...

Страница 130: ...ection cable is connected to the camera only In this case connect the other end of the USB connection cable to a PC or a printer P112 114 PRINTER BUSY PLEASE CHECK THE PRINTER The printer cannot print Check the printer Functions that cannot be set or will not work Main conditions in which the functions cannot be set or will not work AUTO POWER LCD High angle mode P25 mode HISTOGRAM P45 mode CALEND...

Страница 131: ...SCENE MODE mode When QUALITY is set to or FLIP ANIM Color Bracket P54 Advanced scene mode Û mode mode When QUALITY is set to or FLIP ANIM Burst ô 5 and in SCENE MODE mode AUDIO REC When QUALITY is set to or FLIP ANIM PICTURE SIZE P79 9 ô and in SCENE MODE mode When QUALITY is set to or QUALITY P80 9 ô and in SCENE MODE mode ASPECT RATIO P80 9 ô and in SCENE MODE INTELLIGENT ISO P81 mode º mode Adv...

Страница 132: ...d 4 in SCENE MODE When manual focus is set AF Lock P88 When AF tracking is set mode AE Lock P88 º mode Advanced scene mode Û mode When AF tracking is set mode I EXPOSURE P88 Advanced scene mode Û mode mode COLOR EFFECT P89 Advanced scene mode Û mode PICT ADJ P89 Advanced scene mode Û mode mode MIN SHTR SPEED P90 mode mode º mode Advanced scene mode Û mode mode When Intelligent ISO is set AUDIO REC...

Страница 133: ...es with audio FLIP ANIM When set to RAW or RAWiJPEG TRIMMING P104 Motion pictures Pictures stamped with TEXT STAMP Still pictures with audio FLIP ANIM When set to RAW or RAWiJPEG LEVELING P105 Motion pictures Pictures stamped with TEXT STAMP Still pictures with audio FLIP ANIM Protected pictures When set to RAW or RAWiJPEG ASPECT CONV P105 Motion pictures Pictures stamped with TEXT STAMP Still pic...

Страница 134: ...sted Charge the battery The battery is exhausted Charge the battery If you leave the camera on the battery will be exhausted Turn the camera off frequently by using the ECONOMY mode etc P26 Is the temperature of the battery excessively high or low If it is it will take longer than usual to charge the battery or charging may remain incomplete Are the terminals of the charger or battery dirty Wipe o...

Страница 135: ...ode P69 70 or the burst mode P55 to OFF Is the self timer P52 set to 10S 3PICTURES The focus range varies depending on the recording mode Set to the proper mode for the distance to the subject The subject is beyond the focus range of the camera P36 There is camera shake jitter or the subject is moving slightly P37 The shutter speed becomes slower when pictures are taken in dark places so hold the ...

Страница 136: ...the CONVERSION P93 set to or Set the AF area to the distinctive color of the subject if there is a part that is different from the surrounding color P86 It is possible that the subject may be warped slightly or the borders get colored depending on the zoom magnification due to the characteristics of the lens Also the peripherals of the image might look warped because the perspective is enhanced wh...

Страница 137: ... P25 POWER LCD or HIGH ANGLE is activated P25 Does the picture appear on the Viewfinder Press EVF LCD button to switch to LCD monitor display This is not a malfunction These pixels do not affect the recorded pictures In dark places noise may appear to maintain the brightness of the LCD monitor This does not affect the pictures you are recording Is the flash closed Press OPEN to open the flash P46 ...

Страница 138: ...l before formatting Is the clock in the camera set properly P20 When pictures edited using a PC or pictures taken by other equipment are searched they may be displayed on dates differing from the actual dates on which the pictures were taken Is it a picture that has been recorded with other equipment In such cases these pictures may be displayed with a deteriorated picture quality Playback The pic...

Страница 139: ...mera recognized by the PC correctly Set to PC in USB MODE P28 112 Disconnect the USB connection cable Connect it again while the card is inserted in the camera Pictures cannot be printed using a printer which does not support PictBridge Set to PictBridge PTP in USB MODE P28 114 When using a printer with a trimming or borderless printing function cancel this function before printing For details ref...

Страница 140: ...corded P20 At some magnification levels the pictures taken are slightly distorted or the outlines and other areas in the pictures taken are colored but this is not a malfunction When you perform an operation after taking a certain action the pictures may be recorded in folders with different numbers from the ones used prior to the operation P113 If the battery was inserted or removed without first...

Страница 141: ...rrel retracts about 15 seconds after switching from REC mode to PLAYBACK mode This is constructed to turn when attaching or detaching a filter so that the lens is protected AGE is not displayed correctly The lens barrel is retracted The ring at the end of the lens barrel turns ...

Страница 142: ...dable pictures Aspect ratio X Picture size 10M 3648k2736 7M 3072k2304 5M 2560k1920 Quality A A A Built in Memory Approx 50 MB 4 3 9 20 14 28 20 40 Card 32 MB 2 1 5 11 7 16 11 23 64 MB 5 4 11 24 16 34 24 48 128 MB 10 8 24 49 35 69 50 99 256 MB 19 16 48 97 68 135 98 190 512 MB 39 32 97 190 135 270 195 380 1 GB 79 65 195 380 270 540 390 770 2 GB 160 130 390 770 550 1090 790 1530 4 GB 310 260 770 1520...

Страница 143: ... 29 56 145 230 64 MB 38 75 61 115 290 480 128 MB 78 150 125 230 600 970 256 MB 150 290 240 460 1170 1900 512 MB 300 590 480 910 2320 3770 1 GB 600 1180 970 1830 4640 7550 2 GB 1220 2360 1920 3610 8780 12290 4 GB 2410 4640 3770 7090 17240 24130 8 GB 4910 9440 7670 14440 35080 49120 16 GB 9880 19000 15440 29070 70590 98840 32 GB 19820 38120 30970 58310 141620 198270 ...

Страница 144: ...580 7050 5040 9880 7160 13720 10980 20590 32 GB 2910 2410 7180 14160 10110 19820 14360 27530 22020 41300 Aspect ratio W Picture size 7 5M 3648k2056 5 5M 3072k1728 3 5M 2560k1440 2M 1920k1080 Quality A A A A Built in Memory Approx 50 MB 5 4 13 26 18 37 27 53 47 92 Card 32 MB 3 2 7 15 10 21 15 30 27 53 64 MB 6 5 15 32 22 45 32 63 57 105 128 MB 13 11 33 65 46 92 66 125 115 220 256 MB 26 21 65 125 91 ...

Страница 145: ...MB 4 s 14 s 17 s 56 s 2 min 35 s 64 MB 12 s 33 s 39 s 1 min 58 s 5 min 20 s 128 MB 29 s 1 min 10 s 1 min 22 s 4 min 10 min 50 s 256 MB 59 s 2 min 15 s 2 min 40 s 7 min 50 s 21 min 10 s 512 MB 2 min 4 min 30 s 5 min 20 s 15 min 40 s 42 min 1 GB 4 min 9 min 20 s 10 min 50 s 31 min 20 s 1 h 24 min 2 GB 8 min 20 s 19 min 22 min 10 s 1 h 4 min 2 h 51 min 4 GB 16 min 30 s 37 min 30 s 43 min 40 s 2 h 5 m...

Страница 146: ...cus range AF 30 cm 0 99 feet Wide 2 m 6 57 feet Tele to AF Macro MF Intelligent auto 1 cm 0 04 feet Wide 2 m 6 57 feet Tele to However 1 m 3 28 feet to for 11k to 18k zoom Scene mode There may be differences in the above settings Shutter system Electronic shutteriMechanical shutter Motion picture recording 1280k720 pixels 30 frames second only when using a Card 848k480 pixels 30 frames second only...

Страница 147: ...2 7q TFT LCD Approx 230 000 dots field of view ratio about 100 Viewfinder Color LCD Viewfinder Approx 201 000 pixels field of view ratio about 100 with diopter adjustment j4 to i4 diopter Flash Built in pop up flash Flash range ISO AUTO Approx 30 cm 0 99 feet to 8 5 m 27 9 feet Wide AUTO AUTO Red eye reduction Forced flash ON Forced ON Red eye reduction Slow sync Red eye reduction Forced flash OFF...

Страница 148: ...enu DMC FZ28PC Canada version Component Audio line output monaural Terminal COMPONENT OUT Dedicated jack 10 pin DIGITAL AV OUT Dedicated jack 8 pin DC IN Type 3 jack Dimensions Approx 117 6 mm W k75 3 mm H k88 9 mm D 4 3 5q W k2 9 10q H k3 1 2q D excluding the projecting parts Mass weight Approx 370 g 13 1 oz excluding card and battery Approx 417 g 14 7 oz with card and battery Operating temperatu...

Страница 149: ...etween countries Consult your local dealer Accessory Description Figure DMW AC7PP AC Adaptor 1 CGR S006A Lithum Ion Battery MC Protector ND Filter Close up Lens 3 Lens Adaptor DMW LMC46 DMW LND46 DMW LT55 DMW LC55 DMW LA3 DMW CZS7 DMW CZ18 Soft Case 2 Soft Bag Tele Conversion Lens 3 RP SDV32GU1K RP SDV16GU1K RP SDV08GU1K RP SDM04GU1K RP SDV04GU1K RP SDM02GU1A RP SDV02GU1A RP SDR01GU1A RP SDV01GU1A...

Страница 150: ...ER OFFICE 20421 84th Avenue South Kent WA 98032 Ship To Mr Mrs Ms First Last Street Address City State Zip Phone Day Night 4 Shipping information UPS delivery requires complete street address Please photocopy this form when placing an order 3 Method of payment check one Check of Money Order enclosed NO C O D SHIPMENTS VISA MasterCard Make Check or Money Order to PANASONIC ACCESSORIES Please do not...

Страница 151: ...ouhy Ave Elk Grove Village IL 60007 Request for Service Notice USA Only Please photocopy this form when making a request for service notice In the unlikely event this product needs service Please include your proof of purchase Failure to do so will delay your repair To further speed your repair please provide an explanation of what wrong with the unit and any symptom it is exhibiting ...

Страница 152: ...ce it with a new or refurbished product The decision to repair or replace will be made by the warrantor During the Labor warranty period there will be no charge for labor During the Parts warranty period there will be no charge for parts You must carry in or mail in your product during the warranty period If non rechargeable batteries are included they are not warranted This warranty only applies ...

Страница 153: ...ANTIES EXCEPT AS LISTED UNDER LIMITED WARRANTY COVERAGE THE WARRANTOR IS NOT LIABLE FOR INCIDENTAL OR CONSEQUENTIAL DAMAGES RESULTING FROM THE USE OF THIS PRODUCT OR ARISING OUT OF ANY BREACH OF THIS WARRANTY As examples this excludes damages for lost time travel to and from the servicer loss of media or images data or other memory content The items listed are not exclusive but are for illustratio...

Страница 154: ...VQT1S36 154 Others Customer Services Directory For USA Only ...

Страница 155: ... et au son AVERTISSEMENT POUR RÉDUIRE LES RISQUES D INCENDIE DE CHOC ÉLECTRIQUE OU DE DOMMAGES À L APPAREIL N EXPOSEZ PAS CET APPAREIL À LA PLUIE À L HUMIDITÉ À L ÉGOUTTEMENT OU AUX ÉCLABOUSSEMENTS ET NE PLACEZ SUR L APPAREIL AUCUN OBJET REMPLI DE LIQUIDE COMME PAR EXEMPLE DES VASES UTILISEZ EXCLUSIVEMENT LES ACCESSOIRES RECOMMANDÉS NE RETIREZ PAS LE COUVERCLE OU LE PANNEAU ARRIÈRE IL N Y A AUCUNE...

Страница 156: ...terie batterie au lithium ion Utilisez l unité spécifiée pour recharger la batterie N utilisez la batterie avec aucun autre appareil que l appareil spécifiée Évitez le contact des saletés du sable du liquide ou autres corps étrangers avec les bornes Ne touchez pas les bornes des fiches i et j avec des objets métalliques Évitez de démonter remodeler chauffer ou jeter au feu Si de l électrolyte entr...

Страница 157: ...ry 96 Center Weighted 84 Changing the Zoom Area 60 Charger 127 Charging 15 16 Cleaning 126 Clock Set 20 24 Color Bracket 54 Color Effect 89 Color Temperature Setting 84 Component Cable 119 Condensation 5 Copy 110 D Date Printing 109 116 DCF standard 41 Deleting Pictures 42 Demo Mode 29 Digital Zoom 38 89 Diopter Adjustment 45 DPOF Print Setting 108 E Economy Mode 26 Exposure Compensation 53 Extend...

Страница 158: ...de 67 PC 28 Pet Mode 68 PictBridge 114 Picture Adjustment 89 Picture Size 79 142 143 Pictures with Audio 97 Pin Hole Mode 73 Playback Pictures on TV 118 119 Playback Zoom 41 Playing Back Motion Pictures 97 Portrait Mode 63 Power LCD 25 Power Save 26 Prefocus 61 Program AE Mode 35 Protect 109 Q Quality 80 142 143 Quick Menu 23 R RAW 80 Reset of Setting 27 Resizing 103 Rotate 106 Rotate Display 106 ...

Страница 159: ...159 VQT1S36 U USB Connection Cable 112 114 USB Mode 28 V Video Output 28 118 Volume of Speakers 24 W White Balance 82 White Balance Fine Adjustment 83 World Time 24 78 Z Zoom 38 ...

Страница 160: ...o Rico Inc Ave 65 de Infantería Km 9 5 San Gabriel Industrial Park Carolina Puerto Rico 00985 Panasonic Canada Inc 5770 Ambler Drive Mississauga Ontario L4W 2T3 2008 Matsushita Electric Industrial Co Ltd VQT1S36 F0708GA0 20100 P QuickTime and the QuickTime logo are trademarks or registered trademarks of Apple Inc used under license therefrom ...

Отзывы: