RQT8320
5
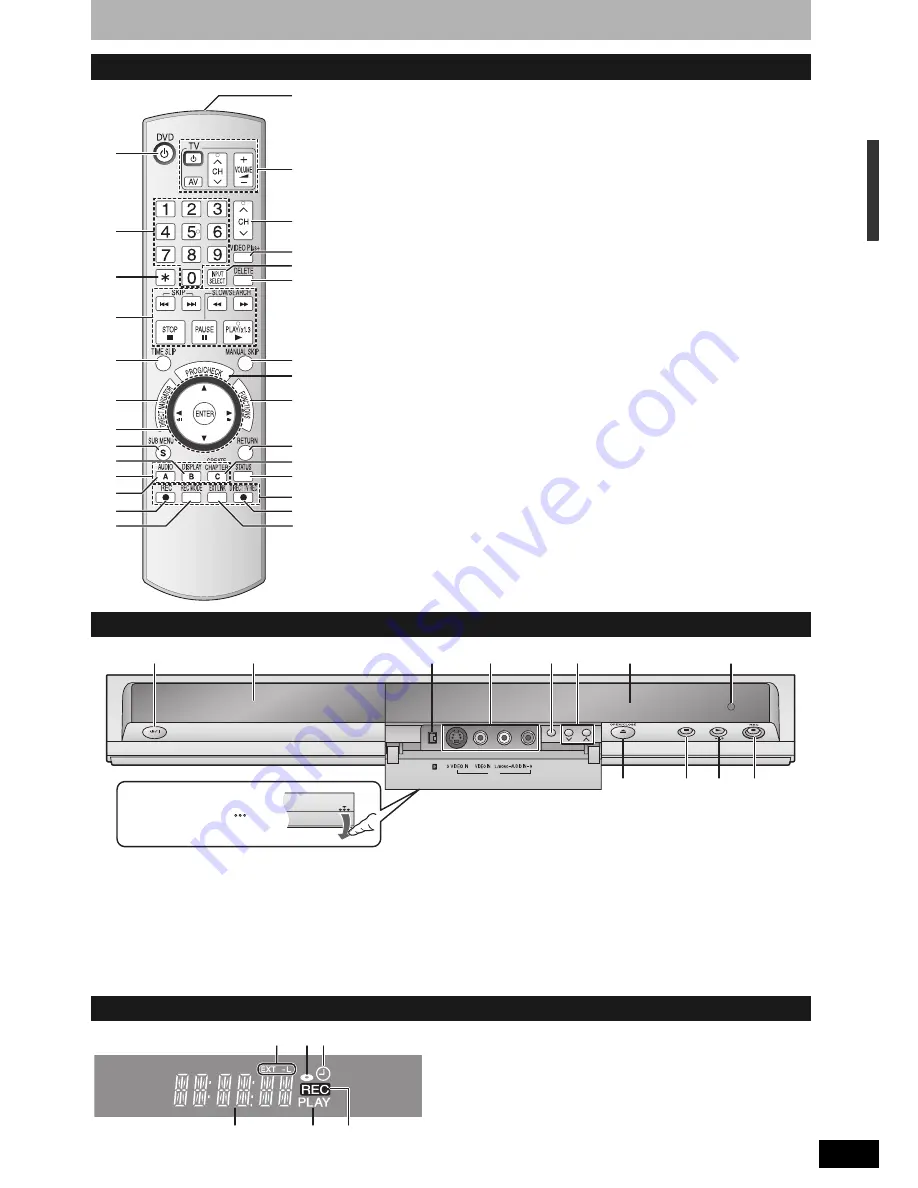
Control reference guide
Remote control
Main unit
The unit’s display
1
bp
bq
ck
cn
cm
br
bt
bs
3
5
8
bl
bk
9
cl
6
7
4
2
bm
bn
cs
cr
cp
cq
co
bo
1
Turn the unit on/off (
Ô
page 12)
2
Select channels and title numbers etc./Enter numbers
3
Cancel
4
Basic operations for recording and play
5
Skip the specified time (
Ô
page 25)
6
Show Direct Navigator/Top menu (
Ô
page 24, 26, 30)
7
Selection/Enter, Frame-by-frame (
Ô
page 12, 25)
8
Show sub menu (
Ô
page 27, 30, 33)
9
Show on-screen menu (
Ô
page 28)
bk
Manual tuning operation (
Ô
page 42)
bl
Select Audio (
Ô
page 24)
bm
Start recording (
Ô
page 18)
bn
Change recording mode (
Ô
page 18)
bo
Transmit the remote control signal
bp
Television operations (
Ô
page 15)
bq
Channel select (
Ô
page 18)
br
Show VIDEO Plus+ screen (
Ô
page 20)
bs
Input select (AV1, AV2, AV3 or DV)
bt
Delete items (
Ô
page 35)
ck
Skip 30 seconds forward (
Ô
page 25)
cl
Show timer recording programme screen (
Ô
page 21)
cm
Show FUNCTIONS window (
Ô
page 2, 14, 29)
cn
Return to previous screen
co
Create chapter (
Ô
page 25)
cp
Show status messages (
Ô
page 29)
cq
Recording function
cr
Direct TV recording (
Ô
page 38)
cs
Linked timer recordings with external equipment (
Ô
page 23)
CH
EXT LINK
AV3
DV IN
1
3
6
4
2
8
bl
5
7
9
bk
bm
Opening the front panel
Press down on the part
with your finger.
1
Standby/on switch (
8
)
(
Ô
page 12)
Press to switch the unit from on to standby mode or vice
versa. In standby mode, the unit is still consuming a small
amount of power.
2
Disc tray (
Ô
page 18)
3
Connection for digital video (DV) camcorder (
Ô
page 34)
4
Connection for camcorder etc. (
Ô
page 34)
5
Linked timer recordings with external equipment
(
Ô
page 23)
6
Channel select (
Ô
page 18)
7
Open/close disc tray (
Ô
page 18)
8
Display (
Ô
below)
9
Stop (
Ô
page 18, 25)
bk
Start play (
Ô
page 24)
bl
Remote control signal sensor
bm
Start recording (
Ô
page 18)/
Specify the time to stop recording (
Ô
page 19)
2
1
4
6
5
3
1
Linked timer recordings with external equipment
indicator
2
Disc indicator
• This indicator lights up when a disc that is supported by
this unit is inserted.
3
Timer recording indicator
4
Main display section
5
Playing indicator
6
Recording indicator
In
clu
d
ed
a
cce
sso
ri
es/Di
sc h
an
d
lin
g
/U
n
it
car
e/Co
n
tro
l r
ef
er
en
ce
g
u
id
e


