27
6 Service Mode
6.1.
Error Code Memory Function
1.
General Description
This unit is equipped with history of error code memory function, and can be memorized 16 error codes in sequence from the
latest. When the error is occurred more than 16, the oldest error is overwritten in sequence.
The error code is not memorized when the power supply is shut down forcibly.
The error code is memorized to Flash-ROM when the unit has just before powered off.
2.
How to Display
There are two types of display methods. (refer to the step 2 below)
• Preparation
Attach the fully charged Battery, and insert the memory card to either slot 1 (XQD) or slot 2 (SD).
Set the mode dial to [ P ] (Program AE Mode).
•
Step 1. The temporary cancellation of “Initial Settings”:
Set the drive mode dial to [ Single ], while pressing [ Playback ] button and [ AF ON ] button simultaneously, turn the power
on.
•
Step 2. Execute the error code display mode:
[ Display method by pressing the buttons simultaneously ]
Press [ Playback ] button, [ MENU/SET ] button and “[ LEFT ] of Cursor buttons” simultaneously under the step 1 condition.
*The display is changed as shown below when the above buttons are pressed simultaneously.
Normal display
→
Error code display
→
Camera information display
→
Normal display
→
.....
[ Display method from the menu display ]
Select [ ERR CODE DISP ] from the setup menu and then press [ MENU/SET ] button under the step 1 condition.
*The display is changed as shown below when [ MENU/SET ] button is pressed.
Menu display
→
Error code display
→
Camera information display
→
Menu display
→
.....
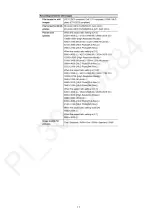
Example of Error Code Display
Содержание DC-S1P
Страница 17: ...17 ...
Страница 18: ...18 ...
Страница 19: ...19 ...
Страница 20: ...20 ...
Страница 21: ...21 ...
Страница 22: ...22 ...
Страница 28: ...28 Error Code List The error code consists of 8 bit data and it shows the following information ...
Страница 29: ...29 ...
Страница 31: ...31 7 Troubleshooting Guide 7 1 Checking Method of Body and Interchangeable Lens 1 Reference information ...
Страница 32: ...32 ...
Страница 33: ...33 ...
Страница 36: ...36 ...
Страница 40: ...40 9 2 P C B Location ...
Страница 43: ...43 Fig D2 Fig D3 ...
Страница 44: ...44 Fig D4 Fig D5 ...
Страница 45: ...45 Fig D6 Fig D7 ...
Страница 46: ...46 Fig D8 Fig D9 9 3 3 Removal of the Top 1 Unit Fig D10 ...
Страница 47: ...47 Fig D11 Fig D12 9 3 4 Removal of the Main P C B Fig D13 ...
Страница 48: ...48 Fig D14 Fig D15 9 3 5 Removal of the EXT MIC HP P C B Fig D16 ...
Страница 50: ...50 Fig D20 Fig D21 9 3 9 Removal of the Battery Case Unit Fig D22 ...
Страница 51: ...51 Fig D23 9 3 10 Removal of the WIFI BT P C B Fig D24 ...
Страница 54: ...54 Fig D29 9 3 15 Removal of the SD Door Unit Fig D30 ...
Страница 55: ...55 9 3 16 Removal of the Rear Plate Unit Fig D31 Fig D32 9 3 17 Removal of the LVF Unit Fig D33 ...
Страница 56: ...56 9 3 18 Removal of the Rear IF P C B Fig D34 9 3 19 Removal of the LCD Unit Fig D35 ...
Страница 58: ...58 9 3 23 Removal of the Image Sensor Unit Fig D39 Fig D40 ...


