background image

115

Others

 (ENG) DVQX1067

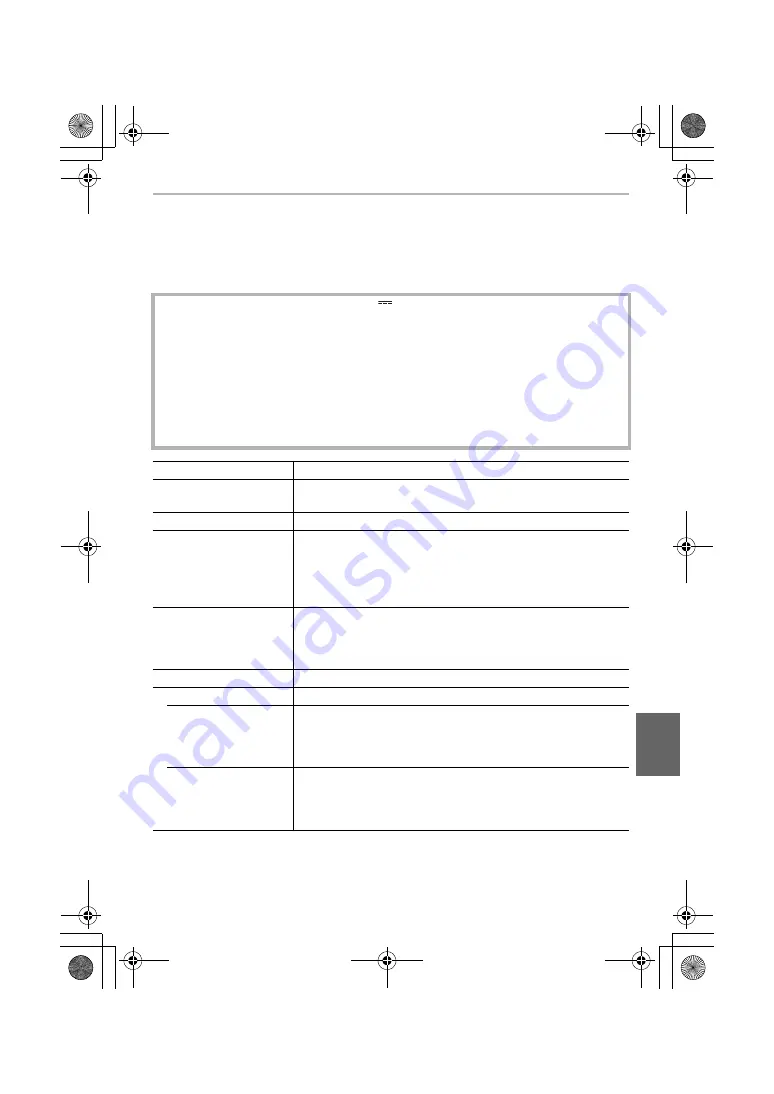
Specifications

Specifications are subject to change without notice.

Digital Camera Body (DC-GH5):

Information for your safety

Power Source:

DC 8.4 V (8.4 V

)

Power Consumption:

4.1 W (When recording with Monitor)
[When the Interchangeable lens (H-ES12060) is used]
4.0 W (When recording with Monitor)
[When the Interchangeable lens (H-HSA12035) is used]

3.2 W (When playing back with Monitor)
[When the Interchangeable lens (H-ES12060) is used]
3.0 W (When playing back with Monitor)
[When the Interchangeable lens (H-HSA12035) is used]

Camera effective pixels

20,330,000 pixels

Image sensor

4/3

q

 Live MOS sensor, total pixel number 21,770,000 pixels, 

Primary colour filter

Digital Zoom

Max. 4

k

Extra Tele Conversion

When taking still pictures:
Max. 2

(When a picture size of [S] (5 M), aspect ratio of [4:3] is 

selected.)
When recording motion pictures:
1.4

k

/2.7

k

Focus

Auto Focus/Manual Focus,
Face/Eye Detection/Tracking/225-area-focusing/Custom Multi/
1-area-focusing/Pinpoint
(Focus area selection is possible by touching or with the joystick)

Shutter type

Focal-plane shutter

Burst recording

Burst speed

12 pictures/second (High speed, AFS/MF),
9 pictures/second (High speed, AFF/AFC),
7 pictures/second (Middle speed),
2 pictures/second (Low speed)

Number of recordable 
pictures

When there are RAW files: 60 or higher pictures
When there are no RAW files: 600 or higher pictures

¢

When recording is performed under the test conditions 
specified by Panasonic

DC-GH5LABodyGA-DVQX1067_eng.book  115 ページ  2017年2月13日 月曜日 午前11時34分

Содержание DC-GH5L

Страница 1: ...instructions carefully before using this product and save this manual for future use More detailed operating instructions are available in Operating Instructions for advanced features PDF format To re...

Страница 2: ...nfringe copyright laws Even for the purpose of private use recording of certain material may be restricted Information for Your Safety Product identification marking For Thailand only This telecommuni...

Страница 3: ...ong as the power cord is connected to an electrical outlet Battery pack information Battery Charger information CAUTION Danger of explosion if battery is incorrectly replaced Replace only with the typ...

Страница 4: ...ed or pictures may be distorted by strong magnetic fields created by speakers or large motors Electromagnetic wave radiation may adversely affect this unit disturbing the pictures and or sound If this...

Страница 5: ...ta on the card may be damaged or lost due to electromagnetic waves static electricity or breakdown of the camera or the card We recommend storing important data on a PC etc Do not format the card on y...

Страница 6: ...ng 44 Taking Pictures with Time Lapse Shot Stop Motion Animation 46 Taking Pictures While Adjusting a Setting Automatically Bracket Recording 48 Image Stabiliser 51 Raising the telescopic effect 53 Ta...

Страница 7: ...any other foreign material clean it as soon as possible taking the necessary precautions that the foreign substance does not get inside the camera Under no circumstances should you touch or place any...

Страница 8: ...me of purchase 1 Interchangeable Lens 1 2 2 Lens Hood 3 Lens Cap 3 4 Lens Rear Cap 3 5 Body Cap 4 6 Battery Pack Indicated as battery pack or battery in the text Charge the battery before use 7 Batter...

Страница 9: ...are the speed standards regarding continuous writing To check the class see the labelled side etc of the card Please confirm the latest information on the following website http panasonic jp support g...

Страница 10: ...test information on the firmware or to download the firmware visit the support site below http panasonic jp support global cs dsc This Site is English only To check the firmware version of the interch...

Страница 11: ...t can be used with this unit is DMW BLF19E 1 Connect the AC Cable 2 Attach the battery paying attention to the direction of the battery The CHARGE indicator A lights up and charging begins About the C...

Страница 12: ...rientation insert all the way until you hear a locking sound and then check that it is locked by lever A When removing the battery push the lever A toward the arrow and pull out the battery Check that...

Страница 13: ...ectricity perform the operation again With Double Slot Function in the Setup menu you can set the way recording to the two card slots is performed P83 Change lenses where there is not a lot of dirt or...

Страница 14: ...en facing inward to prevent dirt and scratches The clock is not set when the camera is shipped 1 Turn the camera on When the camera is turned on the status indicator 1 lights up 2 Press MENU SET 3 Pre...

Страница 15: ...ach press locks unlocks the dial The settings of the main functions are adjusted automatically 1 Hold the camera gently with both hands keep your arms still at your side and stand with your feet sligh...

Страница 16: ...e shutter button fully push it in further and take the picture Be careful not to move the camera when you press the shutter button Pictures cannot be taken until focus is achieved when Focus Release P...

Страница 17: ...14 Mode dial lock button P21 15 Stereo microphone Be careful not to cover the microphone with your finger Doing so may make sound difficult to record 16 Hot shoe Hot shoe cover P54 Keep the hot shoe...

Страница 18: ...47 Cursor buttons P20 Function button P28 3 Fn17 1 Fn18 4 Fn19 2 Fn20 48 Control dial P20 49 MENU SET button P20 26 50 Card slot 1 P12 51 Access lamp card 1 P13 52 Card slot 2 P12 53 Access lamp card...

Страница 19: ...2 1 Lens surface 2 Tele 3 Focus ring P36 4 Zoom ring 5 Wide 6 O I S switch 7 AF MF switch When either the AF MF switch of the lens or the setting of the camera is set to MF Manual Focus MF is enabled...

Страница 20: ...ions Example When rotating the control dial to the left or right Rotating Selection of items or setting of values is performed during the various settings These operating instructions describe operati...

Страница 21: ...ing contents etc is performed In these operating instructions the up down left and right of the joystick are expressed as 3 4 2 1 Moving Pressing Mode dial Selecting a Recording Mode Intelligent Auto...

Страница 22: ...The exposure is adjusted by the aperture value and the shutter speed which are manually adjusted Aperture value B Shutter speed C Creative Video Mode P60 Custom Mode Use this mode to take pictures wit...

Страница 23: ...e or an object near it If you enable the automatic viewfinder monitor switching function and display the On monitor recording information screen on the monitor Power Save LVF Shooting in Economy can b...

Страница 24: ...ed information tilt sensor display With information tilt sensor display With information Without information With information tilt sensor display Without information tilt sensor display Turned off On...

Страница 25: ...o cancel the function touch or Touch screen Touch operations Touch Shutter Just by touching the subject you want as your point of focus the camera will focus on the subject and take the picture automa...

Страница 26: ...can be set up according to your preferences Setup P77 This menu lets you perform the clock settings select the operating beep tone settings and set other settings which make it easier for you to oper...

Страница 27: ...of the menu settings can be easily found 1 Press Q MENU to display the Quick Menu 2 Rotate the front dial to select the menu item 3 Rotate the rear dial to select the setting 4 Press Q MENU to exit t...

Страница 28: ...function to and then press MENU SET To select a button from Fn12 to Fn20 in Setting in REC mode press DISP to switch the screen 3 Press 3 4 to select the function you want to assign and then press MEN...

Страница 29: ...ht Shadow i Dynamic i Resolution Post Focus P44 HDR Shutter Type P80 Flash Mode P54 Flash Adjust Wireless Flash Setup Ex Tele Conv still pictures motion pictures P53 Digital Zoom Stabilizer P51 Silent...

Страница 30: ...and the subject multiple still pictures are recorded with differing exposures and combined to create a single still picture rich in gradation Switching between Intelligent Auto Plus Mode and Intellig...

Страница 31: ...default level centre point when this unit is turned off or the camera is switched to another Recording Mode Taking a picture with a blurred background Defocus Control 1 Press Fn4 to display the settin...

Страница 32: ...ositions AFF Auto Focus Flexible Movement cannot be predicted Children pets etc AFF is an abbreviation of Auto Focus Flexible In this mode focusing is performed automatically when the shutter button i...

Страница 33: ...motion detection is activated in response to a change in the speed of the subject Face Eye Detection The camera automatically detects the person s face and eyes An eye closer to the camera will be in...

Страница 34: ...MENU SET is pressed or is touched 225 Area Up to 225 AF areas can be focused This is effective when a subject is not in the centre of the screen etc Custom Multi From among 225 AF areas you can freel...

Страница 35: ...s the joystick to switch between the default AF area position and the position you have set The enlarged display will appear when Pinpoint is set 3 Press the shutter button halfway to set Press the jo...

Страница 36: ...perform the following operations 5 Press the shutter button halfway You can also perform the same operation by pressing MENU SET When using an interchangeable lens H ES12060 H HSA12035 with a focus r...

Страница 37: ...button fully A AE Lock indication Compensating the Exposure Applicable modes Use this function when you cannot achieve appropriate exposure due to the difference in brightness between the subject and...

Страница 38: ...pper Limit Setting in ISO Sensitivity photo or in ISO Sensitivity video when using Creative Video Mode It will work when the Sensitivity is set to AUTO or 4 Press to set Only available when Extended I...

Страница 39: ...are suppressed to reproduce the original colours of the subject more accurately The same tones as AWB may be applied in a bright environment AWB and AWBc apply the same tones under light sources wher...

Страница 40: ...a size of 6K approx 6 000 horizontal k3 000 vertical Use a UHS Speed Class 3 card to record 6K 4K photos P9 Single When the shutter button is pressed only one picture is recorded Burst Recordings are...

Страница 41: ...cond 4K H 8M 4 3 3328k2496 16 9 3840k2160 3 2 3504k2336 1 1 2880k2880 60 pictures second 4K 8M 30 pictures second Rec 6K 4K PHOTO Rec Method 6K 4K Burst For capturing the best shot of a fast moving su...

Страница 42: ...o opportunity Auto Focus operation settings and menus that cannot be set while this function is in use are the same as those during 6K 4K Pre Burst operation Setting Loop Recording 6K 4K Burst S S Wit...

Страница 43: ...of Burst Mode pictures in JPEG format Correcting distortion in pictures Reduce Rolling Shutter The camera corrects distortion in pictures caused by the electronic shutter rolling shutter effect when...

Страница 44: ...4 Decide on the composition and press the shutter button halfway Auto Focus will detect focus areas on the screen Excluding the edges of the screen If no areas on the screen can be brought into focus...

Страница 45: ...ill be saved in JPEG format The camera may automatically correct the misalignments of pictures caused by camera shake If they are corrected the angle of view becomes slightly narrower when pictures ar...

Страница 46: ...the drive mode dial to 2 Select the menu P26 3 Press 3 4 to select an item and set 4 Press the shutter button halfway to exit the menu 5 Press the shutter button fully The recording starts automatical...

Страница 47: ...ollow the steps below 1 Select the methods for creating a motion picture The recording format is set to MP4 2 Press 3 4 to select OK and then press MENU SET Creating Stop Motion Pictures Stop Motion A...

Страница 48: ...racket Bracket Type Exposure Bracket Press the shutter button to perform recording while adjusting the exposure P49 This is disabled when recording using the flash Aperture Bracket Press the shutter b...

Страница 49: ...s Exposure Bracket Step Sets the number of pictures to be taken and the exposure compensation range 3 1 3 Takes three pictures with an interval of 1 3 EV to 7 1 Takes seven pictures with an interval o...

Страница 50: ...n also set the correction range by touching About More settings step 2 in P48 Rotate the control dial to adjust the correction range and press MENU SET You can also set the correction range by touchin...

Страница 51: ...hen taking pictures When recording motion pictures Panasonic lenses compatible with Dual I S Mode Based on the Micro Four Thirds System standard For the latest information on compatible lenses please...

Страница 52: ...h continues to move in a fixed direction OFF Stabilizer does not work When using a lens with an O I S switch set the switch to OFF E Stabilization Video Jitter during motion picture recording is corre...

Страница 53: ...hen the function button is pressed again or a certain amount of time passes Fixing the zoom magnification at the maximum level Select the menu P26 When taking pictures Ex Tele Conv Rec 1 4k M 2 0k S 1...

Страница 54: ...cus function When using the electronic shutter When an image effect in Filter Effect of Filter Settings is set When Silent Mode is set to ON When HDR is set to ON Changing Flash Mode Rec Flash Flash M...

Страница 55: ...during the motion picture recording by fully pressing the shutter button Except for in Creative Video Mode In Creative Video Mode motion pictures are recorded at the selected ISO sensitivity in other...

Страница 56: ...8 bit Long GOP FHD 24M 24p 1920k1080 23 98p 24 Mbps 4 2 0 8 bit Long GOP FHD 28M 50p 1 50 00Hz PAL 1920k1080 50 00p 28 Mbps 4 2 0 8 bit Long GOP FHD 17M 50i 1920k1080 50 00i 17 Mbps 4 2 0 8 bit Long G...

Страница 57: ...4p 1920k1080 23 98p 100 Mbps 4 2 0 8 bit Long GOP 4K 8bit 150M 50p 50 00Hz PAL 3840k2160 50 00p 150 Mbps 4 2 0 8 bit Long GOP 4K 10bit 150M 25p 3840k2160 25 00p 150 Mbps 4 2 2 10 bit Long GOP 4K 8bit...

Страница 58: ...anually P36 Customising the operation settings of Auto Focus for motion picture recording AF Custom Setting Video Motion Picture AF Custom Setting Video ON Records motion pictures using the customised...

Страница 59: ...ode Sets the time code recording method DF Drop Frame The camera modifies the difference between recorded time and time code Seconds and frames are separated by Example 00 00 00 00 NDF Non Drop Frame...

Страница 60: ...ording of a motion picture Using touch icons allows silent operation while recording motion pictures 4 Press the motion picture button or shutter button again to stop recording With Creative Video Mod...

Страница 61: ...s and record a motion picture a quick motion effect of 2k can be gained 1 Set the mode dial to 2 Select an item that supports Variable Frame Rate MP4 does not support Variable Frame Rate Items availab...

Страница 62: ...is set to MP4 LPCM or MOV in Creative Video Mode Creative Video Loop Recording video Settings ON OFF While recording is in progress the elapsed recording time is indicated with A and the available rec...

Страница 63: ...press MENU SET 5 Set the focus position This is the same operation as Manual Focus operation P36 6 Press MENU SET To register focus positions to other items repeat steps 2 through 4 Set the items bel...

Страница 64: ...d of focus varies depending on the lens being used By cropping your motion picture down from the 4K angle of view to Full High Definition you can record a motion picture that pans and zooms in out whi...

Страница 65: ...recording midway press the motion picture button or the shutter button again Changing the position and size of a crop frame Press 2 while the recording screen is displayed and perform steps 3 and 4 Re...

Страница 66: ...eet long Attaching the cable holder Attach the cable holder to prevent the HDMI cable or USB connection cable from getting disconnected by accident or the HDMI or USB socket from being damaged Example...

Страница 67: ...r 4K 8bit 150M 50p in Creative Video Mode Recording Mode Aspect ratio The output setting is determined by the Rec Quality setting in the Motion Picture menu When Anamorphic 4 3 is set black bars appea...

Страница 68: ...ces connected to the HDMI socket HDMI Recording Control can only be set when HDMI Time Code Output P59 is set to ON in Creative Video Mode Control information can be output only when outputting a time...

Страница 69: ...MENU SET When the external microphone is connected Mic Level Disp is automatically set to ON and the mic level is displayed on the screen When a stereo microphone VW VMS10 optional is used Special Mic...

Страница 70: ...structions of the XLR microphone adaptor You can record motion pictures while hearing the sounds that are being recorded by connecting a commercially available headphones to this unit Adjusting the he...

Страница 71: ...The fast forward rewind speed increases if you press 1 2 again 2 When a motion picture recorded with AVCHD is rewound frame by frame its frames will be shown in intervals of approximately 0 5 seconds...

Страница 72: ...ard selected for playback by pressing Fn3 If the rear dial is rotated to the right the previous playback screen will be displayed To return to Normal Playback Press 3 4 2 1 to select a picture and the...

Страница 73: ...ng of pictures taken with Focus Bracket P49 A picture group consisting of pictures taken in a Time Lapse Shot P46 A picture group consisting of pictures taken in the Stop Motion Animation P47 Press 3...

Страница 74: ...Press 3 4 to select Delete Multi or Delete All and then press MENU SET If you select Delete All all the pictures on the card of the displayed icon will be deleted 3 When Delete Multi is selected Pres...

Страница 75: ...e Frame Rate Master Pedestal Level Focus Transition Anamorphic 4 3 SS Gain Operation 4K Live Cropping Loop Recording video WFM Vector Scope Custom Mode Creative Control Filter Effect Simultaneous reco...

Страница 76: ...Exposure MF Assist Display Center Marker ISO Increments Highlight Extended ISO Operation Zebra Pattern Exposure Comp Reset Fn Button Set Expo Meter Q MENU MF Guide Focus Release Shutter Dial Set LVF...

Страница 77: ...Sensor Cleaning Headphone Volume Language Level Gauge Adjust Economy Version Disp Format Live View Mode Activate My Menu My Menu Setting Playback Slide Show 6K 4K PHOTO Bulk Saving Rotate Playback Mo...

Страница 78: ...kawa Soft Laboratory to process and edit RAW files on a PC Picture Size Rec Picture Size When the aspect ratio is 4 3 When the aspect ratio is 3 2 Settings Image size Settings Image size L 20M 5184k38...

Страница 79: ...screen automatically Usually we recommend using this method Centre weighted This is the method used to focus on the subject on the centre of the screen and measure the whole screen evenly Spot This is...

Страница 80: ...If you set Rec Quality to a 10bit motion picture setting the available options change to 0 1023 64 940 and 64 1023 This function works only for motion pictures Still pictures including those you take...

Страница 81: ...ancel Sleep Mode Sleep Mode Wi Fi and Power Save LVF Shooting To turn the monitor viewfinder on again press any button Zebra Pattern Custom Monitor Display Zebra Pattern ZEBRA1 ZEBRA2 Economy Setup Ec...

Страница 82: ...ue to use the card that was inserted in the camera We recommend that you replace the card with another one and format P15 it on the camera If you continue to use the card that was inserted in the came...

Страница 83: ...ou to redefine the 5 digit user defined segment before creating a new folder A new folder with an incremented folder number is created File Name Setting Folder Number Link Uses the folder number of th...

Страница 84: ...can register up to 23 menus My Menu My Menu Setting Save Restore Camera Setting Setup Save Restore Camera Setting Save Saves the camera s setup information to the card To save new information select N...

Страница 85: ...ure twice when it is enlarged it will be reduced to the original size RAW Processing White Balance Highlight i Resolution Brightness correction Shadow Sharpness Photo Style Saturation Color Tone Setup...

Страница 86: ...tting and press MENU SET Recorded motion picture and 6K 4K burst files can be divided in two It is recommended for when you want to divide a part you need with a part you do not need Dividing a file i...

Страница 87: ...hone Tablet P93 Recording with a smartphone P94 Playing back or saving images stored on the camera or uploading them on social media sites P95 Explore more enjoyment possibilities with Bluetooth You c...

Страница 88: ...d via radio waves may be intercepted by a third party Do not use the camera in areas with magnetic fields static electricity or interference Do not use the camera in areas with magnetic fields static...

Страница 89: ...Image App refer to the support site below http panasonic jp support global cs dsc This Site is English only When downloading the app on a mobile network high packet communication fees may be incurred...

Страница 90: ...as a paired device after connected via Wi Fi Pairing needs to be set up only for the first connection For the second and subsequent connections P91 is displayed on the recording screen during Bluetoo...

Страница 91: ...a smartphone that supports Bluetooth low energy by following the same steps You can easily set up a direct connection to your smartphone without entering a password Select the menu P26 A SSID When the...

Страница 92: ...e camera 3 Enter the password displayed on the camera into the smartphone For first time connection only If you are using an Android device marking the box for password display will allow the device t...

Страница 93: ...you record images with it Terminating the Wi Fi connection Setup Wi Fi Wi Fi Function Yes If you are using an iOS device On the screen of Image App press the home button to close the app If you are us...

Страница 94: ...on the camera with the smartphone the status indicator will flash When Remote Wakeup is set to ON the Bluetooth function continues to operate even after the camera is turned off thus causing the batt...

Страница 95: ...s only with the smartphone during remote recording The camera s dial settings etc can be changed with the smartphone To end remote recording press any of the buttons on the camera to turn on the scree...

Страница 96: ...ly in step 1 Registering the wireless access point you want to use to the camera Setup 1 If you have connected the camera to the wireless access point you want to use before the procedure below is not...

Страница 97: ...rate following the on screen instructions Setting up Image App Setup 3 1 Make a Bluetooth connection to the smartphone P89 2 Operate the smartphone Preparations The following conditions are required t...

Страница 98: ...back up motion pictures 6K 4K burst files and images recorded with the Post Focus function The camera automatically transfers recorded images to a Bluetooth connected smartphone via Wi Fi 1 Make a Bl...

Страница 99: ...he camera performs recording while writing the acquired location information Preparations Enable the GPS function on the smartphone 1 Make a Bluetooth connection to the smartphone P89 2 Select the cam...

Страница 100: ...ly the same setup to more than one camera 1 Make a Bluetooth connection to the smartphone P89 2 Operate the smartphone Synchronising the camera s clock with a smartphone Wireless connectivity required...

Страница 101: ...mple OS X v10 8 1 Select a folder you intend to use for receiving then click on the items in the following order File Get Info 2 Enable sharing of the folder For details refer to the operating instruc...

Страница 102: ...we recommend changing the name to one consisting only of 15 or less alphanumeric characters When Auto Transfer in Bluetooth is set to ON Wi Fi Function is not available Sending an image each time a r...

Страница 103: ...andards will not work High Speed HDMI cable Type A Type A plug up to 1 5 m 4 9 feet long Downloading software Download and install software to edit and play back images with a PC To download the softw...

Страница 104: ...tory s support website This software allows you to edit motion pictures with ease Check the site below to download and install the software http loilo tv product 20 Only the trial version will be inst...

Страница 105: ...where PHOTOfunSTUDIO cannot be installed you can still copy files and folders by connecting the camera to the computer and then dragging and dropping them to it The content folder structure on the car...

Страница 106: ...ures Recording format Recording quality P56 Recording format Recording quality P56 Variable Frame Rate P61 Picture size Aspect Ratio P78 Extra Tele Conversion when taking still pictures Image effect f...

Страница 107: ...Age 2 Location 3 Current date and time Travel destination setting 3 Exposure meter Focal distance display Step zoom Time Stamp Recording AFS AFF AFC MF AFS BKT AFL LOW STAR 4 AF area P34 Spot metering...

Страница 108: ...er of recordable pictures r20 Maximum number of pictures that can be taken continuously Available recording time 1 Relay recording P83 Backup recording P83 Allocation recording P83 BKT AWB AWBc 1 1 8m...

Страница 109: ...EXPS EXPS ISO AUTO 0 0 WL 3 Single Burst 6K 4K Photo P40 Post Focus P44 Self timer Focus Mode P32 36 AF Mode P33 A Quality P78 Picture size Aspect Ratio P78 Wi Fi Bluetooth P87 Function button settin...

Страница 110: ...rror This memory card cannot be used Use a card compatible with this unit P9 Insert SD card again Try another card An error has occurred accessing the card Insert the card again Insert a different car...

Страница 111: ...function may not work properly when taking pictures especially in dark places We recommend using a tripod and the self timer when taking pictures with a slow shutter speed If you record a moving subje...

Страница 112: ...e to use the same card after changing System Frequency P82 motion pictures may not be recorded To record with the same card reset System Frequency to the original setting To record motion pictures wit...

Страница 113: ...r the connection may be disrupted A message such as Communication error is displayed If you place the camera on a metal table or shelf the radio waves may be adversely affected In such cases you may n...

Страница 114: ...s point is far Transmit closer to the wireless access point File format of the motion picture that can be sent differs depending on the destination It is a sound of lens movement or aperture operation...

Страница 115: ...0 000 pixels Primary colour filter Digital Zoom Max 4k Extra Tele Conversion When taking still pictures Max 2k When a picture size of S 5 M aspect ratio of 4 3 is selected When recording motion pictur...

Страница 116: ...en System Frequency is set to 50 00Hz PAL When the Interchangeable lens H HSA12035 is used Shutter speed Still picture B Bulb Max approx 30 minutes 60 seconds to 1 8000th of a second Mechanical shutte...

Страница 117: ...lot 1 Card slot 2 UHS I UHS II UHS Speed Class 3 Double slot recording function is available Picture size Still picture When the aspect ratio setting is 4 3 4992k3744 pixels 6K photo 3328k2496 pixels...

Страница 118: ...phone 3 5 mm jack HDMI HDMI Type A USB Super Speed USB 3 1 GEN1 USB 3 1 Type C Flash synchro Available Dimensions Approx 138 5 mm W k98 1 mm H k87 4 mm D 5 45q W k3 86q H k3 44q D excluding the projec...

Страница 119: ...rotocol Frequency range used central frequency 2412 MHz to 2472 MHz 1 to 13 ch 5180 MHz to 5320 MHz 36 40 44 48 52 56 60 64 ch Encryption method Wi Fi compliant WPATM WPA2TM Access method Infrastructu...

Страница 120: ...s 4 aspherical lenses 1 UED Lens 1 UHR Lens Nano surface coating Yes Yes In focus distance Wide 0 2 m 0 66 feet to Tele 0 24 m 0 79 feet to from the focus distance reference line 0 25 m 0 82 feet to f...

Страница 121: ...may vary between countries Consult your local dealer For lens related optional accessories such as compatible lenses and filters refer to catalogues Web pages etc Description Accessory Battery Pack D...

Страница 122: ...se Version 2 1 LGPL V2 1 and or 5 open source software other than the software licensed under the GPL V2 0 and or LGPL V2 1 The software categorized as 3 5 are distributed in the hope that it will be...

Страница 123: ...Dolby Dolby Audio and the double D symbol are trademarks of Dolby Laboratories HDAVI Control is a trademark of Panasonic Corporation Adobe is a trademark or registered trademark of Adobe Systems Inco...

Страница 124: ...emark of DENSO WAVE INCORPORATED Other names of systems and products mentioned in these instructions are usually the registered trademarks or trademarks of the manufacturers who developed the system o...

Отзывы: