background image

22

ENGLISH

4

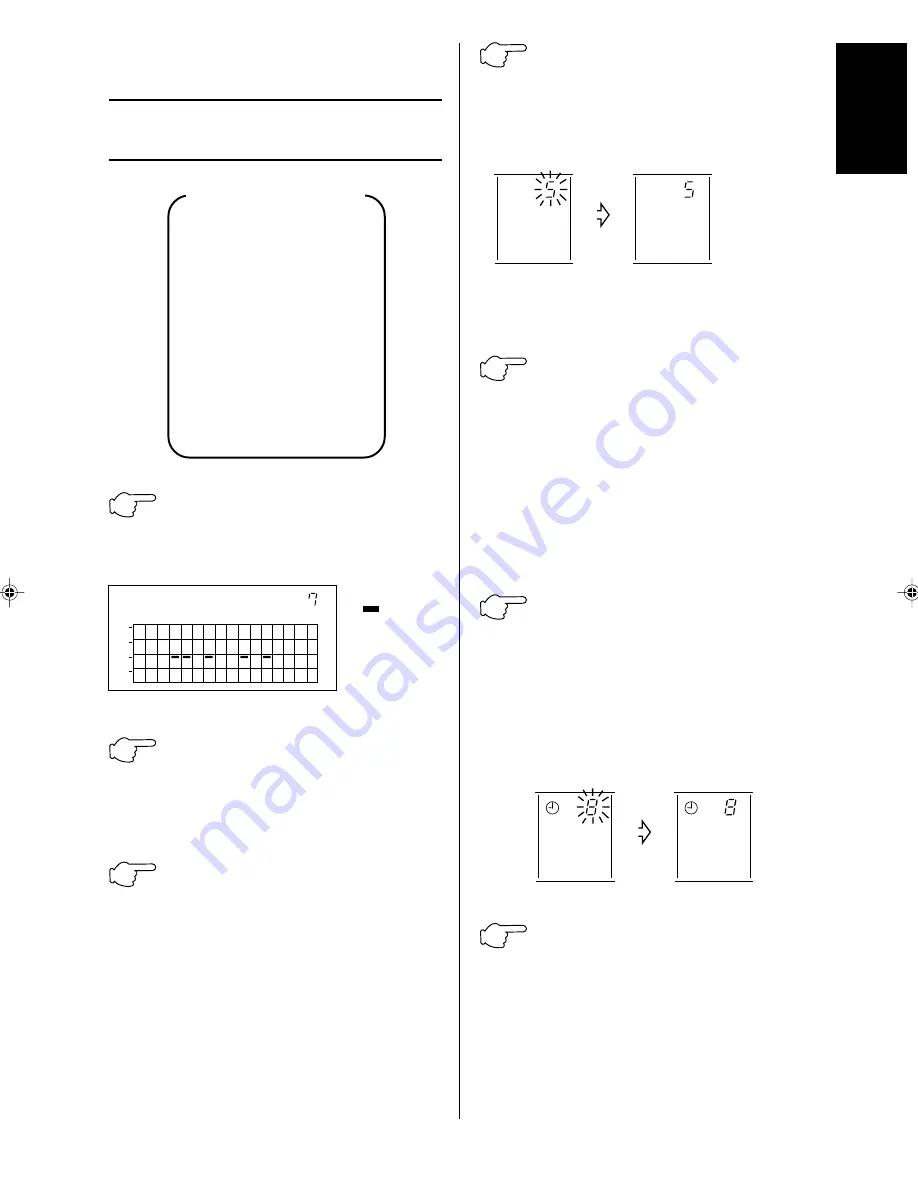
Press the TIMER ON BUTTON.

Press the TIMER ON BUTTON within
10 seconds after the code No. is
displayed.  The display stops flash-
ing and lights up solidly.

The display
returns to its
original state
after no less
than 10
seconds.

(only in conjunction with the schedule
timer)

5

Press the TIME No. BUTTON, to

select the desired time No..  When
you change the setting, the display
flashes.  If you don’t wish to pro-
gram the NOITG time, set timer No.
to “—”.

Check the timer No. of the schedule timer.  If the
schedule timer is not programmed, set the
program in accordance with the instruction manual
of schedule timer.

6

Press the TIMER ON BUTTON,

to finalize the time No.  The display
flashes, and then lights up solidly.
Press the TIMER ON BUTTON within
10 seconds after the time No. is
displayed.

The display returns to its original state after no
less than 10 seconds.

7

Press the OPERATION MODE

SELECTOR BUTTON, to call up the
desired mode.  If you don’t wish to
execute the unified setting in the
zone, set it to “ – – ”.  (See page 29
for further details.)

OPERATION

OPERATION BY ZONE
(Fig. 4)

Flow of operation by zone

Call up the desired zone.

Set the control mode.

Set time No.

Set operation mode.

Set temperature.

Start operation.

Stop

1

Press the ZONE/GROUP

CHANGEOVER BUTTON, to call up
the display of zoning.

The display
“ 

 ” of the

group set in
the display
zone lights
up.

2

Press the ADVANCE/ BACK-

WARD BUTTON, to select the zone
No.  Holding it down will quickly
move the display.

3

Press the CONTROL MODE

BUTTON, to call up the desired code
No. (See page 24.)  Following the
change, the display flashes.

Setting is not possible when using a data station
or parallel interface.

1

2

3

4

00 01 02 03 04 05 06 07 08 09 10 11 12 13 14 15

MONITOR

ZONE

CODE

No.

CODE

No.

No.

No.

Содержание CZ-01ESM11P

Страница 1: ...rations together with this manual Wir danken Ihnen für den Kauf der zentralen Fernbedienung von Panasonic Lesen Sie bitte diese Anleitung bevor Sie das Gerät in Betrieb setzen durch um es richtig zu verwenden Diese Anleitung wird Ihnen Ungewißheiten aufzuklären oder evtl auftretende Betriebsstörungen zu korrigieren helfen Bewahren Sie diese Anleitung für spätere Bezungnahme griffbereit auf HINWEIS...

Страница 2: ... operation mode selecting possible impossible by remote controller Zone control for simpler operation You can control a maximum of 64 groups of indoor units by using this central remote controller You don t have to repeat the same setting operations by group because you can make each of the following settings by zone 䡬 Operation mode 䡬 Control mode 䡬 Setting temperature 䡬 Programming time No Used ...

Страница 3: ...Y PRESET TEM PERATURE Displays the preset temperature CODE No DISPLAY CONTROL MODE Displays codes on how to control equipment ON OFF control impossible by remote controller centralized individual etc Displays the No of the particular unit that has stopped due to malfunction DISPLAY MALFUNCTION CODE Displays the contents of a malfunction The lamp flashes when a malfunction stops operation The conte...

Страница 4: ...p displayed ZONE SETTING BUTTON Turns zone setting mode ON OFF SELECTOR BUTTON Selects the group to be assigned to a zone ZONE OPERATION ON OFF BUT TON Finalizes the zone BUTTON FOR REFRIGERANT SYSTEM DISPLAY See page 30 ZONE GROUP CHANGEOVER BUTTON Switches display zone to display group or vice versa ADVANCE BACKWARD BUTTON See page 21 ON OFF BUTTON Starts stops operation by zone 18 19 20 21 22 2...

Страница 5: ...ready been set lights up 5 Press the ZONE SETTING BUT TON again to finish zoning The current display goes out and the normal display appears NOTES To clear all registered zones Display Then hold down both RESET and ALL 䡬 for about 4 seconds This will clear all registered zones If you have set a group in the wrong zone reset it in the correct zone The last zone set is judged to be effective You can...

Страница 6: ... time No is displayed The display returns to its original state after no less than 10 seconds 7 Press the OPERATION MODE SELECTOR BUTTON to call up the desired mode If you don t wish to execute the unified setting in the zone set it to See page 29 for further details OPERATION OPERATION BY ZONE Fig 4 Flow of operation by zone Call up the desired zone Set the control mode Set time No Set operation ...

Страница 7: ...by zone Press the ON BUTTON The operation lamp lights up and then the display of the correspond ing group appears Press the OFF BUTTON Unless operated from within one minute from when the display of zoning appears the display will automatically revert back to the group display Unified operation is not set within the zone Cooling mode is selected C No C No 28 C is selected Unified operation is not ...

Страница 8: ...es of 0 to 19 For further details see EXAMPLE OF OPERATION SCHEDULE on the next page ON OFF control impossible by remote controller Use this mode when operating and stopping from the central remote controller only ON OFF control by the remote controller is disabled Only OFF control possible by remote controller Use this mode when executing the operation only by the central remote controller and ex...

Страница 9: ...cceptance Rejection 19 AIR CONDITIONER HOST OFF ON PM AM SET1 OFF ON PM AM SET2 Note Do not select the timer operation possible without the remote controller In this case timer operation is disabled When the operation stop temperature setting and operation mode setting by remote controller are rejected HOST is displayed on the remote controller Operation schedule is possible only in conjunction wi...

Страница 10: ...op at 10 00 Programmed to stop at 10 00 Programmed to operate at 5 20 Operation starts without fail at the timer programmed time Individual Centralized Timer operation possible by remote controller Timer operation possible by remote controller at preset times Stop Timer stops Power reminder stops Timer operation possi ble by remote controller at preset times Stops temporarily at the timer programm...

Страница 11: ...ons For further details see the list on the right B Zone with display No group with master remote controller setting exists in this zone The cool heat selection is not available because the master remote controller has not been set Some operations other than cool heat operations can be set For further details see the list in the right See page 31 if the display is flashing 1 Press the OPERATION MO...

Страница 12: ...The display appears Press the when the display shows 32 C The display appears Set the temperature at the point 1 C higher than the upper limit and 1 C lower than the lower limit of the range subject to setting respectively GROUP MONITORING Fig 7 Utilize the group monitor function in each of the following cases 1 Check the malfunction code See the next page 2 Check the group that requires cleaning ...

Страница 13: ...tion and FAN operation can be set by remote controller and central remote controller 1 Check the particular group with the master remote controller setting for the refrigerant system you wish to reset See the right Call up the group without the display See page 30 Hold the OPERATION MODE SELEC TOR BUTTON down for about four seconds while the above group is being called up The display flashes on th...

Страница 14: ...ERANT SYSTEM DISPLAY again The display goes out The refrigerant system display is finished now NOTES Unless operated from within one minute from when the refrigerant system display the display will automatically revert back to the group display This function may not be available depending on the type of outdoor unit with which the unit is connected In this case the display flashes DISPLAY OF TIME ...

Страница 15: ...play of group No in operation go out at the same time then the lights of all the groups stop at the same time When using the central remote controller in conjunc tion with other optional controllers for centralized control the OPERATION LAMP on controllers which are not being used for operation may delay a few minutes before lighting or going out There is nothing wrong with the equipment The delay...

Страница 16: ... BS6 BUTTON field set on the PC board The controller will enter the FIELD SET MODE 4 Select the MODE No with the BS2 BUTTON and BS3 BUTTON temperature setting 5 Use the BS9 BUTTON set A and BS10 BUTTON set B to select the group No for each group Group No increases in the order of 1 00 1 01 1 15 2 00 8 15 6 Press BS7 BUTTON set cancel to set the selected group No 7 Press BS6 BUTTON field set to ret...

Страница 17: ...3VA10582 7A EM01A044 0110 HT Matsushita Electric Industrial Co Ltd Web Site http www panasonic co jp global ...

Отзывы: