7-3. Disassembly Procedure
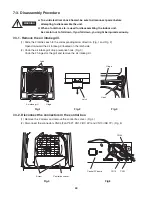
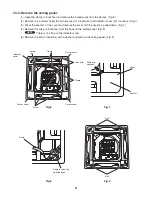
7-3-1. Remove the air intake grill.
(1) Slide the 2 latches each to the corresponding arrow direction. (Fig. 1 and Fig. 2)
Open downward the air intake grill located on the latch side.
(2) Undo the air intake grill drop preventive hook. (Fig. 3)
Undo the 2 hinges for the grill and remove the air intake grill.
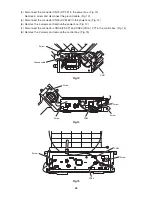
7-3-2. Disconnect the connectors in the control box.
(1) Remove the 2 screws and remove the control box cover. (Fig. 4)
(2) Disconnect the connectors CN04 (FLAP 5P), CN12 (RC 4P) and CN13 (IND 7P). (Fig. 5)
Latch
Latch
Hook
Hinge
Air intake grill
Screw
Control box cover
CN13
CN04
CN12
Fig.1
Fig.4
Fig.5
Fig.2
Fig.3
Hinge
Control PCboard
To avoid electrical shock hazard, be sure to disconnect power before
attempting to disassemble the unit.
When a footstool, etc. is used for disassembling the indoor unit,
be careful not to fall down. If you fall down, you might be injured seriously.
WARNING
40
Содержание CS-KE12NB41
Страница 36: ...8FA2 5251 12200 2 Outdoor Unit CU KE12NK1 36 ...
Страница 69: ......
Страница 89: ......
Страница 114: ...Operating Instructions CZ RD515U 852 6 4181 230 00 1 APPENDIX C A 3 ...
Страница 125: ......
Страница 126: ...A 4 INSTALLATION INSTRUCTIONS CZ RD515U 852 6 4190 592 00 0 APPENDIX D ...
Страница 131: ......
Страница 132: ...DC1111 0 ...

