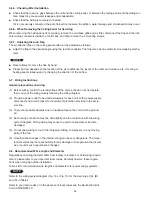
14
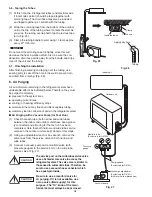
When connecting each power wire to the corresponding terminal, fol-
low the instructions “How to connect wiring to the terminal” and fasten
the wire securely tight with the fixing screw of the terminal plate.
How to connect wiring to the terminal
a) For Indoor Unit
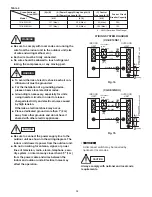
(1) Cut the wire end with a cutting pliers, then strip the insulation to
expose the wire about 9/32" (7 mm). See the label (Fig. 9) near the
terminal plate.
(2) Using a screwdriver, loosen the terminal screw on the terminal
plate.
(3) Insert the wire and tighten the terminal screw completely using a
screwdriver.
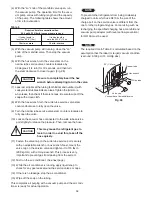
b) For Outdoor Unit
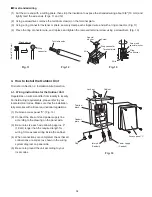
For solid core wiring (or F-cable)
(1) Cut the wire end with a cutting pliers, then strip the insulation to
expose the solid wire about 15/16"
(25 mm). (Fig. 10)
(2) Using a screwdriver, remove the terminal screw(s) on the terminal
plate.
(3) Using the pliers, bend the solid wire to form a loop suitable for the
terminal screw.
(4) Shape the loop wire properly, place it on the terminal plate and fix
it securely with the removed terminal screw using a screwdriver.
Loose wiring may cause the ter-
minal to overheat or result in unit
malfunction. A fire hazard may
also exist. Therefore, be sure all
wiring is tightly connected.
WARNING
Fig. 9
STRIP
SIZE
9/32"
(7 mm) (ACTUAL
SIZE)
Fig. 8
Fig. 10
Solid wire
Loop
Insulation
Strip 15/16" (25 mm)
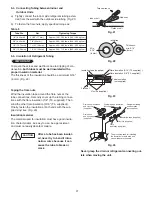
1
3
2
Earth screw
Clamping strap
(Conduit)
Inter unit
Power wiring
(Locally purchased)
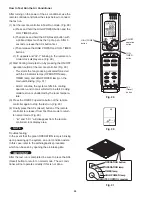
3-9. Wiring Instructions for Inter-unit Connections
(1) Remove the 1 screw from the terminal cover, then open the
cover. Be careful that the cover does not fall.
(2) Remove the 3 screws from the power box cover, then open
the cover. Be careful that the cover does not fall.
(3) Use the screw to securely fasten the ground wire from the
outdoor unit in place.
(4) Remove the transparent plastic cover from the 3P terminal
plate.
(5) While viewing the wiring diagram, connect the inter-unit and
power supply line to terminals 1, 2 and 3 on the 3P terminal
plate.
(6) Remount the transparent plastic cover onto the 3P terminal
plate.
(7) Be sure to use the clamping strap to fasten the wires in place.
(8) Tighten the screws to remount the terminal and the power
box cover.
Содержание CS-KE12NB41
Страница 36: ...8FA2 5251 12200 2 Outdoor Unit CU KE12NK1 36 ...
Страница 69: ......
Страница 89: ......
Страница 114: ...Operating Instructions CZ RD515U 852 6 4181 230 00 1 APPENDIX C A 3 ...
Страница 125: ......
Страница 126: ...A 4 INSTALLATION INSTRUCTIONS CZ RD515U 852 6 4190 592 00 0 APPENDIX D ...
Страница 131: ......
Страница 132: ...DC1111 0 ...


