background image

3

English

Space

I

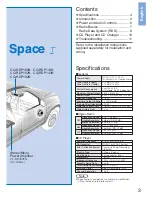
Contents

Specifications

Specifications and design are subject to modification
without notice due to improvements.

Note

General

Power Supply

Tone Controls (Bass)
Tone Controls (Treble)

Current Consumption

Maximum Power Output
Power Output
Speaker Impedance
Pre-Amp Output Voltage
Pre-Amp Output Impedance
Dimensions (Main Unit)
Weight (Main Unit)

DC 12 V (11 V - 16 V), 
Test Voltage 14.4 V, Negative Ground
±12 dB at 100 Hz
±12 dB at 10 kHz

Less than 2.5 A
(CD mode, 0.5 W 4-Speaker)
45 W x 4 (at 4 

20 W x 4 (DIN45 324, at 4 

)

4 - 8 

2 V (CD mode)
600 

178(W) x 50(H) x 150(D) mm
1.4 k

g

Stereo Radio

Frequency Range
Usable Sensitivity
Stereo Separation

87.5 - 108 MHz
6 dB/µV(S/N 30 dB)
35 dB (at 1 kHz)

Frequency Range
Usable Sensitivity

531 - 1 602 kHz
28 dB/µV (S/N 20 dB)

Frequency Range
Usable Sensitivity

153 - 279 kHz
32 dB/µV (S/N 20 dB)

CD Player

Sampling Frequency
DA Converter
Error Correction System

Pick-Up Type
Light Source
Wavelength
Frequency Response

Total Harmonic Distortion

Signal to Noise Ratio

Wow and Flutter
Channel Separation

Panasonic Super Decoding
Algorithm
Astigma 3-beam
Semiconductor laser
780 nm
20 Hz - 20 kHz (±1 dB)
96 dB
0.01 % (1 kHz)
Below measurable limits
75 dB

8 times oversampling
MASH 1 bit/4 DAC System

CQ-RDP162N
CQ-RDP152N
CQ-RDP102N

CQ-RDP112N
CQ-RDP142N

Stereo/Mono
Power Amplifier

:

CY-M7052EN
(Up Grade)

Specifications ................................. 3

Introduction..................................... 4

Power and Audio Controls .............. 6

Radio Basics................................... 7
Radio Data System (RDS).............. 8

CD Player and CD Changer ......... 10

Troubleshooting ............................ 11

Refer to the Installation Instructions
supplied separately for installation and
wiring.

FM

MW

LW

Содержание CQ-RDP102N

Страница 1: ...rodotto Español Lea estas instrucciones antes de poner en funcionamiento este aparato Polski Przed rozpoczeçciem uzæywania urzaçdzenia prosimy o dok adne przeczytanie instrukcji CD Player Receiver with CD Changer Control CQ RDP162 RDP112N CD Player Receiver CQ RDP152 RDP142 RDP102N Operating Instructions Bedienungsanleitung Manuel d instructions Gebruiksaanwijzing Bruksanvisning Manuale di istruzi...

Страница 2: ...he people who are proud of their excellent reputation established over the years We know this product will bring you many hours of enjoyment After you realize its quality value and reliability we are sure that you are proud to be a member of our family Fantastic Sound Sophisticated Product Achieved by Optional Functions Sound System with Spurting Realism 2 channel Power Amplifier Powerful Heavy Ba...

Страница 3: ...B at 1 kHz Frequency Range Usable Sensitivity 531 1 602 kHz 28 dB µV S N 20 dB Frequency Range Usable Sensitivity 153 279 kHz 32 dB µV S N 20 dB CD Player Sampling Frequency DA Converter Error Correction System Pick Up Type Light Source Wavelength Frequency Response Total Harmonic Distortion Signal to Noise Ratio Wow and Flutter Channel Separation Panasonic Super Decoding Algorithm Astigma 3 beam ...

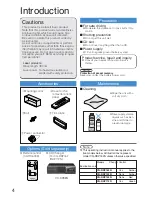
Страница 4: ...N None Amber CQ RDP142N None Red CQ RDP112N Yes Green qMounting collar rCase for the removable front panel wBolt tTrim plate Cautions Accessories ePower connector Remote control CA RC61EX Options Sold separately CD Changer For CQ RDP162 RDP112N CX DP88N This product is a class I laser product Note that this product uses a visible invisi ble laser beam which could cause haz ardous radiation exposur...

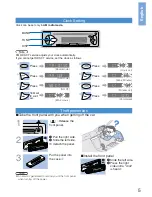
Страница 5: ...k Hours CT 10 35 CT 10 35 Completed Press FM1 87 50 a a a a a a a a A B C D E F G Clock can be set only in AM radio mode An alarm is generated to remind you of the front panel when turning off the power Note Release the front panel 1 w q q Pull the right side w Slide the left side a detach the panel 2 Put the panel into the case r 3 Take the front panel with you when getting off the car Install th...

Страница 6: ...left right 1 to 15 front rear 1 to 15 Sound quality adjustment Volume adjustment Power on VOL Adjust the level 2 Power on The volume increases gradually to the last level if that level was over 20 When first powered up a mes sage is displayed DISP Stop the message SOURCE Hold down at power off Turn on the power and dis play the message Notes on off MUTE MUTE Toggle the Mute on and off Mute the sou...

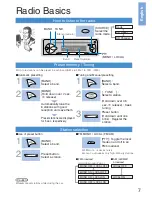
Страница 7: ...ically tune the 6 stations with good reception and save them Preset stations are displayed for 5 sec respectively BAND Select a band Preset button Select a station 1 Use of preset button 2 PTY PTY Toggle the local mode on and off in an FM broadcast FM MONO LOCAL FM AM FM mono reduces noise Local auto seeks only high intensity stations MONO OFF LOCAL OFF MONO ON LOCAL OFF MONO ON LOCAL ON MONO OFF ...

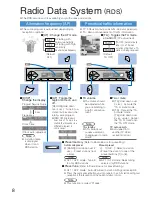
Страница 8: ... mute and the TA ON mode Alternative frequency AF Periodical traffic information Clock auto adjusted Manual preset TUNE Select a station APreset the station to one of the preset buttons 1 to 6 TA ON Automatically tune in to a TP when a station other than a TA station is being received REG ON Hold down over 2 sec Tune in to a station that broadcasts the totally same program Preset tune Refer to Rad...

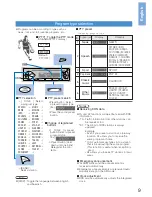
Страница 9: ... from other stations can be received too AF The AF list of RDS stations is always updated No Program type Display Program type selection Notes APreset button Hold down until one blink Reregister the con tents DISP Toggle the language between English and Swedish Note Contents Emergency announcement ALARM blinks and the announcement is received automatically Emergency announcements are received auto...

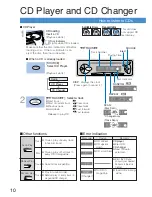
Страница 10: ...CE Select CD Player 1 When a CD is already loaded 1TRACK2 Select a track 2 Disc indicator Lights when CD is loaded CD loading Insert a CD Playback starts Next track Start of current track Press once Previous track Press twice Hold down Fast forward Fast reverse Release to play CD DISP displays the clock Press again to cancel it Playback starts SCAN Disc Scan Track Scan Changer only SOURCE DISC DIS...

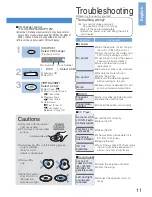
Страница 11: ...rt the engine Or turn the igni tion switch to the ACC position Verify the wiring Ex battery cord ACC cord grounding cord etc Fuse blown Contact the nearest Panasonic Service Center Ask a professional for fuse replacement Be sure to use the same rated fuse Disable the mute function Verify the wiring Wait until the dew disappears before turning on the unit Keep a distance between this unit and an ac...

Страница 12: ... SAH0502 0 Printed in Hungary Matsushita Electric Industrial Co Ltd Central P O Box 288 Osaka 542 8588 Japan Matsushita Communication Deutschland GmbH Lahnstraße 5 Industriegebiet Süd 24539 Neumünster F R Germany ...

Отзывы: