background image

E

N

G

L

I

S

H

20

Specifications

CQ-R253U

29

E

N

G

L

I

S

H

19

CQ-R253U

28

Dolby noise reduction manufactured under license from Dolby Laboratories Licensing Corporation.
“DOLBY” and the double-D symbol 

A

are trademarks of Dolby Laboratories Licensing Corporation.

General

Power Supply: 

12 V DC (11 V – 16 V) Test Voltage 14.4 V, Negative ground

Maximum Power Output: 

50 W 

×

4 channels at 400 Hz, Volume Control maximum 

Tone adjustment range: 
Bass:

± 12 dB at 100 Hz 

Treble:

± 12 dB at 10 kHz

Current Consumption: 

Less than 2 A (tape mode, 0.5 W 

×

4 chanels)

Pre-Amp Output Voltage: 

2.0 V (CD Play mode; 1kHz, 0 dB)

Suitable speaker impedance: 

4 - 8 

Dimensions (W 

×

×

D): 7" 

×

1-15/16" 

×

6-1/10" (178 

×

50 

×

155 mm)

Weight: 

3 lbs. 1 oz (1.4 k

g

)

AM Radio

Frequency Range: 

530 – 1 710 kHz 

Useable Sensitivity: 

28 dBµV (25 µV, S/N 20 dB)

FM Stereo Radio

Frequency Range: 

87.9 - 107.9 MHz

Useable Sensitivity: 

13.2 dBf. (1.25 µV, 75 

)

50 dB Quieting Sensitivity: 

15.2 dBf. (1.6 µV, 75 

)

Frequency Response: 

30 - 15 000 Hz (±3 dB)

Capture Ratio: 

1.5 dB

Alternate Channel Selectivity: 

75 dB 

Stereo Separation: 

35 dB (1 kHz)

Image Response Ratio: 

65 dB

IF Response Ratio: 

100 dB

Signal/Noise Ratio: 

70 dB

Tape Player

Reproduction System: 

4-track, 2-program stereo

Tape Speed: 

1-7/8"/sec (4.76 cm/sec)

FF/REW Time: 

Less than 110 sec (C-60)

Frequency Response: 

35 - 14 000 Hz ±3 dB (normal)
35 - 17 000 Hz ±3 dB (metal)

Wow and Flutter: 

0.12 % (WRMS)

Signal/Noise Ratio: 

52 dB (Dolby B NR OFF)
62 dB (Dolby B NR ON)

Note: Specifications and design are subject to modification without notice due to improvements in technology.

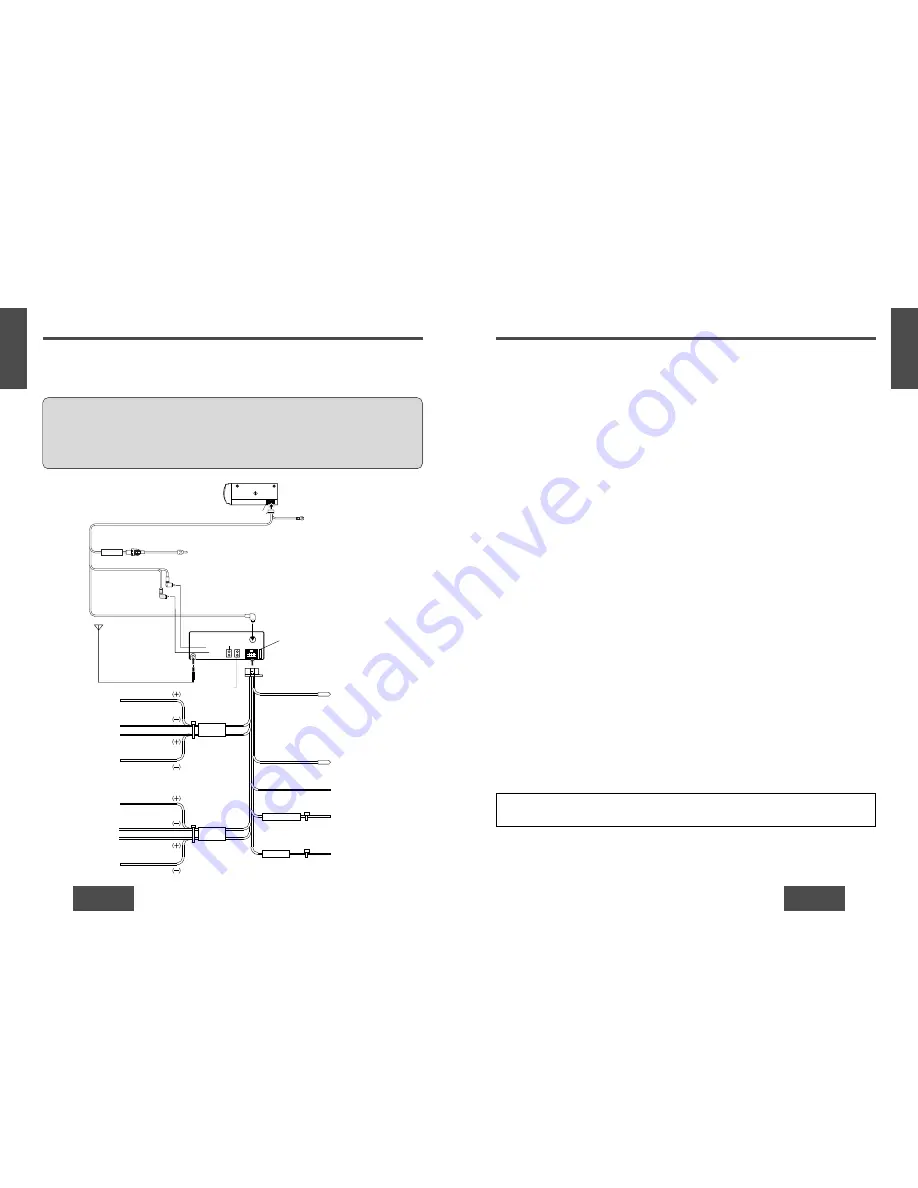
Electrical Connections

Cautions:
• To prevent damage to the unit, be sure to follow the connection diagram below.
• Remove the covering of the leads about 5 mm long from their end before connecting.
• Do not insert the power connector into the unit until the wiring is completed.
• Be sure to insulate any exposed wires from a possible short-circuit from the car chassis. Bundle all cables and

keep cable terminals free from touching any metal parts.

CQ-R253U

Antenna

PREAMP OUT CONNECTOR (Rear)

CD Changer
Control Connector

L(White)

R(Red)

CD•C IN

Fuse(3A)

Extension Cord
Supplied for an optional CD changer
(DIN/BATT/RCA/GND)

Ground Lead

To a clean, bare metallic
part of your car

To the car battery, continuous
+12V DC

Battery Lead

RCA Cord

DIN Cord

(White)

(Red)

(R)

(L)

CD Changer
CX-DP880U
(option)

BATTERY

Fuse (15 A)
If the fuse (rear panel) blows
frequently, they may be
something wrong with the unit.
Consult your nearest Panasonic
Service Centre for servica.

Blue/white stripe

Front speaker lead

White

White/black stripe

Gray

Gray/black stripe

Green

Green/black stripe

Violet

Violet/black stripe

Left

Front

Rear

Right

Right

Left

Rear speaker lead

Blue

Black

Yellow

Red

External Amplitier
Control Power Lead
To an external amplitier

Note: This lead is used for power
control when an external power
amplifier is connected. The power
supply of a power amplifier will be
activated when turning on 
the power of this unit.

Not Used

Ground lead
(To a clean, bare metallic
part of the car chassis.)

Battery lead
(To the car battery,
cont12 V DC)

ACC power lead
(To ACC power, +12 V DC)

FRONT SP

BATTERY 15A

ACC

REAR SP


Power

    Connector

Preparation:
• This unit can be connected to an optional CD changer (CX-DP880U). For details consult your nearest panasonic

servicenter.

• For connection to a CD changer, refer to the operating instructions of the CD Changer (CX-DP880U).

Schéma de câblage

Содержание CQ-R253U

Страница 1: ...nes M O D E CQ R253U DOLBY B NR DIS P TRACK TUNE LO UD MONO MUTE DISC SCAN REPEAT RANDOM REMOTE APM BAND P W R VOL P U S H S E L 1 MTL NR 2 5 B S 6 3 TPS REP 4 CQ R253U Please read these instructions...

Страница 2: ...NG TO REDUCE THE RISK OF FIRE OR ELECTRIC SHOCK OR PRODUCT DAMAGE DO NOT EXPOSE THIS APPLIANCE TO RAIN SPLASHING DRIPPING OR MOISTURE CAUTION PLEASE FOLLOW THE LAWS AND REGULATIONS OF YOUR STATE PROVI...

Страница 3: ...heures d agr ment Notre r putation est fond e sur une ing nierie lectronique et m canique de haute pr cision laquelle pr side la fabrication d appareils ne comportant que des composants de choix assem...

Страница 4: ...s met licos lejos del mecanismo de la cinta y de la cabeza de la cinta para evitar rendimiento pobre o mal funcionamiento Uso de los centros de servicio autorizados No intente desmontar ni ajustar est...

Страница 5: ...s lectriques 48 Mesures de pr caution et soh ma de c blage Donn es techniques 49 Informaci n para su seguridad P gina 3 Utilizaci n de este equipo con seguridad 6 Accesorios 6 Generalidades 50 Aliment...

Страница 6: ...3U DOLBY B NR DISP TRACK TUNE LO UD MONO MUTE DISC SCAN REPEAT RANDOM REMOTE APM BAND P W R VOL P U S H S E L 1 MTL NR 2 5 B S 6 3 TPS REP 4 DISP TRACK TUNE Audio Mode Bass Treble Balance Fader The 12...

Страница 7: ...ge Press DISP display to switch to the clock display Preset Station Setting Up to 6 stations can be saved in each of the FM1 FM2 FM3 and AM preset station memories Note Existing saved stations are ove...

Страница 8: ...Press 1 MTL again to cancel Blank Skip Press 5 B S to skip unrecorded portions longer than 15 seconds on the tape Press 5 B S again to cancel Note When repeat is on the blank skip does not work becaus...

Страница 9: ...ailure persists press the reset switch on the CD changer If normal operation is not restored yet call the store where you purchased the unit No disc in the changer magazine Insert discs into the chang...

Страница 10: ...Press and position A of the battery holder and then pull it out Install the battery on the battery holder Place a battery in the holder with its side facing up as shown in the figure Insert the batter...

Страница 11: ...has run down Replace the battery Remote control is in the wrong direction Direct the remote control at sensor REMOTE on the panel Cause Step Remote Control Unit Speaker Connections Caution Please foll...

Страница 12: ...ition on to the accessory position and ground one lead of the test bulb to the chassis Touch the other lead of the test bulb to each of the exposed wires from the cut radio connector plug Touch one wi...

Страница 13: ...aller for assistance Preparation Disconnect the cable from the negative battery terminal see cautions below Unit should be installed in a horizontal position with the front end up at a convenient angl...

Страница 14: ...essive moisture Do not remove the face plate while driving your car Do not place the face plate on the dashboard or nearby areas where the temperature rises to high level Do not touch the contacts on...

Страница 15: ...follow the connection diagram below Remove the covering of the leads about 5 mm long from their end before connecting Do not insert the power connector into the unit until the wiring is completed Be...

Страница 16: ...affichage retourne en mode standard M O D E CQ R253U DOLBY B NR DISP TRACK TUNE LO UD MONO MUTE DISC SCAN REPEAT RANDOM REMOTE APM BAND P W R VOL P U S H S E L 1 MTL NR 2 5 B S 6 3 TPS REP 4 DISP TRA...

Страница 17: ...z sur DISP affichage our commuter sur l affichage l horloge R glage de station m moris e Un nombre maximum de 6 stations peuvent tre sauvegard es dans chacune des m moires de station m moris e FM1 FM2...

Страница 18: ...duction de Bruit Dolby B Pressez 2 NR pour choisir la mode Dolby B NR Pressez de nouveau 2 NR pour annuler Remarques choisissez la mode Dolby B NR pour la lecture d une cassette enregistr e la r duct...

Страница 19: ...z chez le d taillant o vous avez achet l appareil Il n y a pas de disaue dans le changeur le magasin Introduisez les disques dans le changeur de disque le magasin Messages d erreur affich s Lecture de...

Страница 20: ...ctement M O D E DOLBY B NR TRACK TUNE REMOTE Installation de la pile Retirez le porte pile Pressez et positionner le porteur de batt rie A Ensuite retirez le Installez la pile sur le porte pile Placez...

Страница 21: ...correctement La pile utilis e n est pas adapt e V rifiez la pile La pile est puis e Remplacez la pile La t l commande n est pas orient e correctement Dirigez la t l commande vers le capteur de t Orig...

Страница 22: ...autre fil du v rificateur de continuit chacun des fils expos s du connecteur sectionn Touchez un fil la fois jusqu ce que le fil faisant allu mer l ampoule du v rificateur ait t rep r Ensuite mettez l...

Страница 23: ...tall en position horizontale avec son extr mit avant inclin e vers le haut un angle commode mais ne d passant pas 30 Installation sur le tableau de bord Baie d installation Vous pouvez installer l app...

Страница 24: ...rez pas la plaque de fa ade en conduisant Ne placez pas la plaque de fa ade sur le tableau de bord ou dans un endroit susceptible de devenir excessivement chaud Ne touchez pas aux contacts de la plaqu...

Страница 25: ...exion ci dessous pour viter d endommager l appareil Avant de raccorder un c ble d nuder son extr mit d environ 5 mm Ne ins rez pas le connecteur d alimentation dans l unit avant que l installation lec...

Страница 26: ...NO MUTE DISC SCAN REPEAT RANDOM REMOTE APM BAND P W R VOL P U S H S E L 1 MTL NR 2 5 B S 6 3 TPS REP 4 DISP TRACK TUNE Modo de audio graves agudos balance derecho izquierdo balance delantero trasero E...

Страница 27: ...isualizaci n para pasar a la pantalla de reloj Ajuste de emisoras presintonizadas Pueden guardarse hasta 6 emisoras en cada una de las memorias de emisoras predeterminadas de FM1 FM2 FM3 y AM Nota Des...

Страница 28: ...undos existentes en la cinta Presione nuevamente 5 B S si desea cancelar dicha funci n Nota Cuando la funci n de repetici n esta prendida la funci n de salteado de espacios en blanco es inhabilitada a...

Страница 29: ...hay ning n disco en el cambiador cartucho Inserte los discos en el cambiador cartucho Visualizaci n de mensajes de error Reproducci n por exploraci n de pistas Presione 3 SCAN El n mero de pista parpa...

Страница 30: ...nmediatamente la alimentaci n Desenchufe el cable de la alimentaci n y compruebe que no haya humo ni calor procedentes del aparato antes de solicitar la reparaci n No trate nunca de reparar usted mism...

Страница 31: ...Ajuste del sonido Problema Los bolones no funcionan Se han invertido las polaridades de la pila Inserte correctamente la pila Pila incorrecta Compruebe la pila La pila est gastada Reemplace la pila El...

Страница 32: ...a masa en el chasis uno de los conductores de la bombilla de prueba Toque con el otro conductor de la bombilla de prueba cada uno de los cables expuestos de la clavija de conexi n de radio cortada To...

Страница 33: ...citarle ayuda Preparaci n Desconecte el cable del terminal de bater a negativo consulte la precauci n de m s abajo El aparato deber instalarse en una posici n horizontal con el extremo delantero forma...

Страница 34: ...xtraiga la placa frontal mientras conduzca el veh culo No ponga la placa frontal sobre el tablero de instrumentos ni en lugares cercanos en los que la temperatura sube en gran medida No toque los cont...

Страница 35: ...de la conexi n No inserte el conector de alimentaci n en el aparato hasta que haya terminado el tendido el ctrico Ase rese de aislar cualquier cable expuesto a un posible cortacircuito del chasis del...

Страница 36: ...Memorandum Memorandum...

Страница 37: ...e Panasonic Way Secaucus New Jersey 07094 http www panasonic com Panasonic Sales Company Division of Matsushita Electric of Puerto Rico Inc PSC Ave 65 de Infanteria Km 9 5 San Gabriel Industrial Park...

Отзывы: