


SIRIUS Satellite Radio control
(continued)
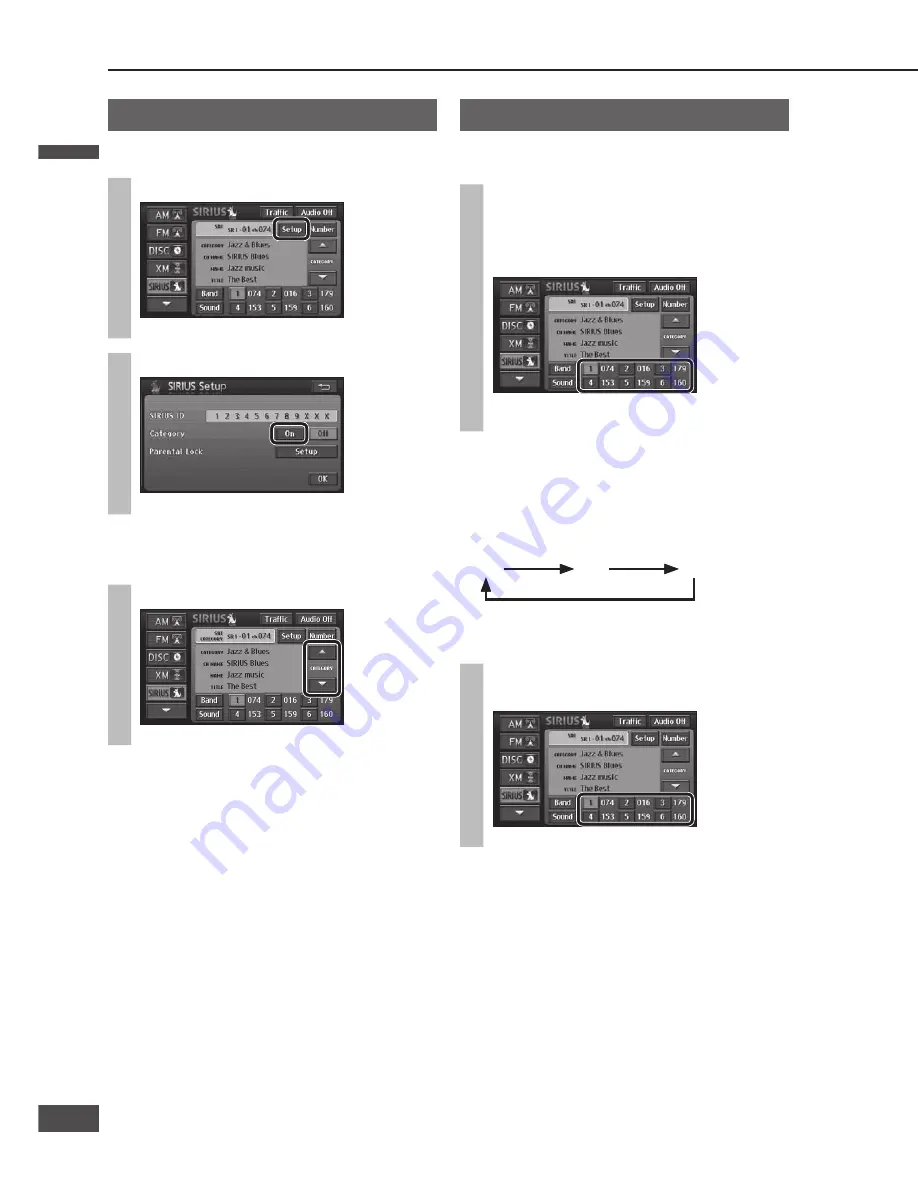
Select a category
To turn the category selection on
1
Select [Setup].
The SIRIUS Setup screen is displayed.
2
Select [On] from “Category”.
Select [Off] to turn the category selection off.
To select a category
Select [
] or [
].
The category switches.
Note:
It is not possible to select a category if “Category” is
set to [Off].
Preset memory
The channel being received can be stored manually
under a selected number.
Select the channel, then touch and
hold the number under which you
wish to store the channel for at least
2 seconds.
The channel being received is stored under the
selected number.
Note:
6 channels can be stored for each channel list (SR1,
SR2, and SR3). (18 channels in total)
Select [Band] to switch between channel lists.
The channel list switches as shown below each time
[Band] is selected.
Select a stored channel
Select a channel (number) from the
preset channels.
The channel switches to the selected channel.
SR1
SR2
SR3
SR1
SR2
SR3
Parental lock
Restricts the channels that can be received.
1
Select [Setup] from “Parental Lock”
on the SIRIUS Setup screen.
2
Enter the 4-digit passcode and select
[Enter].
default:
0000
The Parental lock setup screen is displayed.
Select [Ret] to delete the entered numbers.
Once a code number is entered, the code
number will be required the next time the item
is used, and thereafter. Do not forget the code
number. If you forget your code number, touch
[Ret] 10 times to initialize the setting.
3
Make settings.
Parental lock
[On]: Enables the parental lock.
[Off]: Disables the parental lock.
To set the lock channel
Select [Set] from “Lock Channel”. (
page 7)
To change the passcode
Select [Set] from “Passcode”. (
page 7)
To set the lock channel
Set the channels to be protected by Parental lock.
Select [Lock]/[Unlock] for each channel.
When [Lock] is selected, the channel is locked.
Locked channels are skipped at channel
selection. (
page 5)
The passcode entry screen is displayed when a
locked channel number is entered at the direct
channel selection. (
page 5)
Enter the passcode to switch to the selected
channel.
When [Unlock] is selected, the channel is unlocked.
: Moves the cursor to the previous/next screen.
: Moves the cursor to the previous/next
item.
To change the passcode
1
Enter the current 4-digit passcode
and select [Enter].
2
Enter the new 4-digit passcode and
select [Enter].
3
Enter the new 4-digit passcode again
and select [Enter].
The passcode is updated to the new entry.
English
English
6
7
7
6


