background image

8

Getting Star

ted

First-time Operation

5

Input the Product Number written on the “Certificate of Authenticity” located in
the Windows

®

 95 book that comes with this computer then press [Next].

Press [Finish].

6

4

After reading the agreement, select [I accept the agreement] or [I don't accept the
agreement], then press [Next].

If [I accept the agreement] is selected, the [Certificate of Authenticity] will
appear.  If [I don't accept the agreement] is selected, the Windows setup will be
aborted.

NOTE

Setup Windows 95

3

Enter your name and your company’s name, then press [Next].
(It is possible to omit the company name item.)
The License Agreement will be displayed.

Select settings for your region, then press [Next].

Select your keyboard layout, then press [Next].
(for U.S.A.: United States 101)

2

1

Moving the cursor ( ) or clicking buttons can be performed with the touch

pad. (

page 12)

NOTE

6

5

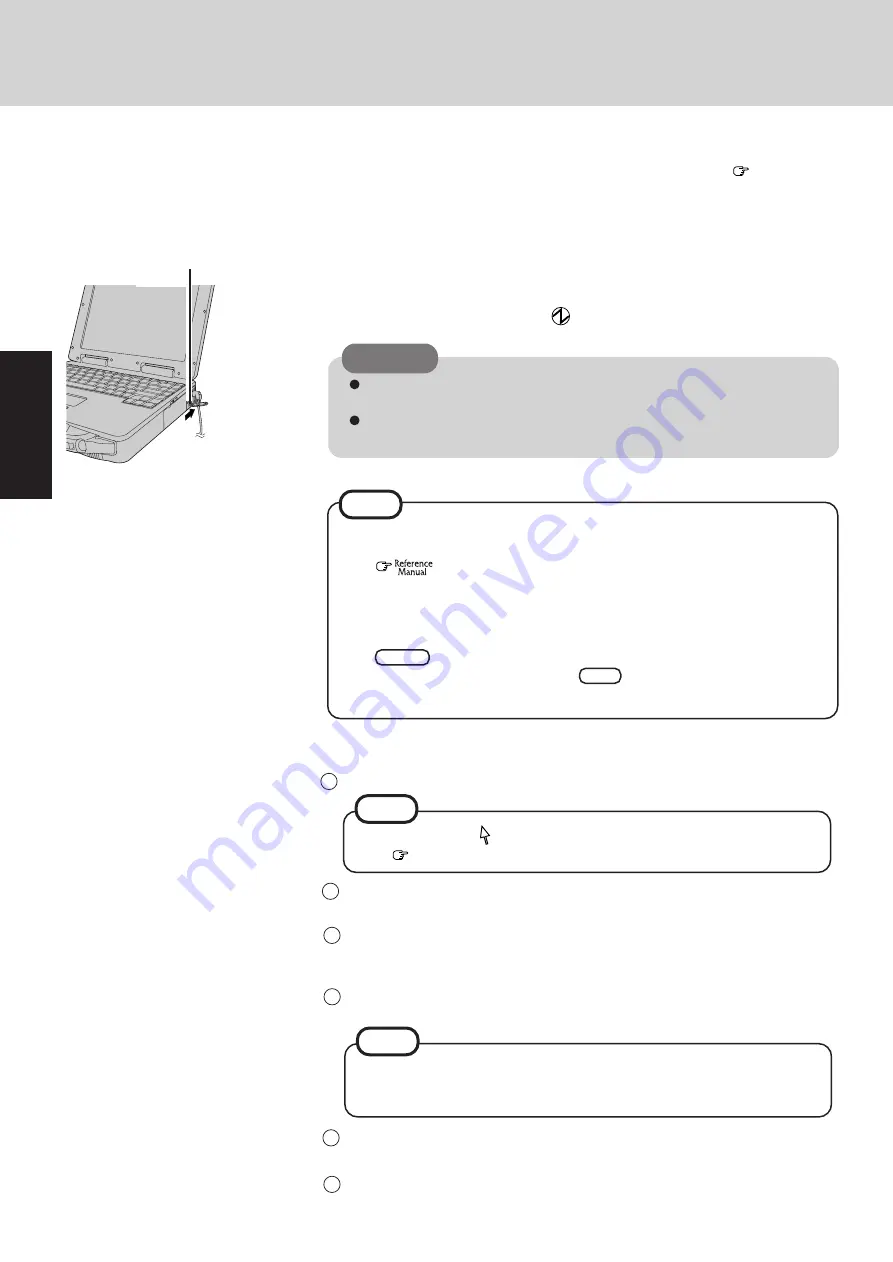
Turn your computer on

Slide the power switch toward the rear of the computer and hold it for approximately

one second until the power indicator (

) turns on before releasing it.

CAUTION

After confirming that the power indicator has turned on, do not touch the power
switch until Windows setup has started.
Once the computer is powered off, you must wait at least ten seconds before
powering it on again.

The power saving function is factory set, so if there is no input from a key, the touch
pad, or the external mouse for two minutes, the power to the LCD is cut (ECO
mode

 "Computing on the Road" )*.

The LCD will resume operation when the touch pad is used or a key is pressed.
The computer may enter the ECO mode while Windows is setting up or even when
an application software is being installed.  In this case, because it is conceivable
that a selection dialog box will be shown, for resuming from the ECO mode, do not
press 

  Enter

   which may trigger a selection, but instead, press a key unrelated to

the direct triggering of a selection, like                .

NOTE


  Ctrl

Power Switch

* Except the devices connected to the USB port such as a USB mouse.

4

Read the LIMITED USE LICENSE AGREEMENT 

(

page 23)

Before removing the seal covering the power switch, please read the LIMITED USE LI-
CENSE AGREEMENT.  Removal of this seal indicates agreement to the terms specified.
After you have agreed to the terms, you may turn your computer on.

Содержание CF-27 Series

Страница 1: ...g Operation Appendix Additional Manual Reference Manual This manual can be accessed on your computer Please refer to page 15 on how to access the Reference Manual Contents Key Combinations LED Indicat...

Страница 2: ...served No part of this manual may be reproduced in any form without the prior written permission of Matsushita Electric Industrial Co Ltd No patent liability is assumed with respect to the use of the...

Страница 3: ...1 800 LAPTOP 5 1 800 527 8675 Incorrectly using peripheral devices may lead to a decrease in performance an increase in temperature and or damage your computer For more information on peripheral devi...

Страница 4: ...sitive and negative contacts Do Not Put into a Microwave Do not put the battery pack into a microwave oven or a pressurized chamber Avoid Extreme Heat Cold and Direct Sun light Do not charge use or le...

Страница 5: ...to shock Please use care when handling your computer shock may damage your hard disk or make your software applications and data unusable Do not power off your computer while software applications are...

Страница 6: ...se items are missing or is not working properly please contact Panasonic Technical Support CAUTION CF AA1639 Have 2HD floppy disks prepared to create disks that will allow you to reinstall the operati...

Страница 7: ...7 Getting Started...

Страница 8: ...ng it CAUTION After confirming that the power indicator has turned on do not touch the power switch until Windows setup has started Once the computer is powered off you must wait at least ten seconds...

Страница 9: ...n instruc tions 9 Input the correct date time and time zone and press Close You can also complete these settings at a later time 7 Simply follow the on screen instructions You can also complete these...

Страница 10: ...1 2 3 Lift open the display Power Switch Latch CAUTION The computer will not power on when the display is closed except when con necting an external display After confirming that the power indicator...

Страница 11: ...ing Area Scrolling up down Possible when a check mark is added for Vertical For the Pan and Auto Scroll functions the entire work surface of the touch pad can be used for scroll ing Changing the mode...

Страница 12: ...ur finger lightly over the surface Wheel Indicates an operation applicable to the Microsoft IntelliMouseTM Wheel mode Indicates an operation applicable to the original mode Original When a check mark...

Страница 13: ...ed again see the procedure for When you want to re enable the touch pad 1 Select Mouse in Start Settings Control Panel 2 Select General in Mouse Properties and then select Change 3 Select Show all dev...

Страница 14: ...using a key combination such as Fn F5 do not touch the touch pad If a key combination is used while the pad is being touched the function of the key combination will not work In addition it is possibl...

Страница 15: ...e beginning or end of a document Cancel or correct an operation Change the display size Perform a find operation Display of the manual Table of Content Items By clicking an item the corre sponding pag...

Страница 16: ...16 Operation...

Страница 17: ...e address Conflict Allocation Error for device CD ROM Drive Entering SETUP Failing Bits nnnn Fixed Disk n Invalid System Configuration Data I O device IRQ conflict PS 2 Mouse Boot Summary Screen nnnn...

Страница 18: ...the battery pack and disconnect the AC adapter then connect them again Please input your password If you have forgotten it contact Panasonic Technical Support page 17 Press F9 in the Setup Utility Set...

Страница 19: ...nfirm your display is powered on Check the settings for your external display Try changing the display by pressing Fn F3 When displaying only through an external display if the computer is shut down b...

Страница 20: ...nnect the FDD cable to the floppy disk drive Refer to the operating instructions of the CD ROM pack and FDD cable for details 2 3 1 1 Start Windows and insert the FIRSTAID FD 2 Select Start Programs A...

Страница 21: ...c util drivers video press OK then press Finish The display will ask you to restart Windows then press Yes Touch pad driver 26 In Start Settings Control Panel Mouse Gen e r a l C h a n g e H a v e D i...

Страница 22: ...ct OK at the Display Properties and select YES at the Do you want to keep this setting If after a short period of time no action is taken for the Do you want to keep this setting the Win dows has rest...

Страница 23: ...d documentation available to any third party by time sharing or otherwise without the prior written consent of MEI D You may not copy or reproduce or permit to be copied or reproduced the Programs or...

Страница 24: ...ouvez assembler en sens inverse compiler en sens inverse ni retracer les Logiciels ni aucune de leurs copies de fa on lectronique ou m canique en tout ou en partie Vous ne pouvez utiliser copier modif...

Страница 25: ...py Disk Drive Multimedia Pocket Security Lock LOCK Parallel Port Using a Printer You may use the floppy disk drive as an ex ternal drive that is connected through the par allel port by using an option...

Страница 26: ...n Volume Control You may also use the function keys to adjust the volume Fn F5 or F6 Speaker on off Fn F4 Speaker MP Release Button Using a Multimedia Pocket Device MP RELEASE Hard Disk Drive Ram Modu...

Страница 27: ...Slots Two Type I or Type II or one Type III Slots Allowable current 3 3 V 400 mA 5 V 400 mA total for two slots 12 V 120 mA RAM Module Slot 144 pin SO DIMM 3 3 V SDRAM or EDO Parallel Port Dsub 25 pin...

Страница 28: ...ption It is an open system in which business proprietors can participate voluntarily The targeted products are office equipment such as computers displays printers facsimiles and copiers Their standar...

Отзывы: