background image

88

Setup menu list (continued)

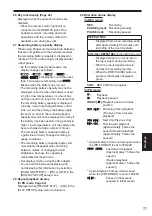
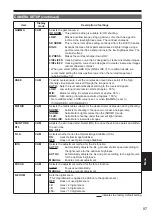
RECORDING SETUP 

The content selected under [RECORDING SETUP] is set for each mode individually. 

Item

Display 

mode

Description of settings

REC FORMAT

SDI/CAM

Selects the recording format.


When [SYSTEM FREQ] 
is set to [59.9Hz]

PH 1080/60i
PH 1080/30P

PH 1080/24P

PH 720/60P
PH 720/30P

PH 720/24P

HA 1080/60i
HG 1080/60i
HE 1080/60i


When [SYSTEM FREQ] 
is set to [50Hz]

PH 1080/50i
PH 1080/25P

PH 720/50P
PH 720/25P

HA 1080/50i
HG 1080/50i
HE 1080/50i

 Only available in CAM mode.

• 

PH 1080/24P and PH 720/24P represent native recording.

PREREC 
MODE

CAM

Selects whether to use the PRE REC function. (Page 51)

ON   OFF

• 

When [ON] is selected, [TCG] in the [TC/UB SETUP] setup menu is set to 
[FREE RUN]. 

AUTO REC

SDI 

Selects whether to record and stop automatically in accordance with the signal 
input from a camera-recorder that is connected to the HD-SDI terminal.

OFF:  

Does not record or stop automatically.

TYPE1: 


 Records and stops automatically in accordance with the recording 
mark in the LTC information that is added to HD-SDI.

TYPE2:


 Records and stops automatically in accordance with the recording 
mark in the S-VITC information that is added to HD-SDI.

TYPE3:


 Sets when using a camera-recorder that is not manufactured by 
Panasonic.

• 

For details on whether to select TYPE1 or TYPE2, see “Recording formats and 
recording marks of Panasonic camera-recorders”. (Page 89)

• 

See the following web site for devices that have confirmed compatibility with TYPE3. 
http://panasonic.biz/sav/autorec_e

• 

The input and recording may not be synchronized at such times as when the 
recording/stop interval is too short (1 second or less) or when the input signals 
are disturbed.

• 

When a setting other than [OFF] is selected, the recorder’s power must be 
turned on, and the camera recorder must be connected in the recording 
standby mode.

REPEAT REC 
MODE

SDI/CAM

Selects the REPEAT REC function. (Page 48)

ON OFF

• 

Selecting [ON] causes the recording format to switch to HE.

• 

In SDI mode, selecting [ON] causes the AUTO REC function to be set to [OFF].

• 

In CAM mode, selecting [ON] causes the PRE REC function to be set to [OFF].

TIME STAMP

SDI/CAM

Sets whether date and time information is superimposed over recorded images.

ON:  

Superimposes the information that is set in [DATE/TIME].

OFF: 

Does not superimpose the information that is set in [DATE/TIME].

        indicates the factory default setting.

Содержание AVCCAM AG-HMR10P

Страница 1: ...is eligible for the AVCCAM 3 Year Warranty Repair Program For details see page 7 Operating Instructions Memory Card Portable Recorder Model No AG HMR10P Model No AG HMR10E S0809S1129 M VQT2H54 1 E Before operating this product please read the instructions carefully and save this manual for future use ENGLISH ...

Страница 2: ...his unit in a bookcase built in cabinet or any other confined space To prevent risk of electric shock or fire hazard due to overheating ensure that curtains and any other materials do not obstruct the ventilation CAUTION To reduce the risk of fire or electric shock and annoying interference use the recommended accessories only CAUTION This apparatus can be operated at a voltage in the range of 110...

Страница 3: ... the cart apparatus combination to avoid injury from tip over 13 Unplug this apparatus during lightning storms or when unused for long periods of time 14 Refer all servicing to qualified service personnel Servicing is required when the apparatus has been damaged in any way such as power supply cord or plug is damaged liquid has been spilled or objects have fallen into the apparatus the apparatus h...

Страница 4: ...g for your safety and convenience A 5 amp fuse is fitted in this plug Should the fuse need to be replaced please ensure that the replacement fuse has a rating of 5 amps and that it is approved by ASTA or BSI to BS1362 Check for the ASTA mark or the BSI mark on the body of the fuse If the plug contains a removable fuse cover you must ensure that it is refitted when the fuse is replaced If you lose ...

Страница 5: ... and used in accordance with the instructions may cause harmful interference to radio communications However there is no guarantee that interference will not occur in a particular installation If this equipment does cause harmful interference to radio or television reception which can be determined by turning the equipment off and on the user is encouraged to try to correct the interference by one...

Страница 6: ...hielded cables which provide quality performance for high frequency transmission applications for analog audio signals Other connecting cables IEEE1394 USB Use shielded cables which provide quality performance for high frequency applications as connecting cables When connecting to the DVI signal terminal use a cable with a ferrite core If your apparatus is supplied with ferrite core s they must be...

Страница 7: ...anty up to three years of free warranty repairs Make sure to save the Registration Notice e mail during the warranty period Please note this is a site that is not maintained by Panasonic Canada Inc The Panasonic Canada Inc privacy policy does not apply and is not applicable in relation to any information submitted This link is provided to you for convenience 1st year 2nd year 3rd year AVCCAM devic...

Страница 8: ...t is licensed under the AVC Patent Portfolio License for the personal and non commercial use of a consumer and no license is granted or shall be implied for any use other than the personal uses detailed below To encode video in compliance with the AVC standard AVC Video To decode AVC Video that was encoded by a consumer engaged in a personal and non commercial activity To decode AVC Video that was...

Страница 9: ...sible to connect an external device equipped with an HD SDI output HD camera recorder HD information camera system etc to the unit and record the data on an SD Memory Card In addition operations for starting or stopping recording on the portable recorder can be performed from some types of camera recorder When SDI input is selected For details on the compatible devices see page 89 32 HD SDI signal...

Страница 10: ...be output to an external monitor for playback 32 HD SDI output HDMI output SD Memory Card AG HMR10 portable recorder External monitor Use the HD SDI output of content that is recorded and played in AVCCAM format only for outputting to an external monitor Editing SD Memory Card content 5 Connecting to a computer for editing Page 73 The portable recorder can be connected to a computer with a USB con...

Страница 11: ... to the output signal When OUTPUT OSD ON is selected in the DISPLAY SETUP setup menu S VITC UMID information is not output Use when performing checks on an external monitor When outputting the input data unchanged Select SDI EE SEL THROUGH in the AV OUT SETUP setup menu Using the setup menus Page 29 HD SDI input signal External device such as a recorder AG HMR10 portable recorder HD SDI output sig...

Страница 12: ...ional HD SDI output signal AG HMR10 portable recorder External monitor AG HCK10G camera head optional Frame sequence information is not output S VITC UMID information is not output Use when performing checks on an external monitor Using the portable recorder continued ...

Страница 13: ...CTIONS 52 Shooting in progressive mode 56 Clip metadata 57 Uploading the metadata META DATA 58 Selecting the USER CLIP NAME recording method 59 Read this first 2 IMPORTANT SAFETY INSTRUCTIONS 3 Recommendation for Use of Genuine Panasonic Battery Rechargeable Battery 3 Using the portable recorder 9 Precaution for use 15 Before use Operating precautions 18 Accessories 20 Optional accessories 20 Desc...

Страница 14: ... headphones 71 Using the external microphone 71 Viewing images on a television or monitor 72 Connecting to a computer nonlinear editing file transfer 72 Nonlinear editing PC mode 73 Displays Screen displays 74 Regular displays 74 Main warning displays 79 Selecting the display items 82 Recording and output format compatibility list 83 Menu Setup menu structure 84 Recording REC mode menu 84 Playback...

Страница 15: ...t laws forbid the use of video and audio material you have recorded for any purpose other than your own personal enjoyment Remember that restrictions apply to the shooting of certain material even if it is intended for private use Batteries that may be used with this product Correct as of October 2009 Panasonic VW VBG260 battery may be used with this product The VW VBG260 battery contains a functi...

Страница 16: ...DP16G 32 GB RP SDV32G RP SDW32G Please see our support page at the following website for the latest information not included in these operating instructions https eww pavc panasonic co jp pro av This product is compatible with SD Memory Cards formatted under the SD standard FAT12 and FAT16 formats and with SDHC Memory Cards formatted under the FAT32 format Only SDHC Memory Cards may be used for ca...

Страница 17: ...ed Can be used What is AVCHD AVCHD is a standard for the recording and playback of highly detailed high definition video Video is compressed in the MPEG 4 AVC H 264 formats and audio is recorded in Dolby Digital Information regarding compatibility of SDHC Memory Cards and recorded video SDHC Memory Cards SDHC Memory Cards cannot be used with non SDHC compatible equipment Ensure that all equipment ...

Страница 18: ...g used in the area take care that they do not come in contact with the portable recorder These can warp the unit or cause the finish to come off Do not leave the unit in contact with rubber or PVC products for extended periods of time When carrying the portable recorder take care not to drop it or let it hit other objects Strong impact can cause the outer case to break or damage the portable recor...

Страница 19: ... use What to remember when throwing memory cards away or transferring them to others Formatting memory cards or deleting data using the functions of the unit or a computer will merely change the file management information it will not completely erase the data on the cards When throwing these cards away or transferring them to others either physically destroy them or use a data deletion program fo...

Страница 20: ...cessories Optional accessories Battery VW VBG260 7 2 V 2640 2500 typ min mAh equivalent to accessory battery Compact camera head for AG HMR10 AG HCK10G The camera head option cable is required for connecting to the AG HMR10 Image sensor 1 4 1 inch MOS type solid state image sensor 3 Lens Optical image stabilizer lens motorized 12 zoom F1 8 to 2 8 f 4 0 mm to 48 mm 35 mm equivalent 40 8 mm to 490 m...

Страница 21: ...iptions Tally lamp Page 27 REC PAUSE button Pages 36 37 SHIFT EXEC button Pages 41 44 PLAY STILL button Pages 29 44 60 Indicated by in the operation descriptions ENTER button Pages 29 41 44 60 AUDIO MON ADV button Pages 44 47 70 FF button Pages 29 44 60 Indicated by in the operation descriptions USER button Pages 41 44 MODE button Pages 28 60 STOP button Pages 29 44 60 Indicated by in the operatio...

Страница 22: ...ge 25 CAMERA terminal cover Terminal covers The terminals are inside the terminal cover Microphone terminal Page 47 71 REMOTE jack You can connect a remote control unit optional to control the zoom and recording start stop HDMI output terminal Page 72 Headphone jack 3 5 mm mini jack Pages 70 71 USB terminal Pages 72 73 HD SDI OUT terminal Page 72 HD SDI IN terminal Page 36 Use a double shielded ca...

Страница 23: ...rogress Off Charging complete Flashing See below If charging lamp is flashing Check that there is no dirt dust or other substances attached to the connectors on the battery or AC adapter and ensure that the adapter has been connected correctly If there is dirt or dust on the connectors disconnect the power plug from the socket before cleaning If the charging lamp continues to flash there may be a ...

Страница 24: ...g in high or low temperatures or when the battery has not been used for a long period of time To ensure that remaining battery capacity is displayed correctly use the battery completely from a fully charged state and charge the battery again Remaining battery capacity may still not be displayed correctly if the battery has been used for long periods in high or low temperatures or if the battery ha...

Страница 25: ...ry compartment of the portable recorder until it clicks into place Removal 1 Press the POWER button for 2 seconds or longer to turn off the power Check that the POWER lamp goes off 2 Remove the DC cable plate while pressing the battery release button and sliding the DC cable plate in the direction of the button 3 Disconnect the AC power supply cable from the power outlet The battery cannot be char...

Страница 26: ...able is disconnected when the AG HCK10G camera head optional is connected Power saving mode In line with the POWER SAVE setting in the OTHER FUNCTIONS setup menu the following will apply if no designated operations are performed for approximately 5 minutes during recording standby when an SD Memory Card has been inserted ON The portable recorder turns off automatically OFF Does not switch off the ...

Страница 27: ...IO MON ADV REC PAUSE REC PAUSE Tally lamp SD Memory Card access lamp The SD Memory Card access lamp lights as follows depending on the access condition of the SD Memory Card in the portable recorder REC mode PB mode Illuminated orange Reading writing possible Flashing orange fast Verifying card inspecting card for possible defects Flashing orange slow Accessing card recording playing back or loadi...

Страница 28: ...ack on and then proceed with the operation Press the POWER button for 2 seconds or longer to turn on the power REC mode PB mode PC mode SDI mode Used when connecting the portable recorder to a device that has an HD SDI output for recording onto the portable recorder s SD Memory Card This is suitable for operations such as long backup recordings Before switching between SDI mode and CAM mode be sur...

Страница 29: ...o the menu item below For some items changes the value Using the menus The menu items in gray cannot be changed 1 When the portable recorder is not recording or playing back the clips press the MENU button The following is displayed on the LCD monitor When PREREC is set the function screen is displayed after Wait appears REC mode Example PB mode Example 2 Press to move the yellow cursor to the fun...

Страница 30: ...ion during REC mode to return the setup menus to their factory default settings 1 Press the MENU button 2 Select OTHER FUNCTIONS MENU INIT YES and then press the ENTER button When TURN POWER OFF appears turn the power off by pressing the POWER button for 2 seconds or longer then turn the power back on again The current setup menus return to their factory default settings Even when the setup menus ...

Страница 31: ...tting screen Press to set the time difference from Greenwich Mean Time and then press the ENTER button Page 96 5 Press to return to the OTHER FUNCTIONS setup menu then select CLOCK SET YES and press the ENTER button Before recording with this portable recorder first set the date and time and adjust the LCD monitor in the setup menus Setting the date and time 6 Press to select OCT 7 Press to move t...

Страница 32: ...rding When using the recorder overseas do not set the CLOCK SET time to the local time but instead enter the time difference from Greenwich Mean Time in TIME ZONE Page 96 Setting the date and time Recharging the built in battery Adjusting the LCD monitor continued Recharging the built in battery The recorder s built in battery saves the date and time When LOW INTERNAL BATTERY is displayed even whe...

Страница 33: ... SD Memory Card access lamp is flashing such as during recording or during recording finalization 4 Close the card slot cover by pressing it up with your finger Ensure that the cover firmly clicks into place 5 Close the SD card cover SD Memory Cards Always format SD Memory Cards that have been used in other devices when first using them with this portable recorder Page 34 If the system frequency o...

Страница 34: ...pair operation has failed SYSTEM ERROR TURN POWER OFF will be displayed In this case please use the AVCCAM Restorer content repair software Depending on the status of the data it may not be possible to restore all data completely In this case it will no longer be possible to play back the clips that were recorded before the power was turned off Clips with a total recording time of less than 10 sec...

Страница 35: ...es 2 Use an SD memory class of SD speed class 2 or above when recording in HG mode or HE mode 3 This is the highest quality mode of this unit This unit uses the VBR recording system VBR stands for Variable Bit Rate and it refers to a system in which the bit rate volume of data per given time period varies automatically depending on the subject which is being shot This means that the recording time...

Страница 36: ... the recording format of the portable recorder to the video format of the input signal If the formats are not the same recording is not possible and SDI flashes on the LCD monitor screen The factory default setting for this unit is as follows For AG HMR10P PH mode 1080 60i recording For AG HMR10E PH mode 1080 50i recording RECORDING SETUP AUTO REC Page 88 Items in TC UB SETUP Page 90 4 Press the R...

Страница 37: ... the portable recorder s power before connecting or disconnecting the camera head If the camera head has an abnormality such as a malfunction or broken cable recording is not possible SYSTEM ERROR TURN POWER OFF is displayed on the LCD monitor screen and CAM flashes 2 Press MENU Using the setup menus Page 29 3 Select RECORDING SETUP REC FORMAT and then press the ENTER button or 4 Press to select t...

Страница 38: ...before the writing to the SD Memory Card is terminated This means that operations are not accepted if the REC PAUSE button is pressed again immediately The portable recorder reads information from the SD Memory Card immediately after the card is inserted Press the REC PAUSE button to start recording after PAUSE is displayed in the operation status display Page 77 If the input signal format is chan...

Страница 39: ...4P recording is performed 4 frames at a time For this reason if you change the recording format or frame rate it may result in discontinuity from the last time code value of the previous recording Only when SYSTEM FREQ is set to 59 9Hz Setting the time code In the TC UB SETUP setup menu set the following time code related items Page 90 TC MODE Only when SYSTEM FREQ is set to 59 9Hz TCG SDI REGEN T...

Страница 40: ... the setup menus Page 29 3 Select TC UB SETUP UB PRESET 4 Press to move to YES and then press the ENTER button 5 Set the user information Press to select the user information characters You can use numbers from 0 to 9 and letters from A to F Press to move to the next digit and press again to select the character Press the USER button while setting the user information to reset the user information...

Страница 41: ...standby about 2 seconds of the video and audio that were recorded immediately before are played back After playback the portable recorder returns to shooting standby Only the POWER button REC PAUSE button and AUDIO MON ADV buttons are operable during REC CHECK The REC CHECK images are also recorded when a device is connected to the portable recorder and backup images are being recorded The USER bu...

Страница 42: ... even when the steps for adding indexes are taken When repeatedly adding indexes leave a gap of at least one second between adding one index and the next If indexes are added with a gap of less than one second between them only the first operation will be valid SHOT MARK Shot mark function The marks added to clip thumbnails are called shot marks In the thumbnail screen only clips with a shot mark ...

Страница 43: ... each clip TC 12 34 56 01 Time code display When SYSTEM FREQ is set to 59 9Hz Frame digits are displayed in 24 frames when 24P is set Frame digits are displayed in 30 frames when any other format is set When SYSTEM FREQ is set to 50Hz Frame digits are displayed in 25 frames UB 12 34 56 78 User information display No display Data is not displayed Even during clip playback the USER button can be use...

Страница 44: ...AUSE AUDIO MON ADV Buttons pressed at the same time as the SHIFT EXEC button Screen display Function Usable modes SDI CAM AUDIO MON ADV button MIC LEV Lower the audio input and output level Page 47 AUDIO MON ADV button MIC LEV Raise the audio input and output level Page 47 ENTER button Press and hold KEY LOCK Lock the button operations or cancel the setting Page 46 FA Display the focus assist Page...

Страница 45: ...ance and black balance 1 Place a white pattern in a location with the same lighting conditions and light source as the subject and fill the whole screen with white Something white a white cloth or wall near the subject can be used instead Do not include bright spotlights in your shot 2 Select the white balance mode Setting the white balance Page 55 3 While pressing the SHIFT EXEC button press for ...

Страница 46: ... the vector display OFF Does not display the wave form or vector Does not display while the focus assist function is operating The wave form or the vector cannot be recorded The setting is canceled when the power is turned off Temporarily switching to auto focus mode ONE PUSH AF Even during manual focus Page 52 you can temporarily switch to auto focus mode to focus automatically 1 While pressing t...

Страница 47: ...ar By selecting INT SG ON in the RECORDING SETUP setup menu you can display a color bar during REC mode which is useful when adjusting the image quality of a television or external monitor While the color bar is displayed a test tone of 1 kHz will be output from the headphone terminal and built in speaker However in CAM mode there is no output from the built in speaker When SYSTEM FREQ is set to 5...

Страница 48: ...setting other than OFF on the RECORDING SETUP setup menu the setting changes to OFF automatically To cancel the REPEAT REC function either switch power off or select OFF for REPEAT REC MODE After the REPEAT REC function is canceled the recording format the PREREC MODE and AUTOREC MODE settings do not return to their settings before REPEAT REC was used The recording mode is set to HE mode PREREC MO...

Страница 49: ...ng of clip 8 to stop Four clips clip 5 6 7 8 are stored on the SD Memory Card in the order in which they were created On the thumbnail screen thumbnails of the clips are displayed in the order in which they were created 5 6 7 8 When the REPEAT REC function is used in SDI mode REPEAT REC operation stops if the SDI input signal is corrupted If this happens switch the power off and back on again to r...

Страница 50: ...to something other than OFF Page 87 The higher the zoom ratio setting the poorer the image quality For all settings other than OFF x 1 the current zoom ratio will be displayed on the LCD monitor screen The digital zoom function can only be used with the 1080 60i and 720 60P or 1080 50i and 720 50P recording formats The digital zoom setting cannot be adjusted during shooting The operation buttons o...

Страница 51: ...e following cases Immediately after switching from PB mode to CAM mode Immediately after turning the power on Immediately after setting PREREC MODE to ON Immediately after setting TC or UB The thumbnail for clips recorded using the PREREC function will display the image from when the REC PAUSE button was pressed When clips that were recorded using the PREREC function are played back the images pau...

Страница 52: ...s and gain for less brightness F2 4 10dB The current F value as well as gain and shutter values are displayed on the LCD monitor screen Performing manual adjustments CAMERA FUNCTIONS The focus iris shutter speed and white balance can be manually adjusted 1 Enable manual adjustment by setting the items in the CAMERA SETUP setup menu See table below 2 Press the ENTER button to select the function Ea...

Страница 53: ...slow white red blue or green dots may appear on the screen during playback This is not a malfunction When OTHER DISPLAY ON in the DISPLAY SETUP setup menu is selected the currently set shutter speed is displayed on the LCD monitor screen With artificial lighting and especially fluorescent lights and mercury vapor lamps the luminance changes in synchronization with the power line frequency When thi...

Страница 54: ...ooting a television or computer monitor in SYNCRO SCAN in the CAMERA SETUP setup menu Page 86 Adjust the shutter speed to match the frequency of the television or computer monitor to minimize the horizontal noise that appears when shooting such subjects By switching to progressive mode you can also shoot PAL system television screens If a SYNCRO SCAN selection item is grayed out it cannot be used ...

Страница 55: ...e ATW Auto Tracking White function is used to automatically analyze the shooting environment the white balance is constantly adjusted to the optimum value P3 2K Uses the preset values This is useful if you do not have time to adjust the white balance Guide to preset values P3 2K 3200 K halogen light P5 6K 5600 K outdoors P5 6K Depending on the environment there may be some error in the adjustment ...

Страница 56: ...in the progressive mode The video signal will be recorded natively However the external output signal is converted to a 2 3 format 60 fps interlaced signal A B C D E F G H AoAeBoBeBoCeCoDeDoDeEoEeFoFeFoGe GoHeHo He 24 P 60 i 25P mode When SYSTEM FREQ is set to 50Hz Shoot 25 frames a second in the progressive mode For output and recording the 25 frame per second video signal is converted to 50 fiel...

Страница 57: ...uipment and MODEL NAME equipment model name AG HMR10 SHOOT This indicates the SHOOTER name of the videographer and the PLACE NAME name of location LOCATION 4 This indicates ALTITUDE LONGITUDE LATITUDE and SOURCE information source SCENARIO 2 This indicates the PROGRAM NAME SCENE NO and TAKE NO NEWS 1 This indicates the REPORTER name of the reporter and PURPOSE purpose of data collection NEWS 2 Thi...

Страница 58: ...he metadata is to be loaded YES NO and then press the ENTER button Up to 10 items of metadata on the SD Memory Card can be displayed starting from the most recent creation date If characters other than single byte alphanumeric characters are used in the metadata file name that is loaded they are displayed as RECORD Sets whether to record the metadata that is loaded onto the portable recorder simul...

Страница 59: ...ting for recording loaded clip metadata has been turned off Sequential 5 digit number in order of shooting Sequential 5 digit number in order of shooting The COUNT value is indicated as a 4 digit number If clip metadata has been loaded and USER CLIP NAME TYPE2 has been selected the COUNT value is increased by 1 each time recording is performed and a new clip is generated The COUNT value can be res...

Страница 60: ...k PB mode AUDIO MON ADV REC PAUSE 2 1 Pause Press this button during playback to pause the clip Press again to return to normal playback When pressed during fast forward playback or rewind playback returns to playback Rewind Press this button during playback to scroll quickly backwards through the clip Press during rewind to change the rewinding speed Approx 5 times normal speed approx 15 times no...

Страница 61: ...mbnails When there is a large number of clips it will take some time for them to be displayed You can perform the following operations using the thumbnail screen Play and delete clips Format SD Memory Cards Add or delete indexes Add or delete shot marks 10 12 1 2 3 4 6 7 8 9 5 M I 0004 11 Thumbnail screen Continued on the next page ...

Страница 62: ...r 9 Time display Page 65 In accordance with the DATA DISPLAY setting in the THUMBNAIL SETUP setup menu displays one of the following time code at start of clip recording user information at start of clip recording time of recording date of recording date and time of recording 10 Clip number Displayed in order of recording up to 1000 clips The numbers of clips that cannot be played back such as cli...

Страница 63: ...e 4 Press the MENU button to return to the thumbnail screen Clip numbers will be displayed in black where playback is possible and in red where playback is not possible Even if the playback format is changed the format set in REC FORMAT in the RECORDING SETUP setup menu will be restored when the mode is changed to REC mode Repeat playback REPEAT PLAY Use this setting to repeatedly play back all av...

Страница 64: ...tep 2 This setting will be canceled if the power is turned off or if the portable recorder is switched to CAM mode Setting the skip method SKIP MODE Use this setting to set the operation performed when pressing or while playback is paused 1 Press the MENU button Using the setup menus Page 29 2 Select PLAY SETUP SKIP MODE 3 Select the skip method CLIP If or is pressed while playback is paused the p...

Страница 65: ...shot marks INDEX Display clips with indexes Selecting the thumbnail display method THUMBNAIL SETUP INDICATOR Set whether or not to display the indicators ON OFF Factory default setting is ON Clip protect display and resume playback display will still appear even if this setting is set to OFF DATA DISPLAY Select the time display for the clips TC Time code UB User information TIME Shooting time DATE...

Страница 66: ... select ALL CLIPS to delete all clips from the memory the operation may take some time to complete depending on the size of the clips to be deleted INDEX YES Adds an index to the selected clip 1 Select and play a clip and press ENTER at the point where you want to add an index 2 Select YES on the confirmation screen and then press the ENTER button The index is added The point in the clip at which ...

Страница 67: ...at YES NO and then press the ENTER button Formatting will erase all data from the card CARD STATUS Display SD Memory Card information Page 68 CLIP PROPERTY Display information for the selected clip Page 68 Press to display information for the previous or next clip 4 Press the MENU button to return to the thumbnail screen CLIP PROTECT YES Protects the selected clips Press to select a clip and then ...

Страница 68: ...Displays the indicators that are added to the clip and various other information START TC Time code value at the start of recording START UB User information value at the start of recording DATE TIME Date of recording and the time at the start of recording TIME ZONE TIME ZONE setting DURATION Recording time of the clip FORMAT Recording format 4 Clip metadata Press the ENTER button while the clip i...

Страница 69: ...back The screen will return to the thumbnail display after the playback of the last clip is completed during fast forward playback The screen will play back clips starting with the first one after the playback of the last clip is completed during fast forward playback when in repeat play The screen will return to the thumbnail display after the reverse playback of the first clip is completed durin...

Страница 70: ...uring playback to adjust the volume that is output from the built in speaker and headphone jack AUDIO MON ADV Viewing images on a television or monitor You can view the playback images on a television or monitor that is connected to the HD SDI OUT terminal or HDMI terminal of the portable recorder 1 Connect the portable recorder to a television or monitor Page 72 2 Start playback on the portable r...

Страница 71: ...l is connected to the microphone terminal the recorded sound is switched as follows CAM mode Microphone built into camera head external microphone SDI mode Sound multiplexed on the HD SDI input signals external microphone While color bars are displayed 1 kHz test tone external microphone When SYSTEM FREQ is set to 50Hz a test tone of 997 Hz is output The recording volume from the external micropho...

Страница 72: ...VIERA Link Signals cannot be output from both the HD SDI OUT terminal and the HDMI terminal simultaneously If ON or DOWNCON is selected in SDI OUT of the AV OUT SETUP setup menu the signal is output from the HD SDI OUT terminal and if OFF factory default mode is selected the signal is output from the HDMI terminal When HDMI connection is valid Connecting to a computer nonlinear editing file transf...

Страница 73: ...nnecting it Connect or disconnect the USB cable in PC mode 4 Perform nonlinear editing on the computer The contents of the SD Memory Card will appear as a removable disk icon in My Computer or on the desktop of the computer Page 104 Example Windows Removable disk E Example Macintosh NO NAME When copying files from the portable recorder to a computer be very careful not to accidentally overwrite fi...

Страница 74: ...ng time for each clip TC 12 34 56 01 Time code When the time code value cannot be loaded correctly from the SD Memory Card TC is displayed UB 12 34 56 78 User information When user information cannot be loaded correctly from the SD Memory Card UB is displayed 2 Media information display Displays basic information about the inserted SD Memory Card Recording possible Card is write protected Recordin...

Страница 75: ...in the DISPLAY SETUP setup menu 6 System frequency display Page 96 60 59 94 Hz 50 50 Hz You can switch between displaying and not displaying this information by selecting OTHER DISPLAY ON or OFF in the DISPLAY SETUP setup menu 7 Information display Displays the following information Performance of the auto white balance or the auto black balance In CAM mode Page 45 Warning Page 79 AWB error messag...

Страница 76: ... SEL THROUGH is selected in the AV OUT SETUP setup menu THROUGH is displayed There is no output to external devices 21 Focus control information display In CAM mode Pages 52 87 Displays the focus control information with 99 00 In the auto focus mode AF is displayed and in the manual focus mode MF is displayed When the macro control function is operating the black and white of AF or MF are displaye...

Страница 77: ...ining battery capacity display will momentarily disappear when switching between modes or changing the LCD brightness because the capacity is recalculated at these times Not displayed when using the AC adapter You can switch between displaying and not displaying this information by selecting CARD BATTERY ON or OFF in the DISPLAY SETUP setup menu 28 Repeat playback display In PB mode Page 63 Displa...

Страница 78: ...set to something other than OFF In SDI mode Page 88 R Displayed when the REPEAT REC function is selected CAM SDI mode page 48 32 Audio output adjustment level display Page 70 Microphone input adjustment level display Page 47 When the AUDIO MON ADV button is pressed the sound volume output from the built in speaker and headphone jack is displayed During input audio level adjustment I MIC or E MIC i...

Страница 79: ...her clips can be recorded CANNOT SET THE NUMBER OF INDEXES HAS EXCEEDED THE MAXIMUM LIMIT No further indexes can be set because the number of indexes will exceed the maximum limit CANNOT SET PRE REC CARD CAPACITY TOO LOW PRE REC cannot be set because the remaining card capacity is too low CANNOT START REPEAT REC REPEAT REC operation cannot start CARD DOOR OPENED The card door is open CARD ERROR PL...

Страница 80: ... the protection THE RECORDING IS STOPPED OVER THE LIMITATION The recording will stop Continuous recording for 12 hours THE TC MODE IS CHANGED TO NDF NDF is selected as the TC mode setting Displayed when SYSTEM FREQ is set to 59 9Hz THIS BATTERY CANNOT BE USED The battery currently inserted into the portable recorder cannot be used THIS CARD CANNOT RECORD IN VIDEO MODE The card cannot be used for v...

Страница 81: ... Card use the AVCCAM Restorer content repair software Page 34 When the AG HCK10G camera head is connected displayed when the camera cable is removed with the power on First turn off the power then remove the camera cable When the camera head is connected When the AG HCK10G camera head optional is connected and recording is in progress displayed when an abnormality is detected Turn the power on aga...

Страница 82: ...splay 12 Frame rate display 13 Shutter speed display 14 Audio level meter display 15 Focus bar display 16 Camera functions display 17 Auto iris control display 18 Iris display 19 Zoom position display 20 SDI through output display 21 Focus control information display 22 Index shot mark recording display 23 Gain display 24 AWB information display 25 Optical Image Stabilizer display 26 Key lock disp...

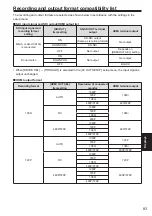
Страница 83: ...utput DOWNCON SD SDI OFF Not output Depends on HDMI OUT SEL setting Do not match ON Not output Not output DOWNCON OFF BLACK When SDI EE SEL THROUGH is selected in the AV OUT SETUP setup menu the input signal is output unchanged HDMI output format Recording format HDMI OUT SEL item setting Resolution of connected monitor HDMI terminal output 1080i AUTO 1080P 1080i 720P 1080i 480P 576P 480 576P FIX ...

Страница 84: ...FORMAT CARD READ Page 93 CARD STATUS RECORD USER CLIP NAME CLIP COUNT RESET META DATA PROP META DATA META INITIAL SET Page 93 OTHER FUNCTIONS USER Page 95 CLOCK SET TIME ZONE POWER SAVE SYSTEM FREQ SYSTEM INFO MENU INIT OPERATION LCD OPERATION CAM mode When the AG HCK10G camera head optional is connected REC MENU CAMERA SETUP SYNCRO SCAN Page 86 DETAIL LEVEL V DETAIL LEVEL DETAIL CORING CHROMA LEV...

Страница 85: ...NIT Page 95 OPERATION LCD OPERATION CAMERA OPERATION Only displayed when the AG HCK10G optional is connected Playback PB mode menu PB MENU PLAY SETUP PB FORMAT Page 94 REPEAT PLAY RESUME PLAY THUMBNAIL MODE SKIP MODE THUMBNAIL SETUP INDICATOR Page 94 DATA DISPLAY DATE FORMAT DELETE INDEX OPERATION CLIP PROTECT Page 95 SDI OUT OUTPUT OSD AV OUT SETUP HDMI OUT SEL DATE TIME Page 91 SDI EDH LEVEL MET...

Страница 86: ... noise CHROMA LEVEL CAM Adjusts the chroma level 7 0 7 CHROMA PHASE CAM Makes fine adjustments to the chroma phase 7 0 7 COLOR TEMP CAM Makes fine adjustments to the color temperature 7 0 7 This item is available when W SET mode is selected in Setting the white balance on page 55 MASTER PED CAM Adjusts the master pedestal black level of the image that is used as the basis for images 15 0 15 A IRIS...

Страница 87: ...x 90 HIGH High setting Compression starts at approx 100 Not available when a DRS value is set or when GAMMA is set to CINE LIKE D or CINE LIKE V MATRIX CAM Selects the matrix table suitable for the desired color expression during shooting NORM1 Suitable for shooting in the open air or under a halogen lamp NORM2 Suitable for brighter colors than the NORM1 mode FLUO Suitable for shooting under fluor...

Страница 88: ...y in accordance with the recording mark in the S VITC information that is added to HD SDI TYPE3 Sets when using a camera recorder that is not manufactured by Panasonic For details on whether to select TYPE1 or TYPE2 see Recording formats and recording marks of Panasonic camera recorders Page 89 See the following web site for devices that have confirmed compatibility with TYPE3 http panasonic biz s...

Страница 89: ...i Switching is possible between TYPE1 and TYPE2 For details on operation see the operating instructions for the Panasonic camera recorder AJ HDX400E 1080 50i 1080 25p over 50i AJ HDX900 720 59 94p TYPE1 720 23 98p over 59 94p TYPE1 720 29 97p over 59 94p TYPE1 1080 59 94i 1080 23 98p over 59 94i TYPE2 1080 29 97p over 59 94i 1080 50i 1080 25p over 50i 720 50p TYPE1 720 25p over 50p TYPE1 AJ HPX210...

Страница 90: ...vanced when shooting When PREREC MODE ON in the RECORDING SETUP setup menu is selected FREE RUN is set automatically SDI REGEN SDI Selects the TC and UB values that are recorded ON Records the values in the S LTC range of the HD SDI input OFF Records the internal TC and UB When ON is set the following applies The TC MODE TCG TC PRESET and UB PRESET settings cannot be changed When TC data has been ...

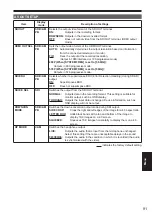
Страница 91: ... during SD SDI output ON Superimposes EDH OFF Does not superimpose EDH SDI EE SEL SDI Switches the output from the SDI OUT terminal NORMAL Outputs data in the recording format This setting is suitable for monitor output such as OSD display THROUGH Outputs the input data unchanged Device information such as OSD display will not be output DOWNCON MODE SDI CAM PB Switches the down conversion output m...

Страница 92: ...display on the LCD monitor or overlay and output on the video TIME Displays outputs the time DATE Displays outputs the date TIME DATE Displays outputs the date and time OFF Does not display output the date and time LEVEL METER SDI CAM PB Sets whether to display the audio level meter ON OFF ZOOM FOCUS CAM Sets whether to display the zoom value and focus value ON OFF CARD BATTERY SDI CAM PB Sets whe...

Страница 93: ...able recorder simultaneously onto an SD Memory Card ON Records simultaneously OFF Does not record simultaneously USER CLIP NAME SDI CAM Selects the data to be recorded as USER CLIP NAME TYPE1 Uploaded metadata TYPE2 Uploaded metadata COUNT value The user clip name is the same as the CLIP NAME if there is no uploaded data CLIP COUNT RESET SDI CAM Resets the COUNT value to 1 YES NO META DATA PROP SD...

Страница 94: ...o the start of the clip or index THUMBNAIL SETUP Item Display mode Description of settings THUMBNAIL MODE PB Selects the thumbnail display method ALL Displays all clips SAME FORMAT Displays clips with the same format as the selected recording format MARKER Displays clips with shot marks INDEX Displays clips with indexes INDICATOR PB Sets whether to display indicators ON Displays OFF Does not displ...

Страница 95: ...EC CHECK 1 Use to check the final 2 seconds of the video and audio that was shot immediately before SPOTLIGHT 1 Switches the auto iris control for the spotlight on or off BACKLIGHT 1 Sets the auto iris control for backlight compensation ATW LOCK 1 Fixes the white balance value when the button is pressed while ATW is set LCD DTL Emphasizes the edges of the video displayed on the LCD monitor screen ...

Страница 96: ...an 04 00 Abu Dhabi 02 30 03 00 Moscow 01 30 02 00 Eastern Europe 00 30 01 00 Central Europe POWER SAVE SDI CAM Selects whether to use the power saving mode when the and buttons and the ENTER MENU AUDIO MON ADV USER REC PAUSE and SHIF EXEC buttons are not operated for about 5 minutes while an SD Memory Card is inserted during SDI CAM mode ON Turns off the portable recorder s power OFF Does not turn...

Страница 97: ... settings Even when the setup menus have been initialized TIME ZONE will not revert to its factory default setting OPERATION SDI CAM PB Displays the power on time a 5 digit figure of the portable recorder LCD OPERATION SDI CAM PB Displays the power on time a 5 digit figure of the portable recorder s LCD monitor CAMERA OPERATION CAM PB Displays the power on time a 5 digit figure of the connected AG...

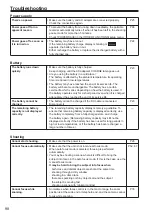
Страница 98: ... service life P23 The battery cannot be charged The battery cannot be charged if the DC cable is connected Disconnect it P23 The remaining battery capacity is not displayed correctly The remaining battery capacity display is merely a guideline To ensure that remaining battery capacity is displayed correctly use the battery completely from a fully charged state and charge the battery again Remainin...

Страница 99: ...nonlinear editing Check the specifications of your computer and connecting cable P72 Displays Something is wrong with the time code display The time code display may not register a regular count if a clip is played in the reverse slow mode This is normal Playback Cannot play even when I press the ENTER button Make sure that the mode is not REC mode After changing to PB mode by pressing the MODE bu...

Страница 100: ...ta can be corrupted by static electricity and electromagnetic waves Please always save important data to a computer or other storage media The SD Memory Card cannot be used even after formatting There could be a fault with the recorder or with the SD Memory Card Please consult the dealer Always use only SD Memory Cards of 512 MB 32 GB with this recorder The recorder does not recognize the SD Memor...

Страница 101: ...1080 50i Playback format 1080 60i 30P or 1080 50i 25P Video pauses momentarily during clip changeover Playback is smooth when changing from HA mode to HG mode or from HG mode to HA mode Recording format HA 1080 60i or HA 1080 50i Recording format HG 1080 60i or HG 1080 50i Recording format HE 1080 60i or HE 1080 50i Recording format HA 1080 60i or HA 1080 50i Recording format PH 1080 60i or PH 108...

Страница 102: ...60 Portable recorder Wrap the recorder in a soft cloth to keep the dust off Battery The battery life is shortened in places with extreme temperatures Storing the battery in a location with oily vapors or high dust concentrations may corrode the terminals or cause other damage leading to malfunction If storing for long periods charge once a year use up the charge until the battery is depleted then ...

Страница 103: ...e recording 720 60P 720 60P 720 30P over 60P 720 24P Native recording HA 1080 60i 1080 60i HG 1080 60i 1080 60i HE 1080 60i 1080 60i When SYSTEM FREQ is set to 50Hz Recording mode Frame rate 50 25P CAM mode only PH 1080 50i 1080 50i 1080 25P over 50i 720 50P 720 50P 720 25P over 50P HA 1080 50i 1080 50i HG 1080 50i 1080 50i HE 1080 50i 1080 50i Recording format list ...

Страница 104: ... AVCCAM Viewer The AVCCAM Viewer can be downloaded from the following website Compatible OS Windows XP Windows Vista Mac OS X 10 5 Mac OS X 10 4 https eww pavc panasonic co jp pro av Concerning the handling of the recorder s metadata A special manufacturer area in the control file area under the AVCHD format is employed for the metadata which is supported by this recorder If files are deleted or c...

Страница 105: ...9 9Hz PH mode 1080 60i 1080 30P over 60i 1080 24P Native recording 720 60P 720 30P over 60P 720 24P Native recording HA mode 1080 60i HG mode 1080 60i HE mode 1080 60i Only when the special optional camera head AG HCK10G is connected When SYSTEM FREQ is set to 50Hz PH mode 1080 50i 1080 25P over 50i 720 50P 720 25P over 50P HA mode 1080 50i HG mode 1080 50i HE mode 1080 50i Only when the special o...

Страница 106: ...ker External microphone input 70 dBV microphone sensitivity 50 dB equivalent 0dB 1 V Pa 1 kHz Not compatible with stereo mini jack 3 5 mm diameter plug in power microphone Headphones Stereo mini jack 3 5 mm diameter 1 100 Ω 22 dBV when load is 32 Ω Built in speaker 20 mm diameter round 1 LCD monitor 3 5 inch LCD color monitor Approx 210 000 pixels Other input and output connectors USB terminal Typ...

Страница 107: ...8 36 CAM mode 28 37 PB mode 28 60 PC mode 28 73 Optical Image Stabilizer 51 P Playback Clip playback 60 Playback format 63 Fast forward rewind playback 69 Next previous clip 69 Frame by frame playback 70 POWER SAVE power saving mode 26 96 PRE REC 51 Progressive mode 56 R Recording format 88 Recording mode 35 REPEAT PLAY repeat playback 63 RESUME PLAY resume playback 64 S Screen displays 74 SD Memo...

Страница 108: ...NH 41 REC CHECK 41 SPOTLIGHT 41 BACKLIGHT 41 ATW LOCK 41 LCD DTL 42 LCD REVERSE 42 INDEX 42 SHOT MARK 42 LAST CLIP 42 COUNTER 43 USER CLIP NAME 59 User information 40 Volume adjustment Input audio level 47 Output audio level 70 W WFM wave form monitor 46 Z Zoom 50 Index continued ...

Страница 109: ...g For more information about collection and recycling of old products and batteries please contact your local municipality your waste disposal service or the point of sale where you purchased the items Penalties may be applicable for incorrect disposal of this waste in accordance with national legislation For business users in the European Union If you wish to discard electrical and electronic equ...

Страница 110: ...E P ...
Отзывы: