background image

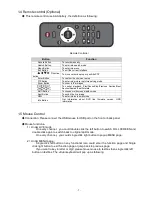
- 8 -

3

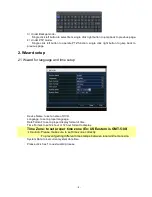
Under Backup mode

Single click left button to select item, single click right button to jump back to previous page.

4

Under PTZ mode

Single  click  left  button  to  operate  PTZ  function,  single  click  right  button  to  jump  back  to

previous page.

2. Wizard setup

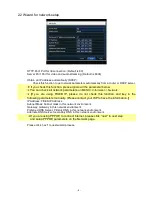
2.1 Wizard for language and time setup

Device Name: to set a name of DVR.
Language: to set a proper language.
Date Format: to set a proper display format of time.
Time Format: to set 24 hour or 12 hour format to display.

Time Zone: to set proper time zone (Ex: US Eastern is GMT-5:00)

Caution: Please make sure to set time zone correctly.

To prevent getting different time stamps between local and remote site.

System Date: to set current system date time.

Please click “next” to next wizard process.

Содержание 4CH

Страница 1: ...Thank you for purchasing our product Please read this quick guide before using the product Change without notice H 264 4 8 16CH DVR Quick guide...

Страница 2: ...Do not install this device near water Clean only with a dry cloth Do not block any ventilation openings And ensure well ventilation around the machine Do not power off the DVR at normal recording cond...

Страница 3: ...4 channel 8 1 for 8 channel 16 1 for 16 channel Motion detection Pre and Post event record Channel related trigger record PTZ control Multi PTZ protocol support Programmable 128 Preset points and 8 c...

Страница 4: ...nt PTZ REW SPEED Fast rewind on playback mode speed adjustment PTZ FF P T Z Fast forward on playback mode enter PTZ mode MENU Enter menu page increase value BACKUP Enter backup page decrease value STO...

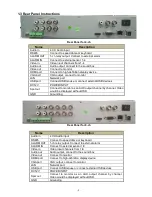
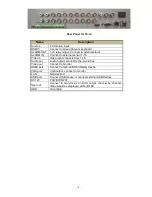
Страница 5: ...Spot out Connect to monitor as an AUX output channel by channel Video would be displayed without OSD GND Grounding Rear Panel for 8 ch Name Description Audio in 4 CH Audio input RS485 Connect to spee...

Страница 6: ...n Video input channels from 1 16 Audio out Audio output connect to the sound box Video out Connect to monitor HDMI port Connect to high definition display device VGA port VGA output connect to monitor...

Страница 7: ...on To switch the live image SEQ To enter into auto dwell mode Info Button Get information about DVR like firmware version HDD information 1 5 Mouse Control Connection Please connect the USB mouse to U...

Страница 8: ...or language and time setup Device Name to set a name of DVR Language to set a proper language Date Format to set a proper display format of time Time Format to set 24 hour or 12 hour format to display...

Страница 9: ...nformation Network If you are using FIXED IP please do not check this function and key in the following parameters manually Please contact your ISP to have the information IP Address FIXED IP Address...

Страница 10: ...ution NTSC frame rate PAL frame rate 4 CH 4CIF 30 25 4HD1 30 25 4D1 30 25 8 CH 8CIF 30 25 8HD1 30 25 8D1 18 15 or 4 D1 30 25 4CIF30 25 16 CH 16CIF 30 25 16HD1 30 25 16D1 7 6 Quality Highest Higher Nor...

Страница 11: ...HDD data before you format the HDD All HDD data will be erased after HDD formatted Please click Finish to get into login page Compatible Devices 1 Compatible USB drive after test Brand Capacity A DAT...

Страница 12: ...500GB 10EURS FW 630AB1 1TB 10EVDS FW 63U8B0 1TB 15EARS FW 00Z5B1 1 5TB 15EURS FW 63S48Y0 1 5TB 20EVDS FW 63T3B0 2TB 20EARS FW 00S8B1 2TB 2001FASS FW 00U0B0 2TB HITACHI HDS721616PLA380 160GB HCT721025S...

Отзывы: