background image

(2)

(3)

(1)

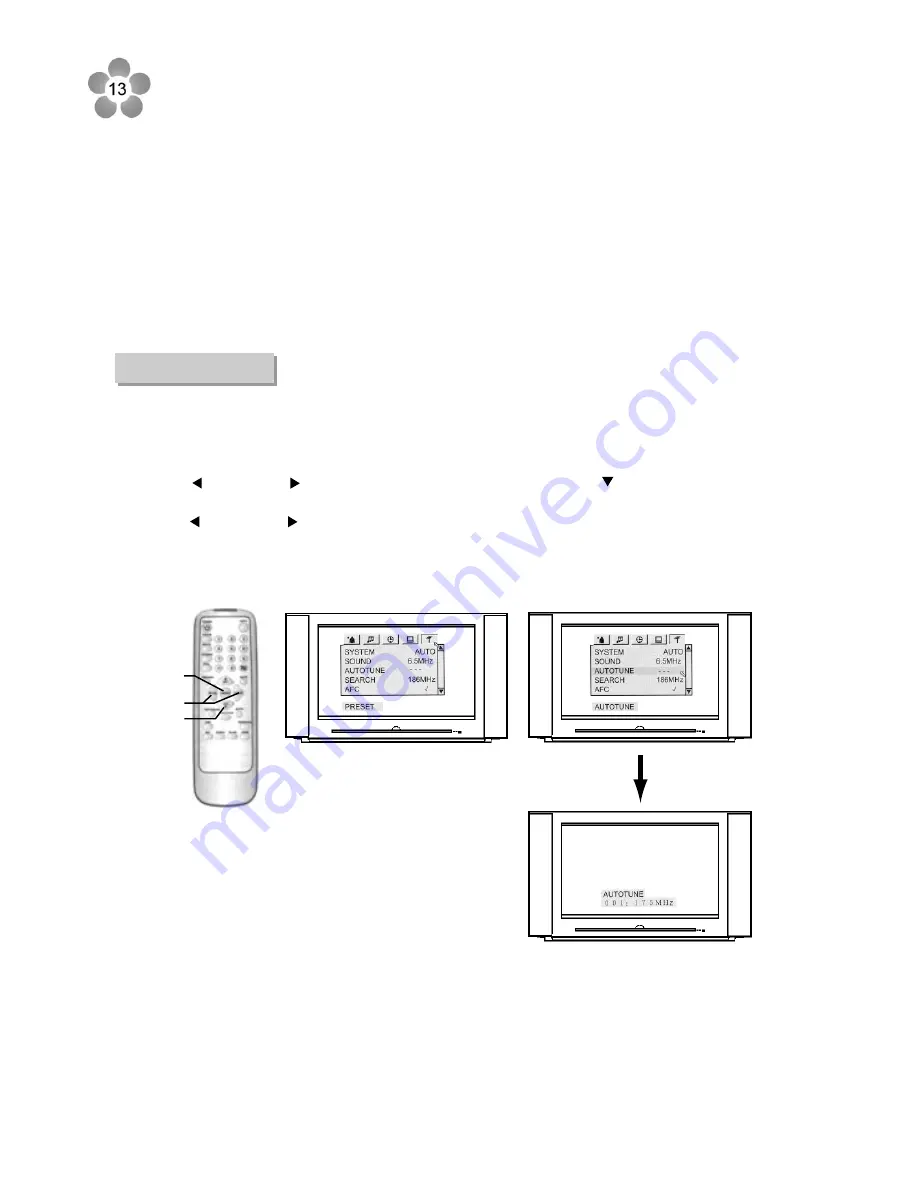
7. Channel Presetting

If you have preset the channels, you can directly watch TV programs after turning on the set.
If not, then preset channels in one of the following ways.

Method 1:

1)
2)

3)

4)

Press 

MENU

 button (1) to enter into the main menu.

Press     

VOL

 or 

VOL 

   button (2) to select 

PRESET

 menu, press 

CH

    button (3) to select and

highlight 

AUTO TUNE

.

Press    

VOL

 or 

VOL 

    button (2) to start the auto tune. All active channels will be searched or

stored into the memory automatically. After auto-tune, the TV will return to the first active channel
program.
During auto tune, pressing 

MENU

 button (1) can exit.

7.1 AUTO TUNE

Содержание 76WSHD

Страница 1: ...AUSTRALIA TEL 02 9313 7111 FAX 02 9313 7555 www palsonic com au PALSONIC CUSTOMER SERVICE TELEPHONE AUSTRALIA 1300 657 888 76CM WIDE SCREEN HDTV READY MODEL 76WSHD OWNER S MANUAL Type Tested Electrica...

Страница 2: ...als 3 4 2 To connect DVD input terminals 3 4 3 To connect AV output terminals 3 4 4 To connect XGA input interface 3 4 5 To connect HDTV set top box Enhanced TV operation RF mode 6 Brief menu operatio...

Страница 3: ...mer 10 5 PROG number 11 1 OSD language selection 11 2 AUTO POWER OFF function 11 3 Rotate function 11 4 Default screen aspect ratio setting 11 5 Picture moving 11 6 Degaussing 11 7 Blue screen setting...

Страница 4: ...a qualified service department in your local area 1 Cautions for safety Note This set can be operated on an AC power of 240V 50Hz You must not use a power supply of any other type When cleaning dust o...

Страница 5: ...e Do not cover the ventilating hole in the cabinet Keep a space of more than 5 cm from the walls to the TV set to ensure adequate ventilation High voltage exists in this TV set Do not remove the cover...

Страница 6: ...ber 3 CH button Select a higher position number 4 MENU button Enter into the menu 5 VOL button Lower the volume 6 VOL button raise the volume 2 1 FRONT VIEW 2 2 SIDE VIEW 1 2 3 4 5 6 2 Location of con...

Страница 7: ...ut terminals VIDEO Y CB CR AUDIO L MONO R 3 AV1 input terminals S VIDEO VIDEO AUDIO L MONO R 4 AV2 input terminals S VIDEO VIDEO AUDIO L MONO R 5 AV output terminals VIDEO AUDIO L MONO R 6 HDTV input...

Страница 8: ...downward Text image mode switch over Retain on screen display Sleep timer Surround sound control NICAM FORCE FM sound decoder selection Play game Selectable picture Open the signal source selection me...

Страница 9: ...supplied When using the coaxial cable not supplied 75 for UHF VHF aerial connect the plug into the 75 ohm aerial socket directly Note 1 When you connect the outdoor antenna cable to the antenna termi...

Страница 10: ...mage or injury from possible battery leakage 5 Do not try to recharge batteries not intended to be recharged they can overheat and rupture Follow battery manufacturer s directions NOTES When there is...

Страница 11: ...Red audio R To select the input press AV TV button to display the signal source selection menu and press the CH or CH button to select the corresponding input mode VIDEO 1 or VIDEO 2 or VIDEO 3 and p...

Страница 12: ...e component video Cr terminal and the audio R terminal are red for easy identification Make sure these are correctly connected 3 4 3 To connect AV output terminals You can connect a stereo system to t...

Страница 13: ...d with YPbPr terminals connect the set top box to the TV set through the YPbPr terminals connect audio lines from set top box to HDTV IN L R sound inputs note that L to L and R to R If your set top bo...

Страница 14: ...To turn off the set temporarily press the POWER button 2 the set is in standby mode the indicator turns to red When the remote operation is received by the set the TIMER indicator green on the set s f...

Страница 15: ...n or waiting for 15 seconds can exit the menu For more details refer to the following pages Press VOL button Press MENU button Press CH button or MENU button Press CH button Press C P r e s s C H b u...

Страница 16: ...items TIMER OFF TIMER ON TIMER PR PROG NO ALARM The OPTION menu includes the following items OSD language Auto power off Rotation Default screen aspect ratio Picture moving Degauss Blue screen Colour...

Страница 17: ...ENU button 1 to enter into the main menu Press VOL or VOL button 2 to select PRESET menu press CH button 3 to select and highlight AUTO TUNE Press VOL or VOL button 2 to start the auto tune All active...

Страница 18: ...select SEARCH Press VOL button 2 to search channels from current channel to lower channel press VOL button 2 to search from current channel to higher channel When a channel is located the searching st...

Страница 19: ...sition number you want to restore with the number buttons enter into the PRESET menu to select SKIP X OFF When picture and sound s effect of a channel is poor for example one or two CATV channel s pic...

Страница 20: ...t according to 8 6 The setting of colour and sound system to set the proper colour and sound system When receiving VCR programs there may occur jump of the picture or bend of upper picture You can sol...

Страница 21: ...system will change in the sequence below In normal circumstances please set the colour system to AUTO and the set can automatically select the proper colour system If colour is still abnormal then se...

Страница 22: ...ect select buttons 0 9 button 8 Channel selection You can select your desired TV program by one of the following methods To select a one digit position number 1 Press button to display on the top righ...

Страница 23: ...scanning from the current channel to higher channel 16 sub pictures will fill up the whole screen one by one You can press one of P SCAN PHOTO DYNAMIC STILL 0 9 buttons on the remote controller to sel...

Страница 24: ...lity you have set in PICTURE menu will be stored into PERSONAL 9 1 2 Making PICTURE menu Press the MENU button 1 to enter into the main menu press VOL or VOL button 2 to select PICTURE menu Press CH 3...

Страница 25: ...g and changing are more and quicker selecting MOVING is suggested 9 1 4 Making use of P SCAN button Press P SCAN button to cycle through AUTO SCAN 100Hz P SCAN and select the proper scan mode in which...

Страница 26: ...s will minimise distortion and produce a remarkable panoramic picture The 4 3 mode leaves conventional 4 3 picture as they are with black bars on both sides of your screen Note the 4 3 display mode is...

Страница 27: ...BALANCE press VOL or VOL button 2 to adjust the level Press VOL button 2 to decrease the right channel s sound press VOL button 2 to decrease the left channel s sound 9 2 3 Making use of Surround soun...

Страница 28: ...e volume Press MUTE button 5 to mute the sound temporarily and press it again to restore the sound 9 2 6 NICAM function This set can identify NICAM program If you are receiving NICAM program and you w...

Страница 29: ...or VOL button 2 until is displayed You can also make use of SLEEP timer function to turn off the set automatically after a preset time and bring the set to standby mode Every time you press the SLP b...

Страница 30: ...ly switch to the preset channel at a preset time The steps are as follows Press CH or CH 3 to select TIMER PR then press VOL or VOL 2 to set the amount of time after which you want the TV to switch ra...

Страница 31: ...function ON the TV will automatically turn off after about certain minutes if a vacant channel is tuned or TV broadcast for a day is finished or no signal is being received Enter into the OPTION menu...

Страница 32: ...ition of the title After completion exit the menu and the title position will be memorised Note If you set the current channel s screen to TITLE by pressing PANORAMA button enter into the OPTION menu...

Страница 33: ...ress GAME button 4 or enter into the OPTION menu and select GAME item then press VOL or VOL 2 to enter into the game playing interface CH button 3 rotate the cube If you want to change the playing dif...

Страница 34: ...is abnormal At this time please set VCR ON and the picture will be normal Please do the following steps Press the MENU button 1 to display the main menu press VOL or VOL button 2 or select PRESET menu...

Страница 35: ...other equipment with YCbCr terminal Press the AV TV button 4 to display the signal source selection menu and then select YCbCr PRESET Note as regards to the menu operation and menu item adjustment in...

Страница 36: ...ter OSD menu is activated CH 3 on the set or CH 3 on the remote controller It is used to move the cursor upward or clockwise after OSD menu is activated or increase the value of parameter after menu i...

Страница 37: ...CH or CH button 3 to select the other terminal which has signal input and press MENU button 1 to confirm Then you can enjoy the program If both the XGA and YPbPr have signal source and you want to sw...

Страница 38: ...EEN ADJUST menu Screen Adjust Menu H SIZE EXIT H PHASE V PHASE SELECTED ITEM NAME ADJUSTMENT ITEM S RANGE POSITION ENGLISH PARALLELOGRAM H MOIRE V MOIRE DEGAUSS ROTATION The selected icon s colour wil...

Страница 39: ...ore to original factory preset mode English Chinese menu on screen display language selection DEGAUSS Manually degauss the set Adjust white balance R at current colour temperature red adjustment Adjus...

Страница 40: ...want to continue the adjustment After completion of the adjustment press TEXT IMAGE button 4 to exit the main menu or you can wait for some time and the menu will automatically disappear 1 2 3 Press...

Страница 41: ...ress MENU button to exit this item s adjustment Repeat the above 3 6 steps to adjust other items After completion of adjustment select EXIT icon or press TEXT IMAGE button to exit the SCREEN ADJUST me...

Страница 42: ...ture there are external equipment with different display modes If user discovers the input signal s display mode is different while the horizontal and vertical frequency accords with the requirement o...

Страница 43: ...r an electronics game machine a broadcast station etc Possible interferences of automobiles motorcycle trolley bus neon lamps etc This may be caused by reflections from nearly mountains or buildings C...

Страница 44: ...ignal blue background display games etc Power supply Power consumption CRT Sound output External control mode Surround sound Full function remote control Dimensions Weight Stored Temperature Working T...

Страница 45: ...PALSONIC CORPORATION PTY LTD 1 JOYNTON AVENUE WATERLOO NSW 2017 AUSTRALIA TEL 02 9313 7111 FAX 02 9313 7555 www palsonic com au PALSONIC CUSTOMER SERVICE TELEPHONE AUSTRALIA 1300 657 888 604 32613 00...

Отзывы: