
PA-7050 FAN TRAY REPLACEMENT GUIDE
docs.paloaltonetworks.com
1
Remove Installed Fan Tray
The fan tray in the first-generation model is interchangeable on either the left slot or the right slot of the firewall.
You can replace a fan tray while the firewall is powered on; however, you must replace it within 45 seconds or the
system automatically shuts down to prevent thermal overload.
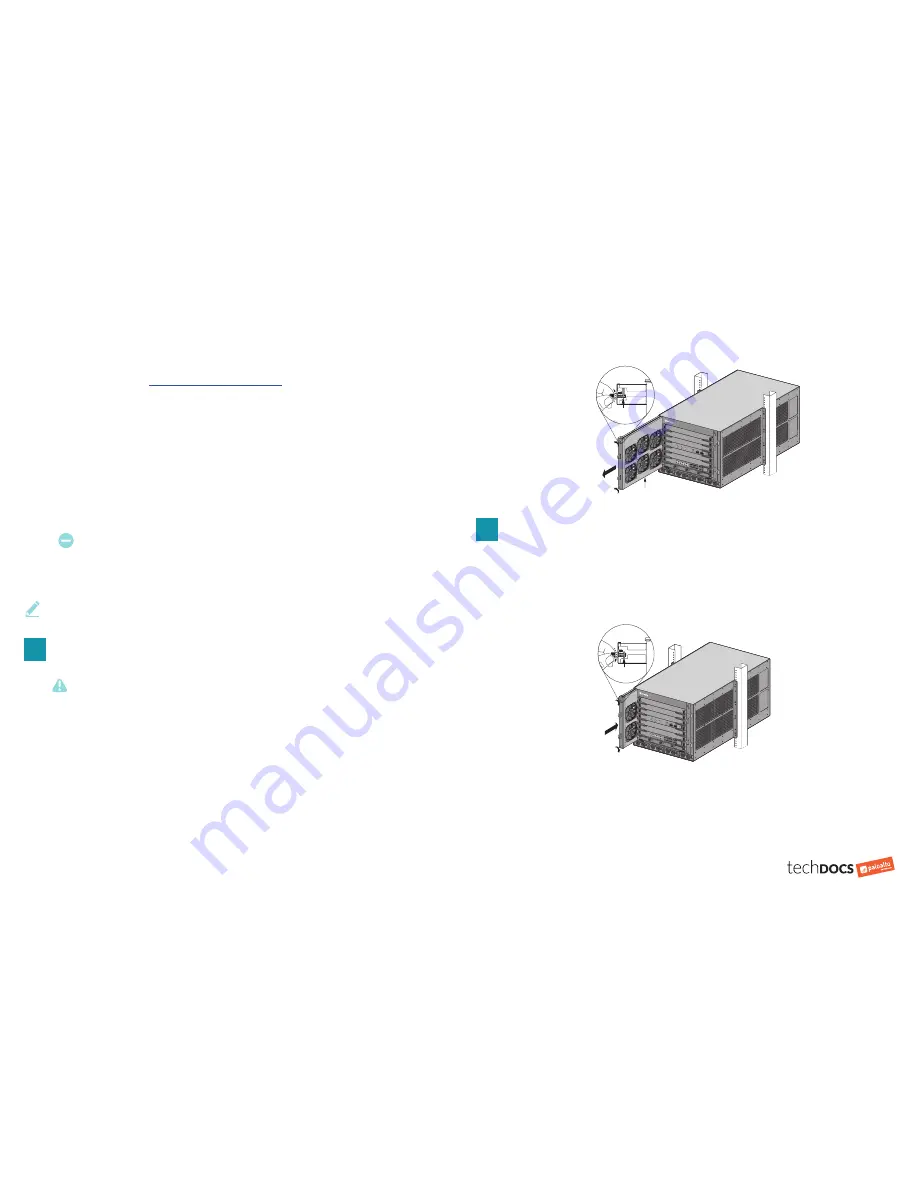
1. Prepare for the removal of the installed fan tray by turning the top and bottom thumb screws counterclockwise until
the screws stop in the open/unlocked position as shown in Figure 1.
2. Grasp the fan tray handles and pull the fan tray out about two inches. After all fans have stopped spinning, remove the
fan tray from the chassis as shown in Figure 1.
Before You Begin
Use this document to replace your Palo Alto Networks PA-7050 fan trays. Refer to the PA-7000 Series Next-Gen
Firewall Hardware Reference at
https://docs.paloaltonetworks.com/hardware
for safety information,
specifications, and more detailed procedures for uninstalling and installing the fan tray.
•
Read this entire procedure before you begin the fan tray replacement procedure.
•
Make sure you have the appropriate fan tray model.
•
First-generation systems employ two fan trays labeled PA-7050-FANTRAY. You have the first-generation fan tray
if the last five digits of the serial number on the chassis are less than 10,000.
•
Second-generation systems employ two fan trays labeled PA-7050-FANTRAY-L-A and PA-7050-FANTRAY-R-A
respectively. You have the second-generation fan tray if the last five digits of the serial number on the chassis are
10,000 or greater.
•
If your firewall is installed in the PAN-AIRDUCT, then the left fan tray slot becomes the top fan tray slot. Similarly, the
right fan tray slot becomes the bottom fan tray slot.
•
You can upgrade older PAN-OS versions on your PA-7050 to use the second-generation fans. To ensure
compatibility with the new fan trays, you need to run one of the following PAN-OS releases:
•
On 7.1.xx, install 7.1.22 or greater
•
On 8.0.xx, install 8.0.15 or greater
•
On 8.1.xx, install 8.1.6 or greater
Lower maintenance versions of these releases will default to running the second-generation fans on high speed,
and the fan trays will not be recognized by PAN-OS.
•
Have a Phillips-head screwdriver available.
2
Install New Fan Tray
1. Unpack the new replacement fan tray (PA-7050-FANTRAY). Ensure that the top and bottom thumb screws on the new fan
tray are in the open/unlocked position by turning both screws counterclockwise as you did in Step 1.
2. Install the new fan tray by carefully sliding the tray into the chassis in the upright position (letter/numbers upright) as shown
in Figure 2, ensuring that the thumb screws are in the open position and that the tray is aligned and properly seated. Once
seated, the fans will automatically restart and the 45 second countdown timer for thermal protection will be cancelled.
3. Turn the top and bottom thumb screws clockwise until the screws stop. This locks the top and bottom latches to secure the
tray to the chassis. Use a Phillips-head screwdriver to tighten the thumb screws.
Page 1 of 3
1
2
3
4
5
6
7
8
1
2
3
4
5
6
7
8
1
2
3
4
5
6
7
8
PA-7050-FA
NTRAY
PA-7050-FA
NTRAY
Open position
Beware of spinning fans
Figure 1
Figure 2
1
2
3
4
5
6
7
8
1
2
3
4
5
6
7
8
1
2
3
4
5
6
7
8
PA-7050-FA
NTRAY
PA-7050-FA
NTRAY
Lock Position
First-Generation Fan Tray
You have the first-generation fan tray if the last five digits of the serial number on the chassis are less than 10,000. If the fan trays have
been upgraded, see the Second-Generation Fan Tray steps.
Even if the last five digits are less than 10,000, you could still have an upgraded
fan tray. Check the fan trays to determine the installed versions (PA-7050-FANTRAY or PA-7050-FANTRAY-L|R-A).


