background image


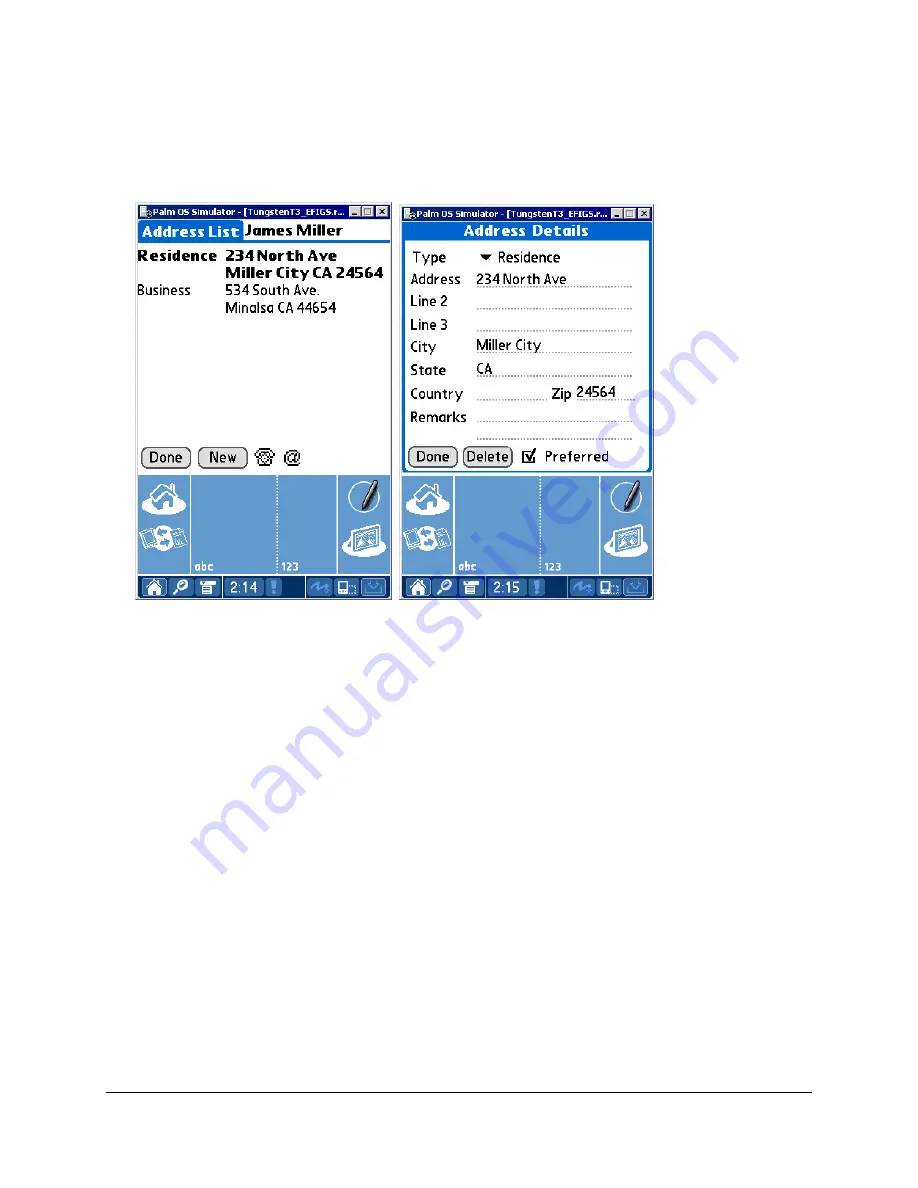
Contact Address List 

1. From 

the 

Contact View

 tab, tap the 

Address

 icon to display the 

Address List

 tab. 

2. Tap 

the 

New 

button to open the Address Details dialog box. 


3. Tap 

the 

Type

 drop-down arrow to select the address type. 

4.  Enter the remaining address information and then tap the 

Done 

button to save the additions. 

Note: 

Both the preferred Phone Number and preferred Address are displayed on the 

Contact View


tab of the Contact record. 

Modifying a Contact Record 

1. From 

the 

Contact View

 tab, tap the 

Edit 

icon to open the 

Details 

tab. 

2.  Modify the information as necessary and then tap the 

Done 

button to save the changes. 

Modifying a Contact’s Phone Number 

1. From 

the 

Contact View

 tab, tap the 

Phone 

icon to display the 

Phone List

 tab. 

2.  Tap the number for modification to open the Phone Details dialog box. 
3.  Modify the information as necessary and then tap the 

Done

 button to save the changes. 

Modifying a Contact’s Address 

1. From 

the 

Contact View

 tab, tap the 

Address 

icon to display the 

Address List 

tab. 

2.  Tap the address for modification to open the Address Details dialog box. 
3.  Modify the information as necessary and then tap the 

Done 

button to save the changes. 

Deleting a Contact Record 

1. From 

the 

Contact View

 tab, tap the 

Edit 

icon to display the 

Details 

tab. 

2. Tap 

the 

Delete

 button to open the 

Delete Record 

dialog box. 

3. Tap 

the 

OK 

button to delete the selected record from the palm device and the server. 

Note: 

Perform a HotSync™ operation to synchronize the data. 

SmartOffice® v3.5 – SmartOffice Mobile for Palm User Guide 

Revised: 11-16-04 

Page 13 

Содержание SmartOffice SmartOffice Mobile

Страница 1: ...SmartOffice Mobile for Palm User Guide SmartOffice v3 5 SmartOffice Mobile for Palm User Guide Revised 11 16 04...

Страница 2: ...prior written consent of E Z Data Inc All product names are trademarks of their respective manufacturers or organizations 918 E Green Street Pasadena CA 91106 Web http www ez data com Telephone 626 5...

Страница 3: ...Personal Dialog Box 15 Business Phone List 15 Business Address List 15 Modifying a Business Record 15 Deleting a Business Record 16 Calendar 16 DayView 16 WeekView 17 MonthView 17 AgendaView 18 Adding...

Страница 4: ...SmartOffice v3 5 SmartOffice Mobile for Palm User Guide Revised 11 16 04...

Страница 5: ...1 Log into SmartOffice 2 From the side menu click User Setup and Installations to open the Installations spreadsheet 3 The Installations spreadsheet appears and displays all the available installatio...

Страница 6: ...the down arrow at the end of the field and select it before clicking the Done button 7 When prompted begin a HotSync on the PDA to install SmartOffice Mobile Once the HotSync is complete click the OK...

Страница 7: ...g SmartOffice for the first time the Security Information window is displayed The user will have the option to either enable or disable security for the device Once security is enabled the only way to...

Страница 8: ...least 6 characters with at least one alpha and one numeric character The password can be changed at any time by accessing the Security Password option from the main SmartOffice Mobile menu Once the p...

Страница 9: ...e login password and tap the OK button The password now shows as Assigned If the SmartOffice One Card System eOCS is being used with SmartOffice select the eOCS User checkbox to enable One Card System...

Страница 10: ...ed continue with step 4 Otherwise the Filter Set Selection dialog box opens Select a set or filter of contacts to synchronize 4 Select a date range of future and past activities for synchronization Cl...

Страница 11: ...or just SmartPad entries manually added as notes can be synchronized 6 The final Synchronization Setup Wizard window is a review of the information selected for synchronization If all of the informati...

Страница 12: ...add new information from SmartOffice 1 From the SmartOffice side menu click Synchronization and select Update Mobile Device to open the Update Mobile Device with Changes dialog box 2 Select the Update...

Страница 13: ...or individual contact s last name and then tap the Find button to display the Contacts tab matching the search criteria 3 Tap the first letter of the business name or individual contact s last name to...

Страница 14: ...e Record Type dialog box 3 Select the Individual option and then tap the Done button to display the Details tab 4 Enter the contact information and then tap the Details button as well as the Phone Add...

Страница 15: ...t Personal Dialog Box 1 From the Contact View tab tap the Details button to open the Contact Personal dialog box 2 Enter the contact personal information and then tap the Done button to save the addit...

Страница 16: ...tab 2 Tap the New button to open the Phone Details dialog box 3 Tap the Type drop down arrow to specify the phone type 4 Enter the remaining phone information and then tap the Done button to save the...

Страница 17: ...iew tab tap the Phone icon to display the Phone List tab 2 Tap the number for modification to open the Phone Details dialog box 3 Modify the information as necessary and then tap the Done button to sa...

Страница 18: ...siness option and then tap the Done button to display the Details tab 4 Enter the business information and then tap the Details button as well as the Phone Address and Web Address icons to enter the c...

Страница 19: ...tab 2 Tap the New button to open the Address Details dialog box 3 Tap the Type drop down arrow to select the address type 4 Enter the remaining address information and then tap the Done button to save...

Страница 20: ...ete button to open the Delete Record dialog box 3 Tap the OK button to delete the selected record from the palm device and the server Note Perform a HotSync operation to synchronize the data Calendar...

Страница 21: ...ek can be displayed by tapping the left or right arrows MonthView The MonthView is used to display activities for a specific month The activities of a previous or future month can be displayed by tapp...

Страница 22: ...future day can be displayed by tapping the left or right arrows Adding an Activity from the Calendar 1 From the DayView calendar tap the New button to open the Activity Details tab 2 Enter the activit...

Страница 23: ...Alarm Select the Alarm option and then specify the amount of time before the activity to be reminded Priority Tap the Priority Type drop down arrow to specify the priority Modifying an Activity from t...

Страница 24: ...ity Details tab 3 Enter the non timed activity information and then tap the Done button to save the activity Modifying a To Do Item 1 From the SmartOffice tab select To Do from the drop down list to o...

Страница 25: ...e applicable To Do item to open the Activity Details tab 3 Tap Delete to display the confirmation dialog box 4 Tap the OK button to delete the To Do item Contact Menu From the Contact View tap the Con...

Страница 26: ...ivity from the Activity Log 1 From the Contact View tap the Contact View tab to display the modules drop down list 2 Tap Activity Log to open the ActLog tab 3 Tap the New button to open the Activity D...

Страница 27: ...ect SmartPad from the drop down list of modules to display the SmartPad tab 2 Tap the New button to display the Details tab Enter the SmartPad note and then tap the Done button to save the additions S...

Страница 28: ...list of modules to display the Policies tab 2 Tap the policy to display the Policy Details tab 3 Tap the IntPrty icon to display the Interested Parties tab 4 Tap the Done button and then tap the Done...

Страница 29: ...SmartOffice v3 5 SmartOffice Mobile for Palm User Guide Revised 11 16 04 Page 25...

Отзывы: