background image

59

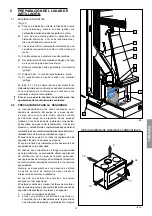
- 5.4 -

- 5.4.1 -

PA

Ø 80

Max 6 mt.

FRANÇAIS

5.4 OPÉRATIONS 

PRÉALABLES

5.4.1 Intervention 

d’adaptation

Il est avant tout nécessaire de contrôler les dimensions de 
l’espace disponible dans la cheminée existante et de les 
comparer à celles du insert a boise


HWGHOD¿FKHWHFKQLTXH

Dans le cas où serait nécessaire une intervention 

G¶DGDSWDWLRQGpFRXSHRXPRGL¿FDWLRQGHVSDURLVLQWHUQHV

du insert a boise), veiller à ne pas en compromettre la 
stabilité.

(QFDVGHSRXWUHHQERLVRXGHWRXWH¿QLWLRQHQPDWpULDX
FRPEXVWLEOHFHOOHVFLGHYURQWrWUHDGpTXDWHPHQWLVROpHV

(ou bien installée en-dehors de la zone de rayonnement 
du insert a boise) et se trouver à au moins 1 cm du insert 

DERLVHSRXUDVVXUHUODOLEUHFLUFXODWLRQGXÀX[G¶DLUVHUYDQW

à éviter toute surchauffe. 

5.4.2  Prise d’air comburant


Le insert a boise lors de son fonctionnement, prend 
beaucoup d’air dans l’environnement où il se trouve, cet 
air devrait être rétabli grâce à une prise d’air extérieur à la 
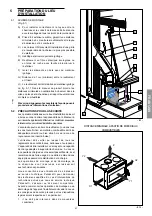
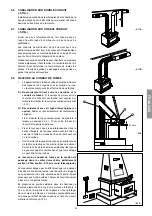
pièce (Fig. 5.4 - PA  =  Bouche d’air).


Vous pouvez connecter une tuyau d’air comburant arrière 
de la machine avec un tuyau de 80 mm de diamètre et de 
6 mètres de longueur maximum pour la connexion externe 
(Fig. 5.4.1)


Si la paroi arrière du insert a boise est un mur extérieur, 
percer un trou pour l’entrée d’air de combustion à une garde 
au sol d’environ 20-30 cm. Il faut  placer à l’extérieur une 
grille d’aération permanente. Dans les zones venteuses et 
exposées il faut prévoir un chapeau de protection.

6¶DVVXUHU TXH O¶HQWUpH G¶DLU FRPEXUDQW RX OD YHUVLRQ

canalisée à l’extérieur n’est pas accidentellement obstruée.

S’il n’est pas possible d’effectuer une canalisation d’air 
directe dans le mur. Vous pouvez également prendre l’air 
directement dans le vide sanitaire s’il est ventilé.

Le soutirage d’air comburant de garages, d’entrepôts 
de matériau combustible ou d’activités avec danger 
d’incendie est interdit.  

6LLO\DG¶DXWUHVDSSDUHLOVGHFKDXIIDJHLOIDXWGDQVFKDTXH

locaux une prise d’air de combustion pour assurer le 
volume d’air nécessaire au bon fonctionnement de tous 
les dispositifs.

/RUVTXHGDQVODSLqFHRVHWURXYHOHSRrOHHVWSUpVHQWH

une extraction d’air motorisée (VMC)  un mauvais 

IRQFWLRQQHPHQWSRXUUDLWrWUHFDXVpSDUXQPDQTXHG¶DLU

de combustion pour l’appareil.

5.4.3 

/RJHPHQWNLWYHQWLODWLRQPñKRSWLRQDO

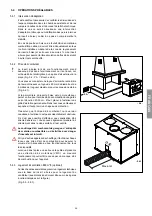
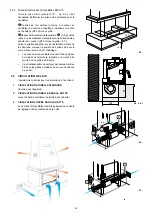
6XUOHVFKHPLQpHVH[LVWDQWHVSUpYRLUXQORJHPHQWWHFKQLTXH

sous la base du insert a boise


pour le logement du 

ventilateur (ses dimensions doivent être au moins égales 

jFHOOHVLQGLTXpHVVXUOD¿JXUH

(Fig. 5.5 - 5.5.1). 

Содержание ECOPALEX T Glass

Страница 1: ...rtung und Verwendung dieAnleitungen stets aufmerksam durchlesen Le présent manuel fait partie intégrante du produit Il est conseillé de lire attentivement les consignes avant l installation l entretien ou l utilisation du produit Este manual es parte integrante del producto Se recomienda leer detenidamente las instrucciones antes de la instalación el mantenimiento y el uso del producto IT MANUALE ...

Страница 2: ... avez accordée en achetant notre produit et vous félicitions pour votre choix Q GH YRXV SHUPHWWUH GH SUR WHU DX PLHX GH YRWUH LQVHUW D ERLVH QRXV YRXV LQYLWRQV j VXLYUH attentivement les instructions reportées dans cette notice Estimado Cliente Deseamos agradecerle por la preferencia que nos ha otorgado adquiriendo nuestro producto y lo felicitamos por su elección Para el mejor uso de su nuevo ins...

Страница 3: ...ETTA DI IDENTIFICAZIONE 3 3 I KIT OPZIONALI 4 MOVIMENTAZIONE E TRASPORTO 5 PREPARAZIONE DEL LUOGO DI INSTALLAZIONE 5 1 SCHEMA DI MONTAGGIO 5 2 PRECAUZIONI PER LA SICUREZZA 5 3 CANNE FUMARIE E COMIGNOLI 5 4 OPERAZIONI PRELIMINARI 5 5 CIRCOLAZIONE DELL ARIA 5 6 CANALIZZAZIONE SU DOPPIO CONDOTTO 5 11A 5 7 CANALIZZAZIONE SU UNICO CONDOTTO 5 11B 5 8 RACCORDO AL CANALE DA FUMO 5 9 INSERIMENTO IN UN CAMI...

Страница 4: ...so e Manutenzione è parte integrante del caminetto DETERIORAMENTO O SMARRIMENTO In caso di necessità fare richiesta di un ulteriore copia a PALAZZETTI CESSIONE DEL CAMINETTO In caso di cessione del caminetto l utente è obbligato a consegnare al nuovo acquirente anche il presente manuale 1 5 AGGIORNAMENTO DEL MANUALE Il presente manuale rispecchia lo stato dell arte al momento dell immissione sul m...

Страница 5: ...a descrizione della prestazione di tali prodotti in relazione alle loro caratteristiche essenziali e per l uso della marcatura CE sui prodotti in questione 4 Direttiva 85 374 CEE Concernente il riavvicinamento delle disposizioni legislative regolamentari ed amministrative degli stati membri in materia di responsabilità per danno da prodotti difettosi 1 8 GARANZIA LEGALE L utente per poter usufruir...

Страница 6: ...IZZATORE Predisporre il luogo d installazione secondo i regolamenti locali nazionale ed europei L apparecchio essendounprodottodariscaldamento SUHVHQWD GHOOH VXSHU FL HVWHUQH SDUWLFRODUPHQWH calde Per questo motivo si raccomanda la massima cautela durante il funzionamento in particolare non toccare e non avvicinarsi al vetro della porta potrebbe causare ustioni non toccare lo scarico dei fumi non ...

Страница 7: ...e garantisce un funzionamento e una resa ai massimi livelli possibili I prodotti sono caratterizzati da un evoluto sistema a doppia combustione studiato per bruciare in maniera ottimale la legna e i gas incombusti della combustione primaria 3 2 TARGHETTA DI IDENTIFICAZIONE La targhetta matricola posta sul caminetto riporta tutti i dati caratteristici relativi al prodotto compresi i dati del Costru...

Страница 8: ...o spazio d ubicazione del caminetto è e rimane a carico dell utilizzatore a quest ultimo è demandata anche l esecuzione delle verifiche relative alle soluzioni d installazione proposte L eventuale trave in legno del rivestimento o comunque TXDOVLDVL QLWXUD LQ PDWHULDOH FRPEXVWLELOH GHYH HVVHUH adeguatamente isolata e comunque posta al di fuori della zona d irraggiamento del focolare L utilizzatore...

Страница 9: ...meglio ancora se di soli 30 Detti spostamenti vanno effettuati preferibilmente in prossimità del comignolo II CANALE DA FUMO tra focolare e condotto fumario dovrà avere la stessa sezione dell uscita fumi dell apparecchio Ilcanaledafumodeveessereatenuta HG q YLHWDWR O XVR GL WXEL PHWDOOLFL ÀHVVLELOL HVWHQVLELOL Per raccordare l apparecchio al camino è possibile effettuare al massimo 3 cambi di dire...

Страница 10: ...na realizzare un foro per l aspirazione dell aria comburente ad una altezza dal suolo di circa 20 30 cm il diametro del foro è indicato nella tabella dei dati tecnici del libretto di prodotto Assicurarsi che l ingresso aria comburente o la versione canalizzata all esterno non venga ostruito accidentalmente Esternamente deve essere messa una griglia di aerazione permanente in zone particolarmente v...

Страница 11: ... locale adiacente fatta eccezione per cucina bagno camera da letto Ø 15cm con griglia 5 7 In relazione alla soluzione adottata durante la prova di installazione a secco è opportuno segnare sia sulla parete esterna che sul rivestimento la posizione delle prese d aria Le prese d aria del ventilatore possono essere dotate di serrandina di chiusura regolabile e devono essere corredate di una griglia a...

Страница 12: ...aticare sulla cappa stessa 5 14 B Collegamento con kit tubo telescopico opzionale Questa è la soluzione nel caso di installazione su caminetti già esistenti Fissare prima di tutto il tubo telescopico ad un altezza tale che tra la base del raccordo e la parte superiore dell apparecchio vi sia uno spazio di 2 12 cm O VVDJJLR GRYUj DYYHQLUH FRQ YLWL DXWR OHWWDQWL QHOOD parte inferiore dell anello pre...

Страница 13: ...ta A togliere in sequenza i cementi B frontale anteriore C parete di IRQGR DQFR ODWHUDOH J 3URFHGHUH TXLQGL FRPH GD J 5 10 2 OOHQWDUH OH YLWL VVDJJLR GHÀHWWRUH IXPL SRVL LRQDWH sulla parete frontale del supporto per almeno 5mm J 5 10 3 7RJOLHUH LO GHÀHWWRUH J 5 10 4 6YLWDUH GDGL H EXOORQL VVDJJLR VXSSRUWR GHÀHWWRUH H VJDQFLDUH LO VXSSRUWR GHÀHWWRUH J 5 10 5 Entrare con la mano nella macchina attra...

Страница 14: ...ti dalla canna fumaria evitando così fuoriuscite di fumo in ambiente Nell avviamento del caminetto quando il focolare non ha ancora raggiunto la temperatura ottimale è consigliabile farlo funzionare alcuni minuti con la portina accostata alla sede di battuta ma non chiusa per permettere I evaporazione della condensa che viene a formarsi sul vetro A fuoco avviato la portina dovrà essere chiusa per ...

Страница 15: ...ria lo si aumenta invece spostandola a sinistra A fuoco avviato la leva può essere posizionata circa a metà apertura in funzione del tiraggio della canna fumaria e della quantità di aria che si vuol fornire Alla prima accensione della giornata o in presenza di legna umida è consigliabile aprire completamente I aria primaria per facilitarne l accensione Durante il funzionamento la temperatura dei r...

Страница 16: ...evisti dalla direttiva 89 391 CEE D Operare sempre con attrezzature appropriate per la manutenzione La manutenzione deve essere effettuata a cura di un FHQWUR GL DVVLVWHQ D VSHFLDOL DWR R SHUVRQDOH TXDOL FDWR 7 2 PULIZIA La pulizia della parte esterna della stufa deve essere effettuata solo con un panno asciutto non abrasivo Non utilizzare detersivi 7 3 RIMOZIONE DELLA CENERE DAL FOCOLARE La stufa...

Страница 17: ...si in fase di accensione e a schiarire durante il funzionamento Il vetro ceramico resiste benissimo alle alte temperature ma è fragile quindi NON URTARE 7 5 MANUTENZIONE DELLA CANNA FUMARIA In condizioni di normale funzionamento la pulizia del camino deve essere effettuata ogni 40 q li di legna bruciata o almeno ogni due anni salvo diverse regolamentazioni XUDQWH OD SXOL LD FRQVLJOLDPR GL WRJOLHUH...

Страница 18: ... a persone ed animali ricade sempre sul proprietario All atto della demolizione la marcatura CE il presente manuale e gli altri documenti relativi a questo apparecchio dovranno essere distrutti Il simbolo del cassonetto barrato riportato sull etichetta dell apparecchiatura indica FKH LO SURGRWWR DOOD QH GHOOD SURSULD YLWD utile deve essere raccolto separatamente GD DOWUL UL XWL Nel caso sia presen...

Страница 19: ...19 ITALIANO ...

Страница 20: ...CS DESCRIPTION 3 1 DESCRIPTION 3 2 IDENTIFICATION TAG 3 3 OPTIONAL KITS 4 HANDLING AND TRANSPORT 5 PREPARING THE PLACE OF INSTALLATION 5 1 ASSEMBLY DIAGRAM 5 2 SAFETY PRECAUTIONS 5 3 FLUES AND CHIMNEY CAPS 5 4 PRELIMINARY OPERATIONS 5 5 AIR CIRCULATION 5 6 DOUBLE DUCT PIPING 5 11A 5 7 SINGLE DUCT PIPING 5 11B 5 8 CONNECTION TO THE FLUE 5 9 RECESSING IN FIREPLACES 5 10 TELESCOPIC TUBE CONNECTION 6 ...

Страница 21: ... RI WKH DUW DW WKH WLPH WKH wood insert was put on the market The wood inserts already on the market together with their technical documentation will not be considered by PALAZZETTI as wanting or inadequate simply because changes or adjustments have been made or new WHFKQRORJLHV KDYH EHHQ DSSOLHG WR WKH QH W JHQHUDWLRQ RI wood inserts 1 6 GENERAL INFORMATION INFORMATION If information is requested...

Страница 22: ...ctions given in the manual Q LQVWDOODWLRQ E XQTXDOL HG DQG XQWUDLQHG SHUVRQQHO Use that fails to conform to the safety directives Alterations and repairs on the wood insert not authorised by the manufacturer Use of spare parts that are either not genuine or VSHFL F IRU WKLV SDUWLFXODU PRGHO RI ZRRG LQVHUW Lack of maintenance FHSWLRQDO HYHQWV 1 10 USER CHARACTERISTICS The person who uses the wood i...

Страница 23: ...a product that heats its outer surfaces can get very hot RU WKLV UHDVRQ ZH DGYLVH PD LPXP FDXWLRQ ZKHQ LW is working in particular Do not touch or go near the glass door as you could get burnt do not touch the smoke discharge do not empty the ashes GR QRW RSHQ WKH GRRU H FHSW IRU QRUPDO discharge operations do not do any type of cleaning make sure that children are kept away Comply with the indica...

Страница 24: ...PD LPXP RSHUDWLRQ DQG HI FLHQF OHYHOV 7KH wood inserts are distinguished by the revolutionary dual combustion system GHVLJQHG WR EXUQ UHZRRG DQG WKH unburned primary combustion gasses optimally 3 2 IDENTIFICATION TAG The serial number plate on the wood insert contains all of the characteristics of the product including manufacturer information serial number and CE mark The serial number must alway...

Страница 25: ...regarding the proposed installation solutions Any wood beam of the cladding or any finish in combustible material must be suitably insulated or located outside the area that is heated by the wood insert The user must comply with all the local national and European rules and regulations If the floor does not have a sufficient load bearing capacity it is advisable to use a load distributing plate of...

Страница 26: ...oke pipe must EH VHDOHG W LV SURKLELWHG WR XVH H WHQGDEOH ÀH LEOH metal pipes To connect the wood insert to the FKLPQH RX PD SHUIRUP D PD LPXP RI GLUHFWLRQ changes no greater than 90 with the smoke pipe no longer than 2 m in horizontal projection and a PD LPXP RI WRWDO PHWHUV 0DNH VXUH WKDW WKH UVW vertical segment is at least 50 cm before changing direction The CHIMNEY TOP shall be the WINDPROOF ...

Страница 27: ...ke an opening for drawing in combustion air around 20 FP DERYH WKH ÀRRU REVHUYLQJ WKH GLPHQVLRQV VKRZQ on the product data sheet at the product technical details Make sure the combustion air intake or the version with H WHUQDO GXFW LV QRW DFFLGHQWDOO EORFNHG A permanent non closable vent cover must be placed on the outside of the opening in especially windy areas RU SODFHV H SRVHG WR EDG ZHDWKHU L...

Страница 28: ...e solution adopted during the dry test installation it is advisable to mark the position of the air LQWDNHV RQ ERWK WKH FODGGLQJ DQG WKH H WHUQDO ZDOO The fan air intakes can be provided with an adjustable closure shutter and must be equipped with anti insect screens W LV LQGLVSHQVDEOH WR FOHDQ OWHUV RU QH PHVK JULOOHV periodically because they may become clogged 5 5 AIR CIRCULATION There are thre...

Страница 29: ...to do it if you are installing WKH SURGXFW RQ H LVWLQJ UHSODFHV LUVW WKH WHOHVFRSLF SLSH DW D KHLJKW VR WKHUH LV D space of 2 12 cm between the base of the connection and the upper part of the device RU LQJ XVH VHOI WDSSLQJ VFUHZV DW WKH ERWWRP RI WKH SUH KRRG ULQJ RU KRRG DW WKH UHSODFH RSHQLQJ 1RZ W WKH SLSHV DQG FXUYHV VHDOLQJ WKH MRLQW ZLWK FHUDPLF EUH DQG FHPHQW PRUWDU I RX DUH XQDEOH WR LQVH...

Страница 30: ...ort by at least PP J 5 10 3 5HPRYH WKH GHÀHFWRU LJ 5 10 4 8QVFUHZ WKH GHÀHFWRU VXSSRUW UHWDLQLQJ QXWV DQG EROWV DQG GHWDFK WKH GHÀHFWRU VXSSRUW LJ 5 10 5 Introduce a hand into the machine through the smoke RXWOHW SXOO GRZQ WKH HG URG LQ WKH WHOHVFRSLF WXEH DQG LQVHUW LW LQWR WKH UHOHYDQW VHDW J 5HPRYH DQ VHDODQW WKDW PD KDYH RYHUÀRZHG inside The smoke connection is now completed 5 10 6 5H W WKH FR...

Страница 31: ... close it The door should be opened gradually so the smoke can EH GUDZQ XS WKH ÀXH DQG QRW LQ WKH URRP KHQ OLJKWLQJ WKH UHSODFH DQG XQWLO LW UHDFKHV WKH ULJKW WHPSHUDWXUH it should burn for a few minutes with the door ajar so that the condensation that forms on the glass can evaporate 2QFH WKH UH LV EXUQLQJ ZHOO FORVH WKH GRRU WR RSWLPLVH yield and consequently wood consumption 6 2 LIGHTING FOR TH...

Страница 32: ...d pieces inside the combustion chamber SODFH D QDWXUDO UH VWDUWHU RQ WKH VWDFN DGG VRPH FURVVHG QH ZRRG VWLFNV OLJKW XS WKH UH VWDUWHU IURP WKH WRS FORVH WKH UH GRRU NHHS WKH DLU YHQW RSHQHG WR HQVXUH D KLJK EULJKW ÀDPH slightly close the air vent only when proper grill base is ensured 6 4 RELOADING THE FUEL To load fuel inside the machine while it is running follow the procedure below 2SHQ WKH UH...

Страница 33: ... XVLQJ a m etallic shovel remove the ash from the ash collection tank using an appropriate ash suction system close the door 7 4 CLEANING THE GLASS During operation of the wood insert it is possible to facilitate the cleaning of the glass ceramic through the pawl without having to open the door Figure 7 1 7KLV QRUPDOO VKRXOG EH SODFHG FORVHG WR ÀRZ I WKH SDZO LV PRYHG RSHQV DQ DLU ÀRZ ZKLFK LQYHVW...

Страница 34: ...ned See Chapter 6 4 DUQLQJ I WKH GLDSKUDJP LV QRW SXW EDFN WKHUH ZRXOG be a strong depression forge effect and the wood would burn too quickly and irregularly 7 5 1 POOR SMOKE DRAUGHT I WKLV RFFXUV WKH UVW WLPHV RX OLJKW WKH ZRRG LQVHUW FKHFN WKDW WKH ÀXH LV QRW FORJJHG ZLWK PDVRQU GHEULV ELUGV nests or anything else in the chimney top Furthermore WKH ÀXH VKRXOG EH FRQQHFWHG DFFRUGLQJ WR WKH LQVWU...

Страница 35: ...always responsible for injury to people and animals When the wood insert is demolished the EC mark this manual and all the other documents relative to it must be destroyed The picture of the bin crossed is labelled on the equipment and it means that when the device is out of use it has to be kept separated by other wastes In this case both the fan kit On the basis of Article 13 by Legislative Decr...

Страница 36: ...EBESCHREIBUNG 3 1 BESCHREIBUNG 3 2 TYPENSCHILD 3 3 DIE OPTIONALEN KITS 4 HANDLING UND TRANSPORT 5 VORBEREITUNG DES INSTALLATIONSORTS 5 1 MONTAGESCHEMA 5 2 VORBEUGENDE SICHERHEITSMASSNAHMEN 5 3 RAUCHFÄNGE UND SCHORNSTEINE 5 4 EINLEITENDE MASSNAHMEN 5 5 LUFTZIRKULATION 5 6 KANALISIERUNG AUF DOPPELTER LEITUNG 5 11A 5 7 KANALISIERUNG AUF EINZIGER LEITUNG 5 11B 5 8 ANSCHLUSS AN DEN RAUCHGASKANAL 5 9 EI...

Страница 37: ...rsonal immer zum Nachschlagen verfügbar sein Das Handbuch Gebrauchs und Wartungsanleitung ist integrierender Gerätebestandteil VERSCHLEISS ODER VERLUST Falls nötig bei der Fa PALAZZETTI eine Ersatzkopie anfordern VERKAUF DES HOLZ KAMIN EINSATZ Beim eventuellen Verkauf des Holz Kamin Einsatz muss dem neuen Käufer auch das Handbuch ausgehändigt werden 1 5 ERWEITERUNG DES HANDBUCHS Dieses Handbuch en...

Страница 38: ...ur Aufhebung der Richtlinie 89 106 EWG des Rates 4 Richtlinie 85 374 EWG zur Angleichung der Rechts und Verwaltungsvorschriften der Mitgliedstaaten über die Haftung für fehlerhafte Produkte 1 8 GEWÄHRLEISTUNG Damit der Benutzer die gesetzliche Garantie laut Richtlinie 1999 44 EG beanspruchen kann hat er die Anweisungen dieses Handbuchs gewissenhaft zu befolgen und insbesondere i m m e r i n n e r ...

Страница 39: ...tel verwenden 2 2 HINWEISE FÜR DEN BENUTZER Den Installationsort des Holz Kamin Einsatz gemäß den örtlichen nationalen und europäischen Normen vorbereiten LH X HQÀlFKHQ GHV 3URGXNWV ZHUGHQ VHKU KHL Aus diesem Grund sind während des Betriebs folgenden Punkten besondere Aufmerksamkeit zu gewähren das Glas der Tür nicht anfassen oder sich diesem nähern es kann Verbrennungen verursachen den Rauchfang ...

Страница 40: ... bei bestmöglicher Leistung Die Kaminöfen zeichnen sich durch das fortschrittliche System der doppelten Verbrennung aus wodurch das Holz und die während der Primärverbrennung unverbrannt gebliebenen Gase optimal verbrannt werden 3 2 TYPENSCHILD Das Typenschild auf dem Kamin enthält alle Produktdaten einschließlich der Daten des Herstellers die Seriennummer und die CE Kennzeichnung Bei Anfragen die...

Страница 41: ...ingriffe lassen 5 2 VORBEUGENDE SICHERHEITSMASSNAHMEN Die Verantwortung für die Arbeiten im Aufstellungsraum des Gerätes ist und bleibt die des Benutzers diesem wird auch die Ausführung der Kontrolle bezüglich der Installationsvorschläge übertragen Ein eventuell an der Verkleidung angebrachter Holzbalken bzw alle Materialien der Verkleidung die brennfähig sind müssen angemessen isoliert werden ode...

Страница 42: ...al muss dicht sein und darf nicht aus ausziehbarem flexiblem Rohr bestehen Zum Anschluss des Geräts an den Schornstein dürfen höchstens drei Richtungsänderungen mit einem Winkel von nicht über 90 und einer Länge des Kanals von nicht über 2 Meter in waagrechter Projektion und nicht über 3 Meter Gesamtlänge verwendet werden Sicherstellen dass das erste senkrechte Teilstück vor einer Richtungsänderun...

Страница 43: ...en der Verbrennungsluft angebracht werden dabei die Maßangaben im technischen Datenblatt des Produkts am Ende des Produkthefts beachten Versichern Sie sich dass der Einlass der Verbrennungsluft oder die zum Außenbereich kanalisierte Ausführung nicht unabsichtlich verstopft wird Außen muss ein bleibendes nicht verschließbares Lüftungsgitter angebracht werden an besonders windigen und der Witterung ...

Страница 44: ...Lösung sollte man während der Probemontage ohne Anschlüsse auf der Aussenwand und auf der Verkleidung die Punkte der Luftöffnungen kennzeichnen Die Lufteinlässe des Ventilators können mit regulierbarer Klappe ausgerüstet sein und müssen ein Insektenschutzgitter besitzen Eventuelle dichtmaschige Filter oder Gitter müssen in regelmässigen Zeitabständen gereinigt werden um Verstopfungen zu vermeiden ...

Страница 45: ...FK LVW GLH 9HUELQGXQJ ZLVFKHQ DPLQ XQG GHU DXEH PLW GHQ 5RKUHQ KHU XVWHOOHQ LVW HV DQJHPHVVHQ GHQ QVFKOXVV XQG GLH 0RQWDJH PLW HLQHU gIIQXQJ DXI GHU DXEH VHOEVW DXV XI KUHQ B Verbindung mit Kit Teleskoprohr optional Diese ist die Lösung im Falle der Installation auf bereits bestehenden Kaminen Befestigen Sie zuerst das Teleskoprohr auf einer solchen Höhe dass sich zwischen der Basis des Anschlusse...

Страница 46: ...eits bestehenden Kamin 5 10 1 Zunächst einmal öffnen Sie die Tür A dann der Reihe nach die Betonelemente entfernen B Vorderfront C Bodenplatte D Seitenwand Abb 5 8 Gehen Sie dann wie in Abb 5 8 1 vor 5 10 2 Lockern Sie die Befestigungsschrauben der Halterung des Rauchleitplatte an der Vorderseite und drehen Sie diese mindestens 5 mm heraus Abb 5 8 1 A 5 10 3 Nehmen Sie die Rauchleitplatte ab Abb 5...

Страница 47: ...o das Entweichen von Rauch in die Umgebung zu vermeiden Bei der Zündung des Kamins ist es empfehlenswert wenn der Feuerraum noch nicht die optimale Temperatur erreicht hat ihn einige Minuten mit angelehnter aber nicht geschlossener Türe funktionieren zu lassen um das Verdampfen des Kondensats das sich auf dem Glas bildet zu erlauben Folgend muss die Türe geschlossen werden um die Leistung und dami...

Страница 48: ...mer ablegen Eine natürliche Feuerzündhilfe auf dem Holzstapel positionieren Darauf kreuzweise kleine Holzstückchen positionieren Von oben die Feuerzündhilfe entzünden Die Tür der Feuerung schließen Die Luftaufnahme geöffnet lassen um eine hohe und leuchtende Flamme garantieren zu können Die Öffnung der Luftaufnahme erst dann verringern wennsicheineausreichendeMengeGlutvorhandenist 6 4 BRENNSTOFFBE...

Страница 49: ...ockenen nicht abschleifenden Tuch durchgeführt werden Keine Reinigungsmittel verwenden 7 3 ENTFERNUNG DER ASCHE VON DER FEUERSTELLE HU HL RIHQ EHGDUI HLQHU HLQIDFKHQ DEHU KlX JHQ XQG VRUJIlOWLJHQ 5HLQLJXQJ XP LPPHU HLQH HI LHQWH HLVWXQJ und einen ordnungsgemäßen Betrieb garantieren zu können Tür öffnen Mit einer Metallschaufel Glut und Asche aus der Feuerkammer entfernen Mit einem entsprechenden A...

Страница 50: ...o Jahr durchzuführen Während der Reinigung sollten das Rauchleiterblech von seinem Platz in der Nähe des Rauchausgangs entfernt werden damit der Russ herausfallen kann Das Rauchleiterblech muss nach der Reinigung wieder an seinem Platz angeordnet werden Siehe Kapitel 6 4 Achtung Das Fehlen des Rauchleiterblechs verursacht einen starken Druckabfall Blasebalgeffekt mit einer zu schnellen und unregel...

Страница 51: ... an Personen und Tieren trägt immer der Eigentümer Beim Abriss müssen das CE Markenzeichen dieses Handbuch und alle Unterlagen zu diesem Holz Kamin Einsatz vernichtet werden Das Symbol der durchgekreuzten Mülltonne auf dem Etikett des Geräts bedeutet dass dasProduktamEndeseinerNutzungsdauer von anderen Abfällen getrennt gesammelt werden muss In diesem Fall sind beide Lüfter Kit Gemäß Art 13 des ge...

Страница 52: ...IQUES ET DESCRIPTION 3 1 DESCRIPTION 3 2 PLAQUE SIGNALÉTIQUE 3 3 LES KITS OPTIONNELS 4 DÉPLACEMENT ET TRANSPORT 5 PRÉPARATION DU LIEU D INSTALLATION 5 1 SCHÉMA DE MONTAGE 5 2 PRÉCAUTIONS POUR LA SÉCURITÉ 5 3 CONDUITS DE FUMÉE ET CHEMINÉES DE TOIT 5 4 OPÉRATIONS PRÉALABLES 5 5 CIRCULATION DE L AIR 5 6 CANALISATION SUR DOUBLE CONDUIT 5 11A 5 7 CANALISATION SUR UN SEUL CONDUIT 5 11B 5 8 RACCORD AU CO...

Страница 53: ...OHV WHFKQLFLHQV UHVSRQVDEOHV GH VRQ montage et de son entretien Le manuel d utilisation et d entretien fait partie intégrante de l appareil DÉTÉRIORATION OU PERTE En cas de perte ou de détérioration du manuel en demander un nouvel exemplaire à la société PALAZZETTI VENTE DU INSERT A BOISE En cas de vente du insert a boise l utilisateur est également tenu de remettre au nouveau propriétaire le prés...

Страница 54: ...islatives réglementaires et administratives des États membres en matière de responsabilité du fait des produits défectueux 1 8 GARANTIE LÉGALE 3RXU SRXYRLU EpQp FLHU GH OD JDUDQWLH OpJDOH SUpYXH SDU la directive CEE CE l utilisateur doit respecter scrupuleusement les prescriptions figurant dans le présent manuel et en particulier il doit utiliser le insert a boise en respectant les limites de fonc...

Страница 55: ...oujours utiliser les dispositifs de sécurité individuelle et les autres moyens de protection prévus par la loi en vigueur 2 2 CONSIGNES POUR L UTILISATEUR Préparer le lieu d installation du insert a boise selon les règlements locaux nationaux et européens S agissant d un produit de chauffage durant son fonctionnement les surfaces extérieures du insert a boise sont très chaudes Pour cette raison il...

Страница 56: ...inée existante ou dans une cheminée neuve Il donne un fonctionnement optimal et un rendement du plus haut niveau Les produits sont caractérisés par un système à double combustion ultra performant conçu pour permettre la combustion du bois et des gaz non brûlés à l issue de la combustion primaire 3 2 PLAQUE SIGNALÉTIQUE D SODTXH VLJQDOpWLTXH VLWXpH VXU OD FKHPLQpH UHSRUWH WRXWHV OHV GRQQpHV FDUDFWp...

Страница 57: ...boise sont de l entière responsabilité de l utilisateur à TXL LO LQFRPEH pJDOHPHQW G HIIHFWXHU OHV FRQWU OHV QpFHVVDLUHV relativement aux solutions d installation proposées L éventuelle poutre en bois du revêtement ou dans tous OHV FDV WRXWH QLWLRQ HQ PDWpULDX FRPEXVWLEOH GRLW rWUH DGpTXDWHPHQW LVROp RX ELHQ VLWXp KRUV GH OD RQH GH rayonnement du insert a boise L utilisateur doit veiller au respec...

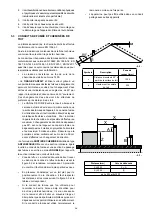
Страница 58: ...terdit d utiliser des tuyaux PpWDOOLTXHV ÀH LEOHV H WHQVLEOHV 3RXU UDFFRUGHU l appareil à la cheminée il est possible d effectuer au maximum 3 changements de direction ne dépassant pas 90 avec une longueur du canal de fumée ne dépassant pas les 2 mètres en projection horizontale HW DX PD LPXP PqWUHV DX WRWDO 6 DVVXUHU TXH OD première section verticale est au moins de 50 cm avant d effectuer un cha...

Страница 59: ...ion externe Fig 5 4 1 Si la paroi arrière du insert a boise est un mur extérieur percer un trou pour l entrée d air de combustion à une garde au sol d environ 20 30 cm Il faut placer à l extérieur une grille d aération permanente Dans les zones venteuses et exposées il faut prévoir un chapeau de protection 6 DVVXUHU TXH O HQWUpH G DLU FRPEXUDQW RX OD YHUVLRQ canalisée à l extérieur n est pas accid...

Страница 60: ... l installation à blanc de OD FKHPLQpH PDUTXHU OD SRVLWLRQ GHV SULVHV G DLU VXU OH PXU H WpULHXU DLQVL TXH VXU O KDELOODJH HV SULVHV G DLU GX YHQWLODWHXU SHXYHQW rWUH pTXLSpHV de clapet de fermeture réglable et doivent être munies d une grille anti insecte O HVW LQGLVSHQVDEOH GH QHWWR HU SpULRGLTXHPHQW OHV OWUHV RX OHV JULOOHV j PDLOOH VHUUpH TXL RQW WHQGDQFH à se salir 5 5 CIRCULATION DE L AIR Il...

Страница 61: ...Q G HQ IDFLOLWHU OH UDFFRUGHPHQW HQ IDLVDQW XQ WURX GLUHFWHPHQW VXU OD KRWWH B Raccordement avec kit tuyau télescopique en option 6ROXWLRQ HQ FDV G LQVWDOODWLRQ VXU OHV FKHPLQpHV GpMj H LVWDQWHV L HU G DERUG OH WX DX WpOHVFRSLTXH GH PDQLqUH j laisser un espace de 2 12 cm entre la base du raccord et la partie supérieure Fixer le tout avec des vis autotaraudeuses dans la partie inférieure de l annea...

Страница 62: ...rontal avant C paroi de IRQG ÀDQF ODWpUDO J 3URFpGHU HQVXLWH FRPPH LQGLTXp GDQV OD J 5 10 2 HVVHUUHU OHV YLV GH DWLRQ GX GpÀHFWHXU GH IXPpHV présentes sur la paroi frontale du support sur au moins PP J 5 10 3 5HWLUHU OH GpÀHFWHXU J 5 10 4 pYLVVHU OHV pFURXV HW OHV ERXORQV GH DWLRQ GX VXSSRUW GX GpÀHFWHXU HW GpFURFKHU OH VXSSRUW GX GpÀHFWHXU J 5 8 1 C 5 10 5 Entrer avec la main dans la machine à tr...

Страница 63: ...WUH HW WRXUQHU YHUV le haut et vers le bas pour fermer Ouvrir progressivement la porte pour permettre aux fumées du foyer d être aspirées par le conduit de fumée en évitant ainsi de les propager dans la pièce En allumant OH IHX GH FKHPLQpH TXDQG OH IR HU Q D SDV HQFRUH atteint la température optimale il est conseillé d attendre TXHOTXHV PLQXWHV DYHF OD SRUWH HQWURXYHUWH SRXU SHUPHWWUH O pYDSRUDWLR...

Страница 64: ...par le haut l allume feu refermer la porte du feu PDLQWHQLU OD SULVH G DLU RXYHUWH SRXU JDUDQWLU XQH ÀDPPH haute et lumineuse UpGXLUH O RXYHUWXUH GH OD SULVH GH O DLU VHXOHPHQW ORUVTX XQH bonne base de braise s est formée 6 4 RECHARGE DU COMBUSTIBLE Durant le fonctionnement pour effectuer la recharge du combustible il faut suivre la procédure suivante 2XYULU OHQWHPHQW OD SRUWH GX IHX D Q G pYLWHU ...

Страница 65: ...H PDLV IUpTXHQW HW VRLJQHX D Q GH WRXMRXUV JDUDQWLU XQ UHQGHPHQW HI FDFH et un fonctionnement régulier Ouvrir la petite porte Enlever éventuellement la braise et la cendre du foyer DYHF XQH SDOHWWH PpWDOOLTXH ôter la cendre du ramasse cendres en se servant d un aspirateur à cendres approprié refermer la petite porte 7 4 NETTOYAGE DE LA VITRE Durant le fonctionnement du poêle il est possible de IDY...

Страница 66: ... FRPEXVWLRQ trop rapide et irrégulière du bois 7 5 1 MAUVAIS TIRAGE DU CONDUIT DE FUMÉE En cas de mauvais tirage lors des premiers allumages V DVVXUHU TXH OH FRQGXLWV GH FKHPLQpH QH VRLW SDV partiellement bouché par des gravats ou bien par la présence d un nid d oiseaux ou autre à hauteur de la cheminée Q RXWUH YHLOOHU j FH TXH OH UDFFRUGHPHQW HQWUH OH LQVHUW a boise et le conduit de cheminée ait ...

Страница 67: ...appareil devront être détruits Le symbole barré de la boite de tri indiqué sur l étiquette du produit indique que le SURGXLW j OD Q GH VD YLH GRLW rWUH pYDFXp séparément des autres déchets Aux sens de l article 13 du Décret législatif n 151 du 25 Juillet 2005 de réalisation de la Directive 2002 96 CE du 23 Février 2003 sur les Rébus des Appareillages Électriques et Electroniques relatifs aux mesur...

Страница 68: ...IPCIÓN 3 2 PLACA DE CARACTERÍSTICAS 3 3 LOS KIT OPCIONALES 4 DESPLAZAMIENTO Y TRANSPORTE 5 PREPARACIÓN DEL LUGAR DE INSTALACIÓN 5 1 ESQUEMA DE MONTAJE 5 2 PRECAUCIONES PARA LA SEGURIDAD 5 3 CAÑONES Y INSERCIÓN DE MADERAS 5 4 OPERACIONES PREVIAS 5 5 CIRCULACIÓN DEL AIRE 5 6 CANALIZACIÓN EN DOBLE CONDUCTO 5 11A 5 7 CANALIZACIÓN CON UN SOLO CONDUCTO 5 11B 5 8 RACOR AL CANAL DE HUMO 5 9 INTRODUCCIÓN E...

Страница 69: ...l montaje y del mantenimiento El manual de Instrucciones Uso y Mantenimiento forma parte integrante del equipo DETERIORO O PÉRDIDA Si fuera necesario solicitar otro ejemplar a PALAZZETTI TRASPASO DE LA ESTUFA En caso de que se traspase la estufa el usuario está obligado a entregar al nuevo comprador también este manual 1 5 ACTUALIZACIÓN DEL MANUAL VWH PDQXDO UHÀHMD HO HVWDGR GHO DUWH DO DFWR GH OD...

Страница 70: ...oga la directiva 89 106 cee del consejo 4 Directiva 85 374 CEE relativa a la aproximación de las disposiciones legales reglamentarias y administrativas de los Estados Miembros en materia de responsabilidad por los daños causados por productos defectuosos 1 8 GARANTÍA LEGAL El usuario para poder gozar de la garantía legal según la Directiva 1999 44 CE debe cumplir con esmero las prescripciones indi...

Страница 71: ...vos de seguridad individual y los otros medios de protección dispuestos por las leyes 2 2 ADVERTENCIAS PARA EL USUARIO Predisponer el lugar de instalación de la inserción de madera según los reglamentos locales nacionales y europeos La inserción de madera tratándose de un producto GH FDOHIDFFLyQ WLHQH ODV VXSHU FLHV H WHULRUHV PX calientes Por esta razón se recomienda tener el máximo cuidado duran...

Страница 72: ... lleva a un funcionamiento y rendimiento en los máximos niveles posibles Las inserción de maderas se caracterizan por un avanzado sistema de doble combustión concebido para quemar de la mejor forma la leña y los gases no quemados de la combustión primaria 3 2 PLACA DE CARACTERÍSTICAS La placa de matrícula que se encuentra en la inserción de madera indica todos los datos característicos del product...

Страница 73: ...a cargo del usuario este último también tendrá que hacerse cargo de la ejecución de las pruebas relativas a las soluciones de instalación propuestas El travesaño de madera del revestimiento si estuviera presente o de todas formas cualquier acabado de material combustible debenencontrarseaisladosadecuadamente o ubicadas fuera de la zona de radiación del hogar El usuario debe cumplir con todos los r...

Страница 74: ...OHV H WHQVLEOHV 3DUD FRQHFWDU HO HTXLSR D OD inserción de madera se pueden realizar un máximo de 3 cambios de dirección no superiores a 90 con una longitud del canal de humos no superior a los 2 metros en proyección horizontal y como máximo de 3 metros en total Asegúrese de que el primer tramo vertical sea de al menos 50 cm antes de efectuar un cambio de dirección La Inserción de madera debe ser d...

Страница 75: ... XQ RUL FLR SDUD OD DVSLUDFLyQ GHO DLUH FRPEXUHQWH a una altura del suelo de aprox 20 30 cm respetando las LQGLFDFLRQHV GH PHGLGDV GH OD FKD WpFQLFD GHO PDQXDO del producto Asegurarse que la entrada de aire comburente o la versión canalizada al exterior no se obstruya accidentalmente En la parte externa debe colocarse una rejilla de aireación permanente que no se cierre en zonas especialmente vent...

Страница 76: ...a durante la prueba de instalación en seco es oportuno marcar tanto en la pared exterior como en el revestimiento la posición de las tomas de aire Las tomas de aire del ventilador pueden estar equipadas con persianas de cierre regulable y deben contener una rejilla de red anti insecto Es indispensable limpiar periódicamente los HYHQWXDOHV OWURV R UHMLOODV GH PDOOD HVWUHFKD TXH podrían obstruirse 5...

Страница 77: ...DMH FRQ XQ DJXMHUR TXH VH GHEH KDFHU HQ OD FDPSDQD PLVPD B Conexión con kit tubo telescópico opcional VWD HV OD VROXFLyQ HQ FDVR GH LQVWDODFLyQ HQ FKLPHQHDV D H LVWHQWHV Fijar primero el tubo telescópico a una altura adecuada que entre la base del racor y la parte superior del aparato haya un espacio de 2 12 cm D MDFLyQ VH GHEHUi UHDOL DU FRQ WRUQLOORV WDODGUDGRUHV en la parte inferior del anillo ...

Страница 78: ...ar en secuencia los cementos B frontal anterior C pared de IRQGR FRVWDGR ODWHUDO J 3URFHGHU OXHJR FRPR VH PXHVWUD HQ OD J 5 10 2 ÀRMDU ORV WRUQLOORV GH MDFLyQ GHÀHFWRU GH KXPRV colocados en la pared frontal del soporte por lo menos PP J 5 10 3 4XLWDU HO GHÀHFWRU J 5 10 4 HVDWRUQLOODU WXHUFDV SHUQRV GH MDFLyQ VRSRUWH GHÀHFWRU GHVHQJDQFKDU HO VRSRUWH GHÀHFWRU J C 5 10 5 Entrar con la mano en la máqu...

Страница 79: ...or el humero evitando de esta manera salidas de humo en ambiente En el encendido de la chimenea cuando el fogón aún no ha alcanzado la temperatura optimal se recomienda hacerlo funcionar algunos minutos con la puerta entornada en la sede de tope pero no cerrada para permitir la evaporación del agua de condensación que se forma en el vidrio Con el fuego encendido la puerta se deberá cerrar para opt...

Страница 80: ...car un encendedor natural en la pila DJUHJDU DUULED YDULOODV QDV GH PDGHUD FUX DGDV HQWUH ellas encender el encendedor desde arriba cerrar la puerta del fuego mantener la toma de aire abierta para garantizar una llama alta y luminosa reducir la abertura de la toma del aire sólo cuando se ha formado una buena base de brasas 6 4 RECARGA DEL COMBUSTIBLE Durante el funcionamiento para realizar la reca...

Страница 81: ... dispositivos de protección individual dispuestos por la directiva 89 391 CEE D Actuar siempre con los equipos adecuados para las operaciones de mantenimiento El mantenimiento debe ser realizado por un centro de DVLVWHQFLD DXWRUL DGR R SRU SHUVRQDO FXDOL FDGR 7 2 LIMPIEZA La limpieza de la parte esterior de la estufa debe de efectuarse solamente por medio de un paño seco no abrasivo No utilizar de...

Страница 82: ...rece durante el funcionamiento El vidrio cerámico resiste muy bien las altas temperaturas sin embargo es frágil por tanto NO DARLE GOLPES 7 5 LIMPIEZA DEL CAÑÓN DE HUMO En condiciones de funcionamiento normal la limpieza de la inserción de madera debe ser realizada cada 4 toneladas de leña quemada o al menos cada dos años excepto reglamentaciones diferentes 3RU WDQWR VH DFRQVHMD UHWLUDU HO GHÀHFWR...

Страница 83: ...ro para las personas y los animales La responsabilidad por los daños eventuales a personas y animales recae siempre sobre el propietario En el momento del desguace la marca CE este manual y los demás documentos correspondientes al equipo se deben destruir El símbolo del contenedor cruzado en la etiqueta GHO GLVSRVLWLYR LQGLFD TXH HO SURGXFWR DO QDO GH su vida útil debe ser recogido separadamente d...

Страница 84: ...prodotti Palazzetti accepts no liability for any mistakes in this handbook and is free to modify the features of its products without prior notice Die Firma Palazzetti übernimmt für eventuelle Fehler in diesem Heft keine Verantwortung und behält sich das Recht vor die Eigenschaften ihrer Produkte ohne Vorbescheid zu ändern Palazzetti décline toute responsabilité en cas d erreurs dans la présente d...

Отзывы: