background image

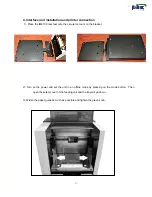
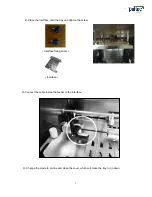
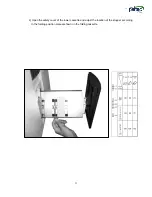
4. Interface unit installation and printer connection 

  1> 

Place the IM

8

100 rear feet onto the circular cut


outs on the bracket


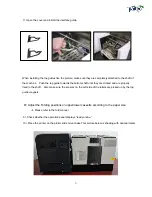
        2> Turn on the power and set the unit in an offline mode by pressing on the mode button.    Then 

open the safety cover of the feeding unit and the tray will go down. 

       
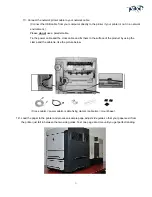
        3> Widen the paper guide as much as possible and tighten the green knob. 


6

Содержание IM8100

Страница 1: ...Sales Service Repair Professional Service Fast Nationwide Shipping 1 866 455 9900 www OnlineSkyline com CustomerService onlineskyline com...

Страница 2: ...IM8100 Inline System User s Manual Rev 111014 1...

Страница 3: ...he contents about ES8000 Please refer to the user s manual given 1 Identifying parts Safety cover of feeding unit Safety cover of upper folding cassette Control panel Lower cassette cover Paper tray F...

Страница 4: ...d assist hanger Feed roller assembly Pick up feed separate roller Control sensor for paper detection Control sensor for tray height Lower cassette Lower cassette Stopper adjustment knob Lower cassette...

Страница 5: ...2 IM8100 Inline Parts Interface HP Printer Only Slide Mount Base Interface Top Guide Interface fixing screw 4...

Страница 6: ...he printer interface please perform the following procedures to change the mode to an off line mode Make sure to remove Interface and Interface Top Guide 1 Press the set store button for 3 seconds to...

Страница 7: ...eet onto the circular cut outs on the bracket 2 Turn on the power and set the unit in an offline mode by pressing on the mode button Then open the safety cover of the feeding unit and the tray will go...

Страница 8: ...rface onto the tray and tighten the screw Interface fixing screw Interface 5 Connect the cable inside the feeder to the interface 6 Change the mode to on line and close the cover which will make the t...

Страница 9: ...clicked and are properly fixed to the shaft Also make sure the sensors on the Left side of the rollers are picked up by the top guide magnets 8 Adjust the Folding positions on upper lower cassette ac...

Страница 10: ...power cable and the cross cable and fix them to the surface of the product by using the clamp and the cable tie like the picture below 12 Load the paper to the printer and process a sample page adjust...

Страница 11: ...5 How to set the folding position 1 Open the safety cover of the upper cassette and adjust the location of the stopper according to the folding position manual shown on the folding cassette 10...

Страница 12: ...2 Open the safety cover of the lower cassette and adjust the location of the stopper according to the folding position manual shown on the folding cassette 11...

Страница 13: ...e are setup correctly 7 How to remove paper jam Refer to the manual 4 2 1 Press the stop restart button on the printer to stop printing 2 Slide Printer away from the machine 3 Open the cover of the fe...

Страница 14: ......

Отзывы: