background image

OPERA

TING 

FOLD SETTING 

- 9 - 

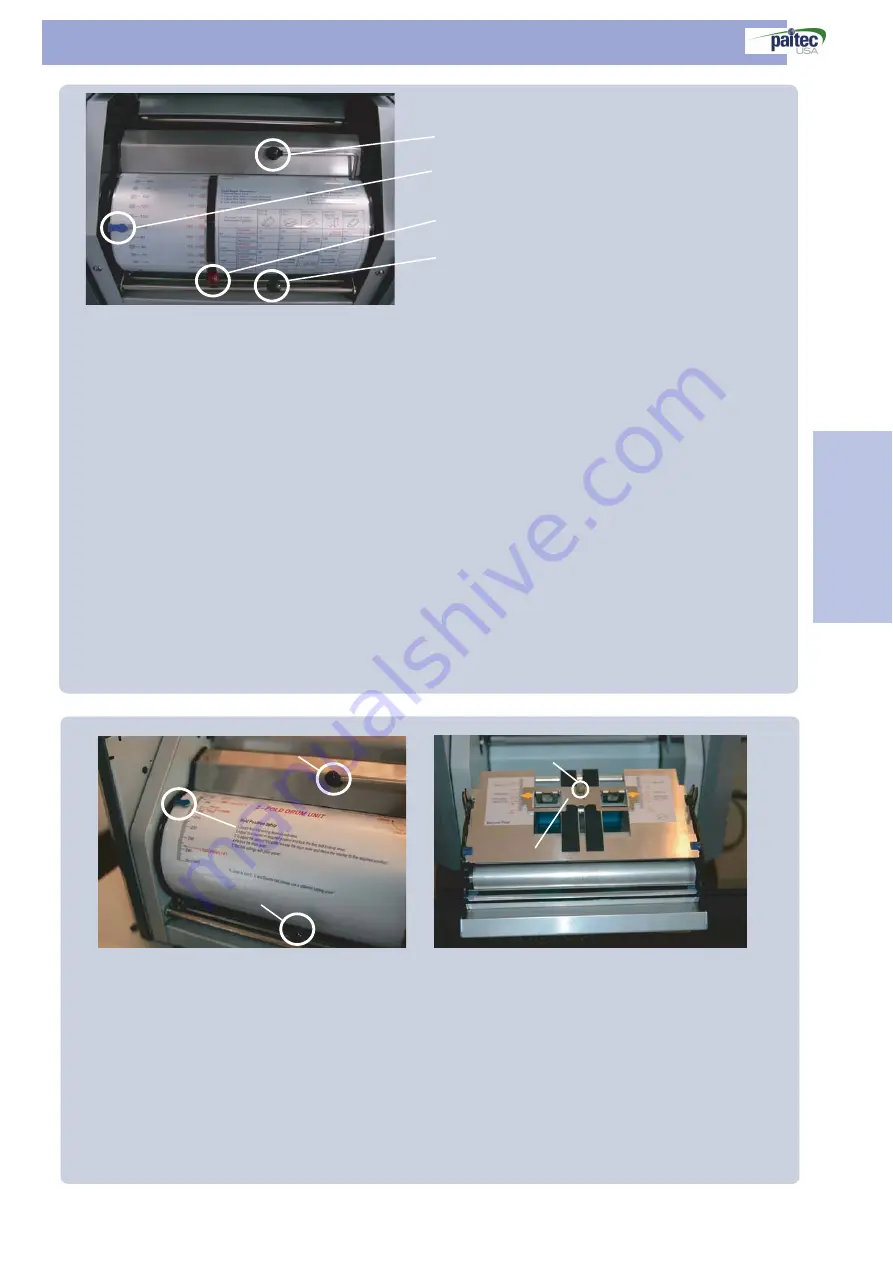
Standard Drum (Does not support 14” Z-Fold)

1) Unlock the green release lever to change the fold setting.
2) Move the red arrow on the red knob to your desired position according to the manual.
3) Move blue arrow according to the manual.
4) After checking the blue and the red knob, lock back the green release lever.
There are two fold pockets, the red knob and the blue knob.
- The red knob is the first fold setting and the blue knob is the second fold setting
EX 1) Folding a Z-fold with an 

8 1/2" X 11"

-  red knob "1

86

"(First fold 198mm), blue knob "9

3

"(second fold 9

3

mm)

EX 2) Folding a C-fold with an 

8 1/2" X 11"

-  red knob "9

2

"(First fold 9

2

mm),  blue knob "9

4

"(second fold 9

4

mm)

EX 3) Folding a V-fold with an 

8 1/2" X 11"

-  red knob "14

0

"(First fold 14

0

mm), blue knob "0"(very bottom)  

- Although we suggest that you follow the fold setting according to the manual, however, 
  the scale on the drum is NOT 100% accurate.
- Please use a plain paper to test the fold setting each time you alter the setting.

First Fold Locking Lever

Blue Arrow

14” Z-Fold Drum (Z-Folds Only)

1) Unlock the first fold locking lever to change the first fold setting.
2) Move the blue arrow according to the manual.
3) Lock the first fold locking lever to complete the first fold setting.
4) Unlock the fold drum handle by pushing it downward.
5) Pull the drum to gain access to the second fold drum setting.
6) Release the second fold locking knob.
7) Move the second fold stopper according to the manual.
8) Tighten the second fold locking knob and close the drum.

Standard Drum

Fold Locking Lever

Blue Knob (Second Fold Position)

Red Knob (First Fold Position)

Fold Drum Handle

Fold Drum Handle

Second Fold locking Knob

14” Z-Fold Drum

Second Fold Stopper

Содержание IM- 4000

Страница 1: ...Manual This manual provides detailed information on how to operate and maintain the Inline Model IM 4000 Please read this manual before operating the machine in order to prevent any damages caused by...

Страница 2: ...YOU ENHANCE YOUR USAGE OF IM 4000 Copyright Information All rights reserved Reproduction or translation without permission is prohibited except as allowed under the copyright laws WORKING WITH THE MA...

Страница 3: ...keeps all the contents confidential even to the operator IM 4000 can handle 3 300 sheets per hour when on line with the HP LJ4350 printer Compared to the old pressure sealing technology IM 4000 perfor...

Страница 4: ...for HP LJ4000 series Displays the process and controls special functions FOLD POSITION LOCKING LEVER Release this lever to change the fold setting BLUE KNOB RED KNOB FOLD SETTING MANUAL Counter Reset...

Страница 5: ...0 only POWER SWITCH AND POWER INLET DELIVERY UNIT PRINTER CONNECTING BASE PLATE Interface guide enhances the infeed process of each processed forms A simple manual feeder allows the processing of sing...

Страница 6: ......

Страница 7: ...ground Outlet without the ground may cause the machine to malfunction Please setup the machine on a stable ground Improper installment will create noise and cause the machine to malfunction Please ope...

Страница 8: ...emble the upper tray guide Press with your finger to remove the back cover of the priner Fix the interface unit onto the main body 1 2 3 4 1 2 THE MAIN BODY ATTACHING INTERFACE GUIDE Place the interfa...

Страница 9: ...ay guide wires are pointing downward Please set the fold type according to the manual Please check the connection between the main guide and the interface guide Attach the plate to the foot of the pri...

Страница 10: ...m blue knob 0 very bottom Although we suggest that you follow the fold setting according to the manual however the scale on the drum is NOT 100 accurate Please use a plain paper to test the fold setti...

Страница 11: ...of the folding CAUTION If you choose to use different type of paper please reset the machine by turning off and back on the power If this is not done properly the machine will not accept the new pape...

Страница 12: ...at a default setting however depending on the customer needs it can be modified to cope with different types of forms Please read the following examples to better understand this setting Ex If the fir...

Страница 13: ...indicates the number of processed forms in batches Please read the following examples to better understand this setting Ex If the batch counter is set at 50 IM 4000 will signal by creating a beeping...

Страница 14: ...urning off and back on the power switch You must reset the machine everytime you change the paper type since IM 4000 is programmend to only remember the first paper that was fed to the machine Use the...

Страница 15: ...CONTINUOUS BEEPING NOISE PAPER JAM WITHIN THE PRESS ROLLER You can check the jam within the press roller by sliding out the folding unit Use the jam removal tool which is attached inside of the machin...

Страница 16: ...ng unit like the top left picture by releasing the bottom lever Remove any jammed paper like the top right picture If there is a frequent paper jam within this unit check the fold setting Please press...

Страница 17: ...nd cause frequent paper jam in the press roller Do not use any sharp edged tools to remove the contamination since that may damage the surface of the roller You will be able to see the folding roller...

Страница 18: ...TS Description Order No Replace Period K 1000 Remarks Feeding Roller Folding Roller Pickup Roller Clutch Solenoid PM5 1565 800 1 200 PM5 4460 1 000 1 500 PM5 1562 800 1 000 FRR 020DY 800 1 000 PM5 156...

Страница 19: ...ill show an arrow on the bottom left corner Understanding the Functions of IM 4000 Automatically stops the printing process in the event of a jam in the IM 4000 Ex In the event of a jam in the IM 4000...

Страница 20: ...PAITEC USA Division of Pai Trading Inc Headquarters Factory 15951 SW 41st Street Suite 400 Davie FL 33331 Email paitec paitec com www paitec com This page intentionally left blank...

Отзывы: