15
MiniMaster
MA60-16E
ENGLISH
E
1 2 3 4 5 6 7
G
F
E
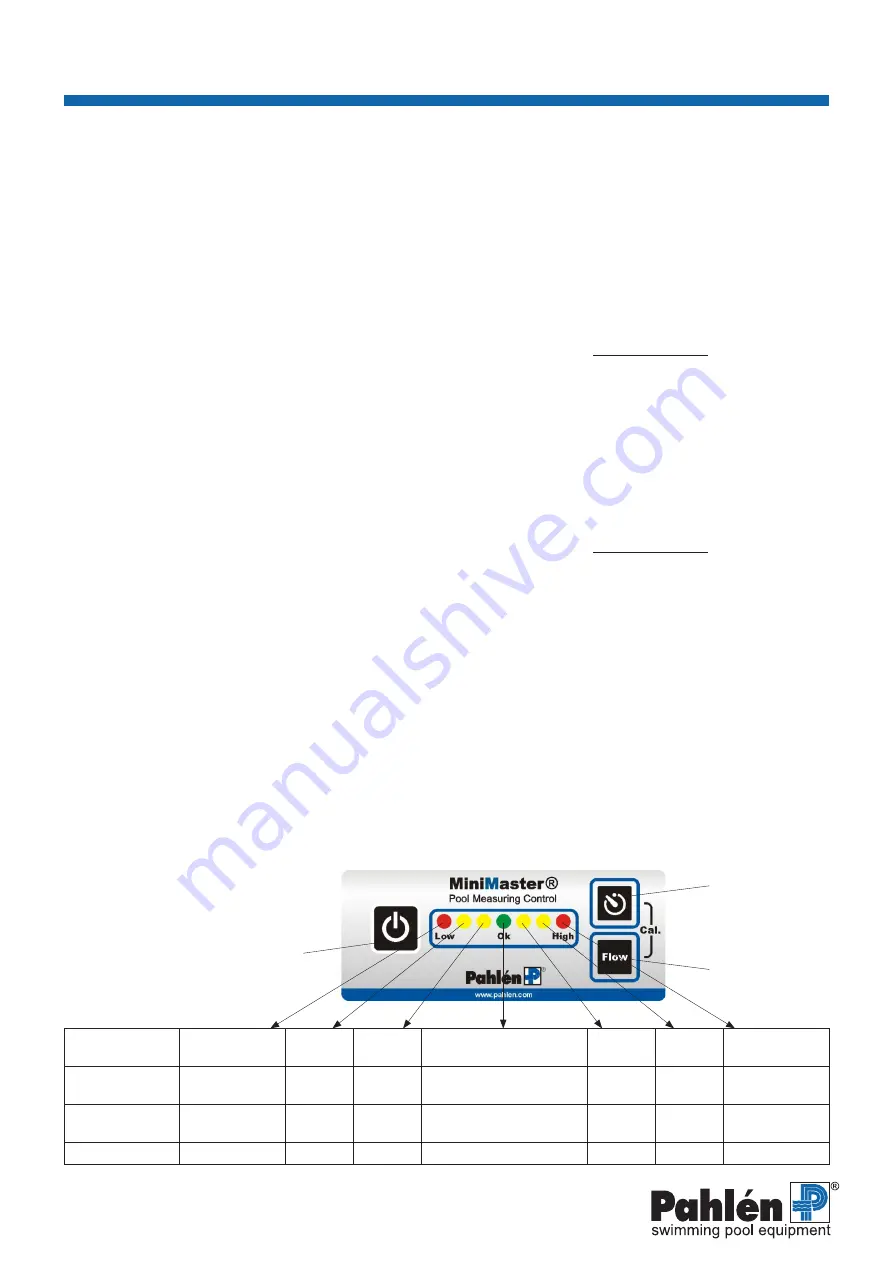
LED →
↓
1. Red
Low
2. Yellow 3. Yellow
4. Green
Ok
5. Yellow 6. Yellow
7. Red
High
pH
< 6.8
6.8-7.0
7.0-7.2
Calibration value
(rec. 7.2-7.4)
7.4–7.6
7.6-7.8
>7.8
Free chlorine
< -80%
-60%
-30%
Calibration value
(rec. 0.5-1.5 ppm)
+30%
+60%
>+80%
Flow L/h
<10
11-18
18-26
27-52
53-72
72-100
>100
Calibrate pH
1.
Reference to calibrate against can either be the pool water (alt. 1) or buffer fluid (alt. 2). The pH value shall be between 7.2 and 7.4.
Alt. 1 pool water:
Take measurement water from the drain tap on the prefilter (N) and check it with the photometric measure
-
ment instrument.
Alt. 2 buffer fluid:
Switch off the measurement water to the flow cell. Disconnect brace (M) fold out the modules, disconnect
the electrode's BNC contact (see picture5) from the control unit, unscrew the pH electrode from the module, put back the BNC
contact. Pour reference liquid pH 7.3 in a measurement glass, so much so it covers at least 2cm of the pH electrode (tapped
reference liquid may not be reused) and let the electrode stand in the liquid for at least 30 seconds.
2. Calibrate the unit by pressing the two calibration buttons (F+G) at the same time and
keep them pressed.
3.
The LED flashes quickly (approx. 5 times per second) to confirm that calibration is in progress.
The flashing slows down once calibration is complete. You can then release the buttons.
4.
The calibrated value is saved in the unit memory. The green LED in the middle turns on and now represents this value.
Once the unit is calibrated, dosing is activated by pressing the On/Off button (E) on the control unit.
The LED for the current value is now lit with a steady glow.
Calibrate free chlorine
1.
If pH has been calibrated with buffer fluid, but the pool water has an entirely different pH, wait until MiniMaster has achieved
pH 7.2-7.4 either through automatic or manual dosing of acid/alkali.
2. Test measure free chlorine: Take measurement water from the drain tap (N) on the prefilter. Use photometric measurement
equipment and check that the free chlorine lies within 0.5-1.5mg/l (ppm).
3.
Calibrate the unit by pressing the two calibration buttons (F+G) at the same time and
keep them pressed
. The LED flashes
quickly (approx. 5 times per second) to confirm that calibration is in progress.
4. The flashing slows down once calibration is complete. You can then release the buttons.
The calibrated value is saved in the unit memory. The green LED in the middle turns on and now represents this value.
5. Once the unit is calibrated, dosing is activated by pressing the On/Off button (E) on the control unit.
The LED for the current value is now lit with a steady glow.
If calibration fails, it is often due to an implausible value (the previous value is then retained). The calibration then needs to be
redone or see section 14 Trouble-shooting.
10. Operation
The measured value in the pool is indicated on the display with the seven LEDs.
A green LED shows MiniMaster's calibrated value (everything is OK) and is the unit's desired value. Yellow/red LED indicates a
deviation from the calibrated value, see table below.
A blinking LED means that MiniMaster is measuring and a steady glow means measurement and an activated dosing mode,
for more information see "LEDs" on the next page.
Upon a high pH:
Relay output R- activated refers to acid dosing.
Upon a low pH:
Relay output R+ activated refers to alkali dosing (see section 12 - Change of factory settings).
Upon a low free chlorine: Relay output R+ activated refers to chlorine dosing.
Picture 8
9. Calibration
The electrodes shall be cleaned, the flow cell shall have the right flow and the dosing mode shall be deactivated before calibra
-
tion is done. Every unit is calibrated separately, they are independent of each other.
Содержание MiniMaster
Страница 2: ...SVENSKA 3 10 ENGLISH 11 18 РУССКИЙ 19 26 ...


