background image

20

LED Beleuchtung Typ 300 Marine

MA50-09T 2015-1

1

DEUTSCH

Art.no.

Rev.no.

Scale

Designed by:

Approved by:

Revised by:  Date

Drawn by:  Date

Drawing number

Assembly drawing no.

Surface treatment

part of ISO 2768-1 

The tolerance class in accordance with this

E

Box 728, SE-194 27 Upplands Väsby, Sweden
Phone +46 8 59411050, Fax +46 8 59086880


ASA 2012-02-07

för MA50-09

Installationsbild


M11604  

Låsbricka (6x)

M5x10 Torx (6x)

Belysningsinsats

Fästskruv (2x)

Front Marine

Art.no.

Rev.no.

Scale

Designed by:

Approved by:

Revised by:  Date

Drawn by:  Date

Drawing number

Assembly drawing no.

Surface treatment

part of ISO 2768-1 

The tolerance class in accordance with this

E

Box 728, SE-194 27 Upplands Väsby, Sweden
Phone +46 8 59411050, Fax +46 8 59086880


ASA 2012-02-07

för MA50-09

Installationsbild


M11605  

Belysningsinsats

Fästskruv (2x)

Låsbricka (6x)

Front Marine

M5x10 (6x)

Art.no.

Rev.no.

Scale

Designed by:

Approved by:

Revised by:  Date

Drawn by:  Date

Drawing number

Assembly drawing no.

Surface treatment

part of ISO 2768-1 

The tolerance class in accordance with this

E

Box 728, SE-194 27 Upplands Väsby, Sweden
Phone +46 8 59411050, Fax +46 8 59086880

1553002X

ASA 2009-05-26

ASA 2014-06-26


Belysningsinsats LED typ 300


M11563 1

T

h

is

 d

o

c

u

m

e

n

a

n

d

 i

ts

 c

o

n

te

n

ts

 a

re

 t

h

e

 e

x

c

lu

s

iv

e


p

ro

p

e

rt

y

 o

P

a

h

n

s

 a

n

d

 m

a

y

 n

o

b

e

 c

o

p

ie

d

re

p

ro

d

u

c

e

d

tr

a

n

s

m

it

te

d

 o

c

o

m

m

u

n

ic

a

te

d

 t

o

 a

 t

h

ir

d


p

a

rt

y

o

u

s

e

d

 f

o

a

n

y

 p

u

rp

o

s

e

 w

it

h

o

u

w

ri

tt

e

n

 p

e

rm

is

s

io

n

.

Plastbit

ingår i lampan


Plastdistans

1

8

DIN 933 - M5  x 20

19901221

A4

Skruv M6S M5x20

2

7

12461

12461

POM

Knopp räfflad SR6127 typ 1

2

6

ISO 7045 - M4 x 12 - 4.8 - H

19909215

A4

Skruv MRX M4x10

2

5

M11042

123401

EN 1.4404 (SS2348)

Bygel till LED-lampa

1

4

LED

123241 alt. 123341


LED lampa Spectravision 700, multi alt. vit

1

3

U-list

12272

PVC

U-list PVC GV-1-5, L=550mm

1

2

M11445

15530021


Fästram 300- och LED-lampa

1

1

Drawing.no:

Art_nr

Material

Title/ Name

Qty.

Item.

(3

m

)

Art.nr 
Belysningsinsats

Pos 3 
LED-lampa

Anm

15530025

123241

röd/grön/blå

15530026

123341

vit

Pos 8 är bipackad lampan 

8

2

3

4

5

7

6

1

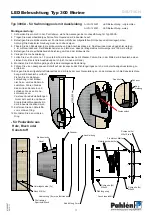
Montagereihenfolge der LED-Beleuchtungseinheit

1 Marin-Einbaurahmen)

2   U-Einfassung (optional)

3   Leuchte

4   Halterung

5   Schraube (M4)

6   Fuss

7   Schraube (M5)

8   Distanzstück

Art.Nr 123261

Ersatz-LED-Leuchte, rot/grün/blau

Art.Nr 123361

Ersatz-LED-Leuchte, weiss

Technische Spezifikationen


Spannung: 12V AC


Leistung: Siehe Typenschild der Lampe (Max 50W)

Dieses LED-Licht ist für die meisten PAR56-Standard-Pool-Lichter geeignet.

Es kann mit allen Pahlén-Beleuchtungseinheiten des Typs 300 verwendet werden, 

sowohl mit der Standard- als auch der Marin-Ausführung.

Nur für den Gebrauch unter Wasser bestimmt.

Das Pool-Licht ist über einen Trenntransformator (12 VAC/60 W alt. 300W) anzu-schließen.

Sollte Ihr Pool mit mehr als einem LED-Licht ausgestattet sein, stellen Sie sicher,  

dass alle Lichter an den gleichen Transformator und Schalter angeschlossen sind.

Beide Licht-Typen werden auf die gleiche Weise angeschlossen.

Sollten die externen Kabel oder Litzen der Leuchte beschädigt sein, so müssen  

diese vom Kundendienst oder einer anderen qualifizierten Person ersetzt werden.

Installation

1.  Entfernen Sie den vorderen Ring.

2.  Bauen Sie die vorhandene Leuchteneinheit aus.

3.  Demontieren Sie das alte Licht vom Rahmen der Leuchteneinheit.

4.  Montieren Sie die Ersatzbirne. Das Distanzstück (Pos. 8) ist dort zu platzieren, 

wo das Kabel auf die Kabelverschraubung trifft.

5.  Schließen Sie das Kabel an.

6.  Montieren Sie die Leuchteneinheit an der Poolwand.

7.  Montieren Sie den vorderen Frontstück Marine.

Inbetriebnahme

Vergewissern Sie sich, dass jedes Licht korrekt installiert wurde.

Synchronisierung mehrerer Lichter

1.  Um die Lichter auf das gleiche Programm zu synchronisieren, 

  schalten Sie die Lichter an, ein paar Sekunden warten.

2.  Schalten Sie die Lichter aus, und warten Sie mindestens 12 

  Sekunden, dann wieder einschalten.

3.  Ändern Sie die Farbe/Programm 2 mal. Jetzt sind die Lichter synchronisiert.

Sobald die Lichter synchronisiert sind, werden sie auch so bleiben, bis eine der LED 

Lichter ersetzt wird oder ein Licht an getrennt von den anderen umgeschaltet wird.

Programm/Farbwechsel:

 Schalten Sie die Lampen aus und schnell wieder ein  

(maximal 10 Sekunden ausgeschaltet).

Speicherung der letzten Farbe/Programm:

1.  Wählen Sie die gewünschte Farbe/Programm.

2.  Schalten Sie die Lampen mindestens 12 Sekunden aus. 

  Die gewählte Farbe ist nun gespeichert.

Das Rot/Grün/Blau-Licht

Bei dem LED-Licht PAR56 handelt es sich um äußerst fortschrittliches, elektronisch 

gesteuertes Licht, das auf LEDs in drei Farben zurückgreift: rot, grün und blau.

Im Zusammenspiel können diese drei Farben mehrere andere Farben produzieren.

Über den Ein/Aus-Schalter Ihrer Pool-Beleuchtung können Sie eines der 16 vor- 

programmierten Lichtprogramme auswählen.

16 program

  1  Warmes Weiß  

Festgelegte Farbe ist warmes Weiß

  2  Rot  

Festgelegte Farbe ist Rot

  3  Grün  

Festgelegte Farbe ist Grün

  4  Blau  

Festgelegte Farbe ist Blau

  5  Grün-Blau  

Festgelegte Farbe ist Grün/Blau

  6  Rot-Grün  

Festgelegte Farbe ist Rot/Grün

  7  Blau-Rot  

Festgelegte Farbe ist Blau/Rot

  8  Abendliches Meer  

Langsamer Wechsel der Farben Rot/Blau

  9  Abendlicher Fluss  

Langsamer Wechsel der Farben Rot/Grün

10  Riviera  

Langsamer Wechsel der Farben Grün/Blau

11  Weiß  

Festgelegte Farbe ist neutrales Weiß

12  Regenbogen  

Langsamer Wechsel der Farben Blau/Rot/Grün

13  Fluss der Farben  

Programm 12 gefolgt von Programm 15

14  Disco Schneller  

Farbenwechsel

15  Vier Jahreszeiten  

Langsamer Wechsel der Farben Rot/Blau/Grün/Violett

16  Party  

Schneller Farbenwechsel

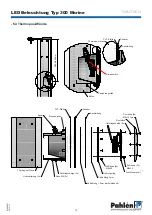
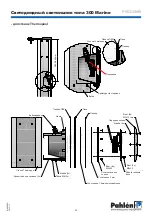
Unterleg-

scheibe 

(6x)

Leuchteneinheit  

Marine

Schraube M5x20 (2x)

Frontstück Marine

Schraube M5x10 Torx (6x)

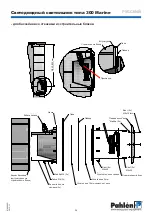
Unterleg-

scheibe (6x)

Leuchteneinheit Marine

Schraube M5x50 (2x)

Frontstück Marine

Schraube M5x10 Torx (6x)

Содержание Marine 300C

Страница 1: ...7 Upplands V sby Sweden Tel 46 8 594 110 50 Fax 46 8 590 868 80 e mail info pahlen se www pahlen com Manual User manual Gerbrauchsanleitung Manuel d utilisation Manuiale d usa Manual de instrucciones...

Страница 2: ......
Страница 3: ...0CA LED M11446 0 170 160 140 25 282 288 Art no Rev no Scale Designed by Approved by Revised by Date Drawn by Date Drawing number Assembly drawing no Surface treatment part of ISO 2768 1 The tolerance...

Страница 4: ...8 1 The tolerance class in accordance with this E ASA 2011 12 01 Kakel Kakelfix Betong Kabelr r Nisch Front M5x10 Torx 6x F stbricka 6x T tring M5x50 2x Typ 300A f r ingjutning i poolstomme av betong...

Страница 5: ...l med liner Art nr 124291 LED r d gr n bl Art nr 124391 LED vit Montera s h r 1 Borra h l i stommen se m ttskiss h ltagningsmall 2 Applicera lite vattenfast fett i nischens g ngor 3 F st nischen i poo...

Страница 6: ...lysningsinsats LED Kabelr r F stbricka 6x Art no Rev no Scale Designed by Approved by Revised by Date Drawn by Date Drawing number Assembly drawing no Surface treatment part of ISO 2768 1 The toleranc...

Страница 7: ...ted or communicated to a third party or used for any purpose without written permission Art no Rev no Scale Designed by Approved by Revised by Date Drawn by Date Drawing number Assembly drawing no Sur...

Страница 8: ...ontera s h r 1 St ng av str mmen 2 Lossa befintlig belysningsinsats 3 Lossa den gamla lampan fr n belysningsinsatsens f stram 4 S tt dit utbyteslampan Hylsan pos 8 skall placeras d r kabeln g r igenom...

Страница 9: ...LED M11446 0 170 160 140 25 282 288 Art no Rev no Scale Designed by Approved by Revised by Date Drawn by Date Drawing number Assembly drawing no Surface treatment part of ISO 2768 1 The tolerance cla...

Страница 10: ...accordance with this E ASA 2011 12 01 Kakel Kakelfix Betong Kabelr r Nisch Front M5x10 Torx 6x F stbricka 6x T tring M5x50 2x Type 300A for concrete pools Item no 124381 LED white Item no 124281 LED...

Страница 11: ...ite Mounting instructions 1 Cut out a hole in the pool frame see measurement for hole type 300CA 2 Apply some water resistant grease in the threads of the niche 3 Fixate the niche in the pool frame wi...

Страница 12: ...y or used for any purpose without written permission Art no Rev no Scale Designed by Approved by Revised by Date Drawn by Date Drawing number Assembly drawing no Surface treatment part of ISO 2768 1 T...

Страница 13: ...ed transmitted or communicated to a third party or used for any purpose without written permission Art no Rev no Scale Designed by Approved by Revised by Date Drawn by Date Drawing number Assembly dra...

Страница 14: ...ied person Installation 1 Remove the front ring 2 Remove the existing lamp unit 3 Dismantle the old light from the lamp unit frame 4 Mount the replacement bulb The spacer pos 8 shall be placed where t...

Страница 15: ...ed by Revised by Date Drawn by Date Drawing number Assembly drawing no Surface treatment part of ISO 2768 1 The tolerance class in accordance with this E Box 728 SE 194 27 Upplands V sby Sweden Phone...

Страница 16: ...en Art Nr 124381 LED Beleuchtung wei Art Nr 124281 LED Beleuchtung rot gr n blau Montageanleitung Die Vorderkante der Einbaunische muss auf einer Linie mit der Betonwand liegen siehe A in der untenste...

Страница 17: ...men mithilfe der mitgelieferten Schrauben und Unterlegscheiben Achtung Die Kabelverschraubung muss nach oben zeigen 4 F deln Sie den Kabelkanal in die Einbaunische und die Anschlussdose ein Das Gewind...

Страница 18: ...e without written permission Art no Rev no Scale Designed by Approved by Revised by Date Drawn by Date Drawing number Assembly drawing no Surface treatment part of ISO 2768 1 The tolerance class in ac...

Страница 19: ...ed to a third party or used for any purpose without written permission Art no Rev no Scale Designed by Approved by Revised by Date Drawn by Date Drawing number Assembly drawing no Surface treatment pa...

Страница 20: ...cht vom Rahmen der Leuchteneinheit 4 Montieren Sie die Ersatzbirne Das Distanzst ck Pos 8 ist dort zu platzieren wo das Kabel auf die Kabelverschraubung trifft 5 Schlie en Sie das Kabel an 6 Montieren...

Страница 21: ...ass in accordance with this E Box 728 SE 194 27 Upplands V sby Sweden 124X9Y ASA 2011 09 29 Belysning 300CA LED M11446 0 170 160 140 25 282 288 Art no Rev no Scale Designed by Approved by Revised by D...

Страница 22: ...d may not be copied reproduced transmitted or communicated to a third party or used for any purpose without written permission Kakelfix Kakel Betong 300 800mm Sid 1 2 300 800 nt and its contents are t...

Страница 23: ...ird party or used for any purpose without written permission 300 800mm Sid 1 2 Liner Foam Plywood 300 800 f Pahl ns and may not be copied d transmitted or communicated to a third sed for any purpose w...

Страница 24: ...Mursten 300 800 property of Pahl ns and may not be copied reproduced transmitted or communicated to a third party or used for any purpose without written permission Art no Rev no Scale Designed by Ap...

Страница 25: ...document and its contents are the exclusive property of Pahl ns and may not be copied reproduced transmitted or communicated to a third party or used for any purpose without written permission Art no...

Страница 26: ...O 2768 1 The tolerance class in accordance with this E Box 728 SE 194 27 Upplands V sby Sweden Phone 46 8 59411050 Fax 46 8 59086880 ASA 2012 02 07 f r MA50 09 Installationsbild M11605 Belysningsinsat...

Отзывы: