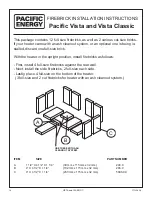
Pacific energy Paci?c VISTA Скачать руководство пользователя страница 4

12"

12"

17


3/4"

24"

8"

20


5/8"

8"

3"

3"

15


5/8"

11"

24"

12"

12"

16


3/4"

12"

12


3/4"

24"

7"

14"

15"

20


3/4"

26"

10"

10"

22


5/8"

VISTA and CLASSIC-C 

111206-16

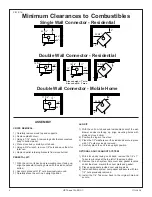
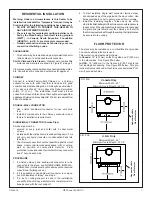
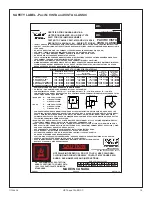
Minimum Clearances to Combustibles

Single Wall Connector - Residential

Alcove height - 7' min.
Alcove depth - 3' max.

Double Wall Connector - Mobile Home

Double Wall Connector - Residential
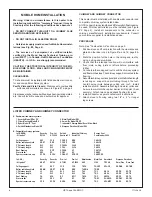
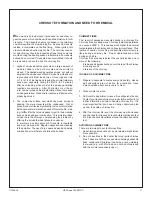
ASSEMBLY

CRATE REMOVAL:

1

)  Carefully remove wood top and supports.

2

)  Remove plastic cover.

3

) Using a 

7/16"

 wrench, remove lag bolts that secure stove 

body to bottom pallet.

4

)  Place stove body carefully on its back.

5

) Using a 

3/4"

 wrench, remove 

1/2"

 nuts and save them for 

later use.

6

)  Remove pallet retaining brackets from stove bottom.

PEDESTAL KIT:

1

)  With the unit on its back and removable cover facing up, 

align the pedestal mounting holes with the studs on stove 
bottom.

2

)  Secure in place with 

1/2"

 nuts previously removed.

3

)  Carefully place the unit in an upright position.

LEG KIT:

1

)  With the unit on its back and removable cover of the ash 

drawer enclosure facing up, align mounting holes with 
studs on stove bottom.

2

)  Position the legs on the stove.

3

) Place the 

1/2"

 washers over the studs and secure in place 

with 

1/2"

 nuts previously removed.

4

)  Carefully place the unit in an upright position.

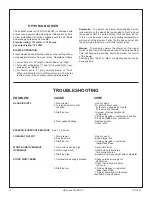
OPTIONAL ASH CLEANOUT SYSTEM:

1

)  With stove body laying on its back, remove the 

1/4

” x 

1

” 

Tek screw located at the top left of the stove bottom.

2

)  Remove the ash system hole cover and gasket located 

under the stove. discard the cover plate and gasket.

3

)  Place new gasket provided over existing studs.

4

)  Install ash dump system over gasket and secure with two 

1/2

” nuts previously removed.

5

) Install the 

1/4

” Tek screw back to the original hole and 

secure.

FIG. #1a

Содержание Paci?c VISTA

Страница 1: ...C SAFETY NOTICE If this stove is not properly installed a house fire may result For your safety follow the installation directions Contact local building or fire officials about restrictions and inst...

Страница 2: ...Y AND MAINTENANCE 3 ASSEMBLY 4 MOBILE HOME INSTALLATION 6 RESIDENTIAL INSTALLATION 7 FLOOR PROTECTOR 7 COMBUSTION AIR 8 WOOD SELECTION 8 OPERATING 8 PROPER DRAFT 9 ASH REMOVAL 9 BAFFLE REMOVAL 9 OPTIO...

Страница 3: ...onnect the detectors If necessary relocate them to reduce their sensitivity SAFETY NOTICE IF THIS STOVE IS NOT PROPERLY INSTALLED A HOUSE FIRE MAY RE SULT FOR YOUR SAFETY FOLLOW THE INSTALLATION DIREC...

Страница 4: ...stal mounting holes with the studs on stove bottom 2 Secure in place with 1 2 nuts previously removed 3 Carefully place the unit in an upright position LEG KIT 1 With the unit on its back and removabl...

Страница 5: ...Chimney Roof ashing Storm collar Hooded vent Attachment to oor for mobile homes Spark arrestor rain cap FIG 2 7 2 1 m Minimum Ceiling Height 58 1473 mm Minimum 48 1219 mm Minimum The chimney may incor...

Страница 6: ...upplier for installation advice PROCEDURE Note See Combustion Air section on page 9 1 Position stove and oor protection with the clearances as stated on the label or as in Figure 1a and 1b page 4 5 2...

Страница 7: ...ntingdown This will carry any liquid creosote or condensation back into the stove Thechimneyconnectorshouldnotpassthroughatticorroof space closet or similar concealed space or oor ceiling wall or part...

Страница 8: ...nder no circumstances should you attempt to barbecue in this heater HOW TO TEST YOUR WOOD Add a large piece of wood to the stove when it has a good large bed of coals It is dry if it is burning on mor...

Страница 9: ...e room through appliance and chimney connector joints indicates inadequate draft ASH REMOVAL When ever ashes get 3 to 4 inches deep in your rebox and when rehasburneddownandcooled removeexcessashes Le...

Страница 10: ...t leakage Replace gasket Check latch EXCESSIVE CREOSOTE BUILDUP See 1 2 3 above LOW HEAT OUTPUT 1 Wood is wet Use dry wood 2 Fire too small Build a larger re 3 Draft too low Chimney plugged or restric...

Страница 11: ...open When wood is burned slowly it produces tar and other or ganic vapours which combine with expelled moisture to form creosote The creosote vapours condense in the relatively cool chimney ue of a s...

Страница 12: ...ST VSNI 9 DOOR HANDLE ASSEMBLY WODC 4147 10 BOOST MANIFOLD 2105 11a FIREBRICK 1 1 2 x 4 1 2 x 1 1 4 248 11b FIREBRICK 3 x 4 1 2 x 1 1 4 247 11c FIREBRICK 4 x 4 1 2 x 1 1 4 246 11d FIREBRICK 9 x 4 1 2...

Страница 13: ...x 4 1 2 x 1 1 4 248 11b FIREBRICK 3 x 4 1 2 x 1 1 4 247 11c FIREBRICK 4 x 4 1 2 x 1 1 4 246 11d FIREBRICK 9 x 4 1 2 x 1 1 4 5096 99 FIREBRICK SET BRIC VISTA 12a BRICK RAIL LEFT 2122 12b BRICK RAIL RI...

Страница 14: ...the heater in the upright position install rebricks as follows First install 4 full size rebricks against the rear wall Next install the side rebricks 2 full size each side Lastly place 4 full size on...

Страница 15: ...MODEL HT 3000 SELKIRK SENTINEL MODEL CF INDUSTRIAL CHIMNEY MODEL EXCEL 2100 ENERGY VENT COMMANDER 5000 IN USA SECURITY MODEL ASHT OR S2100 OLIVER MACLEOD MODEL 3103 OR HT 3000 SELKIRK METALBESTOS MODE...

Страница 16: ...16 VISTA and CLASSIC C 111206 16 Printed in Canada PACIFIC ENERGY FIREPLACE PRODUCTS LTD 2975 Allenby Rd Duncan BC V9L 6V8 Phone 888 715 2398 Web site www paci cenergy net...

Отзывы: