Pacific energy NEO 1.6 INSERT Скачать руководство пользователя страница 10

10  

130715-24

©PACIFIC ENERGY FIREPLACE 
PRODUCTS LTD.

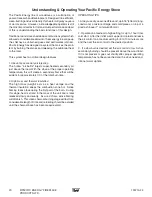
7)  Remove the two screws securing the front leg cover to 

the leg. Fig. #5

8)  Repeat steps 5-7 on the opposite side of the unit.

9)  Remove the stop screws in the ends of the curved brackets 

behind the leg adapter cover. Fig. #6

10) Lift and turn the leg adapter down as shown in Fig. #7. 

Remove the screws securing the leg adapter cover to the 
mounting brackets on the left and right of the leg adapter 
cover. Fig. #7

11) Reverse all previous steps in order when installing new 

or replacement pieces.

FIG. #5

SCREWS

STOP 

SCREW

LEG ADAPTER 

COVER

FIG. #6

FIG. #7

SCREW AND

MOUNTING 

BRACKET

Содержание NEO 1.6 INSERT

Страница 1: ...ructions Contact local building or fire officials about restrictions and installation inspection requirements in your area TESTED and LISTED to CAN ULC S627 AND UL 1482 Meets the Environmental Protect...

Страница 2: ...ictions and installation inspection requirements in you area Please read this entire manual before you install and use your new room woodstove Failure to follow instructions may result in property dam...

Страница 3: ...e and must be lived with Regular inspection and cleaning is the solution The use of dry seasoned wood and am ple combustion air will help to minimize annoying smoke emissions and creosote buildup Chim...

Страница 4: ...s burning on more than one side within one minute It is damp if it turns black and lights within three minutes If it sizzles hisses and blackens without igniting in five minutes it is soaked and shoul...

Страница 5: ...with the pedestals Do not store paper or other stove lighting devices within the pedestal area Although this is possible it is not recommended NOTE Refer to local fire codes CAN B365 and NFPA 211 in...

Страница 6: ...ramic glass only Do not substitute with any other type To remove broken glass remove the door gasket and then undo the eight screws securing the gasket guides and glass retainers Removeallparticlesofg...

Страница 7: ...r riser tube in the back of the firebox Back side of airwash chamber located in the upper front of firebox Baffle locking pin Boost tube cover located in center of manifold bottom front of firebox Whe...

Страница 8: ...atsecure hold down brackets to bottom pallet 4 Slide the hold down brackets away from the stove NOTE ALL DIMENSIONS IN INCHES MM Cast Iron Parts Removal and Installation 1 The Newcastle Top Assembly c...

Страница 9: ...ver the flue collar Fig 3 4 Open the door slightly and lift the door to disengage the hinge pins from the hinge bracket 5 While supporting the side panel remove the two bolts securing the top of the s...

Страница 10: ...dsofthecurvedbrackets behind the leg adapter cover Fig 6 10 Lift and turn the leg adapter down as shown in Fig 7 Remove the screws securing the leg adapter cover to the mounting brackets on the left a...

Страница 11: ...ucture to prevent dislodging of the air duct To draw outside air from behind the stove an outside air adaptor may be required see Optional Blower section Cut or drill a 4 102mm hole through a wall beh...

Страница 12: ...rformance Chimney flue exit is to be 3 feet 1 m above roof and two feet 0 6 m above highest projection within 10 feet 3 m The installation must meet all local codes Do not connect this unit to a chimn...

Страница 13: ...idential Single Wall Connector Residential Alcove Min Height 7 Max Depth 3 18 457mm 12 305mm 25 1 2 673mm 20 508mm 8 203mm 11 279mm 5 127mm 15 381mm 3 76mm 8 203mm 3 76mm 8 203mm 8 203mm 21 1 2 549mm...

Страница 14: ...ile homes Non combustible floor protector 48 1219 mm 3 914 mm Minimum Hooded vent or 90 elbow turned down The chimney may incorporate an offset To do this safely all sections of listed connector offse...

Страница 15: ...nimum 7 2 1m Ceiling Height Non combustible floor protector 48 1219 mm Hooded vent or 90 elbow turned down Ensure that the Masonry chimney meets all National Fire Protection Association and local buil...

Страница 16: ...upplier for installation advice FIG 13 Mobile Home Installation Procedure CAUTION THESTRUCTURALINTEGRITYOFTHEMOBILE HOME FLOOR WALL AND CEILING ROOF MUST BE MAINTAINED The services of a competent or c...

Страница 17: ...urn on as the stove heats up to operating temperature It will also shut the blower off after the fire has gone out and the unit cooled to below a useful heat output range Manual Tomanuallyoperatethebl...

Страница 18: ...ed check flue Provide outside air for combustion 4 Door gasket leakage Replace gasket Check latch Excessive Creosote Buildup See 1 2 3 above Low Heat Output 1 Wood is wet Use dry wood 2 Fire too small...

Страница 19: ...Baffle Pin SSER 125001 14 Ash System CA16 LGADA 15 Ash Dump Assembly NE16 7857 All parts may be ordered from your nearest Pacific Energy dealer http www pacificenergy net for the location of the deal...

Страница 20: ...ant factor for maximum performance and part of this is understanding the basic functions of this design Traditionalwoodstoveshadabasiccombustionsystemwhich allowed a considerable amount of heat energy...

Страница 21: ...99 NEO 1 6 Firebrick Installation Instructions This package contains 13 full size firebricks as well as 2 various cut size bricks With the heater in the upright position install firebricks as follows...

Страница 22: ...operating correctly at installation Any part that shows in our judgment evidence of defect shall be repaired replaced or refunded at Pacific Energy s option The defective part may be required to be r...

Страница 23: ...NSTALLATION ET D OP RATION FOURNI AVEC L APPAREIL CONTACTEZ LES OFFICIELS DE LA CONSTRUCTION OU DE SERVICE D INCENDIE POUR DES INFORMATIONS QUANT AUX RESTRICTIONS PERMIS D INSTALLATION ET INSPECTIONS...

Страница 24: ...PACIFIC ENERGY FIREPLACE PRODUCTS LTD 2975 Allenby Rd Duncan B C V9L 6V8 For technical support please contact your retailer Web site http www pacificenergy net Printed in Canada...

Отзывы: