background image

Optional Ash Cleanout system:   

The ash dump handle is located under the ash lip on the left hand side.  To operate ash dump, pull handle 
out 1/2"(13mm) and turn clockwise. This will unlock the ash dump and allow it to open. Hold handle open 
while pulling ashes into the opening. Avoid large embers as these still contain heat value. Release handle and 
push in to lock. Ensure ash dump door is properly engaged. Fill the cavity with the remaining ash level with 
the firebox floor. Lift and pull out ashpan and discard ashes into metal container. Replace ashpan and ensure 
it is seated properly.

Do not burn with ash dump door open. Doing so will create a hazardous condition. Always leave about 
1"(25mm) of ash when cleaning.

Disposal of Ashes

Ashes should be placed in a metal container with a tight fitting lid. The closed container of ashes should 
be placed on a non-combustible floor or on the ground, well away from all combustible materials, pending 
final disposal. If the ashes are disposed of by burial in soil or otherwise locally dispersed, they should be 
retained in closed container until all cinders have thoroughly cooled. Other waste should not be placed in this 
container.

Chimney connector pipe should be disconnected from stove to clean and inspect.  Only if this is not possible 
should you remove baffle assembly.

DO NOT OPERATE WITH BAFFLE ASSEMBLY OR INSULATION REMOVED.

Removal 

Remove retaining pin at the back top of the firebox, just under the baffle.  Lift baffle up and pull forward to 
disconnect from the supply tube.  Tilt baffle sideways to drop down and remove from firebox.  Inspect gasket 
between baffle and supply tube.  If necessary, replace with gasket #139.5 available from your Pacific Energy 
dealer.  Re-install baffle assembly in reverse order.  The two side pieces of insulation must be tight against the 
siderails.

 Baffle Removal 

SUPER-SD1_100517-32

21

5055.201

Содержание Classic Gas

Страница 1: ...al building or fire officials about restrictions and installation inspection requirements in your area TESTED and LISTED to CAN ULC S627 AND UL 1482 Meets the Environmental Protection Agency s May 201...

Страница 2: ...17 Wood Selection 17 DO NOT BURN 17 How to Test Your Wood 18 Lighting a Fire for the first time 18 Curing of the Paint Finish 18 Lighting a fire 18 Normal Operation 18 Restarting After Extended or Ove...

Страница 3: ...PERMIS D INSTALLATION ET INSPECTIONS DANS VOTRE R GION NE RELIEZ PAS CET APPAREIL UN CONDUIT DE CHEMIN E DESSERVANT D J UN AUTRE APPAREIL TATS UNIS SEULE MENT UTILISEZ UN RACCORDEMENT NOIR OU CLASS D...

Страница 4: ...building up at least as quickly in the chimney WARNING ONLY USE MATERIALS SUPPLIED BY MANUFACTURER WHEN DOING MAINTENANCE OR REPLACEMENTS 4 DOOR GASKETS The gasket used by Pacific Energy 7 8 22mm med...

Страница 5: ...This moisture laden smoke cools the chimney compounding the problem by offering the smoke the ideal place to condense In summary a certain amount of creosote is inevitable and must be lived with Regul...

Страница 6: ...andle a chimney fire 4 After the chimney fire is out the chimney must be cleaned and checked for stress and cracks before start ing another fire Also check combustibles around the chimney and the roof...

Страница 7: ...Top heat shield and mounting bolt Baffle Gasket Brick Rails Manifold Blower The blower should be cleaned out a minimum every six months by using a vacumn on the grill openings in the back and bottom...

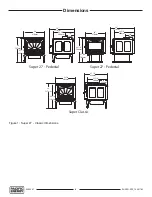
Страница 8: ...5 8 702mm 23 5 8 600mm 23 5 8 600mm 23 5 8 600mm 10 254mm 10 254mm 10 254mm 23 7 8 606mm 27 1 2 699mm 29 737mm 29 737mm 27 1 2 699mm 28 1 4 718mm Super 27 Pedestal Super 27 Pedestal Super Classic Figu...

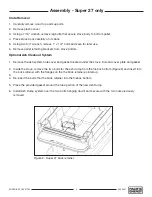
Страница 9: ...ash system hole cover and gasket located under the stove Discard cover plate and gasket 2 Inside the stove remove the two bolts for the ash dump from the firebox bottom Figure 2 and insert into the b...

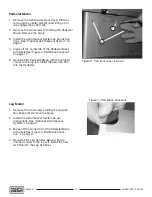
Страница 10: ...Brace knockout on page 10 5 Re install the Pedestal Brace with the notched corner to the top left Install the new Ash Pan into the Pedestal 1 2 Leg Model 1 Remove the two screws holding the Leg Ash B...

Страница 11: ...to the connector or chimney manufacturer s installation require ments Consult your chimney supplier for installation advice Procedure CAUTION THE STRUCTURAL INTEGRITY OF THE MOBILE HOME FLOOR WALL AN...

Страница 12: ...14 357mm 26 660mm 16 406mm 18 457mm 22 559mm 28 711mm 8 203mm 8 203mm 8 203mm Alcove Min Height 7 1 2 2 29m Max Depth 4 1 22m 5 127mm 15 381mm Single Wall Connector Residential Double Wall Connector R...

Страница 13: ...ible floor protector 48 1219 mm 3 914 mm Minimum Hooded vent or 90 elbow turned down The chimney may incor porate an offset To do this safely all sections of listed connector off set elbows and chim n...

Страница 14: ...ram 1 page 6 Chimney and Connector Connect to a listed chimney or a chimney suitable for use with solid fuel that is lined and in good condition and meets local building codes The chimney flue size sh...

Страница 15: ...f the pipe inside the stove collar Use holes provided in collar to secure pipe with two screws 5 Install the remaining lengths of pipe one on top of the other to the finished height of the chimney con...

Страница 16: ...e and 8 203 mm to the other sides Canada Only 8 203mm 18 457mm 8 203mm 8 203mm Minimum Width 40 1 02m Minimum Overall Depth 50 1 2 1 28m Non combustible floor protector Figure 8 Floor protector Canada...

Страница 17: ...outside combustion air for residential installation requires the unit to be secured to the structure to prevent dislodging of the air duct To draw outside air from behind the stove an outside air adap...

Страница 18: ...nths or more Wet or undried wood will cause the fire to smoulder and produce large amounts of creosote Wet wood also produces very little heat and tends to go out often DO NOT BURN Salt water wood Gar...

Страница 19: ...mm 1 25mm until the wood kindling is fully engulfed in flame 4 After the kindling is fully engulfed add a few small logs Close door 5 Begin normal operation after a good coal base exists and wood has...

Страница 20: ...od has approximately 7500 BTU s per pound Experience will give you the right settings for proper combustion and efficient burning Remember the correct air inlet setting is affected by variables such a...

Страница 21: ...be placed on a non combustible floor or on the ground well away from all combustible materials pending final disposal If the ashes are disposed of by burial in soil or otherwise locally dispersed the...

Страница 22: ...up to operating temperature It will also shut the blower off after the fire has gone out and the unit cooled to below a useful heat output range Manual To manually operate the blower set the rocker sw...

Страница 23: ...e gasket Check door latch Low Heat Output 1 Wood may be wet Check wood and use drier wood if required 2 Fire too small Build a larger fire Open draft control to increase burn rate 3 Draft too low Chim...

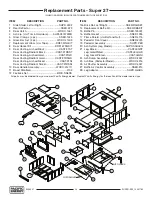
Страница 24: ...fic Energy for the location of the dealer nearest you 1 24 25 11 28 18 21 19 1 28 28 2 10 8 9 10 7 6 26 5 4 27 17 3 9 13a 13b 14 14 12 14 15 16 20 28 SUPD LGADA SUPD ASHLEG Replacement Parts Super 27...

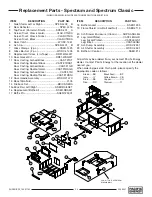
Страница 25: ...16 Replacement Baffle Kit SSER DBAKIT 17 Baffle Pin SSER 125001 All parts may be ordered from your nearest Pacific Energy dealer Contact Pacific Energy for the location of the dealer nearest you When...

Страница 26: ...ion keeps the combustion zone hot Active flaming takes place during the first part of the burn During this stage heat is stored in the mass of the unit and is later released slowly and evenly As wood...

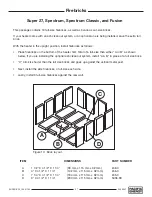
Страница 27: ...ut system or an optional one is being installed save the extra full brick With the heater in the upright position install firebricks as follows Place firebricks on the bottom of the heater first Total...

Страница 28: ...th or without an ash dump 2 Once the firebricks for the floor have been laid down the firebricks for the side walls are next The sides use D bricks The bricks will stand on top of the floor bricks and...

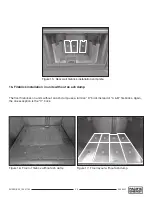
Страница 29: ...an ash dump use a full size D brick instead of A B firebricks Again the one exception is the C brick D D D Figure 15 Rear wall firebrick installation complete Figure 16 Floor of firebox without ash d...

Страница 30: ...Energy s option The defective part may be required to be returned to Pacific Energy or an accredited agent transportation prepaid Porcelain Is warranted for gloss retention Certain colors may darken w...

Страница 31: ...SUPER SD1_100517 32 31 5055 201...

Страница 32: ...V9L 6V8 Phone 250 748 1184 Web site http www pacificenergy net Printed in Canada 2017 Copyright Pacific Energy Fireplace Products LTD Reproduction adaptation or translation without prior written perm...

Отзывы: