7
© 1998 PACE Incorporated, Laurel MD. All rights reserved. Printed in the U.S.A.
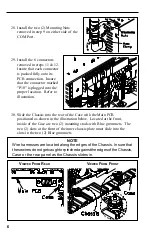
31. Install the 8 Rear Panel mounting screws removed in step 7.
32. Position the power source facing forward.
33. Connect the ribbon cable (removed in step 5) to the Front Panel
Connector; the two (2) plastic locking tabs will automatically lock the
cable in position when it is fully seated in the connector.
34. Install the 10 Front Panel mounting screws removed in step 3.
Additional copies of this manual or other PACE literature may be obtained from:
PACE Incorporated
(301) 490 - 9860
Sales Administration
(301) 498 - 3252 Fax
9893 Brewers Court
Laurel MD 20723-1990
Since 1958, PACE Incorporated has provided
advanced technology training in all aspects of hand
soldering, rework and repair.
PACE Incorporated retains the right to make changes to specifications contained
herein at any time, without notice.
Contact your local authorized PACE Distributor or PACE Incorporated to obtain the
latest specifications.
The following are registered trademarks and/or servicemarks of PACE
Incorporated, Laurel Maryland U.S.A. and may only be used to identify genuine
PACE products or services:
AdapTip, Arm-Evac, Cir-Kit, ComForm I, ConducTweez, CRAFT,
Dual Path, Flo-D-Sodr, FuseSet, HandiPik, HotSpot, LapFlo, MBT,
Micro Portable, MicroChine, MiniChine, Mini-Wave, PACE, Pacenter,
Ped-A-Vac, PETS, Pik-Vac, PRC, Prep-Set, Pro-Evac, Redi-Rak,
ResisTweez, SensaTemp, Snap-Vac, Sodr-Pen, Sodr-X-Tractor, SR-3,
SR-4, ST, StripTweez, SwaPlater, ThermoBond, Thermo-Drive, ThermoJet,
ThermoPart, ThermoPik, ThermoTweez, Tip-Evac,Ventur-Evac VisiFilter.
The following are trademarks and/or servicemarks of PACE Incorporated, Laurel
Maryland U.S.A. and may only be used to identify genuine PACE products or
services:
Heat Wave, Pik-Tip, Pulse Plate, Sodrtek, ThermoFlo, Toolnet.


