If the installed system does not seem to be working properly,
first make sure that all the cables are securely connected
, then carry out the
following checks, in the order shown.
Problem
Suggested solution
Further checks, if there is still a problem
There is nothing
illuminated on your
digital adapter’s front
panel.
Power may not be reaching your digital adapter.
Make sure that the external power supply unit is
properly plugged in. If there is a switch by the
wall AC power outlet, switch it to ON.
Check that the wall AC power outlet is working (for example by plugging
in a lamp).
The remote control
does not operate your
digital adapter.
Check that nothing is blocking the path from
your remote control to the front panel or remote
eye.
If you are using the remote eye, make sure it is
securely connected to your digital adapter.
Check that your remote control is currently set to operate your digital
adapter (consult the instructions supplied with your remote control).
If your remote control will still not operate your digital adapter, replace
the batteries in your remote control.
There is no picture
on your TV screen.
Your TV and other equipment may not be turned
on. Check that they are plugged into AC power
outlets and turned on.
Make sure that the TV and digital adapter are
both set to the
same
channel (3 or 4).
Check that you have selected the appropriate video input on your TV.
If the video path between your digital adapter and your TV loops through
other equipment (such as a VCR) you may need to turn on this equipment.
Try switching the TV and digital adapter to the other channel (3 or 4)
There is no sound.
Check that any audio cables between your TV
and any attached audio equipment are securely
and correctly connected.
Check that you have not muted the sound on your TV and/or any attached
audio equipment. Adjust the volume control on your TV.
If you can hear only mono sound, first check that the program is likely to
have stereo sound (an old movie, for example, may not be in stereo).
If you are still having problems
contact your cable company
, or for additional support visit
www.pace.com/dta
SOLVING PROBLEMS
After you install your digital adapter, the only way to change channels
is with the supplied remote control.
If you need further help, for example to program the remote control to
operate your TV, refer to the instructions supplied with the remote control.
6. USING THE REMOTE CONTROL
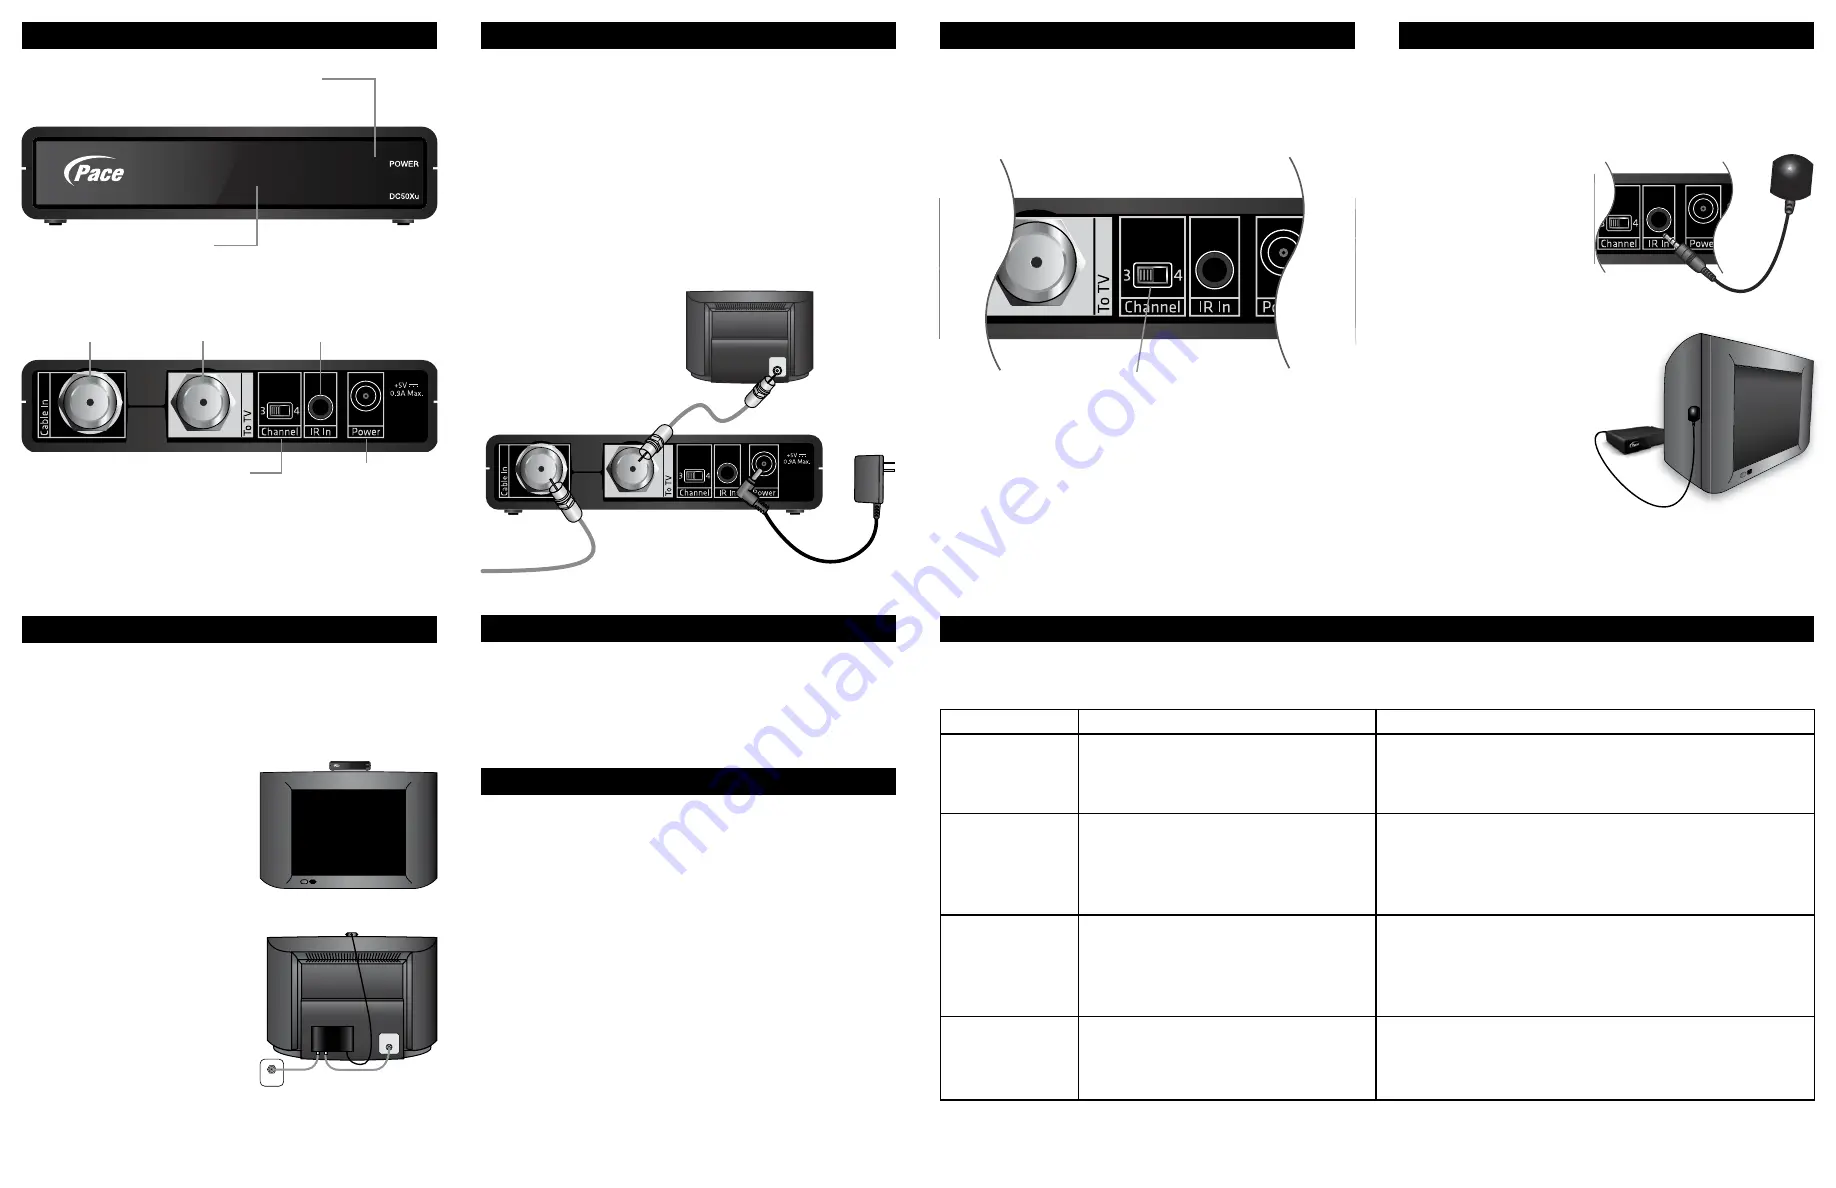
2. CONNECTING THE CABLES
1. Connect the RF cable from the cable service to the connector
marked
CABLE IN
on your digital adapter.
2. Connect the supplied RF cable between the
TO TV
connector on
your digital adapter and the ANTENNA IN/RF IN connector on
your TV (see below).
3. Connect the external power supply unit (supplied) to the
connector marked
DC IN
on your digital adapter, as shown below.
4. After you have made the connections between your digital
adapter and your TV, connect your TV and the external power
supply unit to the AC power supply.
CABLE IN
RF IN
TV
To the wall
AC outlet
From your
cable service
Digital Adapter
Supplied
RF cable
If you have decided to place your digital adapter out of sight
(e.g. behind the TV), you will need to use the supplied remote eye to
receive signals from the remote control.
4. CONNECTING THE REMOTE EYE
1. Connect the lead from
the remote eye to the
IR IN
connector on the
rear panel of your digital
adapter.
2. Use the adhesive tape on
the remote eye to attach
the remote eye to the
top or side of your TV,
ensuring that it is in sight
of the remote control.
3. CHECKING THE PICTURE
1. Tune your TV to channel 3.
2. Set the switch on the back of your digital adapter to channel 3
(see below).
Set this switch to Channel 3
Note:
Some parts of the country use channel 4. If you do not have
a picture, you may need to switch both your TV and your digital
adapter to channel 4.
CABLE IN
RF IN
CABLE
SERVICE
5. PLACING THE DIGITAL ADAPTER
After you have made the connections between the cable service, your
digital adapter and your TV, place your digital adapter in a suitable
location, observing the ventilation requirements set out in the safety
information overleaf.
• You can place your digital
adapter on top of your TV.
• Or, you can use the adhesive
fasteners (supplied) to attach
your digital adapter to the
side or back of your TV.
Following Installation
If you have followed the steps and have picture and sound,
congratulations, you have successfully installed your Pace digital
adapter.
If you are experiencing problems, please consult the “Solving
Problems” guide located to the right.
Note:
If your digital adapter requires activation, contact your cable
company.
Enjoy viewing all of your favorite TV shows, movies and sports
games with digital picture and sound.
7. ENJOY DIGITAL TV!
1. ABOUT YOUR DIGITAL ADAPTER
CABLE IN
From cable
service provider
S
POWER LED
Lights when your
digital adapter is fully on
IR RECEIVER (behind screen)
Receives infra-red signals from your remote control*
POWER INPUT
Make this connection
last of all
TO TV
RF output to
the TV
IR IN
Infra-red input from the
optional remote eye
CHANNEL 3/4
Switch for tuning
your digital adapter
* If you place your digital adapter out of sight (e.g. behind the TV) you
will need to use the remote eye so your adapter can receive signals
from the remote control. Refer to the installation instructions overleaf.


