


3
06-27-13
Legend: SWC- Steering Wheel Control V.I.I.G.- Vehicle Install Information Guide V.C.C. - Vehicle Connection Chart
Mapping SWC Button Functions
PLEASE NOTE: If you programmed the SWI-RC for version 4, refer to the section below for the mapping order of the HVAC controls.
These must be mapped BEFORE the other commands listed in the Radio Function Mapping Order chart, below.
The steering wheel control button functions must be mapped in the specific order shown in the chart below. If you come across a function in the
chart that your steering wheel does not have, or you do not want to map, press the Programming Button on the side of the SWI-RC. The LED will
flash twice and then stay on confirming that you have successfully skipped that function and are ready to map the next button function.
1. Start the vehicle. The LED will flash to indicate the set vehicle version number.
2. Press and release programming button on SWI-RC. LED will turn on.
3. Within 7 seconds, press and hold for 5 seconds,
the first SWC button to be mapped (). The LED will turn off during this process.
PLEASE NOTE:
If using in conjunction with the OS-4 or MS-FRD1 the Source, Media or Speak buttons cannot be held for more than 1.5 seconds.
4. Release the button. The LED will turn on back on.
5. Repeat steps 3 & 4 for each additional audio function you wish to map to the steering wheel (within 7 seconds).
6. Once you have mapped all the desired button functions, wait 7 seconds. The LED will flash three times indicating end of mapping.
The LED will flash to indicate the set vehicle version number.
7. Test the interface for proper functionality. Whenever an SWC button is pressed the LED on the interface should blink.
If any function does not work, repeat the mapping process or refer to Troubleshooting Guide.
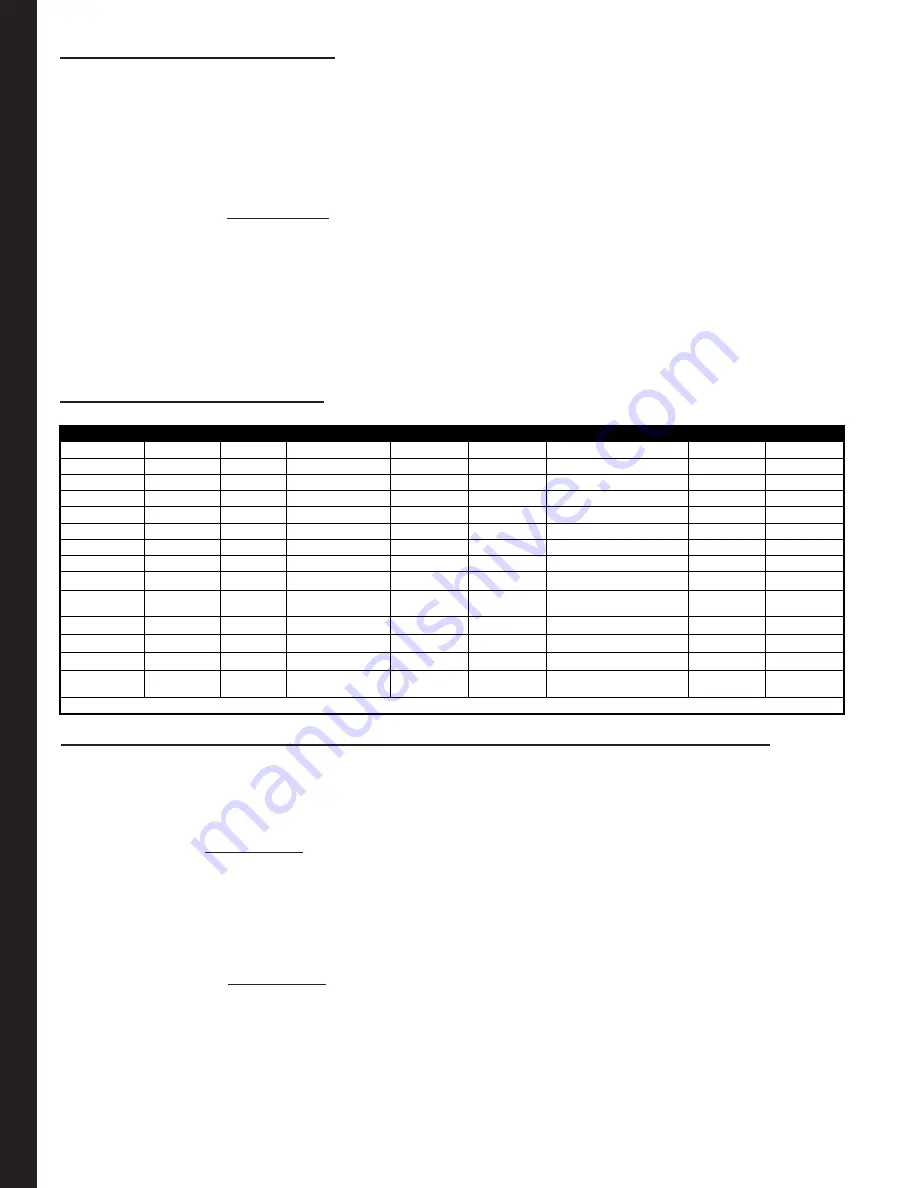
Radio Function Mapping Order
Special Instructions For General Motors Vehicles With Fan / Temp Control Buttons
To Map SWC button functions for GM vehicles with HVAC controls, first program the Vehicle Version # to 4.
HVAC controlls must be mapped BEFORE the other commands listed in the main chart above.
1. Start the vehicle. LED will flash 4 times to indicate the set Vehicle Version #.
2. Press and release programming button on SWI-RC. LED will turn on.
3. Within 7 seconds, press hold for 5 seconds the TEMP UP button on the steering wheel control. LED will turn off and back on.
The function is Mapped.
4. Repeat Step 3, using the TEMP DOWN Button.
5. If the vehicle is equipped with FAN UP and FAN DOWN buttons; Repeat step 3 for these buttons as well.
Once complete the LED will flash two times and stay on.
6. If the vehicle does not have FAN buttons press and release the programming button on the SWI-RC, this will skip those functions and the
LED will flash two times.
7. Within 7 seconds, press and hold for 5 seconds
the first SWC button to be mapped. See the R.F.M.O. chart above. ()
The LED will turn off during this process.
8. Map the rest of the SWC button functions, untill all desired functions are mapped.
9. Release the button. The LED will turn on back on.
10.
Once you have mapped all the desired button functions, wait 7 seconds. The LED will flash three times indicating end of mapping.
The LED will flash 4 times to indicate the set vehicle version number(4).
11. Test the interface for proper functionality. Whenever an SWC button is pressed the LED on the interface should blink.
If any function does not work, repeat the mapping process or refer to Troubleshooting Guide.
Radio
Alpine
JVC
Kenwood
Clarion
Other*
Sony
Pioneer
Fusion
1
2
Volume -
Volume -
Volume -
Volume -
Volume -
Volume -
Volume -
Volume -
3
Mute
Mute
Mute
Mute
Mute
Mute
Mute
Mute
4
Source
Source
Source
Source
5
Preset -
Track +
Play
Preset -
Preset -
Preset -
Track +
6
Source
Track -
Track +
Search -
Source
Source
Source
Track -
7
Track +
Band/Disc +
Track -
Band
Track +
Track +
Track +
Audio
8
Track -
Preset/Disc -
Disc/FM +
Send/End
Track -
Track -
Track -
Power
9
Power
Select
Disc/AM -
Send
Band
Band
Band
10
Enter/Play
Attenuation
Answer
End
Reject Call/Source
(Bluetooth equipped radios only)
Phone Menu
11
Band/Program
Phone Receive
Voice Dial
Skip
Answer Call
12
Receive
Phone Reject
On Hook
Skip
End Call
13
End
Voice Dial
Off Hook
Skip
Voice Activation
14
Power
Mute
(Multimedia units only)
Answer/End Call
*Other = Advent, Boyo, Dual, Lightning Audio, Rockford Fosgate, & Visteon


