background image


10 | 

P a g e


Communication LEDs 
 

Con LED - green 

The Con LED is on when the module is connected to the Ethernet network. 

Act LED - yellow 

It indicates that communication via Ethernet is in progress. 

St LED - red 

It is illuminated while the boot loader is active and it is blinking during a firmware 
upload  procedure.  This  should  only  happen  during  hardware  resets  and  in  the 
second phase of firmware updates. 

Low Power LEDs 

These LEDs turn on when the DC power drops below 6V. 


Содержание FNIP-12xPWM

Страница 1: ...1 P a g e FutureNow FNIP 12xPWM Installation and Operation Manual rev 14 10 2020 12 Channel RGB W LED Dimmer Surface and DIN Rail mountable Figure 1 The FNIP 12xPWM LED dimmer module ...

Страница 2: ...such as water leakage sensor or door contacts or even an output of a security system armed disarmed in alarm The local inputs are usually connected to momentary wall switches and work similarly to traditional light switches The inputs can also be used to recall pre defined scenes See the Scenes section for more details The FNIP 12xPWM connects to the network via an RJ45 Ethernet connector The outp...

Страница 3: ...3 P a g e ...

Страница 4: ...heir last dim level When next turned on lights will return to the last remembered value Adjustable minimum and maximum dim levels Adjustable ramp rates Overcurrent protection Standard DIN rail mount Enhanced Connectivity New TCP IP interface offers remote control and advanced management Built in web server for configuration control and monitoring Remote control and monitoring from network enabled ...

Страница 5: ...er of the module 11 Network settings 12 Users and user rights 14 Channel settings 15 Dim settings 16 Scenes 18 Firmware Upgrade 19 Resetting to factory defaults 19 OPERATION 20 Operation via local inputs 20 Operation Modes via the inputs 20 Input modes 21 Scene no 22 Operation via the built in web server 23 Control page 23 Operation via the local network TCP 27 CONTACT DETAILS 28 ...

Страница 6: ...29 Input 3 4 LED1 R1 17 GND 30 Input 4 5 LED2 G1 18 LED7 R3 31 Input 5 6 LED3 B1 19 LED8 G3 32 Input 6 7 GND 20 LED9 B3 33 Input 7 8 GND 21 GND 34 Input 8 9 GND 22 GND 35 Input 9 10 LED4 R2 23 GND 36 Input 10 11 LED5 G2 24 LED10 R4 W1 37 Input 11 12 LED6 B2 25 LED11 G4 W2 38 Input 12 13 26 LED12 B4 W3 39 Input Common 40 Power for the Inputs GND 41 Power for the Inputs 10V 36V 42 Power for the Main...

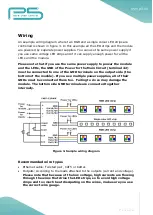
Страница 7: ...al 42 must be connected to one of the GND terminals on the output side the bottom of the module If you use multiple power supplies all of their GNDs must be connected there too Failing to do so may damage the module The bottom side GND terminals are connected together internally Figure 3 Sample wiring diagram Recommended wire types Ethernet cable Twisted pair CAT5 or better Outputs According to th...

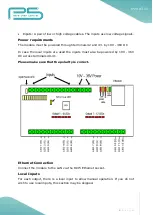
Страница 8: ...DC In case the local inputs are used the inputs must also be powered by 10V 36V DC across terminals 40 41 Please make sure that the polarity is correct Ethernet Connection Connect the module to the LAN via the RJ45 Ethernet socket Local Inputs For each output there is a local input to allow manual operation If you do not wish to use local inputs this section may be skipped ...

Страница 9: ...er to supply both the main circuit and the inputs In that case simply connect terminal 41 to terminal 43 and terminal 40 to terminal 42 Three way switches can be implemented by simply connecting multiple momentary switches in parallel Status LED Indicators In order to make installation and debugging easier communication and channel status are displayed via LEDs Input status LEDs Each input has a d...

Страница 10: ...It indicates that communication via Ethernet is in progress St LED red It is illuminated while the boot loader is active and it is blinking during a firmware upload procedure This should only happen during hardware resets and in the second phase of firmware updates Low Power LEDs These LEDs turn on when the DC power drops below 6V ...

Страница 11: ...oss cable no DHCP server Use the FNIP Network Discovery Utility or other network discovery software to find all FutureNow IP devices on your network Connecting to the web server of the module Connect to the web interface of the module by using a web browser Clicking on one of the units found by the FNIP Network Discovery Tool will automatically do that for you You can also access the web interface...

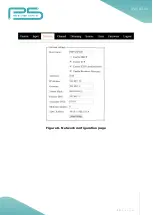
Страница 12: ...an be disabled to make HTTP communication easier for third party applications Enable broadcast messages All FNIP modules periodically send out heartbeat broadcast messages with basic information about themselves This helps discovery tools and mobile apps to find them These broadcasts can be disabled if constant traffic on the network is not desired Please note disabling broadcast messages will sto...

Страница 13: ...13 P a g e Figure 6 Network configuration page ...

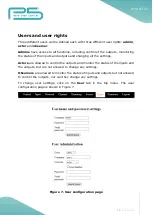
Страница 14: ... and changing all the settings Actors are allowed to control the outputs and monitor the status of the inputs and the outputs but are not allowed to change any settings Observers are allowed to monitor the status of inputs and outputs but not allowed to control the outputs nor can they change any settings To change user settings click on the User tab in the top menu The user configuration page is ...

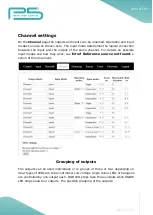
Страница 15: ...r details on possible input modes and how they work see Error Reference source not found s ection of this document Grouping of outputs The outputs can be used individually or in groups of three or four depending on what types of LEDs are to be controlled Low voltage single colour LEDs or halogens are controlled by one output each RGB LED strips take three outputs while RGBW LED strips need four ou...

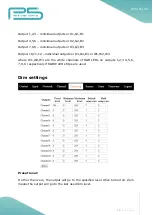
Страница 16: ... B3 Output 10 11 12 individual outputs or R4 G4 B4 or W1 W2 W3 where W1 W2 W3 are the white channels of RGB LEDs on outputs 1 2 3 4 5 6 7 8 9 respectively if RGBW LED strips are used Dim settings Preset level If other than zero the output will go to the specified level when turned on Zero means the output will go to the last used dim level ...

Страница 17: ...s level One reason may be to limit the brightness to suit the environment Default ramp rate This is the time it takes for the light to go from zero to 100 when turned on off via the inputs via the website or TCP commands Shorter ramps will take a proportionally shorter time For example going from zero to 50 will take half the time than what the ramp rate is set to Hold ramp rate The time it takes ...

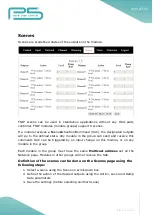
Страница 18: ...up can send and receive this command SAC can be triggered by an input change on this module or on any module in the group Each module in the group must have the same Multicast address set on the Network page Modules in other groups will not receive the SAC Definition of the scenes can be done on the Scenes page using the following steps 1 Select a scene using the Scene no scroll down box 2 Define ...

Страница 19: ... on and stays on or blinks during firmware update After uploading the new firmware which takes about a minute the module will automatically restart The version of the current firmware and the time since the last reset are also displayed on this page Resetting to factory defaults Holding the reset button for at least 2 sec while powering up the module will set all the settings to factory defaults P...

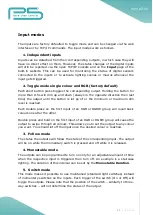
Страница 20: ...s Single Each input controls the corresponding output For example single colour led fixture If RGB or RGBW LEDs are controlled only the first input of each RGB group will control the outputs of the module directly RGB The first input in the group controls the entire group E g Input 1 controls RGB LEDs connected to output 1 2 3 Input 4 controls RGB LEDs connected to output 4 5 6 Input 7 controls RG...

Страница 21: ...vel is reached Each double press on the first input of an RGB or RGBW group will recall basic colours one after the other Double press and hold on the first input of an RGB or RGBW group will cause the output to swipe through all colours This allows you to set the output to any colour you want You should let off the input once the desired colour is reached 3 Follow mode The status the outputs will...

Страница 22: ...configuration page will be executed 7 Scene on close mode If an input gets closed the Scene Activation Command assigned to the input on the channel configuration page will be executed Scene no The selected Scene Activation Command will be sent to the other modules within the same group in case Input Mode 6 or 7 is selected ...

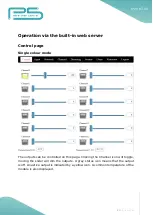
Страница 23: ...ur mode The outputs can be controlled on this page Clicking the Channel icon will toggle moving the slider will dim the outputs A grey status icon means that the output is off An active output is indicated by a yellow icon A common temperature of the module is also displayed ...

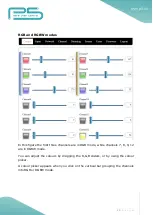
Страница 24: ...ree channels are in RGB mode while channels 7 8 9 12 are in RGBW mode You can adjust the colours by dragging the R G B sliders or by using the colour picker A colour picker appears when you click on the vertical bar grouping the channels into RGB or RGBW mode ...

Страница 25: ...25 P a g e The colour picker appears as this You can choose the desired colour by clicking on the circle Use the slider to set the luminance ...

Страница 26: ...tus page The status of the local inputs is displayed on the Input status page A grey icon means that the corresponding input is inactive input circuit open An active input input circuit closed is indicated by a green icon ...

Страница 27: ...t to clients via the open socket connections whenever the status of an input or output changes The TCP IP communication can be enabled disabled via the Network settings page Most third party automation controllers that can implement the simple TCP IP communication protocol can control the FutureNow FNIP 12xPWM The following are the most widely used AMX Control4 Crestron RTI Savant Extron Neets Sof...

Страница 28: ...at are allowed to be opened simultaneously 4 HTTP via built in web server Other parameters Dimensions W x H x D 157 mm x 86 mm x 57 mm 9 DIN unit width Standards EN 60669 2 1 EN 55015 2013 EN 61547 2009 EN 61347 1 EN 61347 2 13 RoHS Test methods EN 55016 2 3 2010 EN 55022 2010 AC 2011 EN 61000 4 3 2006 A1 2008 A2 2010 EN 61000 4 6 2009 EN 61000 4 4 2005 A1 2010 EN 61000 4 2 2009 CONTACT DETAILS RE...

Отзывы: